Manage client encryption keys with Vault as a KMIP server
Challenge
The OASIS Key Management Interoperability Protocol (KMIP) standard is a widely adopted protocol for handling cryptographic workloads and secrets management for enterprise infrastructure such as databases, network storage, and virtual/physical servers.
When an organization has services and applications that need to perform cryptographic operations (e.g.: transparent database encryption, full disk encryption, etc.), it often delegates the key management task to an external provider via the KMIP protocol. As a result, your organization may have existing services or applications that implement KMIP or use wrapper clients with libraries/drivers that implement KMIP. This makes it difficult for an organization to adopt the Vault API in place of KMIP.
Solution
Vault Enterprise provides a KMIP secrets engine which allows Vault to act as a KMIP server for clients that retrieve cryptographic keys for encrypting data via the KMIP protocol.
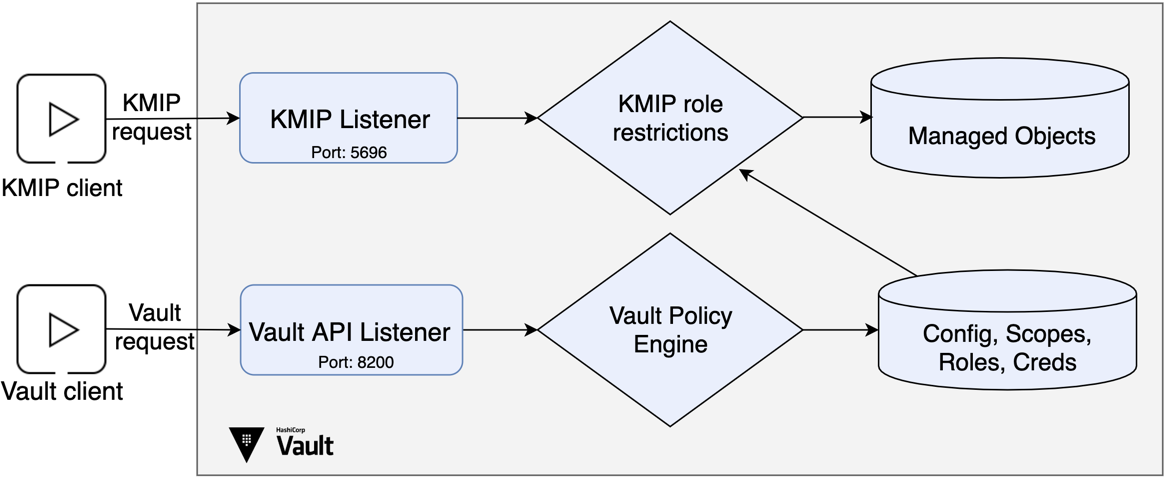
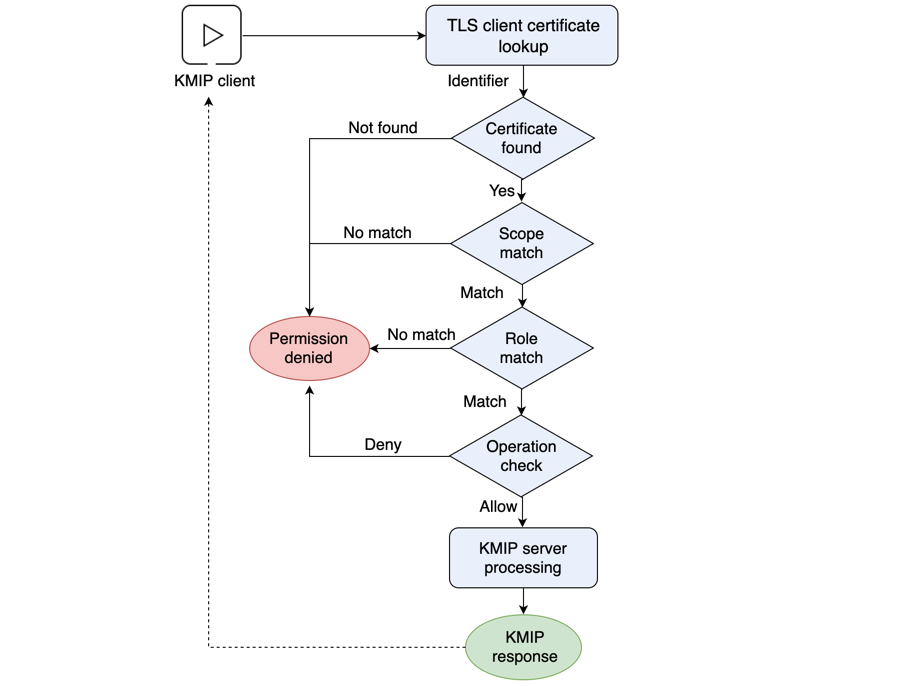
Vault's KMIP secrets engine manages its own listener to service KMIP requests which operate on KMIP managed objects. Vault policies do not come into play during these KMIP requests. The KMIP secrets engine determines the set of KMIP operations the clients are allowed to perform based on the roles that are applied to the TLS client certificate.
This enables the existing systems to continue using the KMIP APIs instead of Vault APIs.
Prerequisites
- Vault Enterprise with the Advanced Data Protection Module or HCP Vault Dedicated cluster.
- Vault binary installed
- Docker installed
- jq installed
Policy requirements
For the purpose of this tutorial, you can use root token to work
with Vault. However, it is recommended that root tokens are only used for just
enough initial setup or in emergencies. As a best practice, use tokens with
appropriate set of policies based on your role in the organization.
To perform all tasks demonstrated in this tutorial, your policy must include the following permissions:
# Work with kmip secrets engine
path "kmip/*" {
  capabilities = [ "create", "read", "update", "delete", "list" ]
}

# Enable secrets engine
path "sys/mounts/*" {
  capabilities = [ "create", "read", "update", "delete", "list" ]
}

# List enabled secrets engine
path "sys/mounts" {
  capabilities = [ "read", "list" ]
}
If you are not familiar with policies, complete the policies tutorial.
Lab setup
Vault setup
Launch the HCP Portal and login.
Click Vault in the left navigation pane.
In the Vault clusters pane, click vault-cluster.
Under Cluster URLs, click Public Cluster URL.
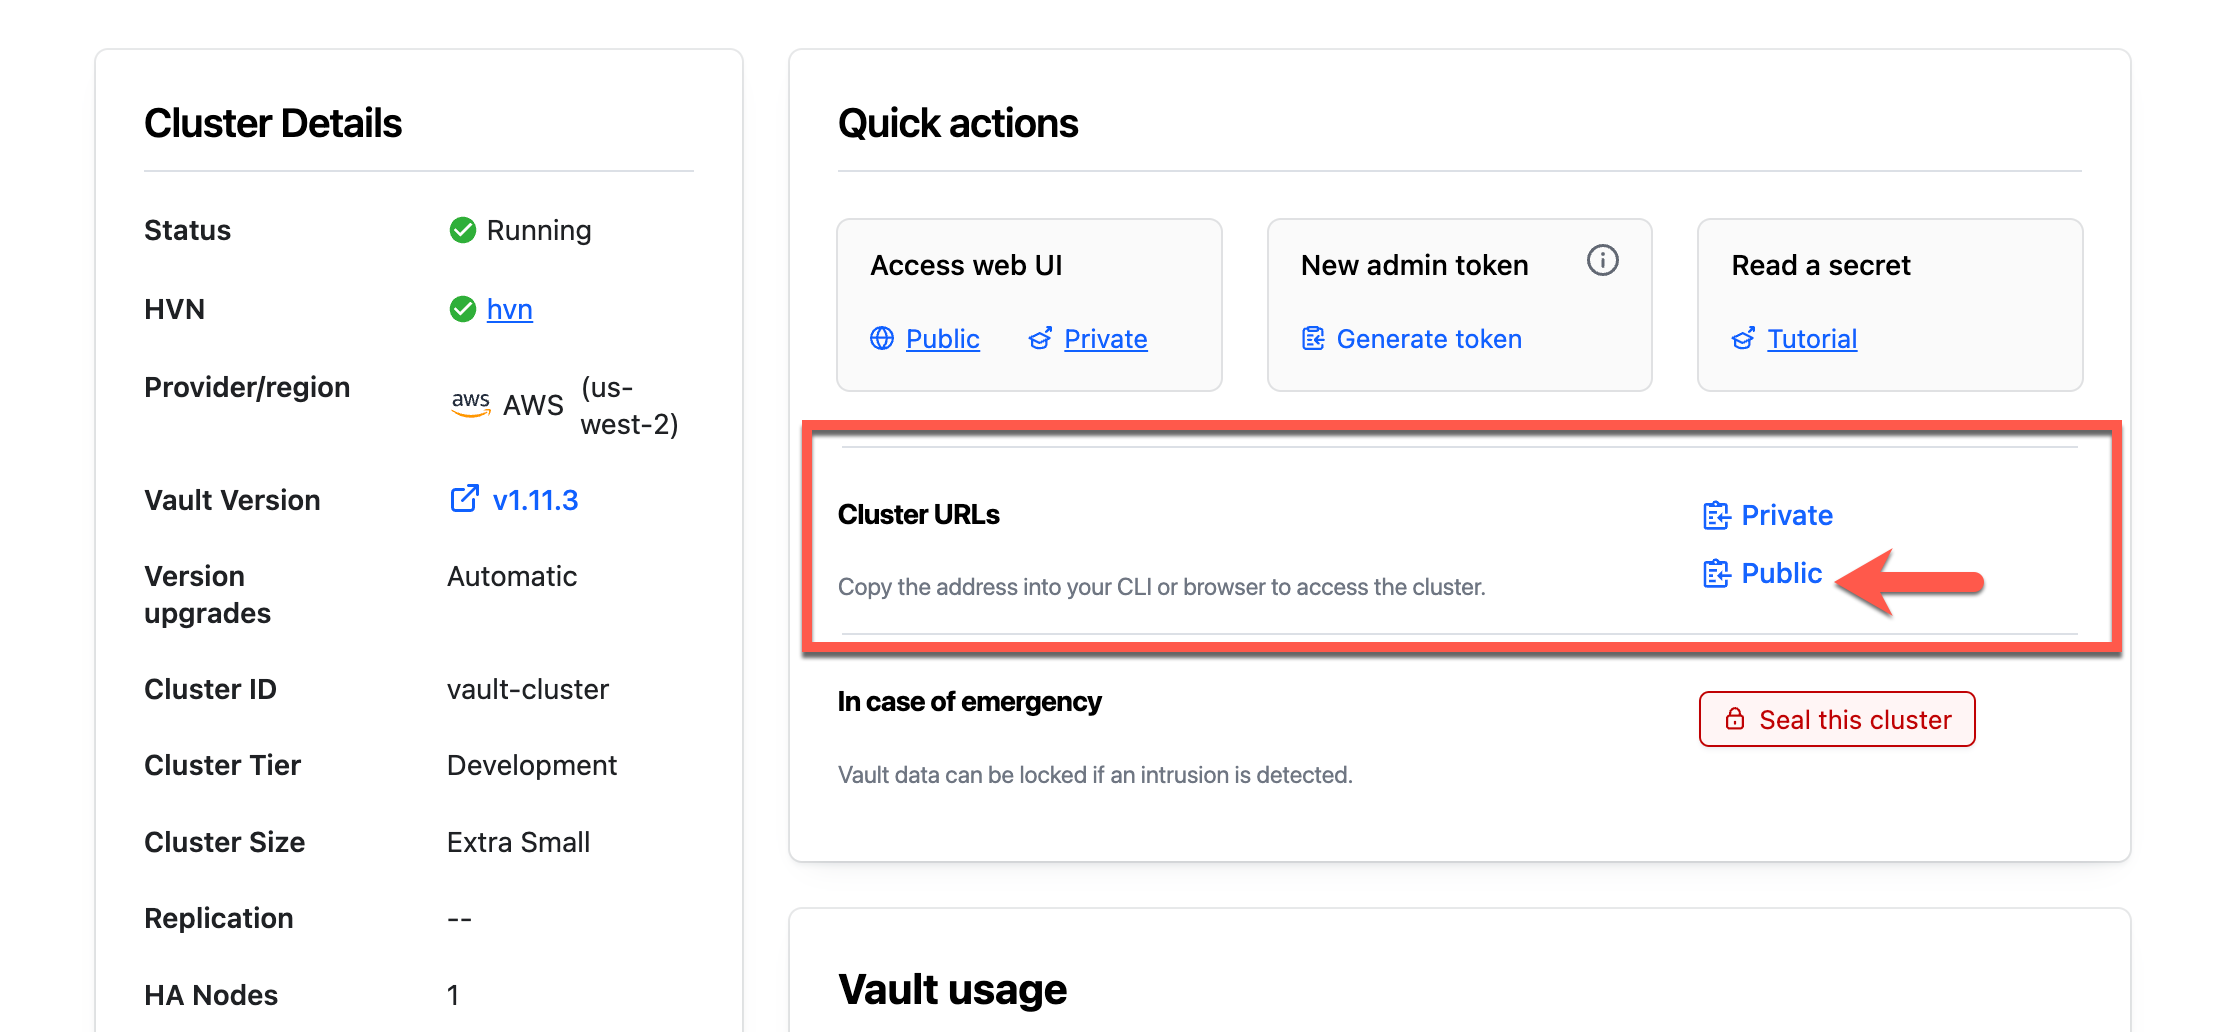
In a terminal, set the
VAULT_ADDRenvironment variable to the copied address.$ export VAULT_ADDR=<Public_Cluster_URL>Return to the Overview page and click Generate token.
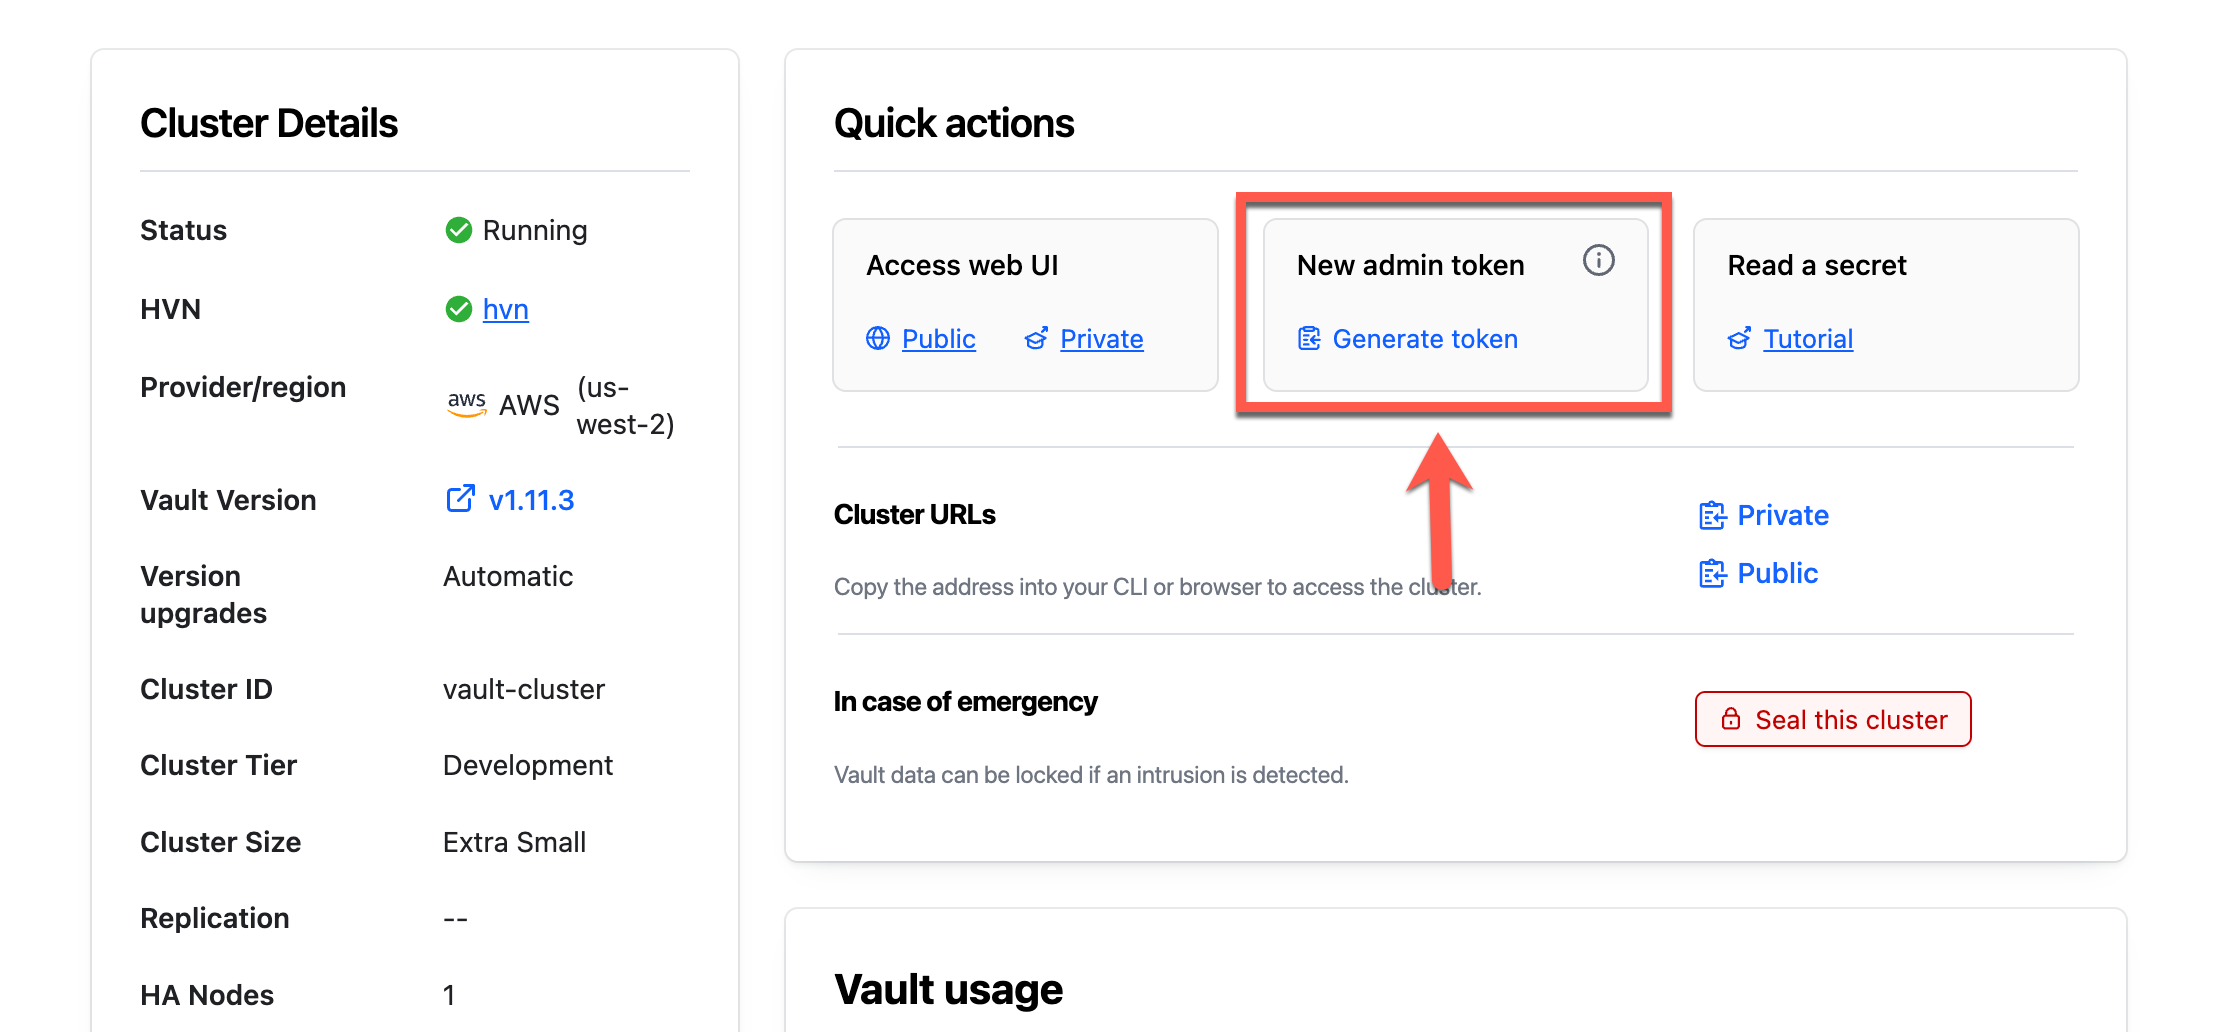
Within a few moments, a new token will be generated.
Copy the Admin Token.
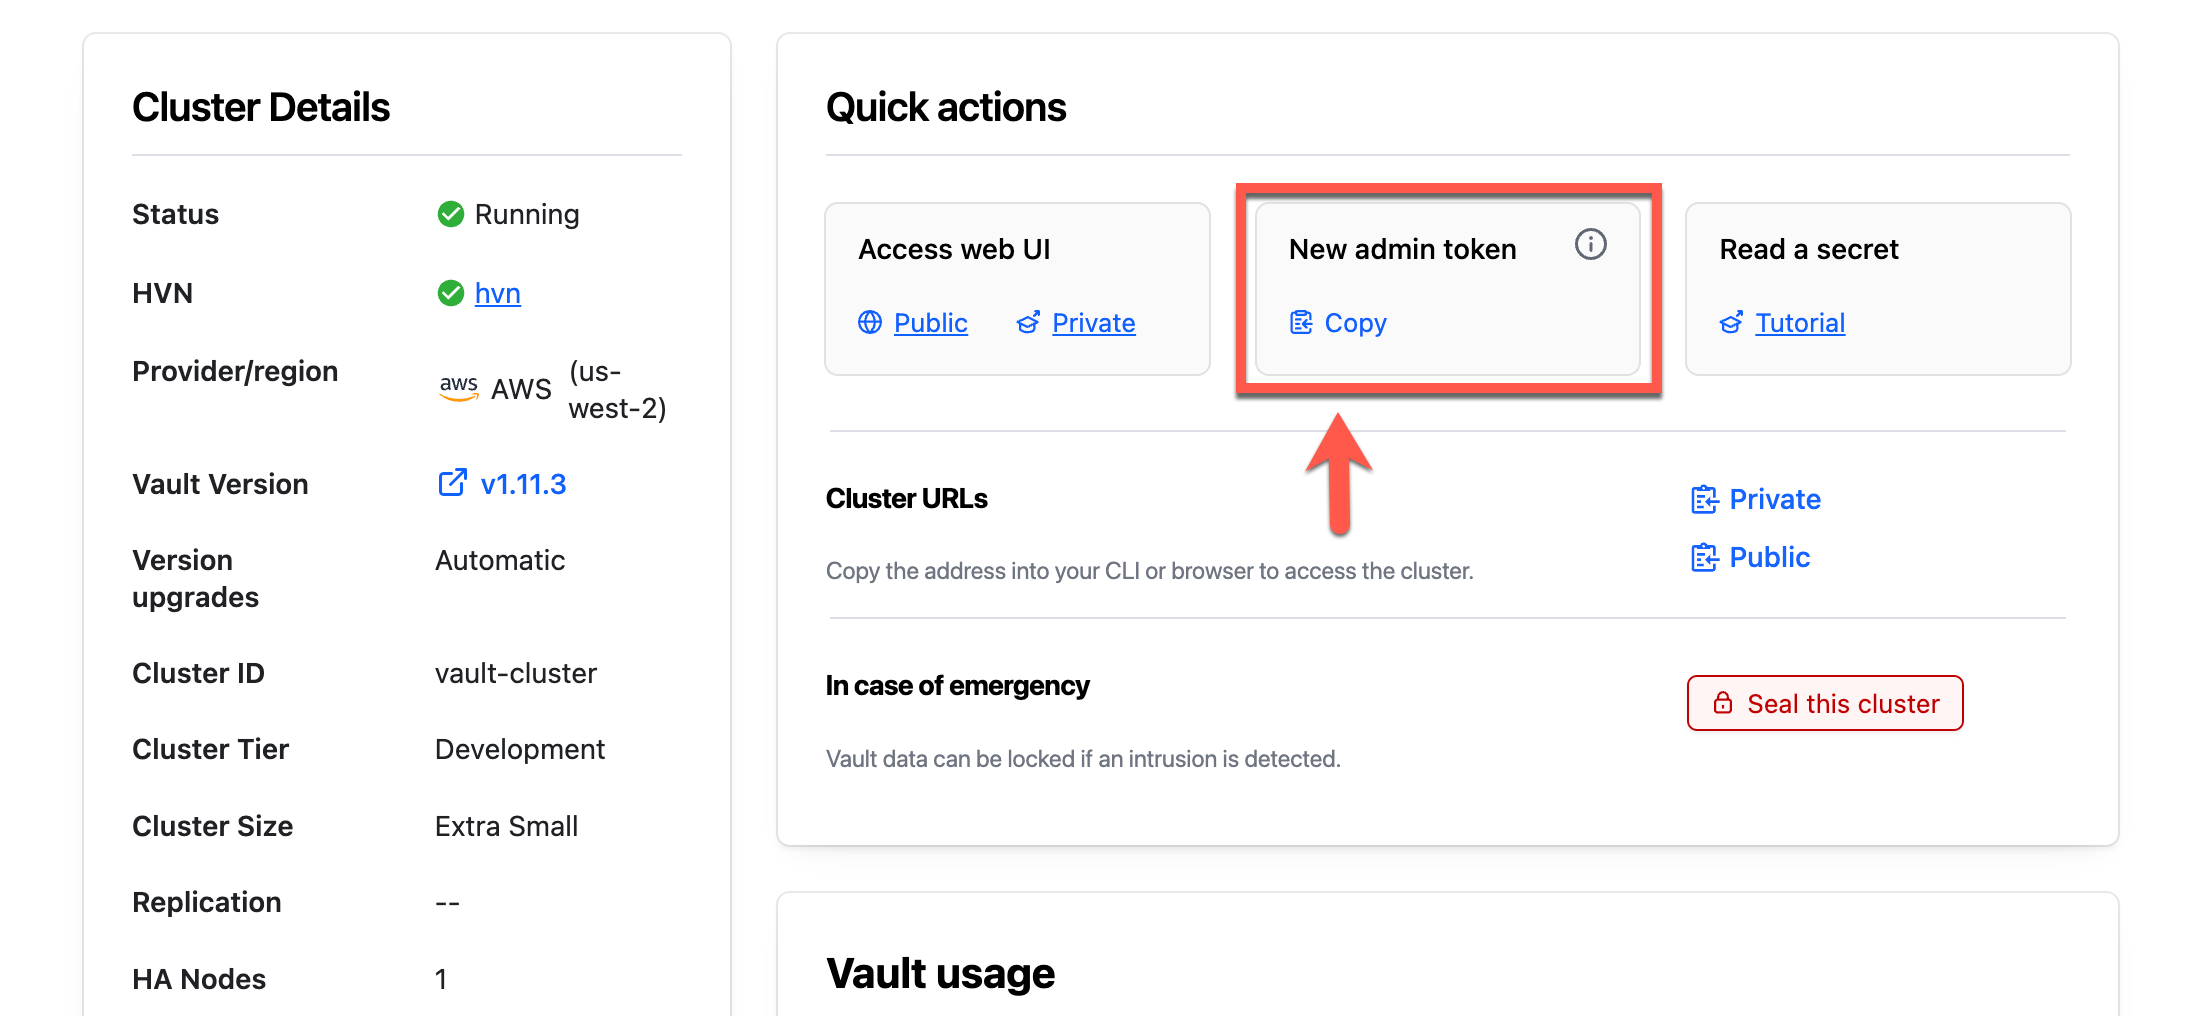
Return to the terminal and set the
VAULT_TOKENenvironment variable.$ export VAULT_TOKEN=$VAULT_TOKENSet the
VAULT_NAMESPACEenvironment variable toadmin.$ export VAULT_NAMESPACE=adminThe
adminnamespace is the top-level namespace automatically created by HCP Vault. All CLI operations default to use the namespace defined in this environment variable.The Vault Dedicated server is ready to proceed with the lab.
KMIP client setup
Create a working directory. You will store the necessary files in this location to use when configuring the KMIP client.
$ mkdir TUTORIAL_TEMPChange in to the new directory.
$ cd TUTORIAL_TEMPStore the working directory as an environment variable.
$ TEMP_DIR=$(pwd)Start a MongoDB Enterprise container and mount the
TUTORIAL_TEMPdirectory. You will use MongoDB as an example KMIP client.$ docker run --name test-mongo \ --volume $TEMP_DIR:/TEMP_DIR \ --env KMIP_ADDR=$(echo ${VAULT_ADDR:8} | rev | cut -c6- | rev) \ --detach \ mongodb/mongodb-enterprise-server --port 8000MongoDB will connect to Vault Dedicated using the public address.
If you do not have a local image of the MongoDB Enterprise Server container, Docker will pull the image.
Example output:
Unable to find image 'mongodb/mongodb-enterprise-server:latest' locally
latest: Pulling from mongodb/mongodb-enterprise-server
3153aa388d02: Pull complete
1b2a539cdfaf: Pull complete
a803aed565d2: Pull complete
d030d25df727: Pull complete
eeb04fb20d80: Pull complete
1ace0051919c: Pull complete
2ab361d11dfa: Pull complete
61e712bdcc56: Pull complete
4f4fb700ef54: Pull complete
fbfecf92fd00: Pull complete
Digest: sha256:c0ab980894407de01d48c8524952ee489b4f6c00393c40e3db382e74125a967a
Status: Downloaded newer image for mongodb/mongodb-enterprise-server:latest
d15cb2aa1acd7296cc54a6b68617df3d5e314c9ab0e46fcb4d0fe0a407d00106
Verify you can connect to the MongoDB container.
$ docker exec -it test-mongo bashThe shell will change to the MongoDB container.
Example output:
mongodb@d15cb2aa1acd:/$Verify the
TEMP_DIRdirectory mounted.$ ls | grep TEMP_DIR TEMP_DIRDisconnect from the MongoDB container.
$ exitYou are now ready to begin the tutorial.
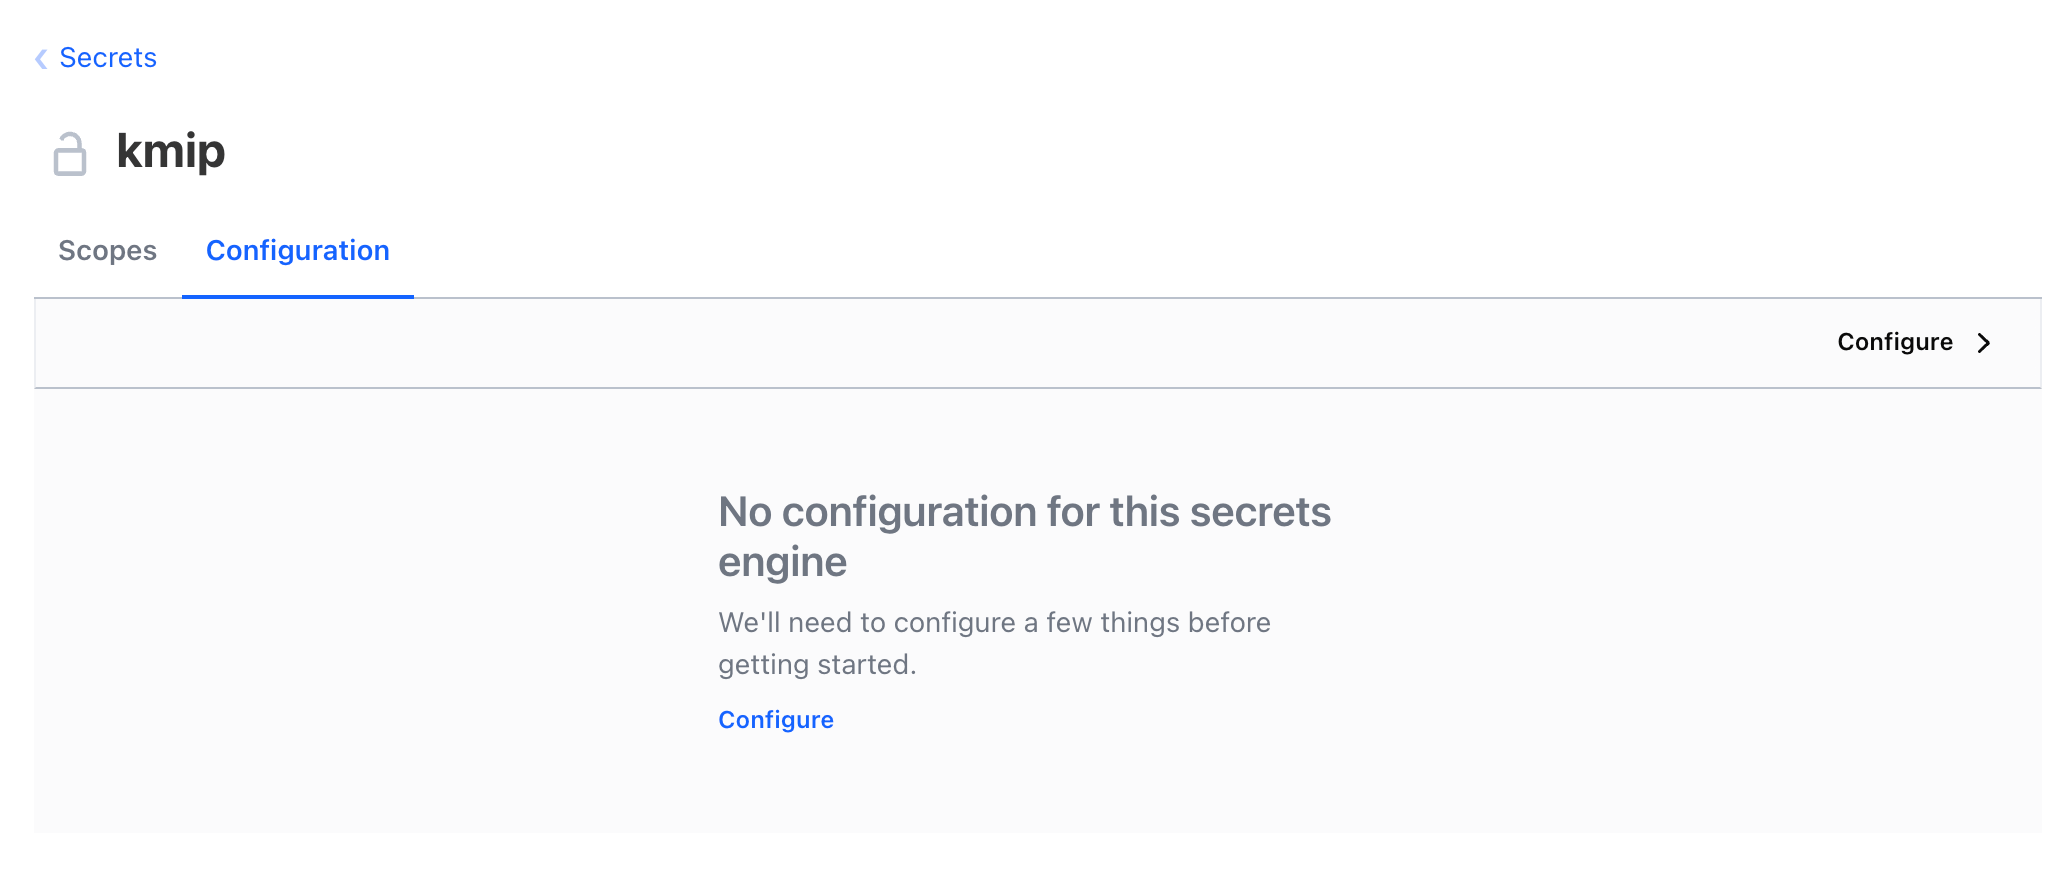
Enable and configure the KMIP secrets engine
The first step is to enable the kmip secrets engine at a desired path. In this
tutorial, you are going to enable the kmip secrets engine at /kmip.
Enable the
kmipsecrets engine.$ vault secrets enable kmip Success! Enabled the kmip secrets engine at: kmip/Configure the
kmipserver to listen on port5696.$ vault write kmip/config \ listen_addrs=0.0.0.0:5696 \ server_hostnames=$(echo ${VAULT_ADDR:8} | rev | cut -c6- | rev)Example output:
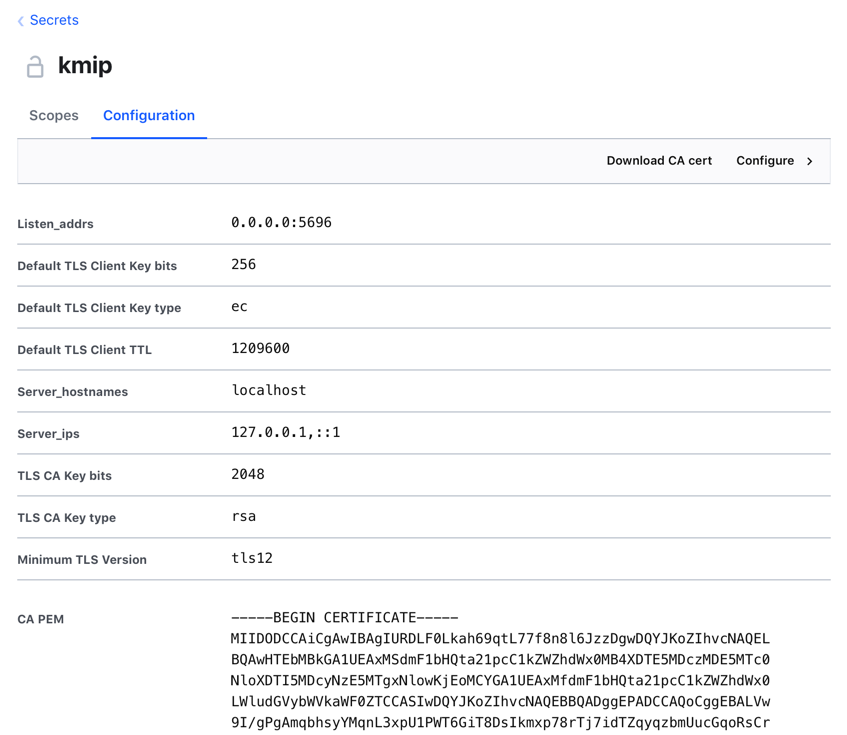
Success! Data written to: kmip/configReview the
kmipsecrets engine configuration.$ vault read kmip/config Key Value --- ----- default_tls_client_key_bits 256 default_tls_client_key_type ec default_tls_client_ttl 336h listen_addrs [0.0.0.0:5696] server_hostnames [localhost] server_ips [127.0.0.1 ::1] tls_ca_key_bits 256 tls_ca_key_type ec tls_min_version tls12When the KMIP engine is configured, it generates and stores a key-pair and uses it to sign a root CA which is used to sign an intermediate CA. The intermediate CA is used to sign the server TLS certificate used by the KMIP listener to identify itself during the TLS handshake.
By default, the certificate type (
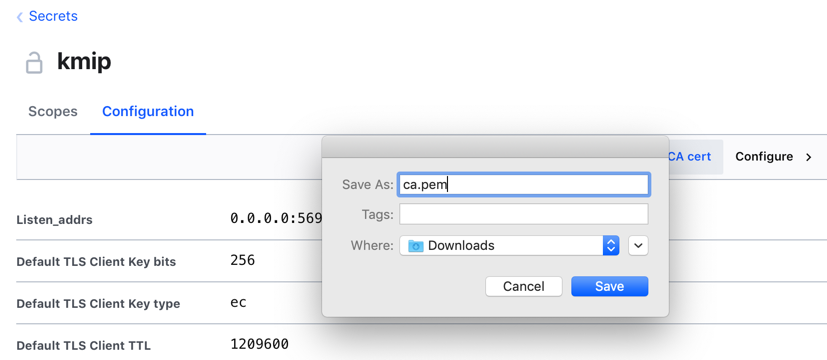
default_tls_client_key_type) isec(Elliptic Curve). If you need RSA instead, specify the certificate type (tls_ca_key_type) and bits (tls_ca_key_bits) when you configure thekmipserver.$ vault write kmip/config listen_addrs=0.0.0.0:5696 \ tls_ca_key_type="rsa" \ tls_ca_key_bits=2048Retrieve the generated CA certificate and save it in a file named
vault-ca.pem.$ vault read kmip/ca -format=json | jq -r '.data | .ca_pem' >> vault-ca.pem && cat vault-ca.pem -----BEGIN CERTIFICATE----- MIIBrDCCAVKgAwIBAgIUepWIXt6CqCLoUEPLVbjyO2q7ihEwCgYIKoZIzj0EAwIw HTEbMBkGA1UEAxMSdmF1bHQta21pcC1kZWZhdWx0MB4XDTIzMDgxNzIxMDA0NFoX DTMzMDgxNDIxMDExNFowKjEoMCYGA1UEAxMfdmF1bHQta21pcC1kZWZhdWx0LWlu dGVybWVkaWF0ZTBZMBMGByqGSM49AgEGCCqGSM49AwEHA0IABI16pHn0LoN59b/f xHxBnEmhioKODmhO94e86rNVJRsDY1Zz8BO2nZ4/HiHVESCfU249J5nd84yNaZZC 9MYhIG2jYzBhMA4GA1UdDwEB/wQEAwIBBjAPBgNVHRMBAf8EBTADAQH/MB0GA1Ud DgQWBBRSHkNkRvVRuTu9PkX6rz4WbQStyjAfBgNVHSMEGDAWgBT97Fucze6351ek Jtoz2fu0Y822kTAKBggqhkjOPQQDAgNIADBFAiEAxtAsabBtZn2Cm01ozELcv17q sKCljeXsArsOUYlMJRECIF4HUTqL4QiYDsgPwDiOtMeNNMkaICYA1RufLYKys+nE -----END CERTIFICATE----- -----BEGIN CERTIFICATE----- MIIBnjCCAUWgAwIBAgIUST+/bF6Ux5G61KbflBK9S2WgkA8wCgYIKoZIzj0EAwIw HTEbMBkGA1UEAxMSdmF1bHQta21pcC1kZWZhdWx0MB4XDTIzMDgxNzIxMDA0NFoX DTMzMDgxNDIxMDExNFowHTEbMBkGA1UEAxMSdmF1bHQta21pcC1kZWZhdWx0MFkw EwYHKoZIzj0CAQYIKoZIzj0DAQcDQgAElo0QMG2krqdKw6CcYEQdsHGMYrtORGAg O2oxNRQ31voALba9sA5LX5NvAZMwvXxT5iOYzOEITj5Mwbjwn1+SlKNjMGEwDgYD VR0PAQH/BAQDAgEGMA8GA1UdEwEB/wQFMAMBAf8wHQYDVR0OBBYEFP3sW5zN7rfn V6Qm2jPZ+7RjzbaRMB8GA1UdIwQYMBaAFP3sW5zN7rfnV6Qm2jPZ+7RjzbaRMAoG CCqGSM49BAMCA0cAMEQCIBSUi8dNc2eMznzURznq9kmvwf1EhyxwPyCuJC3cJoQ6 AiBrlBWn8oBDTMU0mtNmanvD242WNakeEiWWtRZQshPBYg== -----END CERTIFICATE-----
Create scopes and roles
Scopes partition KMIP managed object storage into multiple named buckets. (NOTE: Scopes cannot be nested.)
Roles in the KMIP secrets engine determine the set of KMIP operations that KMIP clients are allowed to perform.
Create a new scope named, "finance".
$ vault write -f kmip/scope/finance
Success! Data written to: kmip/scope/finance
List the existing scopes.
$ vault list kmip/scope
Keys
----
finance
Create a new role, "accounting" under the
financescope.$ vault write kmip/scope/finance/role/accounting operation_all=true Success! Data written to: kmip/scope/finance/role/accountingBy setting the
operation_allparameter totrue, the created role is granted to perform all KMIP client-server operations. Refer to Manage KMIP roles to learn how to modify the allowed operation list.List existing roles under
financescope.$ vault list kmip/scope/finance/role Keys ---- accountingRead the
accountingrole definition.$ vault read kmip/scope/finance/role/accounting Key Value --- ----- operation_all true tls_client_key_bits 0 tls_client_key_ttl 0s tls_client_key_type n/a
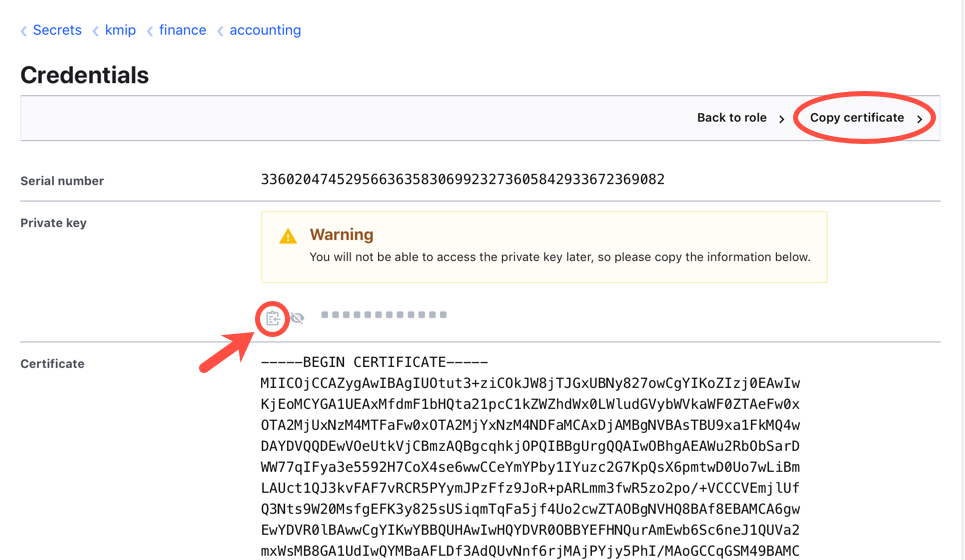
Client certificate generation
Once the scope was created and a role was created under the scope, the next step is to get the certificate for the KMIP client.
Generate a certificate in PEM format, and save it in a file named
credential.json.$ vault write -format=json \ kmip/scope/finance/role/accounting/credential/generate \ format=pem > credential.json && cat credential.jsonThe resulting
credential.jsoncontains the certificates that your KMIP client will use to establish a connection with Vault KMIP server.Example output:
{
  "request_id": "e646483b-dcf2-392e-75a2-d10292f59794",
  "lease_id": "",
  "lease_duration": 0,
  "renewable": false,
  "data": {
    "ca_chain": [
      "-----BEGIN CERTIFICATE-----\nMIIBrDCCAVKgAwIBAgIUGvBNoVCx0BLGTrRiAemINa7...snip...Cg+6nuyvvFcXugK3xSHggqNtxetN9e+0qOjcPj\n-----END CERTIFICATE-----",
      "-----BEGIN CERTIFICATE-----\nMIIBnzCCAUWgAwIBAgIUJjJ9lnQUbw5DpMHYQFlfLF1...snip...abcdefvGnymqlYzWohhlC5FCpm7Enesh5zP2s=\n-----END CERTIFICATE-----"
    ],
    "certificate": "-----BEGIN CERTIFICATE-----\nMIIBwTCCAWegAwIBAgIUWXc97Ip/n6...snip...BOAjBI4wCgYIKoZIzj0EAwIw\nKjEoMCYGA1UE\n-----END CERTIFICATE-----",
    "private_key": "-----BEGIN EC PRIVATE KEY-----\nMHcCAQEEIG7y7BwxdAyMH5C4O0U...snip...NHuGbafWWYEmebCi7bfJ5PDwzoAoGCCqGSM49=\n-----END EC PRIVATE KEY-----",
    "serial_number": "51075936162212341123456128960130371031336078"
  },
  "warnings": null
}
Extract the certificate from the
credential.jsonusingjqtool and save it in a file namedcert.pem.$ jq -r .data.certificate < credential.json > cert.pemExtract the private key from the
credential.jsonusingjqtool and save it in a file namedkey.pem.$ jq -r .data.private_key < credential.json > key.pemList the certification serial numbers associated with the
accountingrole.$ vault list kmip/scope/finance/role/accounting/credential Keys ---- 693751915900546682090704263335075174345458639865You can lookup the client certificate by its serial number as shown in the example. You can copy the output from the command above, or retrieve it from the
credential.jsonfile.$ vault read kmip/scope/finance/role/accounting/credential/lookup \ serial_number=$(cat credential.json | jq -r '.data | .serial_number')Example output:
Key              Value
---              -----
ca_chain         [-----BEGIN CERTIFICATE-----
MIIBrDCCAVKgAwIBAgIUGvBNoVCx0BLGTrRiAemINa7R+QswCgYIKoZIzj0EAwIw
HTEbMBkGA1UEAxMSdmF1bHQta21pcC1kZWZhdWx0MB4XDTIzMDgxODE5MTI1MVoX
DTMzMDgxNTE5MTMyMVowKjEoMCYGA1UEAxMfdmF1bHQta21pcC1kZWZhdWx0LWlu
dGVybWVkaWF0ZTBZMBMGByqGSM49AgEGCCqGSM49AwEHA0IABJ+5g1hmjyHThog1
ee3zZe8ic+5TRvQaK+/a+RpSoYd9knm5P6EvAQk7wwneJorfEGUIBO0/TN3Xt9/U
skECN1ijYzBhMA4GA1UdDwEB/wQEAwIBBjAPBgNVHRMBAf8EBTADAQH/MB0GA1Ud
DgQWBBSX/jXsZE3doA7ojZyt66hhAezL0jAfBgNVHSMEGDAWgBSNgA4syZP7tYXl
pu6zZL5Iu4DHLDAKBggqhkjOPQQDAgNIADBFAiB34g33groCphFs9STd6ek6lBBD
7eo0Rx9OxIU/e6zIMwIhAOuOOeCg+6nuyvvFcXugK3xSHggqNtxetN9e+0qOjcPj
-----END CERTIFICATE----- -----BEGIN CERTIFICATE-----
MIIBnzCCAUWgAwIBAgIUJjJ9lnQUbw5DpMHYQFlfLF1QO74wCgYIKoZIzj0EAwIw
HTEbMBkGA1UEAxMSdmF1bHQta21pcC1kZWZhdWx0MB4XDTIzMDgxODE5MTI1MVoX
DTMzMDgxNTE5MTMyMVowHTEbMBkGA1UEAxMSdmF1bHQta21pcC1kZWZhdWx0MFkw
EwYHKoZIzj0CAQYIKoZIzj0DAQcDQgAEHvD9qvfjxRP4iNPGhcV97rytanI0UmUt
TCCF4iXtRuGgnFAXJ/BX1TeYHbp+cAJdRUPjAqJKyctPCLKxzDSp+KNjMGEwDgYD
VR0PAQH/BAQDAgEGMA8GA1UdEwEB/wQFMAMBAf8wHQYDVR0OBBYEFI2ADizJk/u1
heWm7rNkvki7gMcsMB8GA1UdIwQYMBaAFI2ADizJk/u1heWm7rNkvki7gMcsMAoG
CCqGSM49BAMCA0gAMEUCIQD+DdOrTFBp0Afi7KUrA2b20rASZm/5+MpDzJx6mJyP
4gIgDDZVLrhnIw0ZvGnymqlYzWohhlC5FCpm7Enesh5zP2s=
-----END CERTIFICATE-----]
certificate      -----BEGIN CERTIFICATE-----
MIIBwTCCAWegAwIBAgIUWXc97Ip/n6P/fpQCD8fjBOAjBI4wCgYIKoZIzj0EAwIw
KjEoMCYGA1UEAxMfdmF1bHQta21pcC1kZWZhdWx0LWludGVybWVkaWF0ZTAeFw0y
MzA4MTgxOTEzMjRaFw0yMzA5MDExOTEzNTRaMCAxDjAMBgNVBAsTBTJ6N2t4MQ4w
DAYDVQQDEwUxMjRHcDBZMBMGByqGSM49AgEGCCqGSM49AwEHA0IABAUFSs6y21W2
sBl8ERYAaBH07wGXVtakyWwTLD8Z5Hs+Wwb+kj117e9XT3IK+NM10TS5hnvNUkrB
MMdrxKWmSaijdTBzMA4GA1UdDwEB/wQEAwIDqDATBgNVHSUEDDAKBggrBgEFBQcD
AjAMBgNVHRMBAf8EAjAAMB0GA1UdDgQWBBT2PNwt8EQeEtwjHaUtXSqEJRxBnDAf
BgNVHSMEGDAWgBSX/jXsZE3doA7ojZyt66hhAezL0jAKBggqhkjOPQQDAgNIADBF
AiAydpj1p2u9ZXS8ImDuFO1H7tD6zFey53SgkXmk/cFkUAIhAODOZL+ajtd3yvSN
Zj7SKWcP53VlMeWIO11BPd/uKSHF
-----END CERTIFICATE-----
-----BEGIN CERTIFICATE-----
MIIBrDCCAVKgAwIBAgIUGvBNoVCx0BLGTrRiAemINa7R+QswCgYIKoZIzj0EAwIw
HTEbMBkGA1UEAxMSdmF1bHQta21pcC1kZWZhdWx0MB4XDTIzMDgxODE5MTI1MVoX
DTMzMDgxNTE5MTMyMVowKjEoMCYGA1UEAxMfdmF1bHQta21pcC1kZWZhdWx0LWlu
dGVybWVkaWF0ZTBZMBMGByqGSM49AgEGCCqGSM49AwEHA0IABJ+5g1hmjyHThog1
ee3zZe8ic+5TRvQaK+/a+RpSoYd9knm5P6EvAQk7wwneJorfEGUIBO0/TN3Xt9/U
skECN1ijYzBhMA4GA1UdDwEB/wQEAwIBBjAPBgNVHRMBAf8EBTADAQH/MB0GA1Ud
DgQWBBSX/jXsZE3doA7ojZyt66hhAezL0jAfBgNVHSMEGDAWgBSNgA4syZP7tYXl
pu6zZL5Iu4DHLDAKBggqhkjOPQQDAgNIADBFAiB34g33groCphFs9STd6ek6lBBD
7eo0Rx9OxIU/e6zIMwIhAOuOOeCg+6nuyvvFcXugK3xSHggqNtxetN9e+0qOjcPj
-----END CERTIFICATE-----
-----BEGIN CERTIFICATE-----
MIIBnzCCAUWgAwIBAgIUJjJ9lnQUbw5DpMHYQFlfLF1QO74wCgYIKoZIzj0EAwIw
HTEbMBkGA1UEAxMSdmF1bHQta21pcC1kZWZhdWx0MB4XDTIzMDgxODE5MTI1MVoX
DTMzMDgxNTE5MTMyMVowHTEbMBkGA1UEAxMSdmF1bHQta21pcC1kZWZhdWx0MFkw
EwYHKoZIzj0CAQYIKoZIzj0DAQcDQgAEHvD9qvfjxRP4iNPGhcV97rytanI0UmUt
TCCF4iXtRuGgnFAXJ/BX1TeYHbp+cAJdRUPjAqJKyctPCLKxzDSp+KNjMGEwDgYD
VR0PAQH/BAQDAgEGMA8GA1UdEwEB/wQFMAMBAf8wHQYDVR0OBBYEFI2ADizJk/u1
heWm7rNkvki7gMcsMB8GA1UdIwQYMBaAFI2ADizJk/u1heWm7rNkvki7gMcsMAoG
CCqGSM49BAMCA0gAMEUCIQD+DdOrTFBp0Afi7KUrA2b20rASZm/5+MpDzJx6mJyP
4gIgDDZVLrhnIw0ZvGnymqlYzWohhlC5FCpm7Enesh5zP2s=
-----END CERTIFICATE-----
serial_number    510759361622123415542856862128960130371031336078
KMIP client configuration
In the Enable and configure the KMIP secrets engine,
you saved the CA certificate in a file named, ca.pem. You then created a role named
"accounting" with all supported KMIP operations allowed. Based on the role, a client certificate
was generated and saved in a file, cert.pem and its private key in key.pem.
You will now use the certificates to configure a KMIP client.
Use mongod daemon
process to configure the KMIP settings.
Combine the cert.pem and key.pem and save it as
client.pem.$ cat cert.pem key.pem > client.pemConnect to the MongoDB container.
$ docker exec -it test-mongo bashCreate a data directory.
$ cd ~ && mkdir testKMIPUse the
mongodcommand to specify the cert & key file locations.$ mongod --dbpath ~/testKMIP --enableEncryption --kmipServerName $KMIP_ADDR \ --kmipPort 5696 --kmipServerCAFile /TEMP_DIR/vault-ca.pem \ --kmipClientCertificateFile /TEMP_DIR/client.pemExample output:
The command output shows the created KMIP key ID:
...
"ctx":"initandlisten","msg":"Options set by command line","attr":{"options":{"security":{"enableEncryption":true,"kmip":{"clientCertificateFile":"/TEMP_DIR/client.pem","port":5696,"serverCAFile":"/TEMP_DIR/vault-ca.pem","serverName":"vault-cluster-public-vault-0fa6faeb.866839f6.z1.hashicorp.cloud"}},"storage":{"dbPath":"/data/db/testKMIP"}}}}
...
"ctx":"initandlisten","msg":"Created KMIP key","attr":{"keyId":"FuzjYbD1iPUvti9I3mrB8DjDzpXG8SlF"}}
"ctx":"initandlisten","msg":"Activated KMIP key","attr":{"uid":"FuzjYbD1iPUvti9I3mrB8DjDzpXG8SlF"}}
...
"ctx":"initandlisten","msg":"Encryption key manager initialized","attr":{"keyId":"FuzjYbD1iPUvti9I3mrB8DjDzpXG8SlF"}}
Stop the MongoDB process by typing
ctrl c.Exit the container shell.
$ exitStop the MongoDB container.
$ docker stop test-mongo
Revoke a client certificate
You can also revoke existing client certificates if necessary.
Revoke a client certificate by its serial number.
$ vault write kmip/scope/finance/role/accounting/credential/revoke \
        serial_number=$(cat credential.json | jq -r '.data | .serial_number')
Example output:
Success! Data written to: kmip/scope/finance/role/accounting/credential/revokeVerify that it no longer exists.
$ vault list kmip/scope/finance/role/accounting/credential

No value found at kmip/scope/finance/role/accounting/credential/
Manage KMIP roles
In the Create scopes and roles section the accounting role was permitted to perform all KMIP
operations (operation_all). However, you should practice least privilege and avoid granting more permissions than necessary.
When you grant KMIP operations, the argument convention is
operation_<KMIP_operation>. For example, to grant a Create operation, the
parameter becomes operation_create.
Update the
accountingrole and grant onlyActivate,Create, andGetoperations.$ vault write kmip/scope/finance/role/accounting \ operation_activate=true \ operation_create=true \ operation_get=trueExample output:
WARNING! The following warnings were returned from Vault:

  * operation_all overwritten by newly provided operation value(s)
Verify the changes.
$ vault read kmip/scope/finance/role/accounting
Key                    Value
---                    -----
operation_activate     true
operation_create       true
operation_get          true
tls_client_key_bits    0
tls_client_key_ttl     0s
tls_client_key_type    n/a
Delete the
accountingrole.$ vault delete kmip/scope/finance/role/accounting
Delete scopes
If you need to delete scopes, follow this step.
Delete the finance scope.
$ vault delete kmip/scope/finance force=true
The force parameter allows deleting a scope which has some
managed objects created with.
Knowledge checks
A quiz to test your knowledge.
What determines which KMIP operations a client can perform when it connects to Vault?
🔘 Vault policies attached to the token used to enable the secrets engine.
🔘 The role applied to the client's TLS certificate.
🔘 The storage backend configured for the
kmipmount.🔘 The Docker network used by the KMIP client.
❌ Vault policies attached to the token used to enable the secrets engine.
✅ The role applied to the client's TLS certificate.
❌ The storage backend configured for the
kmipmount.❌ The Docker network used by the KMIP client.
How do scopes and roles work together in the KMIP secrets engine?
Scopes partition KMIP managed object storage into named buckets, and roles define which KMIP operations a client can perform inside that scope. In this tutorial, the
financescope contains theaccountingrole that the client certificate uses.Why does the tutorial combine
cert.pemandkey.pemintoclient.pembefore startingmongod?🔘 MongoDB requires a single file that contains the client certificate and private key for KMIP authentication.
🔘 Vault only accepts RSA keys after they are merged into one file.
🔘 The KMIP server reads
client.pemto discover the scope and role names directly.🔘 Docker copies only files with a
.pemextension into mounted volumes.✅ MongoDB requires a single file that contains the client certificate and private key for KMIP authentication.
❌ Vault only accepts RSA keys after they are merged into one file.
❌ The KMIP server reads
client.pemto discover the scope and role names directly.❌ Docker copies only files with a
.pemextension into mounted volumes.
Additional Discussion
Review KMIP certificates
Vault policies do not come into play during these KMIP requests.
The KMIP secrets engine determines the set of KMIP operations the
clients are allowed to perform based on the roles (accounting).
Review the generated client certificate file.
$ openssl x509 -in cert.pem -text -noout

Certificate:
    Data:
        Version: 3 (0x2)
        Serial Number:
            37:78:04:36:13:b2:0a:35:0a:5c:f8:6e:d8:ef:b7:b5:52:ff:ad:8d
    Signature Algorithm: ecdsa-with-SHA256
        Issuer: CN=vault-kmip-default-intermediate
        Validity
            Not Before: Jun 25 17:12:40 2019 GMT
            Not After : Jun 26 17:13:10 2019 GMT
        Subject: OU=5J7Ck, CN=ImYFE
        Subject Public Key Info:
            Public Key Algorithm: id-ecPublicKey
                Public-Key: (521 bit)
                pub:
                    04:01:d3:21:de:6b:b7:ed:36:1e:c4:05:48:39:3d:
                    ce:16:01:e3:11:6e:34:b0:69:bb:aa:35:7f:7e:f5:
                    24:1d:9d:ca:eb:4b:66:41:00:5e:0d:21:91:b5:c7:
                    f4:db:3f:b3:fc:fa:d9:d9:10:10:7c:41:53:45:51:
                    aa:e9:e4:a0:5a:46:25:01:f5:75:69:15:12:0e:bd:
                    4d:5a:9e:a8:f3:19:e1:7a:42:0a:cf:2d:43:bf:b4:
                    43:17:3b:eb:85:55:64:65:c1:7a:19:11:06:33:81:
                    88:0e:49:28:34:d1:a9:76:df:b5:d1:46:a3:16:42:
                    72:25:22:84:cf:ae:55:eb:5e:88:55:e6:fe
                ASN1 OID: secp521r1
                NIST CURVE: P-521
        X509v3 extensions:
            X509v3 Key Usage: critical
                Digital Signature, Key Encipherment, Key Agreement
            X509v3 Extended Key Usage:
                TLS Web Client Authentication
            X509v3 Subject Key Identifier:
                F3:54:4D:DF:F8:CA:DA:80:6D:E1:A5:12:F3:2D:4B:23:42:68:31:64
            X509v3 Authority Key Identifier:
                keyid:B0:DF:DC:07:50:52:F3:67:7F:AA:E3:30:08:CF:62:3C:B9:3E:12:3F

    Signature Algorithm: ecdsa-with-SHA256
         30:81:87:02:41:3f:5a:fc:83:a2:d8:3e:f0:9d:48:aa:7a:8d:
         42:47:b8:d4:dc:74:5d:7b:34:b2:a9:c3:ff:93:8d:30:a8:58:
         64:4a:86:7f:7f:64:7c:25:df:67:ca:2f:f3:d4:50:d4:6d:a9:
         56:35:bc:ae:eb:40:7d:23:4f:00:60:a8:45:32:48:3d:02:42:
         01:12:e1:50:b8:45:5a:55:d8:1f:0a:41:34:47:19:67:01:66:
         22:b8:13:6c:db:d0:65:e0:83:18:ac:e4:28:e1:28:30:1e:94:
         96:43:2d:46:e7:da:a8:51:9e:1f:6f:20:7f:49:d2:bc:7c:ff:
         a9:7b:8e:ad:9d:05:10:b2:41:bd:6f:d5
Notice the Subject properties: Subject: OU=5J7Ck, CN=ImYFE
The OU corresponds to the scope (finance) and CN corresponds to the role
(accounting). If you have access to the Vault's storage backend, you would
find persisted data with those IDs.
For example:
"key": "vault/logical/<UUID>/scope/5J7Ck/role/ImYFE"
"key": "vault/logical/<UUID>/scope/5J7Ck/info"
"key": "vault/logical/<UUID>/managed-objects/5J7Ck/RklNh5GRRQCZ4PLzPYuV5BUm2HuWwbGv"
You can read the allowed operations for the role using the
sys/raw endpoint if it's
enabled.
$ vault read sys/raw/logical/<UUID>/scope/5J7Ck/role/ImYFE

Key      Value
---      -----
value    {"id":"ImYFE","allowed_operations":{"operation_all":{}}}
When a situation requires you to delete the client certificate, simply revoke the certificate as described in Revoke a client certificate.
MySQL Enterprise Edition
This section assumes that you already have an instance of MySQL Enterprise Edition running with your own license.
The keyring_okv keyring plugin uses the KMIP 1.1 protocol to communicate
securely as a client of a KMIP back end. Follow the MySQL online
documentation
to create okvclient.ora file, and an ssl directory to place the certificate
and key files for keyring_ova to work properly.
Also, install the keyring_udf plugin and the user-defined functions (UDFs) as
described in the MySQL
documentation.
Now, generate a new random key with a given ID, type, and length, and store it in the keyring.
mysql> SELECT keyring_key_generate('MyKey1', 'AES', 32);
+-------------------------------------------+
| keyring_key_generate('MyKey1', 'AES', 32) |
+-------------------------------------------+
|                                         1 |
+-------------------------------------------+
1 row in set (0.35 sec)
Clean up
1. Delete the Vault Dedicated cluster using the HCP Portal.
2. Remove the local files and TUTORIAL_TEMP directory.
$ cd .. && rm -rf TUTORIAL_TEMP