HSM integration - seal wrap
Vault Enterprise integrates with Hardware Security Module (HSM) platforms to opt-in automatic unsealing. HSM integration provides three pieces of special functionality:
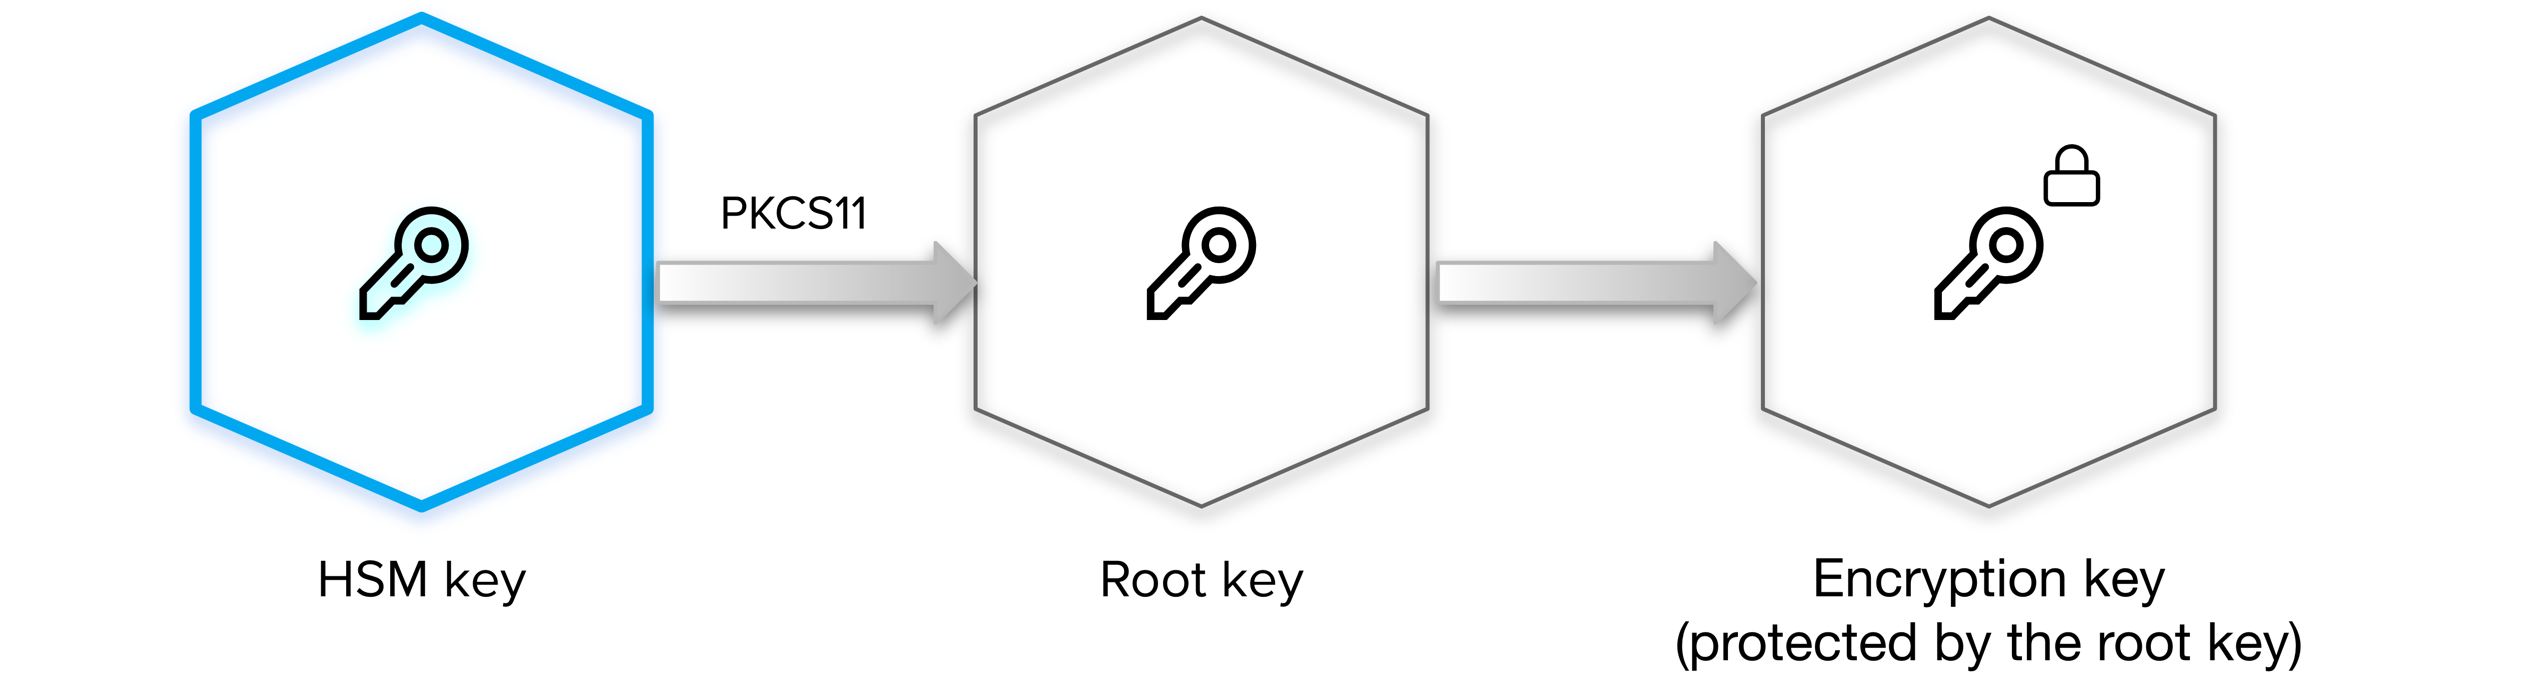
- Root key wrapping: Vault protects its root key (also known as master key) by transiting it through the HSM for encryption rather than splitting into key shares.
- Automatic unsealing: Vault stores its encrypted root key in storage, allowing for automatic unsealing.
- Seal wrapping for FIPS KeyStorage-conforming functionality for Critical Security Parameters.
In some large organizations, there is some complexity in designating key officers who might be available to unseal Vault installations. This is because the most common pattern is to deploy Vault immutably. Automating unseal using an HSM is a simple and secure way of unsealing Vault nodes as they get deployed.
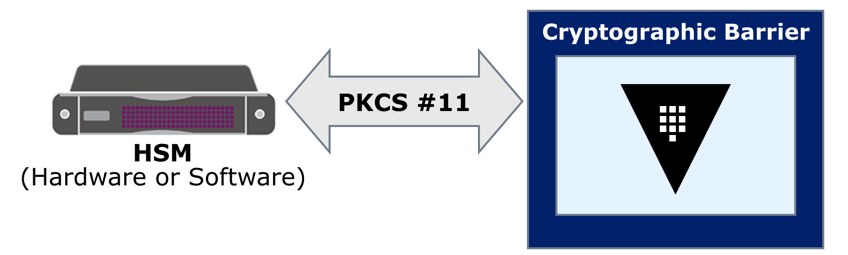
Vault pulls its encrypted root key from storage and transit it through the HSM for decryption using PKCS #11 API. After decrypting the root key, Vault uses the root key to decrypt the encryption key to continue Vault operations.
Challenge
The Federal Information Processing Standard (FIPS) 140-2 is a U.S. Government computer security standard used to accredit cryptography modules. If your product or service does not follow FIPS' security requirements, it may complicate your ability to operate with U.S. Government data.
Aside from doing business with U.S. government, your organization may care about FIPS, which approves cryptographic ciphers for hashing, signature, key exchange, and encryption for security.
Solution
Integrate Vault with FIPS 140-2 certified HSM and enable the seal wrap feature to protect your data.
Seal wrap is a feature that you can use to add an extra layer of protection for secrets, and meet compliance and regulatory requirements. Vault Enterprise enables seal wrap by default.
Vault uses 256-bit AES in GCM mode to encrypt secrets with a randomly generated cryptographic nonce before writing them to persistent storage. By enabling seal wrap, Vault wraps your secrets with an extra layer of encryption using HSM encryption and decryption.
Benefits of the seal wrap
Seal wrap:
- Conforms with FIPS 140-2 directives on Key Storage and Key Transport as certified by Leidos.
- Supports FIPS level of security equal to HSM.
- For example, if you use Level 3 hardware encryption on an HSM, Vault will be using FIPS 140-2 Level 3 cryptography.
- Allows Vault deployments in high security GRC environments (such as PCI-DSS, HIPAA) where FIPS guidelines important for external audits.
- Is a pathway for Vault's use in managing Department of Defense's (DOD) or North Atlantic Treaty Organization (NATO) military secrets.
Prerequisites
This intermediate operations tutorial assumes that you have:
- A supported HSM cluster to integrate with Vault
- Vault Enterprise version 0.9.0 or later
Step 1: Configure HSM auto-unseal
By default a Vault server starts in a sealed state, where a quorum of existing unseal keys can unseal it. By integrating Vault with HSM, your Vault server can be automatically unsealed by the trusted HSM key provider.
To integrate your Vault Enterprise server with an HSM cluster, the configuration file must define the
PKCS11 sealstanza providing necessary connection information.Example:
config-hsm.hcl# Provide your AWS CloudHSM cluster connection information seal "pkcs11" { lib = "/opt/cloudhsm/lib/libcloudhsm_pkcs11.so" slot = "1" pin = "vault:Password1" key_label = "hsm_demo" hmac_key_label = "hsm_hmac_demo" generate_key = "true" } # Configure the storage backend for Vault storage "file" { path = "/tmp/vault" } # Addresses and ports on which Vault will respond to requests listener "tcp" { address = "0.0.0.0:8200" tls_disable = "true" } ui = true disable_mlock = trueIn this tutorial, you will use the local filesystem (
/tmp/vault) as the storage backend to make the verification step simpler.The example configuration defines the following in its
sealstanza:Parameter Description libPath to the PKCS #11 library on the virtual machine where you installed Vault Enterprise. slotThe slot number to use. pinPKCS #11 PIN for login. key_labelDefines the label of the key you want to use. hmac_key_labelDefines the label of the key you want to use for HMACing. generate_keyIf no existing key with the label specified by key_labelis found at Vault initialization time, Vault generates a key.IMPORTANT: Vault can generate its own key to simplify the setup process, but for security, Vault marks the key as non-exportable. If your HSM key backup strategy requires the key to be exportable, you should generate the key yourself. Refer to the key generation attributes.
If you are using systemd, the
ExecStartparameter should point to the correct location of your configuration file. For example, if your configuration file is located at/etc/vault.d/config-hsm.hcl, thevault.servicefile may look as follow.Example:
/etc/systemd/system/vault.service[Unit] Description="HashiCorp Vault - A tool for managing secrets" Documentation=https://www.vaultproject.io/docs/ Requires=network-online.target After=network-online.target ConditionFileNotEmpty=/etc/vault.d/vault.hcl StartLimitIntervalSec=60 StartLimitBurst=3 [Service] User=vault Group=vault ProtectSystem=full ProtectHome=read-only PrivateTmp=yes PrivateDevices=yes SecureBits=keep-caps AmbientCapabilities=CAP_IPC_LOCK Capabilities=CAP_IPC_LOCK+ep CapabilityBoundingSet=CAP_SYSLOG CAP_IPC_LOCK NoNewPrivileges=yes ExecStart=/usr/local/bin/vault server -config=/etc/vault.d/config-hsm.hcl ExecReload=/bin/kill --signal HUP $MAINPID KillMode=process KillSignal=SIGINT Restart=on-failure RestartSec=5 TimeoutStopSec=30 StartLimitInterval=60 StartLimitIntervalSec=60 StartLimitBurst=3 LimitNOFILE=65536 LimitMEMLOCK=infinity [Install] WantedBy=multi-user.targetStart the Vault server.
Example:
If starting from the command:
$ vault server -config=/etc/vault.d/config-hsm.hclIf starting as a service using
systemd, first enable thevaultservice.$ sudo systemctl enable vaultStart the Vault server as a service.
$ sudo systemctl start vaultCheck the Vault status.
$ vault status

Key                      Value
---                      -----
Recovery Seal Type       pkcs11
Initialized              false
Sealed                   true
...
Initialize Vault.
First, set the
VAULT_ADDRenvironment variable.$ export VAULT_ADDR="http://127.0.0.1:8200"Initialize Vault.
$ vault operator initExample output:
Recovery Key 1: iz1XWxe4CM+wrOGqRCx8ex8kB2XvGJEdfjhXFC+MA6Rc
Recovery Key 2: rKZETr6IAy686IxfO3ZBKXPDAOkkwkpSepIME+bjeUT7
Recovery Key 3: 4XA/KJqFOm+jzbBkKQuRVePEYPrQe3H3TmFVmdlUjRFv
Recovery Key 4: lfnaYoZufP0uhooO3mHDAKGNZB5HLP9HYYb+LAfKkUmd
Recovery Key 5: L169hHj3DMpphGsOnS8TEz3Febvdx3vsG3Xr8kGWdUtW

Initial Root Token: s.AWnDagUkKNNbvkENiL72wysn

Success! Vault is initialized

Recovery key initialized with 5 key shares and a key threshold of 3. Please
securely distribute the key shares printed above.
When initializing Vault using an HSM, instead of returning unseal keys to the operator, Vault returns recovery keys. Vault generates these from an internal recovery key that it splits using Shamir's Secret Sharing, like Vault's treatment of unseal keys when running without an HSM. Some Vault operations require these recovery keys, such as generation of a root token.
Check the Vault status again.
$ vault status

Key                      Value
---                      -----
Recovery Seal Type       shamir
Initialized              true
Sealed                   false
Total Recovery Shares    1
Threshold                1
Version                  1.2.3+ent.hsm
Cluster Name             vault-cluster-dfcace02
Cluster ID               0fe5ab51-ff92-fdb0-9c37-f739679554f8
HA Enabled               false
Vault is now unsealed (
Sealedvalue is nowfalse).To verify auto-unseal, stop and restart the Vault server and check its status.
If starting the Vault server as a service using
systemd:$ sudo systemctl restart vaultVerify the Vault server status.
$ vault status
Key                      Value
---                      -----
Recovery Seal Type       shamir
Initialized              true
Sealed                   false
...
Step 2: Enable seal wrap
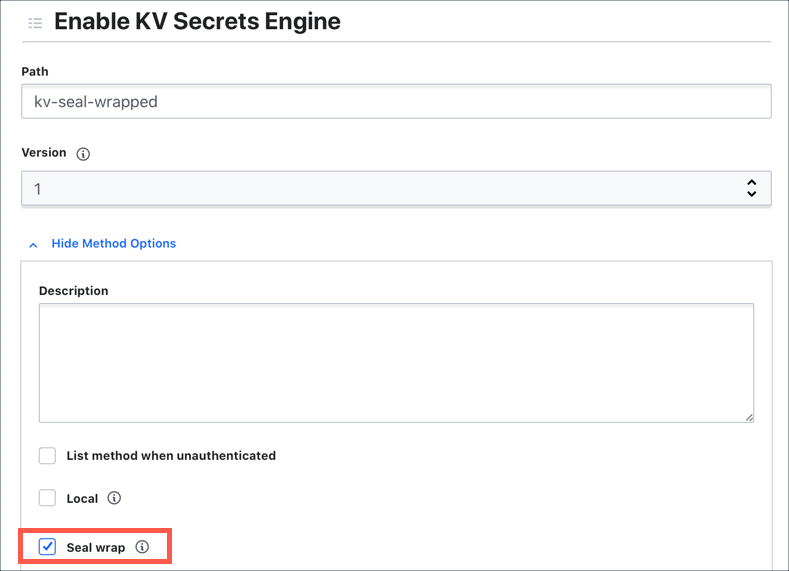
For some values, seal wrapping is always enabled including the recovery key, any stored key shares, the root key, the keyring, and more. When working with the key/value secrets engine, you can enable seal wrap to wrap all data.
Compare seal-wrapped data against unwrapped data by enabling the key/value v1 secrets engine at two different paths:
kv-unwrappedandkv-seal-wrapped.Enable k/v v1 without seal wrap at
kv-unwrapped.$ vault secrets enable -path=kv-unwrapped kvEnable k/v v1 with seal wrap. Use the
-seal-wrapflag when you enable the KV workflow.$ vault secrets enable -path=kv-seal-wrapped -seal-wrap kvTo enable seal wrap, pass the
-seal-wrapflag when you enable a secrets engine.List the enabled secrets engines with details.
$ vault secrets list -detailed

Path                Plugin       Accessor              ...    Seal Wrap    ...
----                ------       --------                     -----------  ...
cubbyhole/          cubbyhole    cubbyhole_b36dd7e1    ...    false        ...
identity/           identity     identity_b5650a96     ...    false        ...
kv-seal-wrapped/    kv           kv_fe02767b           ...    true         ...
kv-unwrapped/       kv           kv_36d321c6           ...    false        ...
...
Notice that the
Seal Wrapparameter value istrueforkv-seal-wrapped.
Step 3: Test the Seal Wrap Feature
In this step, you are going to:
- Write some test data
- View the encrypted secrets
Write a secret at
kv-unwrapped/unwrappedfor testing.$ vault kv put kv-unwrapped/unwrapped password="my-long-password"Read the path to verify.
$ vault kv get kv-unwrapped/unwrapped
====== Data ======
Key         Value
---         -----
password    my-long-password
Write the same secret at
kv-seal-wrapped/wrappedfor testing.$ vault kv put kv-seal-wrapped/wrapped password="my-long-password"Read the path to verify.
$ vault kv get kv-seal-wrapped/wrapped
====== Data ======
Key         Value
---         -----
password    my-long-password
Using a valid token, you can write and read secrets the same way regardless of the seal wrap.


View the encrypted secrets
Remember that you configured the Vault server to use the local filesystem
(/tmp/vault) as its storage backend in this example.
# Configure the storage backend for Vault
storage "file" {
  path = "/tmp/vault"
}
SSH into the machine where the Vault server is running, and check the stored
values in the /tmp/vault directory.
$ cd /tmp/vault/logical
Under the /tmp/vault/logical directory, there are two sub-directories. One
maps to kv-unwrapped/ and another maps to kv-seal-wrapped/ although you cannot tell by
the folder names.
View the secret at rest. One of the directory maps to kv-unwrapped/unwrapped.
Example:
$ cd 2da357cd-55f2-7eed-c46e-c477b70bed18
View its content - password value is encrypted.
$ cat _unwrapped
{"Value":"AAAAAQICk547prhuhMiBXLq2lx8ZkMpSB3p+GKHAwuMhKrZGSeqsFevMS6YoqTVlbvpU9B4zWPZ2HA
SeNZ3YMw=="}
Another directory maps to kv-seal-wrapped/wrapped.
$ cd ../5bcea44d-28a3-87af-393b-c6d398fe41d8
View its content. The password value is encrypted.
$ cat _wrapped
{"Value":"ClBAg9oN7zBBaDBZcsilDAyGkL7soPe7vBA5+ADADuyzo8GuHZHb9UFN2nF1h0OpKEgCIkG3JNHcXt
tZqCi6szcuNBgF3pwhWGwB4FREM3b5CRIQYK7239Q92gRGrcBBeZD6ghogEtSBDmZJBahk7n4lIYF3X4iBqmwZgH
Vo4lzWur7rzncgASofCIIhENEEGghoc21fZGVtbyINaHNtX2htYWNfZGVtb3M="}
The secret is encrypted, but the seal-wrapped value is longer even though both values are the same, my-long-password.