Secure multi-tenancy with namespaces
Everything in Vault is path-based, and often uses the terms path and
namespace interchangeably. The application namespace pattern is a useful
construct for providing Vault as a service to internal customers, giving them
the ability to implement secure multi-tenancy within Vault in order to provide
isolation and ensure teams can self-manage their own environments.
Personas
The scenario described in this tutorial introduces the following personas:
operationsis the cluster-level administrator with privileged policiesorg-adminis the organization-level administratorteam-adminis the team-level administrator
Challenge
When Vault is primarily used as a central location to manage secrets, multiple organizations within a company may need to be able to manage their secrets in a self-serving manner. This means that a company needs to implement a Vault as a Service model allowing each organization (tenant) to manage their own secrets and policies. The most importantly, tenants should be restricted to work only within their tenant scope.
Solution
Create a namespace dedicated to each team, organization, or app where they can perform all necessary tasks within their tenant namespace.
Each namespace can have its own:
- Policies
- Auth Methods
- Secrets Engines
- Tokens
- Identity entities and groups
Tokens are locked to a namespace. Identity groups can pull in entities and groups from other namespaces.
Prerequisites
To perform the tasks described in this tutorial, you need to have a Vault Enterprise environment.
Lab setup
Open a terminal and start a Vault dev server with root as the root token.
$ vault server -dev -dev-root-token-id root
The Vault dev server defaults to running at 127.0.0.1:8200. The server is
also initialized and unsealed.
Export an environment variable for the vault CLI to address the Vault server.
$ export VAULT_ADDR=http://127.0.0.1:8200
Export an environment variable for the vault CLI to authenticate with the
Vault server.
$ export VAULT_TOKEN=root
The Vault server is ready.
Scenario introduction
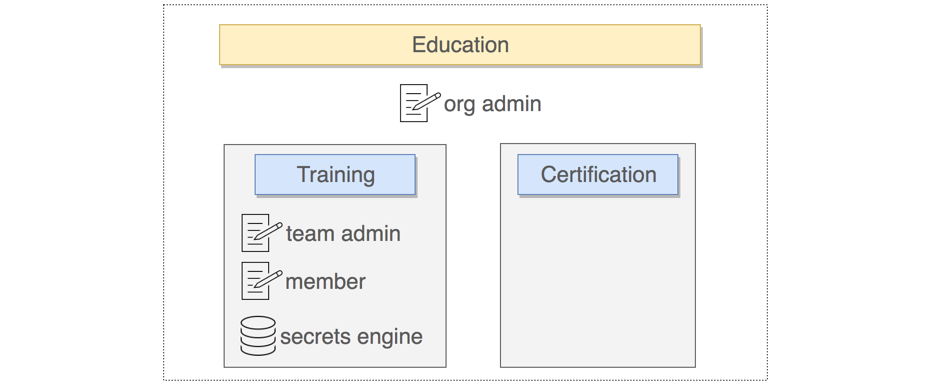
In this tutorial, you are going to create a namespace dedicated to the Education organization which has Training and Certification teams. Delegate operational tasks to the team admins so that the Vault cluster operators won't have to be involved.
The following steps are demonstrated:
- Create namespaces
- Write policies
- Set up entities and groups
- Test the organization admin user
- Test the team admin user
- Audit ambient credentials
Create namespaces
(Persona: operations)
To create a new namespace, run: vault namespace create <namespace_name>
Create a namespace dedicated to the
educationorganizations.$ vault namespace create education Key Value --- ----- custom_metadata map[] id 72cdg path education/In this example, the
educationnamespace ID is72cdg.Create child namespaces called
trainingunder theeducationnamespace.$ vault namespace create -namespace=education training Key Value --- ----- custom_metadata map[] id PjzDJ path education/training/Create child namespaces called
certificationunder theeducationnamespace.$ vault namespace create -namespace=education certification Key Value --- ----- custom_metadata map[] id PdrIi path education/certification/List the existing namespaces on the root.
$ vault namespace list

Keys
----
education/
List the existing namespace on the
educationnamespace.$ vault namespace list -namespace=education Keys ---- certification/ training/
Custom metadata
If you are running Vault 1.12.0 or later, you can add custom metadata to each
namespace using -custom-metadata flag. Custom metadata can be useful when you
have machine-generated namespace names. You can set custom metadata to provide
human-friendly tags or names to the namespace.
$ vault namespace create -custom-metadata=team="Marketing (US)" ns-mktg-usa
Example output:
Key                Value
---                -----
custom_metadata    map[team:Marketing (US)]
id                 vZ5YB
path               ns-mktg-usa/
You can add custom metadata to an existing namespaces using the patch
sub-command.
$ vault namespace patch -custom-metadata=language=English ns-mktg-usa

Key                Value
---                -----
custom_metadata    map[language:English team:Marketing (US)]
id                 vZ5YB
path               ns-mktg-usa/
You can pass multiple -custom-metadata=<key>=<value> to set more than one
custom metadata with vault namespace create or vault namespace patch
commands.
For example:
$ vault namespace create -custom-metadata=team="Marketing (US)" \
   -custom-metadata=language=English \
   -custom-metadata=alias="team-marketing" \
   ns-mktg-usa

Write policies
(Persona: operations)
In this scenario, there is an organization-level administrator who is a
superuser within the scope of the education namespace. Also, there is a
team-level administrator for training and certification.
Policy for education admin
Requirements:
- Create and manage namespaces
- Create and manage policies
- Enable and manage secrets engines
- Create and manage entities and groups
- Manage tokens
edu-admin.hcl
# Manage namespaces
path "sys/namespaces/*" {
   capabilities = ["create", "read", "update", "delete", "list", "sudo"]
}

# Manage policies
path "sys/policies/acl/*" {
   capabilities = ["create", "read", "update", "delete", "list", "sudo"]
}

# List policies
path "sys/policies/acl" {
   capabilities = ["list"]
}

# Enable and manage secrets engines
path "sys/mounts/*" {
   capabilities = ["create", "read", "update", "delete", "list"]
}

# List available secrets engines
path "sys/mounts" {
  capabilities = [ "read" ]
}

# Create and manage entities and groups
path "identity/*" {
   capabilities = ["create", "read", "update", "delete", "list"]
}

# Manage tokens
path "auth/token/*" {
   capabilities = ["create", "read", "update", "delete", "list", "sudo"]
}

# Manage secrets at 'edu-secret'
path "edu-secret/*" {
   capabilities = ["create", "read", "update", "delete", "list"]
}
Policy for training admin
Requirements:
- Create and manage child-namespaces
- Create and manage policies
- Enable and manage secrets engines
training-admin.hcl
# Manage namespaces
path "sys/namespaces/*" {
   capabilities = ["create", "read", "update", "delete", "list", "sudo"]
}

# Manage policies
path "sys/policies/acl/*" {
   capabilities = ["create", "read", "update", "delete", "list", "sudo"]
}

# List policies
path "sys/policies/acl" {
  capabilities = ["list"]
}

# Enable and manage secrets engines
path "sys/mounts/*" {
   capabilities = ["create", "read", "update", "delete", "list"]
}

# List available secrets engines
path "sys/mounts" {
  capabilities = [ "read" ]
}

# Manage secrets at 'team-secret'
path "team-secret/*" {
   capabilities = ["create", "read", "update", "delete", "list"]
}
To target a specific namespace, you can do one of the following:
Option 1: Set VAULT_NAMESPACE so that all subsequent CLI commands will
be executed against that particular namespace.
$ export VAULT_NAMESPACE=<namespace_name>
$ vault policy write <policy_name> <policy_file>
Option 2: Specify the target namespace with -namespace flag
$ vault policy write -namespace=<namespace_name> <policy_name> <policy_file>
Since you have to deploy policies onto education and education/training
namespaces, use -namespace flag instead of environment variable.
Create
edu-adminpolicy undereducationnamespace.$ vault policy write -namespace=education edu-admin edu-admin.hclCreate
training-adminpolicy undereducation/trainingnamespace.$ vault policy write -namespace=education/training training-admin \ training-admin.hcl
Set up entities and groups
(Persona: operations)
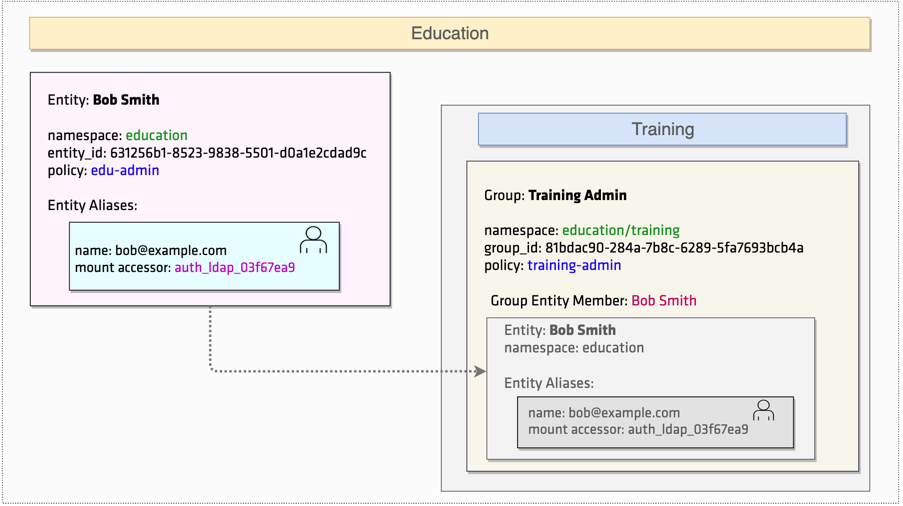
In the education namespace, create an entity, Bob Smith with edu-admin policy attached. Add a userpass user, bob as an entity alias. By default, Bob Smith has no visibility into the education/training namespace since the bob user was defined in the education namespace.
You are going to create an internal group named, Training Admin in the
education/training namespace with training-admin policy attached. To grant
the training-admin policy for bob, add the Bob Smith entity to the
Training Admin group as a member entity.
Enable the
userpassauth method.$ vault auth enable -namespace=education userpassCreate a user
bobunder theeducationnamespace.$ vault write -namespace=education \ auth/userpass/users/bob password="training"Create an entity for
Bob Smithwithedu-adminpolicy attached. Save the generated entity ID in a file namedentity_id.txt.$ vault write -namespace=education -format=json identity/entity name="Bob Smith" \ policies="edu-admin" | jq -r ".data.id" > entity_id.txtGet the mount accessor for userpass auth method and save it in
accessor.txt.$ vault auth list -namespace=education -format=json \ | jq -r '.["userpass/"].accessor' > accessor.txtCreate an entity alias for
Bob Smithto attachbob.$ vault write -namespace=education identity/entity-alias name="bob" \ canonical_id=$(cat entity_id.txt) mount_accessor=$(cat accessor.txt)Create a group, "Training Admin" in
education/trainingnamespace withBob Smithentity as its member.$ vault write -namespace=education/training identity/group \ name="Training Admin" policies="training-admin" \ member_entity_ids=$(cat entity_id.txt)
Test the Bob Smith entity
(Persona: org-admin)
Log in as
bobinto theeducationnamespace.$ vault login -namespace=education -method=userpass \ username="bob" Password (will be hidden):Enter the password
trainingwhen prompted, and pressreturn.Example output:
Key                    Value
---                    -----
token                  hvs.CAESIExs8fiVHOAcwMZH6OPvtrL2a813UyknmPNXTtdVGXCWGiQKImh2cy5XTTlsemtQVm5IYUttcHJiZHRUR3VuRXguZTBiY3U
token_accessor         M4MQ06Zr1pr2NA2g2vSwMNTn.e0bcu
token_duration         768h
token_renewable        true
token_policies         ["default"]
identity_policies      ["edu-admin"]
policies               ["default" "edu-admin"]
token_meta_username    bob
User
bobonly hasdefaultpolicy attached to his token (token_policies); however, he inherited theedu-adminpolicy from theBob Smithentity (identity_policies).Store the generated token value in
BOB_TOKENenvironment variable.Example:
$ export BOB_TOKEN="hvs.CAESIDloyzuzE5SjJwWiZ0inIpKGKSuqusk4nagD4wPXBY0-GiQKImh2cy5xeGFuRzNZS1dYMWhvTW5OWW9UdnJNRnMuZTBiY3U"Test to make sure that
bobcan create a namespace, enable secrets engine, and whatever else that you want to verify against theeducationnamespace.$ export VAULT_NAMESPACE="education"Verify that you can create a new namespace called
web-app.$ VAULT_TOKEN=$BOB_TOKEN vault namespace create web-app Key Value --- ----- custom_metadata map[] id wWIAh path education/web-app/Verify that you can enable key/value v2 secrets engine at
edu-secret.$ VAULT_TOKEN=$BOB_TOKEN vault secrets enable -path=edu-secret kv-v2 Success! Enabled the kv-v2 secrets engine at: edu-secret/Optionally, you can create new policies to test that
bobcan perform the operations as expected.Unset the VAULT_NAMESPACE environment variable.
$ unset VAULT_NAMESPACE
Test the training admin group
(Persona: team-admin)
Look up the token details.
$ VAULT_TOKEN=$BOB_TOKEN vault token lookupExample output:
Key                            Value
---                            -----
accessor                       4DHq7lIlqgElZkqifCyr4kFv.e0bcu
creation_time                  1664329195
creation_ttl                   768h
display_name                   education-auth-userpass-bob
entity_id                      d646746e-a884-8c0a-ae72-1026f0478b32
expire_time                    2022-10-29T18:39:55.055562-07:00
explicit_max_ttl               0s
external_namespace_policies    map[SYIaz:[training-admin]]
id                             hvs.CAESIDloyzuzE5SjJwWiZ0inIpKGKSuqusk4nagD4wPXBY0-GiQKImh2cy5xeGFuRzNZS1dYMWhvTW5OWW9UdnJNRnMuZTBiY3U
identity_policies              [edu-admin]
issue_time                     2022-09-27T18:39:55.055566-07:00
meta                           map[username:bob]
namespace_path                 education/
num_uses                       0
orphan                         true
path                           auth/userpass/login/bob
policies                       [default]
renewable                      true
ttl                            767h45m2s
type                           service
Notice that the
external_namespace_policiesparameter liststraining-adminpolicy. The userbobinherited this policy from theTraining Admingroup defined in theeducation/trainingnamespace althoughbobuser was created in theeducationnamespace.Verify that
bobcan perform the operations permitted by thetraining-adminpolicy.Set the target namespace as an environment variable.
$ export VAULT_NAMESPACE="education/training"Create a new namespace called
vault-training.$ VAULT_TOKEN=$BOB_TOKEN vault namespace create vault-training Key Value --- ----- custom_metadata map[] id MCDB7 path education/training/vault-training/Enable key/value v1 secrets engine at
team-secret.$ VAULT_TOKEN=$BOB_TOKEN vault secrets enable -path=team-secret -version=1 kv Success! Enabled the kv secrets engine at: team-secret/Unset the VAULT_NAMESPACE environment variable.
$ unset VAULT_NAMESPACE
Summary
As this tutorial demonstrated, each namespace you created behaves as an
isolated Vault environment. By default, there is no visibility into other
namespaces regardless of its hierarchical relationship. In order for Bob to
operate in education/training namespace, you can enable an auth method in the
education/training namespace so that he can log in. Or, as demonstrated in
this tutorial, you can use Vault identity to associate entities and groups
defined in different namespaces.
Audit ambient credentials
(Persona: operator)
Many auth and secrets providers, such as AWS, Azure, GCP, and AliCloud, use ambient credentials to authenticate API calls. For example, AWS may:
- Use an access key and secret key configured in Vault.
- If not present, check for environment variables such as
AWS_ACCESS_KEY_IDandAWS_SECRET_ACCESS_KEY. - If not present, load credentials configured in
~/.aws/credentials. - If not present, use instance metadata.
This becomes a problem if these ambient credentials are not intended to be used within a particular namespace.
For example, suppose that your Vault server is running on an AWS EC2 instance. You give the owner of a namespace a particular set of permissions to use for AWS. However, that owner does not configure them. So, Vault falls back to using the credentials available in instance metadata, leading to a privilege escalation.
To handle this:
- Ensure no environment variables are available that could grant a privilege escalation.
- Ensure that any privileges granted through instance metadata (in this example) or other ambient identity info represent a loss of privilege.
- Directly configure the correct credentials in namespaces, and restrict access to that endpoint so credentials can't later be edited to use ambient credentials.
Auth methods and identity groups
For simplicity, this tutorial used the username and password (userpass) auth
method which was enabled in the education namespace as well as the
education/training namespace. However, most likely, your organization uses an
auth method such as ldap or okta and map appropriate policies to those
externally defined groups.
For these types of auth methods, you have two options:
Option 1: Enable the auth method in each namespace the same way you performed in the
set up entities and groups step with userpass.
Option 2: Enable the auth method in the root namespace and use Identity Groups to pull in external groups and map policies in each namespace.
The second option enables an auth method in the root namespace rather than enable in multiple namespaces.
The following steps demonstrate the Option 2 to create the "Training Admin" group as described in this tutorial.
Enable and configure the desired auth method (e.g. LDAP) in the root namespace.
$ vault auth enable ldapConfigure the LDAP auth method.
$ vault write auth/ldap/config \
      url="ldap://ldap.example.com" \
      userdn="ou=Users,dc=example,dc=com" \
      groupdn="ou=Groups,dc=example,dc=com" \
      groupfilter="(&(objectClass=group)(member:1.2.840.113556.1.4.1941:={{.UserDN}}))" \
      groupattr="cn" \
      upndomain="example.com" \
      certificate=@ldap_ca_cert.pem \
      insecure_tls=false \
      starttls=true
For each LDAP group to which you want to map policies, create an external group in the root namespace with an alias whose name exactly matches the LDAP group name.
Get the mount accessor for ldap auth method and save it in
accessor.txt.$ vault auth list -format=json \ | jq -r '.["ldap/"].accessor' > accessor.txtCreate an external group and save the generated group ID in
group_id.txt.$ vault write -format=json identity/group name="training_admin_root" \ type="external" \ | jq -r ".data.id" > group_id.txtCreate a group alias whose name exactly matches the LDAP group name. The following example uses a group name in LDAP is
ops_training.$ vault write -format=json identity/group-alias name="ops_training" \ mount_accessor=$(cat accessor.txt) \ canonical_id=$(cat group_id.txt)In the
education/trainingnamespace, create an internal group which has the external group (training_admin_root) as its member. Attach thetraining-adminpolicy to this internal group. Remember that you created this policy inside of theeducation/trainingnamespace in the write policies step.$ vault write -namespace=education/training identity/group \ name="Training Admin" \ policies="training-admin" \ member_group_ids=$(cat group_id.txt)Assuming the user, "bob_smith" belongs to the LDAP
ops_traininggroup.$ vault login -method=ldap username=bob_smith Password (will be hidden): Success! You are now authenticated. # ...snip...When you check the returned token's properties, the output should display
training-adminas itsexternal_namespace_policies.$ vault token Lookup Key Value --- ----- ...snip... external_namespace_policies map[9dKXw:[training-admin]] id s.10LCp6O5xnweGVm1eyJbp127 identity_policies <nil> ...snip... policies [default] renewable true ttl 767h59m11s type serviceSince you did not assign any policy when you created the
training_admin_rootexternal group, theidentity_policiesshowsnil. Therefore, bob_smith's token only has thedefaultpolicy in the root namespace. However, it hastraining-adminpolicy in the external namespace of ID,9dKXw(in this example, it is the ID ofeducation/trainingnamespace).Set the target namespace as an environment variable for convenience, and
bob_smithis ready to operate against theeducation/trainingnamespace.$ export VAULT_NAMESPACE="education/training"
Policy with namespaces
In this tutorial, you created policies in each namespace (education and
education/training). Therefore, you did not have to specify the target
namespace in the policy paths.
If you want to create policies in the root namespace to control education and
education/training namespaces, prepend the namespace in the paths.
For example:
# Manage policies in the 'education' namespace
path "education/sys/policies/*" {
   capabilities = ["create", "read", "update", "delete", "list", "sudo"]
}

# Manage tokens in the 'education' namespace
path "education/auth/token/*" {
   capabilities = ["create", "read", "update", "delete", "list", "sudo"]
}

# Manage policies under 'education/training' namespace
path "education/training/sys/policies/*" {
   capabilities = ["create", "read", "update", "delete", "list", "sudo"]
}

# Manage tokens in the 'education/training' namespace
path "education/training/auth/token/*" {
   capabilities = ["create", "read", "update", "delete", "list", "sudo"]
}
...
In the write policies step, you deployed the training-admin policy in
the education/training namespace. The path is relative to the working
namespace. So, if you want to create the training-admin policy in the
education namespace instead, the paths starts with training/ rather than
education/training/.
# Manage namespaces
path "training/sys/namespaces/*" {
   capabilities = ["create", "read", "update", "delete", "list", "sudo"]
}

# Manage policies
path "training/sys/policies/*" {
   capabilities = ["create", "read", "update", "delete", "list", "sudo"]
}
...
Administrative namespace
The Vault API includes system backend endpoints, which are mounted under the
sys/ path. Those system backend endpoints let you interact with the internal
features of your Vault. Some of those endpoints are restricted that you can
reach only from the root namespace, or require a token in the root namespace
with elevated permissions.
However, there may be instances where a Vault operator needs to provide access
to a subset of those restricted endpoints without granting access to the full
set of privileged sys/ paths.
Vault 1.15 introduced administrative namespace to let Vault operators grant access to a subset of privileged endpoints by setting a parameter in the Vault configuration file. An administrative namespace is a second namespace you can choose to have access to some otherwise root-only API endpoints. This allows access to these namespaces to be possible outside the root namespace.
Stop the running Vault dev server.
$ pgrep -f vault | xargs killCreate a lab setup script named
lab-setup.shwith the following content.lab-setup.sh
echo "Create a server configuration file"
tee vault-config.hcl -<<EOF
storage "raft" {
   path    = "./vault/node-1"
   node_id = "node1"
}

listener "tcp" {
   address     = "0.0.0.0:8200"
   tls_disable = true
}

ui = true
disable_mlock = true

api_addr = "http://127.0.0.1:8200"
cluster_addr = "https://127.0.0.1:8201"
EOF

# Create the folder structure for raft storage
mkdir -p vault/node-1

echo "\nStart a server"
vault server -config=vault-config.hcl > vault-1.log 2>&1 &

sleep 1

echo "\nSet VAULT_ADDR"
export VAULT_ADDR="http://127.0.0.1:8200"

echo "\nInitialize Vault with 1 shared key and 1 threshold"
vault operator init -key-shares=1 -key-threshold=1 > key.txt

sleep 2

echo "\nUnseal Vault"
vault operator unseal $(grep 'Key 1:' key.txt | awk '{print $NF}')

sleep 1

echo "\nLogin"
vault login $(grep 'Initial Root Token:' key.txt | awk '{print $NF}')

echo "\nCreate 'admin' and 'ns_test' namespaces"
vault namespace create admin
vault namespace create ns_test

echo "\nStop the Vault server"
pgrep -f vault | xargs kill
Make sure that the file is executable.
$ chmod +x lab-setup.shRun the script.
$ ./lab-setup.shThe
lab-setup.shscript:- Created a Vault configuration file (
vaut-config.hcl) which uses integrated storage - Started a Vault server and outputs the system log in a file named
vault-1.log - Initialized the Vault server with 1 key share and the threshold of 1. The
generated unseal key and the initial root token are saved in a file named
key.txt - Unsealed the Vault server
- Login with Vault using the initial root token
- Create
adminandns_testnamespaces - Stop the server
- Created a Vault configuration file (
Update the generated
vault-config.hclfile by adding theadministrative_namespace_pathvalue.vault-config.hcl
storage "raft" {
   path    = "./vault/node-1"
   node_id = "node1"
}

listener "tcp" {
   address     = "0.0.0.0:8200"
   tls_disable = true
}

ui = true
disable_mlock = true

api_addr = "http://127.0.0.1:8200"
cluster_addr = "https://127.0.0.1:8201"

administrative_namespace_path = "admin/"
Re-start the Vault server.
$ vault server -config=vault-config.hcl > vault-1.log 2>&1 &Unseal Vault.
$ vault operator unseal $(grep 'Key 1:' key.txt | awk '{print $NF}')
Verify the new permissions
To verify permissions for the administrative namespace, compare API responses from a restricted endpoint from your new namespace and another namespace without elevated permissions.
Use the monitor command to call the
/sys/monitorendpoint from your test namespace.$ vault monitor -namespace="ns_test" -log-level=debugThe command returns an unsupported path error:
Error starting monitor: Error making API request.
Namespace: ns_test/
URL: GET http://127.0.0.1:8400/v1/sys/monitor?log_format=standard&log_level=debug
Code: 404. Errors:
* 1 error occurred:
* unsupported path
Use the
monitorcommand to call thesys/monitorendpoint from your administrative namespace.$ vault monitor -namespace="admin" -log-level=debugYou should see log data from your Vault instance streaming to the terminal.
Example output:
2023-08-31T11:54:41.846+0200 [DEBUG] replication.index.perf: saved checkpoint: num_dirty=0
2023-08-31T11:54:41.961+0200 [DEBUG] replication.index.local: saved checkpoint: num_dirty=0
Press Ctrl + C to stop the monitor.
Clean up
Unset the
VAULT_TOKEN,VAULT_ADDRandVAULT_NAMESPACEenvironment variables.$ unset VAULT_TOKEN VAULT_ADDR VAULT_NAMESPACEYou can stop the Vault dev by executing the following command.
$ pgrep -f vault | xargs killDelete the generated files.
$ rm vault-1.log key.txt vault-config.hcl lab-setup.shDelete the
./vaultdirectory.$ rm -r vault/