Enable disaster recovery replication
It is inevitable for organizations to have a disaster recovery (DR) strategy to protect their Vault deployment against catastrophic failure of an entire cluster. Vault Enterprise supports multi-datacenter deployment where you can replicate data across datacenters for performance as well as disaster recovery.
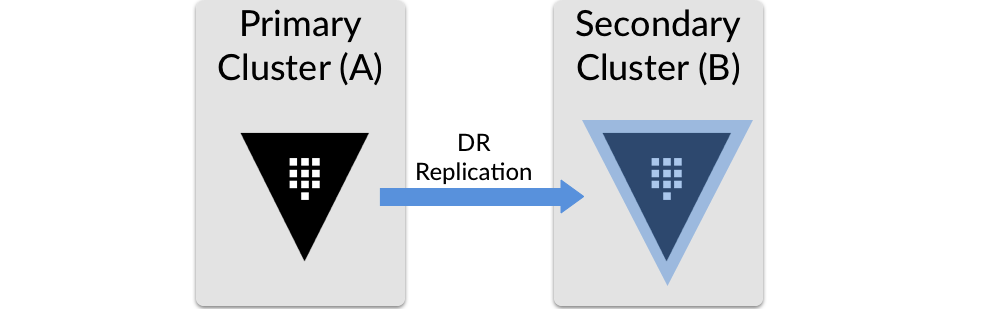
A cluster is the basic unit of Vault Enterprise replication which follows the leader-follower model. A leader cluster is the primary cluster and consider it the system of record. The primary cluster streams data to all secondary (follower) clusters. Primary clusters can stream data to both disaster recovery secondary clusters and performance replication clusters.
In DR replication, secondary clusters do not forward service read or write requests until they are promoted and become a new primary. They essentially act as a warm standby cluster.
In this tutorial you will setup disaster recovery replication and simulate a failure to the primary cluster.
Prerequisites
This intermediate Vault operations tutorial assumes that you have some working knowledge of Vault.
You need two Vault Enterprise clusters: one behaves as the primary cluster, and another becomes the secondary.
Policy requirements
To set up the Vault Enterprise Replication, it requires highly privileged
policies such as root. Some of the API endpoints require the sudo capability.
If you are not using the root token, expand below to see the required policies
to perform the operations described in this tutorial.
# To enable DR primary
path "sys/replication/dr/primary/enable" {
  capabilities = ["create", "update"]
}

# To generate a secondary token required to add a DR secondary
path "sys/replication/dr/primary/secondary-token" {
  capabilities = ["create", "update", "sudo"]
}

# To create ACL policies
path "sys/policies/acl/*" {
  capabilities = ["create", "update", "list"]
}

# Create a token role for batch DR operation token
path "auth/token/roles/*" {
  capabilities = ["create", "update"]
}

# Create a token
path "auth/token/create" {
  capabilities = ["create", "update"]
}

# To demote the primary to secondary
path "sys/replication/dr/primary/demote" {
  capabilities = ["create", "update"]
}

# To enable DR secondary
path "sys/replication/dr/secondary/enable" {
  capabilities = ["create", "update"]
}

# To generate an operation token
path "sys/replication/dr/secondary/generate-operation-token/*" {
  capabilities = ["create", "update"]
}

# To promote the secondary cluster to be primary
path "sys/replication/dr/secondary/promote" {
  capabilities = ["create", "update"]
}

# To update the assigned primary cluster
path "sys/replication/dr/secondary/update-primary" {
  capabilities = ["create", "update"]
}

# If you choose to disable the original primary cluster post-recovery
path "sys/replication/dr/primary/disable" {
  capabilities = ["create", "update"]
}
Workflow
The basic steps to configure a DR replication:

Cluster failure
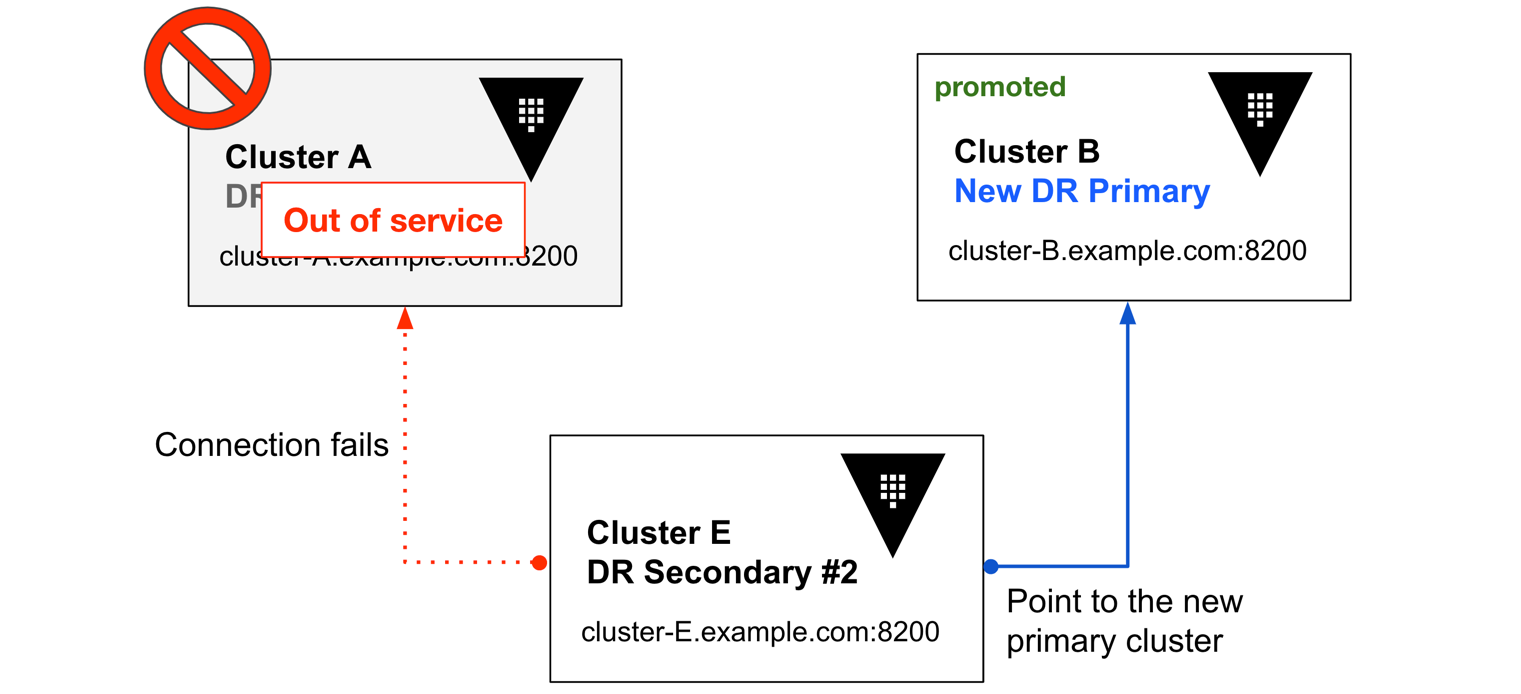
When a catastrophic failure causes the primary cluster (Cluster A) to be inoperable (cannot send requests via API, CLI, or UI), promote the DR secondary (Cluster B) to become the new primary.

Multiple secondaries:
If you have more than one DR secondary clusters, you need to update the remaining secondary clusters to point to the new primary.
Post-recovery of the original DR primary:
If the original primary cluster (Cluster A) becomes operational again after you successfully promoted a DR secondary cluster (Cluster B) to be the new primary, perform one of the following options:
After failing over to Cluster B (Option 1), all the traffic is routed to Cluster B. If your goal is to promote Cluster A back to be the primary, you can reverse the steps to restore the original topology.
Avoid split-brain situation
Keep in mind that only one cluster behaves as a primary. If the cluster failure is temporary and the DR primary (Cluster A) becomes operational shortly after you promoted the DR secondary (Cluster B), it could results in a split-brain situation.
To avoid having two primaries, make sure to perform Option 1 or Option 2 as soon as Cluster A becomes operational again to accept requests.
If you need to promote a DR secondary while the DR primary is still operational, you should demote the DR primary before promoting a DR secondary.
The workflow would be:
Make sure the time window between those operations is as small as possible.
Enable DR primary replication
Enable DR replication on the primary cluster (Cluster A).
$ vault write -f sys/replication/dr/primary/enable
WARNING! The following warnings were returned from Vault:

* This cluster is being enabled as a primary for replication. Vault will be
unavailable for a brief period and will resume service shortly.
Generate a secondary token.
$ vault write sys/replication/dr/primary/secondary-token id="dr-secondary"The output should look similar to:
Key                              Value
---                              -----
wrapping_token:                  eyJhbGciOiJFUzUxMiIsInR5cCI6IkpXVCJ9.eyJhY2Nlc3NvciI6IiIsImFkZHIiOiJodHRwOi8vMTI3LjAuMC4xOjgyMDAiLCJleHAiOjE2NTczMDY2NTgsImlhdCI6MTY1NzMwNDg1OCwianRpIjoiaHZzLnhCVThnZWtpYTBvRnExUVQ3ckpQUUVxcCIsIm5iZiI6MTY1NzMwNDg1MywidHlwZSI6IndyYXBwaW5nIn0.AEC_LzJST00bukWRNAaQvejLeZqeHCcwKZL0izjjywgMOm6d0qGCw9PuMT88b649HaYxPqfc6zL4rZTHIKExQLLhAHZdY_BjEPj-0CzGMuXVWApwPao8uOVaBV2ZCcestYc151xtoTZ63m8Jj8NrZafudWhhAK1oCSx6Omk9J3yrFMsT
wrapping_accessor:               odeEh1YLertHAmr2toQ6zY5O
wrapping_token_ttl:              30m
wrapping_token_creation_time:    2022-07-08 11:27:38.660697 -0700 PDT
wrapping_token_creation_path:    sys/replication/dr/primary/secondary-token
Copy the generated
wrapping_tokenwhich you will need to enable the DR secondary cluster.


Enable DR secondary replication
You must perform the following operations on the DR secondary cluster (Cluster B).
Enable DR replication on the secondary cluster.
$ vault write sys/replication/dr/secondary/enable token="eyJhbGciOiJFUzUxMiIsInR5cCI6Ik..."
Where the token is the wrapping_token obtained from the primary cluster.
Expected output:
WARNING! The following warnings were returned from Vault:

* Vault has successfully found secondary information; it may take a while to
perform setup tasks. Vault will be unavailable until these tasks and initial
sync complete.
DR replication setup is now complete. Log into the secondary cluster using the auth methods configured on the primary cluster.


DR replication setup is now completed, and you do not have to perform any further action.
DR operation token strategy
To promote a DR secondary cluster (Cluster B) to be the new primary, you need a DR operation token. However, the process of generating a DR operation token requires a threshold of unseal keys or recovery keys if configured with auto-unseal. This can be troublesome since a cluster failure is usually caused by unexpected incident and you may not be able to coordinate amongst the key holders to generate the DR operation token in a timely fashion while an immediate failover to the healthy cluster is crucial to your business continuity.
You can create a batch DR operation token which you can use to promote the DR secondary cluster even if the DR primary cluster generated the token. Therefore, this is a strategic operation that the Vault administrator can perform to prepare for unexpected loss of the DR primary.
A DR operation token does not have a TTL; therefore, you should delete it when
you no longer need it using the
/sys/replication/dr/secondary/operation-token/delete
endpoint.
On the DR primary cluster (Cluster A), create a policy named "dr-secondary-promotion" allowing the
updateoperation against thesys/replication/dr/secondary/promotepath. In addition, you can add a policy against thesys/replication/dr/secondary/update-primarypath so that you can use the same DR operation token to update the primary cluster that the secondary cluster points to.$ vault policy write dr-secondary-promotion - <<EOF path "sys/replication/dr/secondary/promote" { capabilities = [ "update" ] } # To update the primary to connect path "sys/replication/dr/secondary/update-primary" { capabilities = [ "update" ] } # Vault 2.0.0+ requires authentication to generate a DR Operation Token path "sys/replication/dr/secondary/generate-operation-token/attempt" { capabilities = ["create", "update", "delete"] } # Only if using integrated storage (raft) as the storage backend # To read the current autopilot status path "sys/storage/raft/autopilot/state" { capabilities = [ "update" , "read"] } EOFVerify to make sure that the policy creation was successful.
$ vault policy list

default
dr-secondary-promotion
root
Create a token role named "failover-handler" with the
dr-secondary-promotionpolicy attached and its type should bebatch. You cannot renew batch tokens, so set therenewableparameter value tofalse. Also, set theorphanparameter totrue.$ vault write auth/token/roles/failover-handler \ allowed_policies=dr-secondary-promotion \ orphan=true \ renewable=false \ token_type=batchCreate a token for role, "failover-handler" with time-to-live (TTL) set to 8 hours.
$ vault token create -role=failover-handler -ttl=8h

WARNING! The following warnings were returned from Vault:

   * Endpoint ignored these unrecognized parameters: [display_name entity_alias
   explicit_max_ttl num_uses period renewable ttl type]

Key                  Value
---                  -----
token                hvb.AAAAAQIL13E0DXo9sq-1vaLJD1_69nfgb-qojEets9EkDTvWs_L_lXVFplXpIpXivr1qlrppxA0tqM4ckYG4dzISLMWqwpqLSQBgfllkd7N-xzsS0Bg7lVO7sb7B2FcWogM64SJshk9VDQajRskb3jZutWW_FLrUhWl5lKfL3j9CxIe5I73NRoYLbtLDEVsGOwQIYgTdNg
token_accessor       n/a
token_duration       8h
token_renewable      false
token_policies       ["default" "dr-secondary-promotion"]
identity_policies    []
policies             ["default" "dr-secondary-promotion"]

Securely store this batch token. If you need to promote the DR secondary cluster, you can use this batch token to perform the necessary operation. The batch token works on both primary and secondary clusters although the primary cluster generated the token.
This eliminates the need for the unseal keys (or recovery keys for clusters with auto-unseal).
Promote DR secondary to primary
This step walks you through the promotion of the secondary cluster (Cluster B) to become the new primary when a catastrophic failure causes the primary cluster (Cluster A) to become inoperable.
Read to the Important Notes section for more relevant information on seals and leader changes and automated DR failover.
Generate a DR operation token
You need a DR operation token to perform this task. If you do not have a batch DR operation token, you must generate a DR operation token before you can promote Cluster B. The process below is similar to Generating a Root Token (via CLI) where the threshold of unseal keys are required (or the recovery keys for clusters with auto-unseal). The unseal keys and recovery keys are the ones generated when you initialized the primary cluster (Cluster A).
Perform this operation on the DR secondary cluster (Cluster B).
Start the DR operation token generation process.
$ vault operator generate-root -dr-token -initThe generated output would look like:
A One-Time-Password has been generated for you and is shown in the OTP field.
You will need this value to decode the resulting root token, so keep it safe.
Nonce         b4738404-0a11-63aa-2cb6-e77dfd96946f
Started       true
Progress      0/3
Complete      false
OTP           EYHAkPQYvvz93e8iI3pg1maQ
OTP Length    24
Distribute the generated nonce to each unseal key holder.
To generate a DR operation token, the following operation must be executed by each unseal key holder.
Example:
$ vault operator generate-root -dr-token \
    -nonce=b4738404-0a11-63aa-2cb6-e77dfd96946f \
    UNSEAL_KEY_OF_ORIGINAL_DR_PRIMARY_1

Nonce            b4738404-0a11-63aa-2cb6-e77dfd96946f
Started          true
Progress         1/3
Complete         false
Once the threshold has been reached, the output displays the encoded DR operation token.
Example:
$ vault operator generate-root -dr-token \
    -nonce=b4738404-0a11-63aa-2cb6-e77dfd96946f \
    UNSEAL_KEY_OF_ORIGINAL_DR_PRIMARY_3

Nonce            b4738404-0a11-63aa-2cb6-e77dfd96946f
Started          true
Progress         3/3
Complete         true
Encoded Token    djw4BR1iaDUFIBxaAwpiCC1YGhQHHDMf
Decode the generated DR operation token (
Encoded Token).Example:
$ vault operator generate-root -dr-token \
     -decode="djw4BR1iaDUFIBxaAwpiCC1YGhQHHDMf" \
     -otp="EYHAkPQYvvz93e8iI3pg1maQ"

hvs.5xsAyncmt1OPEHhMFPMKcYAG


Promote a DR secondary cluster
Use the generated DR operation service token or the batch token to perform this step.
Promote the DR secondary (Cluster B) to become the new primary. The request must
pass the DR operation token using the sys/replication/dr/secondary/promote
endpoint.
$ vault write sys/replication/dr/secondary/promote dr_operation_token=<DR_OPERATION_TOKEN>
Example:
$ vault write sys/replication/dr/secondary/promote \
     dr_operation_token=hvs.5xsAyncmt1OPEHhMFPMKcYAG

WARNING! The following warnings were returned from Vault:

* This cluster is being promoted to a replication primary. Vault will be
unavailable for a brief period and will resume service shortly.


Do not forget to update all Vault clients to point to the new primary (Cluster B) to send requests to resume operations. If your DR replication group has more than one DR secondary, you need to update the remaining DR secondary clusters to point to the new primary (Cluster B).
Update the assigned primary
If you have more than one DR secondary clusters, you need to update the primary cluster that the DR secondaries point to.
On the new primary cluster (Cluster B), generate a secondary activation token similar to what you have done in Enable DR Primary Replication.
$ vault write sys/replication/dr/primary/secondary-token id=dr-secondaryExample output:
Key                              Value
---                              -----
wrapping_token:                  eyJhbGciOiJFUzUxMiIsInR5cCI6IkpXVCJ9.eyJhY2Nlc3NvciI6IiIsImFkZHIiOiJodHRwOi8vMTI3LjAuMC4xOjgzMDAiLCJleHAiOjE2NTczMjgxODAsImlhdCI6MTY1NzMyNjM4MCwianRpIjoiaHZzLk5lRFNBdzVyNG1BR3VlWjJDemN6VUFSdCIsIm5iZiI6MTY1NzMyNjM3NSwidHlwZSI6IndyYXBwaW5nIn0.AUDkvXgLusBk9wqrMz6BA6W8B1OJ8-TUDXSrBd0JsbZEy7tprKrP3lREB0S2vqDyeFJFhVUA_Uv2SlbRWR-Z6oIDALWyNwe8GRE-bZKuheTNPO2s6_cKgB7EwFp5C9bUYmj7ru2B4oyYE3RVk_DbYG7KhD-2k1fq-g68333OUovTccuM
wrapping_accessor:               uZ2ODJ0zBXZDMgXs34a1AXT1
wrapping_token_ttl:              30m
wrapping_token_creation_time:    2022-07-08 17:26:20.651075 -0700 PDT
wrapping_token_creation_path:    sys/replication/dr/primary/secondary-token
Copy the generated
wrapping_tokenvalue.On the DR secondary cluster (Cluster E) you wish to update, invoke the
sys/replication/dr/secondary/update-primaryendpoint where<SECONDARY_ACTIVATION_TOKEN>is thewrapping_tokenyou copied from Cluster B.$ vault write sys/replication/dr/secondary/update-primary \ dr_operation_token=<DR_OPERATION_TOKEN> \ token=<SECONDARY_ACTIVATION_TOKEN>Example:
$ vault write sys/replication/dr/secondary/update-primary \
    dr_operation_token="hvb.AAAAAQIL13E0DXo9sq-1vaLJD1_69nfgb-qojEets9EkDTvWs_L_lXVFplXpIpXivr1qlrppxA0tqM4ckYG4dzISLMWqwpqLSQBgfllkd7N-xzsS0Bg7lVO7sb7B2FcWogM64SJshk9VDQajRskb3jZutWW_FLrUhWl5lKfL3j9CxIe5I73NRoYLbtLDEVsGOwQIYgTdNg" \
    token="eyJhbGciOiJFUzUxMiIsInR5cCI6IkpXVCJ9.eyJhY2Nlc3NvciI6IiIsImFkZHIiOiJodHRwOi8vMTI3LjAuMC4xOjgzMDAiLCJleHAiOjE2NTczMjgxODAsImlhdCI6MTY1NzMyNjM4MCwianRpIjoiaHZzLk5lRFNBdzVyNG1BR3VlWjJDemN6VUFSdCIsIm5iZiI6MTY1NzMyNjM3NSwidHlwZSI6IndyYXBwaW5nIn0.AUDkvXgLusBk9wqrMz6BA6W8B1OJ8-TUDXSrBd0JsbZEy7tprKrP3lREB0S2vqDyeFJFhVUA_Uv2SlbRWR-Z6oIDALWyNwe8GRE-bZKuheTNPO2s6_cKgB7EwFp5C9bUYmj7ru2B4oyYE3RVk_DbYG7KhD-2k1fq-g68333OUovTccuM"

WARNING! The following warnings were returned from Vault:

  * Vault has successfully found secondary information; it may take a while to
  perform setup tasks. Vault will be unavailable until these tasks and initial
  sync complete.


Option 1 - Demote DR primary to secondary
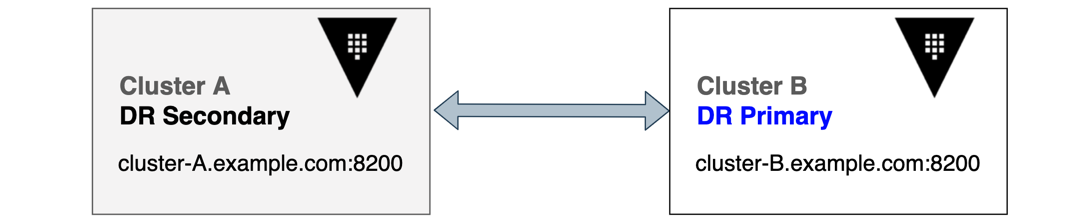
If the original DR primary cluster (Cluster A) becomes operational again after Cluster B was promoted, you can demote Cluster A to become a secondary.
Remember that there is only one primary cluster in the DR replication. At this point, Cluster A's data is outdated due to its outage. Demoting it to be a DR secondary will properly replicate data from the current DR primary cluster (Cluster B).
Cluster A still thinks it is a DR primary that you should be able to log in with root token. Execute the following command to demote Cluster A to a secondary.
$ vault write -f sys/replication/dr/primary/demoteCluster A does not attempt to connect to a primary, but it maintains the knowledge of its cluster ID and can reconnect to the same DR replication set without wiping local storage. Perform the following steps to complete the update-primary operation.
On the new primary cluster (Cluster B), generate a secondary activation token similar to what you have done in Enable DR Primary Replication.
$ vault write sys/replication/dr/primary/secondary-token id=new-secondaryCopy the generated
wrapping_tokenwhich you will need when you invoke thesys/replication/dr/secondary/update-primaryendpoint later.On Cluster A, generate the DR operation token similar to Promote DR Secondary to Primary.
Example:
$ vault operator generate-root -dr-token -init

A One-Time-Password has been generated for you and is shown in the OTP field.
You will need this value to decode the resulting root token, so keep it safe.
Nonce 829b8057-a486-cd02-6ce0-0a2c5d5ab0ce
Started true
...
Distribute the generated nonce to each unseal key holder so that they can execute the
generate-rootcommand with their unseal key.$ vault operator generate-root -dr-token \ -nonce=829b8057-a486-cd02-6ce0-0a2c5d5ab0ce \ UNSEAL_KEY_OF_ORIGINAL_DR_PRIMARY_HEREOnce the threshold has been reached, the output displays the encoded DR operation token which you need to decode first.
$ vault operator generate-root -dr-token \
       -decode=JGsAeTApUAQsIGJTAxAIYgobcRo9TCY3IwA \
       -otp=WEaATFbgIi01meg1AUGNNySFle

 s.a8do2ceIRbnuoSKN6Ts5uqOe
Finally, invoke the
sys/replication/dr/secondary/update-primaryendpoint.$ vault write sys/replication/dr/secondary/update-primary \ dr_operation_token=s.a8do2ceIRbnuoSKN6Ts5uqOe \ token="eyJhbGciOiJFUzUxMiIsImt..."
While token value is the wrapping_token you copied from Cluster B.


Option 2 - Disable the original DR primary
Once the DR secondary cluster (Cluster B) becomes the new primary, you may want to disable the DR replication on the original primary (Cluster A) when it becomes operational again.
Remember that there is only one primary cluster available in a DR replication group. Cluster A's data is outdated due to its outage.
Execute the following command to disable DR replication.
$ vault write -f sys/replication/dr/primary/disable

WARNING! The following warnings were returned from Vault:

* This cluster is having replication disabled. Vault will be unavailable for
  a brief period and will resume service shortly.
Any secondaries will no longer be able to connect.


DR failback
Currently, Cluster B is the active primary.
Once Cluster A is back to a healthy state, you may wish to revert it to being the primary. To achieve this, you must promote Cluster A back to be the DR primary (perform Promote DR Secondary to Primary on Cluster A) and then demote Cluster B to DR secondary (refer to Option 1).
You need a DR operation token to perform this task. If you do not have a batch DR operation token, you must generate a DR operation token first.
On Cluster A, start the DR operation token generation process.
$ vault operator generate-root -dr-token -initThe generated output would look like:
A One-Time-Password has been generated for you and is shown in the OTP field.
You will need this value to decode the resulting root token, so keep it safe.
Nonce         b4738404-0a11-63aa-2cb6-e77dfd96946f
Started       true
Progress      0/3
Complete      false
OTP           EYHAkPQYvvz93e8iI3pg1maQ
OTP Length    24
Distribute the generated nonce to each unseal key holder.
To generate a DR operation token, the following operation must be executed by each unseal key holder.
Example:
$ vault operator generate-root -dr-token \
       -nonce=b4738404-0a11-63aa-2cb6-e77dfd96946f \
       $PRIMARY_UNSEAL_KEY_1
Once the threshold has been reached, the output displays the encoded DR operation token.
$ vault operator generate-root -dr-token \
     -nonce=b4738404-0a11-63aa-2cb6-e77dfd96946f \
     $PRIMARY_UNSEAL_KEY_3

Nonce            b4738404-0a11-63aa-2cb6-e77dfd96946f
Started          true
Progress         3/3
Complete         true
Encoded Token    djw4BR1iaDUFIBxaAwpiCC1YGhQHHDMf
Decode the generated DR operation token (
Encoded Token).Example:
$ vault operator generate-root -dr-token \
     -decode="djw4BR1iaDUFIBxaAwpiCC1YGhQHHDMf" \
     -otp="EYHAkPQYvvz93e8iI3pg1maQ"

s.3epDv29lsVfc0oZadkjs6qRN
Execute the following command on Cluster A to promote it back to be the DR primary using the DR Operation Token you generated when you demoted Cluster A to DR secondary in Option 1.
Example:
$ vault write sys/replication/dr/secondary/promote \
     dr_operation_token="s.3epDv29lsVfc0oZadkjs6qRN"

WARNING! The following warnings were returned from Vault:

* This cluster is being promoted to a replication primary. Vault will be
unavailable for a brief period and will resume service shortly.
Execute the following command on Cluster B to demote it to a secondary.
$ vault write -f sys/replication/dr/primary/demote

WARNING! The following warnings were returned from Vault:

* This cluster is being demoted to a replication secondary. Vault will be
unavailable for a brief period and will resume service shortly.
Now, generate a secondary activation token similar to what you have done in Enable DR Primary Replication.
$ vault write sys/replication/dr/primary/secondary-token id=secondaryCopy the generated
wrapping_tokenwhich you will need when you invoke thesys/replication/dr/secondary/update-primaryendpoint later.On Cluster B, invoke the
sys/replication/dr/secondary/update-primaryendpoint using thewrapping_tokenyou just generated on Cluster A, and the DR Operation Token that you generated in Promote DR Secondary to Primary.If you don't have the DR Operation Token any more, you can create a new one by following the steps described in Promote DR Secondary to Primary.
Example:
$ vault write sys/replication/dr/secondary/update-primary \
     dr_operation_token=s.YxmD095A8fKRGNGNiteJnEiE \
     token="eyJhbGciOiJFUzUxMiIsImt..."
Important notes
Seal and leader changes
A change in leader may occur when performing a promote or demote on a cluster.
Depending on the Seal type used, difference between cluster in their auto-unseal configuration may result in an additional unseal step being required after promote; this is typically evident by your Vault standby nodes sealing and the Vault system log including the message:
[WARN] core: encryption keys have changed out from underneath us (possibly due to replication enabling), must be unsealed again
Automated DR failover
Vault does not support an automatic failover/promotion of a DR secondary cluster, and this is a deliberate choice due to the difficulty in accurately evaluating why a failover should or shouldn't happen. For example, imagine a DR secondary loses its connection to the primary. Is it because the primary is down, or is it because networking between the two has failed?
If the DR secondary promotes itself and clients start connecting to it, you now have two active clusters whose data sets will immediately start diverging. There's no way to understand simply from one perspective or the other which one of them is right.
Vault's API supports programmatically performing various replication operations which allows the customer to write their own logic about automating some of these operations based on experience within their own environments. You can review the available replication APIs at the following links:
Additional discussion
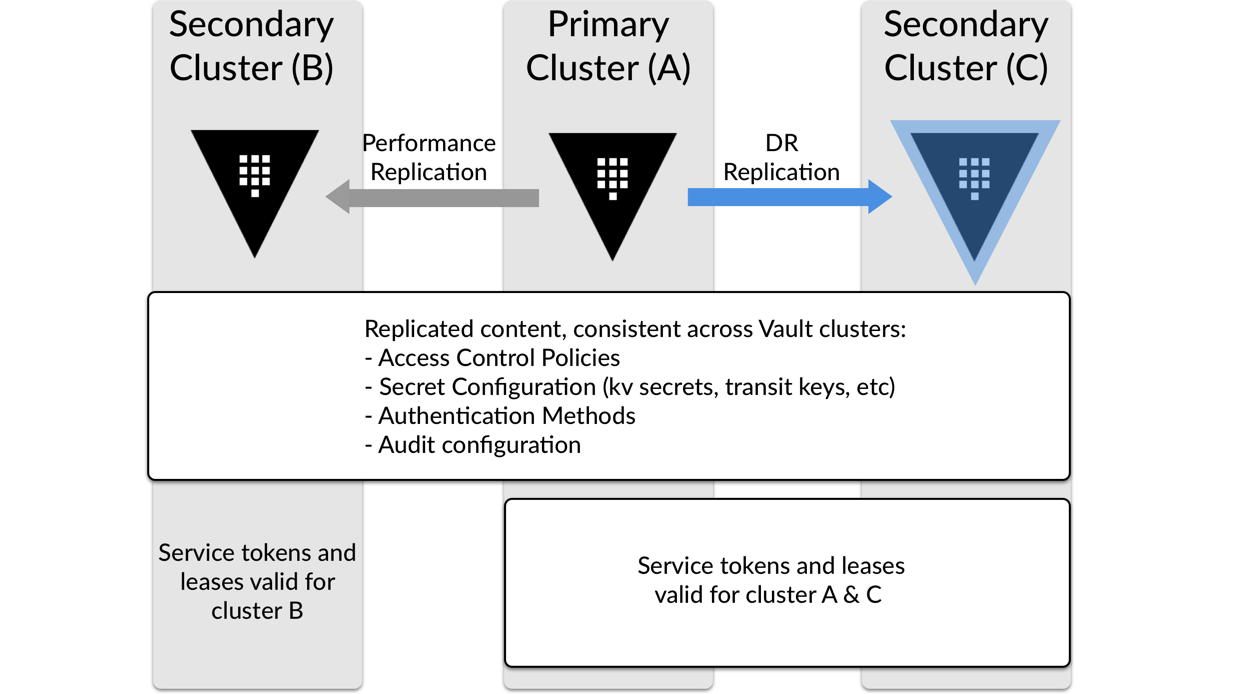
This tutorial focused on the DR replication workflow. In production, you may deploy additional Vault clusters across multiple datacenters and configure both DR replication and performance replication (PR).
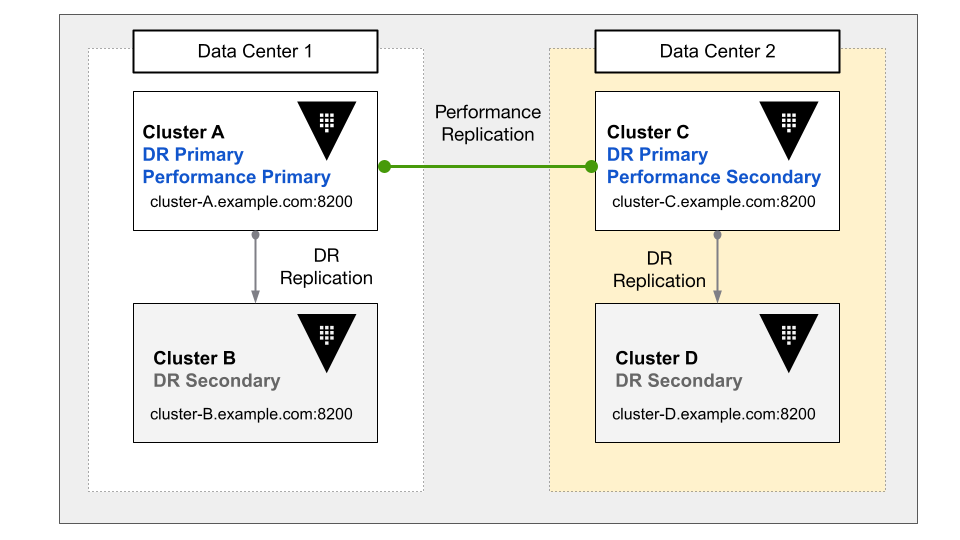
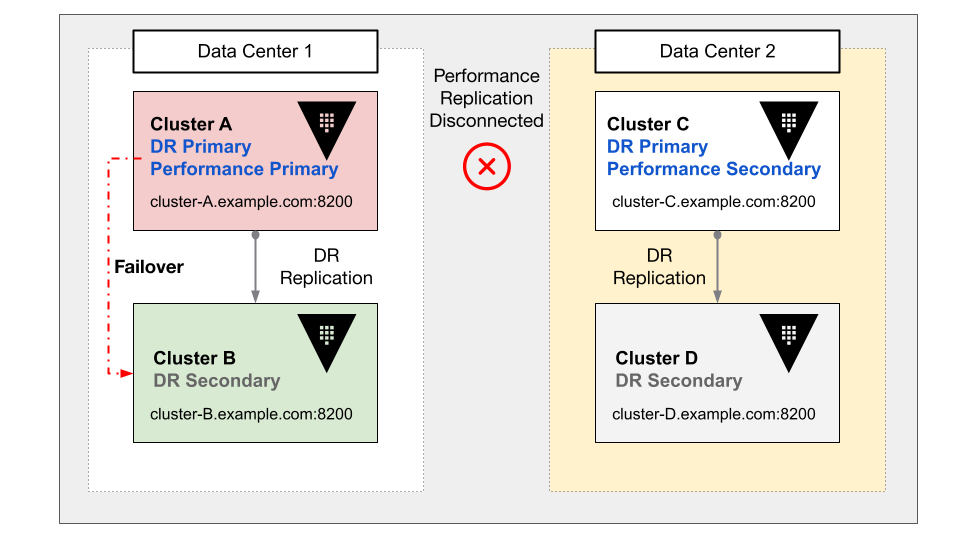
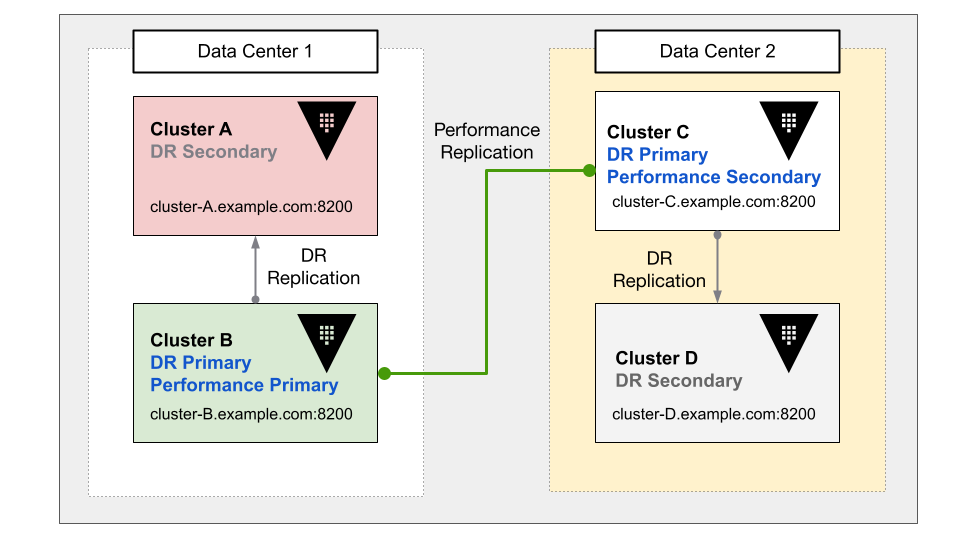
When you have both DR and PR replications, the failure of Cluster A implies the disconnection of performance replication as well.
Failover Cluster A to Cluster B.
Once the failover completes, you can re-enable performance replication between
Cluster B (new primary) and the Cluster C (secondary) by calling the
update-primary
on Cluster C.
You can learn more about performance replication in the Setting up performance replication tutorial.