Manage tenants with Vault namespaces
Organizations using HCP Vault Dedicated often need to provide isolated Vault environments to multiple teams, departments, or applications. Namespaces enable you to implement a "Vault-as-a-Service" model where each tenant manages their own secrets engines, authentication methods, and policies without the ability to impact other tenants' resources.
In this tutorial, you will:
- Create isolated namespaces for two separate tenants
- Configure authentication and policies for namespace-level administrators
- Understand when to use shared vs. dedicated namespace architectures
- Validate isolation between namespaces
By the end, you'll understand how namespace design impacts your organization's secret management strategy and security posture.
Challenge
As organizations scale their use of secrets management services, centralized management of all secrets, policies, and authentication methods becomes a bottleneck. Different teams have different requirements:
- Development teams need rapid secret creation without waiting for security approvals
- Security teams need isolation to prevent accidental cross-team access
- Compliance requires audit trails showing which team accessed which secrets
A flat structure, where all resources exist together, creates several risks:
- Accidental deletion of a secrets engine impacts all teams
- Policy management becomes complex with hundreds of path-specific rules
- No clear ownership boundaries for secret lifecycle management
Solution
Vault namespaces provide logical isolation within a single Vault cluster. Each namespace functions as a "Vault within a Vault" with:
- Dedicated mount points: Each tenant manages their own secrets engines and auth methods
- Scoped policies: Policies apply only within their namespace, preventing cross-tenant access
- Separate login paths: Tenants authenticate to their specific namespace
- Independent administration: Namespace admins cannot impact other namespaces
This tutorial demonstrates two common namespace patterns:
Namespace authentication (
namespaceA,namespaceB): Complete isolation for separate business units.Centralized authentication: Managing all users in the admin namespace with different types of namespace-specific access policies.
You will configure both patterns to understand their trade-offs.
Prerequisites
- An HCP account
- Vault CLI installed
- jq installed
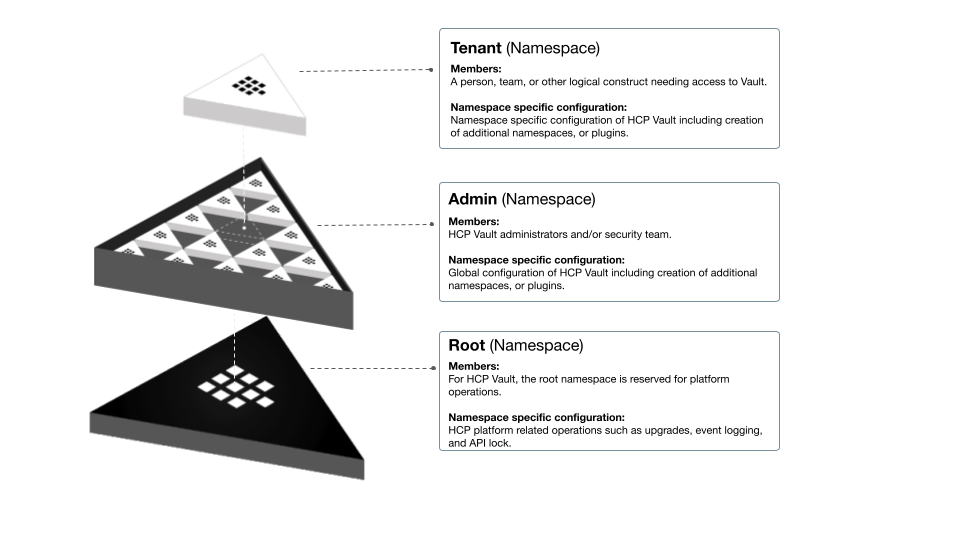
Understand HCP Vault namespace architecture
Before creating namespaces, it's important to understand how they fit into Vault's structure and the impact on your identity and access management strategy.
The admin namespace
HCP Vault clusters start with the admin namespace, created automatically during deployment. This is your top-level namespace where initial configuration happens.
All operations in HCP Vault must specify a namespace through:
VAULT_NAMESPACEenvironment variable-namespaceCLI argumentX-Vault-NamespaceAPI header- Terraform's
vault_namespaceresource
Your HCP Vault cluster will start with the token auth method enabled. This allows you to log in and perform the initial configuration of HCP Vault.
A good security and management practice is to limit the use of the admin token. Use the admin token to perform the initial configuration of your HCP Vault cluster, and configure your preferred auth method(s) for regular use. You can select the auth methods based on who (person) or what (machine) will access your HCP Vault cluster. It is not uncommon to have multiple auth methods enabled.
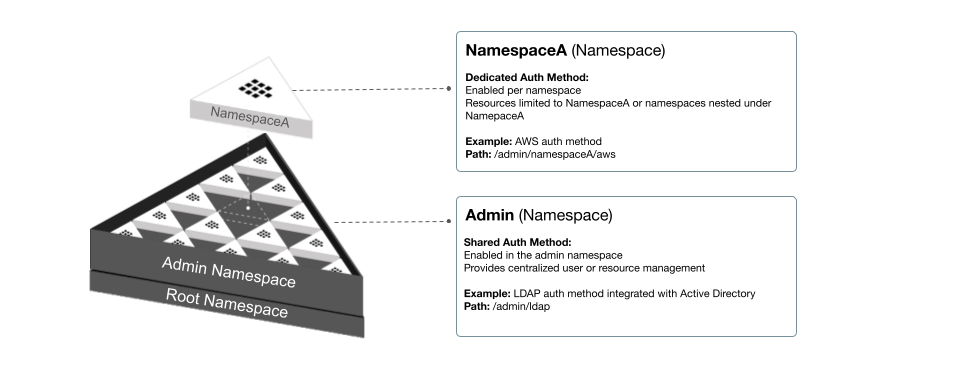
Vault mount points
Everything in Vault is path-based. Writing policies defines the permitted operations based on the specific path structure and namespace you enable the plugin on.
You can design your plugin structure based on your organizational needs and security requirements. For example, you can have:
Dedicated: Auth methods and secrets engines enabled for a specific tenant in a dedicated namespace. For example, the team that manages app-1 can utilize their own AppRole and/or KV mounts without the ability to impact other teams' plugins.
Shared: Auth methods and secrets engines enabled for multiple tenants in a single namespace. For example, you may choose to enable organization level resources such as the Kubernetes auth method or the LDAP secrets engine used by multiple teams. You manage these plugins in a common namespace and write policies to manage access to the other resources.
Namespace design considerations
Sharing plugins between teams has benefits and risks. It is up to you to find the right balance of granularity between the various plugins needed and the roles accessing the plugins. Below are example use cases with their benefits and risks.
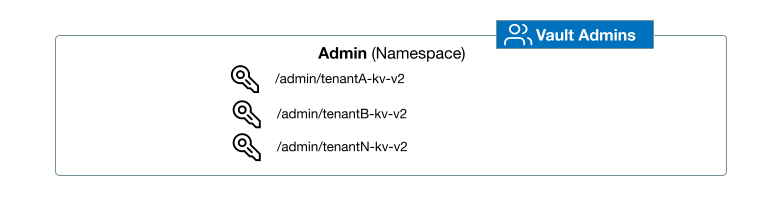
Single shared namespace with sub-paths
Benefit: Reduces management overhead from managing multiple namespaces.
Risk: A mount is accidentally deleted causing all users of that secret engine to be impacted.
Namespace per tenant
Benefit: Provide sub-paths for different teams or applications, and limit the blast-radius of an errant change to a single mount.
Risk: Unique mounts per namespace becomes inefficient from a management perspective at scale.
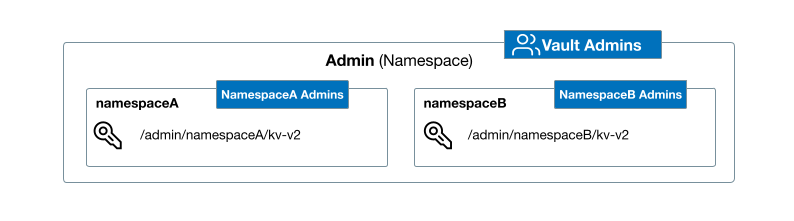
Many organizations adopt a hybrid approach where they have a common namespace for shared plugins, and separate namespaces for team-specific plugins.
Set up the lab
If you do not have access to an HCP Vault cluster, visit the Create a Vault Cluster on HCP tutorial.
Launch the HCP Portal and login.
Click Vault in the left navigation pane.
In the Vault clusters pane, click vault-cluster.
Under Cluster URLs, click Public Cluster URL.
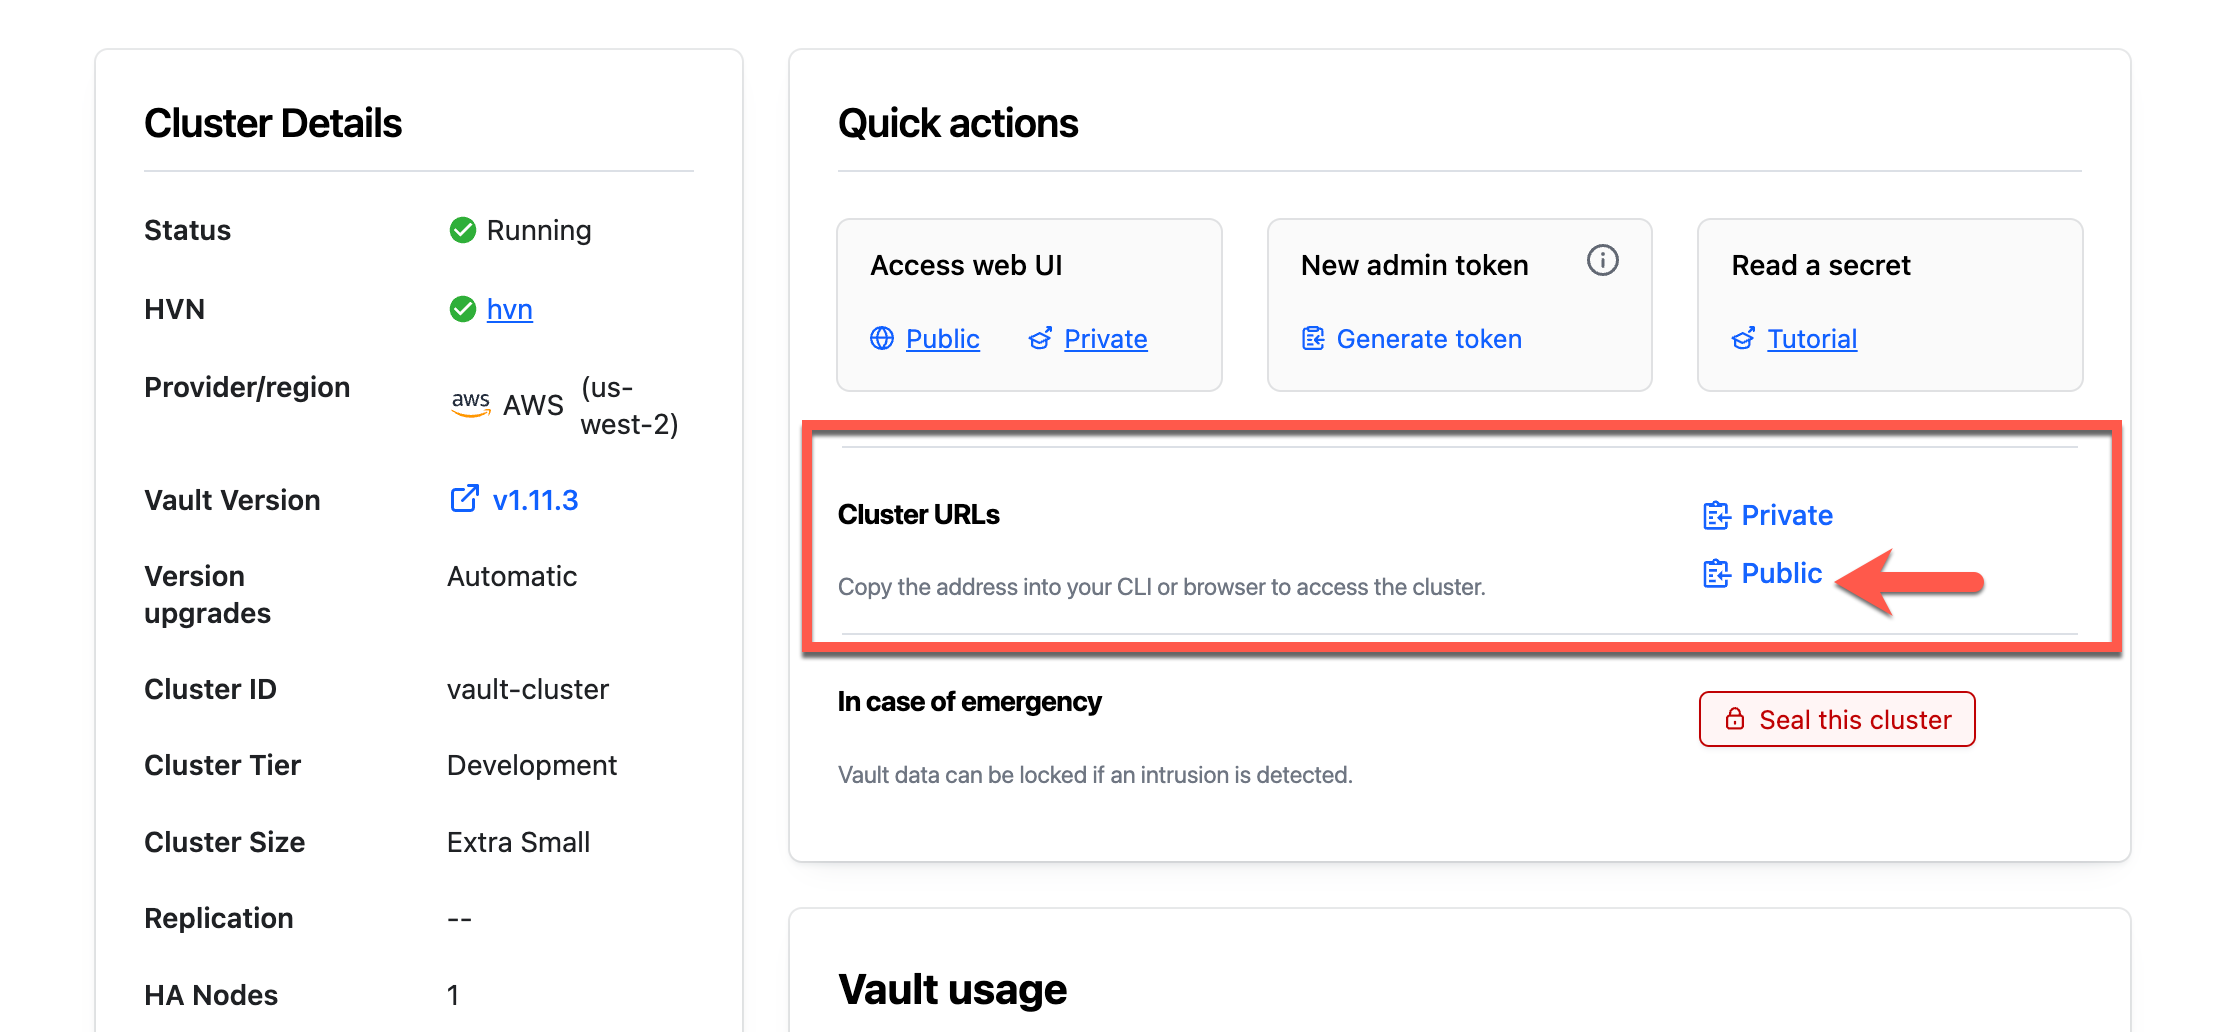
In a terminal, set the
VAULT_ADDRenvironment variable to the copied address.$ export VAULT_ADDR=<Public_Cluster_URL>Return to the Overview page and click Generate token.
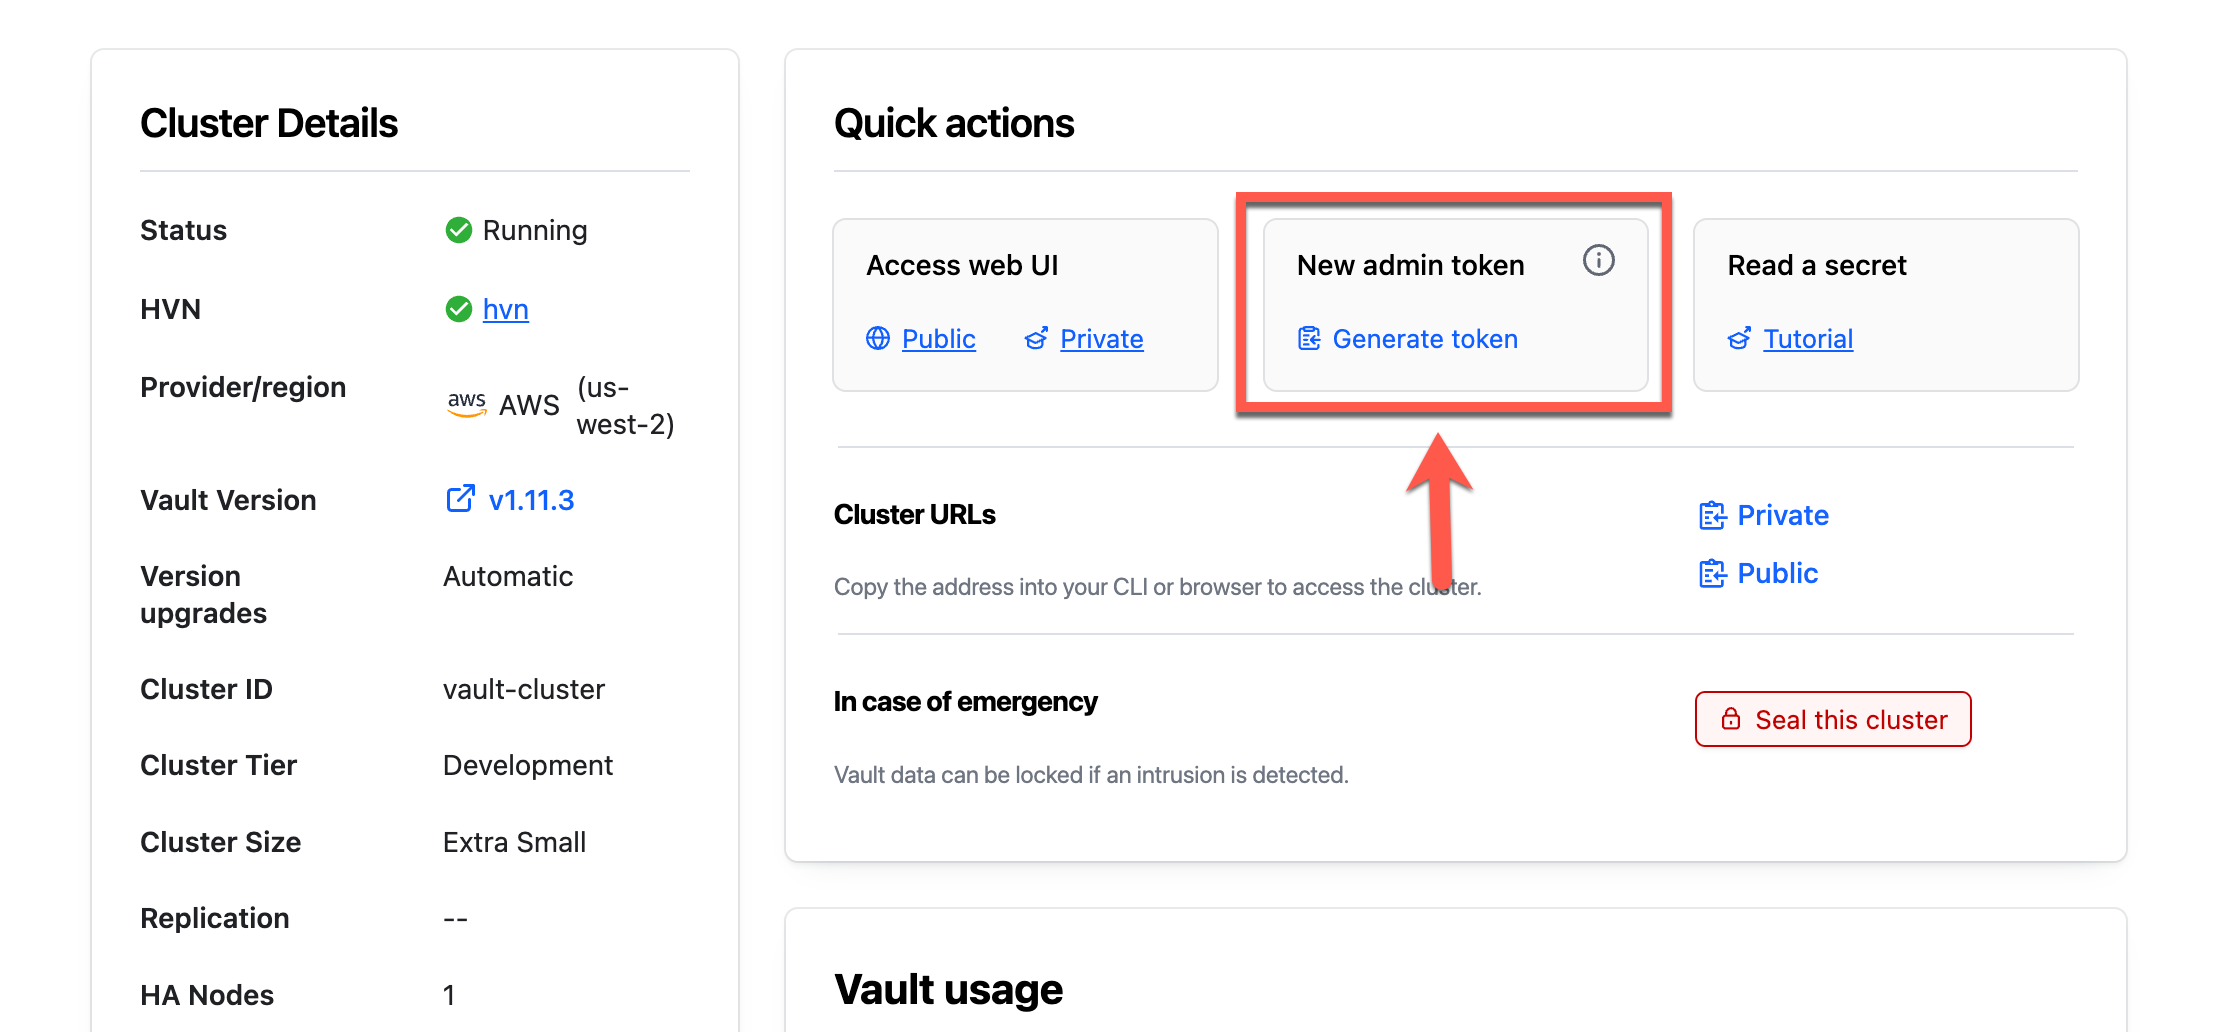
Within a few moments, a new token will be generated.
Copy the Admin Token.
Return to the terminal and set the
VAULT_TOKENenvironment variable.$ export VAULT_TOKEN=<token>Set the
VAULT_NAMESPACEenvironment variable toadmin.$ export VAULT_NAMESPACE=adminThe
adminnamespace is your top-level namespace automatically created by HCP Vault.
The HCP Vault cluster is ready.
Personas
This tutorial involves two personas:
Vault administrator (super-user): Responsible for managing the cluster & admin namespace. Uses the HCP Vault generated admin token to perform initial setup of namespaces, auth methods, and policies.
Tenant administrator: Responsible for managing the tenant namespace (for example,
/admin/namespaceA). Uses an auth method configured by the Vault administrator to log in and manage resources within their namespace.
In a production environment Vault administrators typically use an enterprise single-sign on service with the OIDC auth method. Namespace administrators may configure AppRole, AWS auth, or Kubernetes auth to support their workloads.
This tutorial uses userpass for simplicity.
Create namespaces
(Persona: Vault administrator)
When you create an HCP Vault cluster, you start in the admin namespace. You can create nested namespaces based on your Vault design and organizational needs. In this section you will create two namespaces - namespaceA and namespaceB.
Create
namespaceA.$ vault namespace create namespaceA Key Value --- ----- custom_metadata map[] id ZRaNh path admin/namespaceA/Notice the path is
admin/namespaceA. This is because HCP Vault starts with the admin namespace.Create
namespaceB.$ vault namespace create namespaceB Key Value --- ----- custom_metadata map[] id 5HR2i path admin/namespaceB/List all available namespaces.
$ vault namespace list

Keys
----
namespaceA/
namespaceB/
The results display the two namespaces. The Vault CLI uses the environment variable
VAULT_NAMESPACEto determine the namespace context for the command.
Enable auth methods
(Persona: Vault administrator)
With namespaces created, you need a way for namespace administrators to authenticate. You can enable auth methods in the admin namespace to centrally manage authentication, or in each namespace to delegate control to the namespace administrators.
You will now enable the userpass auth method in the admin namespace, and
namespaceA.
Enable the
userpassauth method in the admin namespace.$ vault auth enable userpass Success! Enabled userpass auth method at: userpass/This auth method illustrates using a centrally managed auth method. Your Vault design may require a specific team to manage authentication, or manage authentication from a single namespace.
Use the
-namespaceargument to enable theuserpassauth method in namespaceA.$ vault auth enable -namespace=admin/namespaceA userpass Success! Enabled userpass auth method at: userpass/List the enabled auth methods.
$ vault auth list && echo "namespaceA" && vault auth list -namespace=admin/namespaceA

Path         Type        Accessor                  Description                Version
----         ----        --------                  -----------                -------
token/       ns_token    auth_ns_token_9cc4b865    token based credentials    n/a
userpass/    userpass    auth_userpass_43e02f4f    n/a                        n/a
namespaceA
Path         Type        Accessor                  Description                Version
----         ----        --------                  -----------                -------
token/       ns_token    auth_ns_token_013c68cc    token based credentials    n/a
userpass/    userpass    auth_userpass_6f2263e3    n/a                        n/a
When you enable an auth method in a child namespace, you can delegate control to namespace administrators without impacting centrally managed auth methods. This also shows clear separation of duties between the Vault administrator and namespace administrator, which may be helpful for compliance requirements.
Create ACL policies
(Persona: Vault administrator)
Now that you have created namespaces, you need to create policies to define what each entity, such as a user or application, can access.
List and review the policies in the admin namespace.
$ vault policy list

default
hcp-root
The
hcp-rootpolicy is available in the admin namespace. This policy provides full access to the admin namespace and any additional namespaces, secret engines, and auth methods you create in HCP Vault. You should limit the use of thehcp-rootpolicy. Once you have performed some initial configuration, you should create a more limited policy that grants explicit access to the resources needed by your Vault administrator to manage the cluster.The
defaultpolicy is, by default, attached to all authenticated resources. This policy provides basic access to allow authenticated resources to perform token lookups, or access to the cubbyhole secrets engine.List and review the policies in the namespaceA namespace.
$ vault policy list -namespace=admin/namespaceA

default
Each namespace you create also has a
defaultpolicy, specific to that namespace.Create a policy file that allows full access to all paths.
$ tee vault-admin-policy.hcl <<EOF
# Admin policy
path "*" {
        capabilities = ["sudo","read","create","update","delete","list","patch"]
}
EOF
The path uses
"*"- meaning an entity with this policy has access to any path in the namespace, and any nested namespaces.Create a policy named
vault-admin-policyin the admin namespace.$ vault policy write vault-admin-policy vault-admin-policy.hcl Success! Uploaded policy: vault-admin-policyCreate a policy named
vault-admina-policyin the namespaceA namespace.$ vault policy write -namespace=admin/namespaceA vault-admina-policy vault-admin-policy.hcl Success! Uploaded policy: vault-admina-policyList the policies.
$ vault policy list && echo "namespaceA" && vault policy list -namespace=admin/namespaceA

default
hcp-root
vault-admin-policy
namespaceA
default
vault-admina-policy
The admin policy, allowing access to all paths, is now available in both the admin and namespaceA namespaces.
Manage centralized authentication
(Persona: Vault administrator)
In this section, you will replicate centrally managing authentication from a top level namespace. You will create a user in the admin namespace and test access based on the policy you assign to the entity.
Create a user named
vault-adminin the admin namespace and assign thevault-admin-policypolicy.$ vault write auth/userpass/users/vault-admin \ password=be3xcellent! \ policies=vault-admin-policy \ token_ttl=8hReturn to the HCP Portal and click the Launch web UI button.

Click the Method pulldown menu and select Userpass.
Enter
vault-adminin the Username field,be3xcellent!in the Password field, and click Sign In.You are now signed into the Vault UI and placed in admin.
Click Access.
Click Namespaces.
You have access to both namespaceA and namespaceB because they are under the scope of the admin namespace, and the policy provides access to all paths (
*).Click the user icon in the top right of the page and select Log out.
Manage namespace-level authentication
(Persona: Vault administrator and namespace administrator)
In the previous section, you created a user in the admin namespace and assigned a policy that provided access to all nested namespaces. In this section, you will create a user in the namespaceA namespace and learn how the namespace context impacts policy assignment and access.
Switch back to the terminal, create a user named
vault-adminain the namespaceA namespace and assign thevault-admin-policypolicy.$ vault write -namespace=admin/namespaceA auth/userpass/users/vault-admina \ password=be3xcellent! \ policies=vault-admin-policyExample output:
Success! Data written to: auth/userpass/users/vault-adminaRead the user details to confirm the user has the policy applied.
$ vault read -namespace=admin/namespaceA auth/userpass/users/vault-admina

Key                        Value
---                        -----
policies                   [vault-admin-policy]
token_bound_cidrs          []
token_explicit_max_ttl     0s
token_max_ttl              0s
token_no_default_policy    false
token_num_uses             0
token_period               0s
token_policies             [vault-admin-policy]
token_ttl                  0s
token_type                 default
Return to the Vault web UI.
If it is not already selected, click the Method pulldown menu and select Userpass.
In the Namespace textbox enter
/namespaceA.Enter
vault-adminain the Username field,be3xcellent!in the Password field, and click Sign In.You are now signed into the Vault UI and placed in namespaceA.
Click Access.
You receive a Not authorized message because the policy you assigned exists in the admin namespace, but the user exists in the namespaceA namespace.
Policies must exist in the same namespace as the auth method for the authenticated resource. You cannot assign a policy from the admin namespace to a resource in namespaceA.
Click the user icon in the top right of the page and select Log out.
Update the vault-admina user with the policy you created in the namespaceA namespace.
$ vault write -namespace=admin/namespaceA auth/userpass/users/vault-admina \
   password=be3xcellent! \
   policies=vault-admina-policy
Return the Vault UI and enter
vault-adminain the Username field,be3xcellent!in the Password field, and click Sign In.Click Access.
Click Namespaces.
You now have the ability to create namespaces under
/admin/namespaceAbecause the vault-admina-policy policy exists in the same namespace as the auth method (userpass) and authenticated entity (vault-admina).Sign out of the Vault UI.
Manage centralized authentication for nested namespaces
(Persona: Vault administrator and namespace administrator)
So far you have created and configured the admin and namespaceA namespaces with an auth method, user, and policy. You have logged into each namespace to demonstrate how a policy works relative to the namespace where you created the policy.
In the admin namespace, using a path of "*" in the policy, you were able to
access all other namespaces. When you created a policy in the namespaceA
namespace using the same policy file, you were able to access that
namespace and not the admin namespace or namespaceB namespace.
Now you will simulate creating an admin user for namespaceB, but you will create the user in the admin namespace and see how this changes how you have to write policies.
Create a policy file that allows full access to all paths in namespaceB.
$ tee vault-adminb-policy.hcl <<EOF
# Admin policy
path "namespaceB/*" {
        capabilities = ["sudo","read","create","update","delete","list","patch"]
}
EOF
Because you are creating the vault-adminb user in the admin namespace, you need to specify the specific mount point for the namespaceB plugins. If you were to reuse the existing vault-admin-policy.hcl file, the user would have access to all namespaces instead of just namespaceB.
Centralizing all users in the admin namespace is one model that an organization may choose to adopt. Centralizing authentication consolidates auth methods to a single namespace and reduces the number of auth methods enabled across all namespaces. A trade off of this model is that it will increase the number of policies you need to write. You need to write policies with specific paths to limit access to the appropriate namespaces and resources.
Create a policy named
vault-adminb-policyin the admin namespace.$ vault policy write vault-adminb-policy vault-adminb-policy.hcl Success! Uploaded policy: vault-adminb-policyCreate user named vault-adminb in the admin namespace and assign the vault-adminb-policy.
$ vault write auth/userpass/users/vault-adminb \
   password=be3xcellent! \
   policies=vault-adminb-policy
Example output:
Success! Data written to: auth/userpass/users/vault-adminbReturn to the Vault UI.
If it is not already selected, click the Method pulldown menu and select Userpass.
Delete any previous namespace text from Namespace text box.
Enter
vault-adminbin the Username field,be3xcellent!in the Password field, and click Sign In.You are now signed into the Vault UI and placed in the admin namespace.
Click Access.
Click Namespaces.
You receive a Not authorized message because the policy you created only permits access to
namespaceB/*.Click the admin menu and select namespaceB, you are now in the namespaceB namespace.
Navigate back to Access >> Namespaces.
Instead of the Not authorized message, you see the Namespaces page where you can create nested namespaces under namespaceB.
Sign out of the Vault UI and close the page.
You have created multiple namespaces in HCP Vault and enabled auth methods in the admin namespace to demonstrate centralized authentication management. You enabled auth methods in the namespaceA namespace, and created policies to replicate managing authentication in a nested namespace.
Using namespace parameters
Now that you have a working HCP Vault cluster with multiple namespaces, you can explore the supported options for including the namespace using the Vault CLI and API.
To target a specific namespace, do one of the following:
- Use the VAULT_NAMESPACE environment variable
- Use the
-namespace(or-nsfor short-hand) argument
In the Set up the lab section, you created several
environment variables to enable CLI access to your HCP Vault cluster.
The VAULT_NAMESPACE environment variable is one of the supported methods for
declaring the namespace.
List all namespaces created using the Vault CLI.
$ vault namespace list

Keys
----
namespaceA/
namespaceB/
Because you configured the
VAULT_NAMESPACEenvironment variable, you can run Vault commands without any additional arguments.You can override the current
VAULT_NAMESPACEvalue without resetting the environment variable.$ VAULT_NAMESPACE=admin/namespaceA vault auth list Path Type Accessor Description Version ---- ---- -------- ----------- ------- token/ ns_token auth_ns_token_82b2e82c token based credentials n/a userpass/ userpass auth_userpass_7fcc15dd n/a n/aAnother option is to pass the
-namespace(or-ns) command line argument. The command line argument takes precedence over the environment variable, if set. As a Vault admin, this precedence order is useful because you can configure your environment for the admin or primary namespace you are responsible for but still can access sub-namespaces without changing your local environment.List the auth methods in the namespaceA namespace using the
-namespaceargument.$ vault auth list -namespace=admin/namespaceA Path Type Accessor Description Version ---- ---- -------- ----------- ------- token/ ns_token auth_ns_token_82b2e82c token based credentials n/a userpass/ userpass auth_userpass_7fcc15dd n/a n/aWithout having to unset the
VAULT_NAMESPACEenvironment variable, you are able to interact with other namespaces using the-namespacecommand line argument.
Troubleshooting
Omitting the namespace from any Vault command or API call results in common error messages.
Unset the
VAULT_NAMESPACEenvironment variable.$ unset VAULT_NAMESPACEVerify there is no
VAULT_NAMESPACEenvironment variable.$ printenv | grep VAULT_ VAULT_ADDR=https://vault-cluster-public-vault-b0iz2.m3n4l1fe.n1.hashicorp.cloud:8200 VAULT_TOKEN=hvs.CAESIBxule_a2c4e6-qhfMZB5TDg8WI8pd8gN0ol0Bhb_5iGicKImh2cy5FcFpCZFJiMUpyeHRkR3hHZTlFenRMR2YudDFsVGQQuAEWhen the
VAULT_NAMESPACEenvironment variable is unset, click the common errors below to produce the example error messages.
There are two common causes of the 403 error code - the namespace value was not provided, or the policy attached to the token does not permit access to the specified resource.
In this example, the namespace value is omitted.
$ vault namespace list
Error listing namespaces: Error making API request.

URL: GET https://vault-cluster-public-vault-b0iz2.m3n4l1fe.n1.hashicorp.cloud:8200/v1/sys/namespaces?list=true
Code: 403. Errors:

* 1 error occurred:
        * permission denied
Because the environment variable was unset, the effective path the command is trying list resources from is the root namespace.
Your VAULT_TOKEN environment variable was created from the token auth method in the admin namespace, with the hcp-root policy
attached. The hcp-root policy provides access to the admin namespace.
Cleanup
To avoid unnecessary charges, you should delete any HCP Vault clusters you created for this tutorial.
Summary
In this tutorial you created two namespaces in HCP Vault Dedicated and enabled the userpass auth method. You created policies in the admin namespace and namespaceA and assigned the policies to users to understand how the namespace context of the policy impacts access. You also explored the supported options for including the namespace using the Vault CLI and API.
Here's how the patterns you implemented compare:
| Pattern | User Created In | Policy Created In | Policy Path | Access Scope | Best For |
|---|---|---|---|---|---|
| Centralized (broad) | admin | admin | path "*" | All namespaces | Platform teams, security teams |
| Namespace-level | namespaceA | namespaceA | path "*" | Only namespaceA | Fully isolated tenants, compliance separation |
| Centralized (scoped) | admin | admin | path "namespaceB/*" | Only namespaceB | Centralized identity with tenant-specific access |
The namespace where you create the auth method and policy determines
access scope. A policy with path "*" in admin grants broader access than the
same policy in a child namespace.