Configure HCP Vault Dedicated with Terraform
In the previous tutorial, you learned how to deploy an HCP Vault Dedicated cluster using Terraform.
In this tutorial you will use Terraform and the Terraform provider for Vault to configure your HCP Vault cluster with namespaces, auth methods, and secrets engines.
Prerequisites
To complete the steps listed in this tutorial, you need:
- Vault CLI installed
- Terraform CLI installed
- An HCP account
gitinstalled
Set up the lab
This tutorial deploys an HCP Vault cluster using Terraform and an HCP service principal user to authenticate Terraform to HCP. If you do not have an existing service principal, follow the Create a service principal.
Create a service principal
If you do not have a service principal created, and keys exported as environment variables from the Deploy HCP Vault with Terraform tutorial, expand the accordion and create the service principal.
Log in to the HCP portal.
From the navigation menu, select your organization and the project where you want to create the HCP Vault cluster.
Click Access control (IAM).
Click Service principals, and then click Create service principal.
Enter
learn-hcp-vaultin the Service principal name field.Click the Select service pulldown menu and select Project name-of-your-project.
Click the Select role pulldown menu and select Contributor.
Click Create service principal.
From the learn-hcp-vault page, click Keys.
Click Generate key.
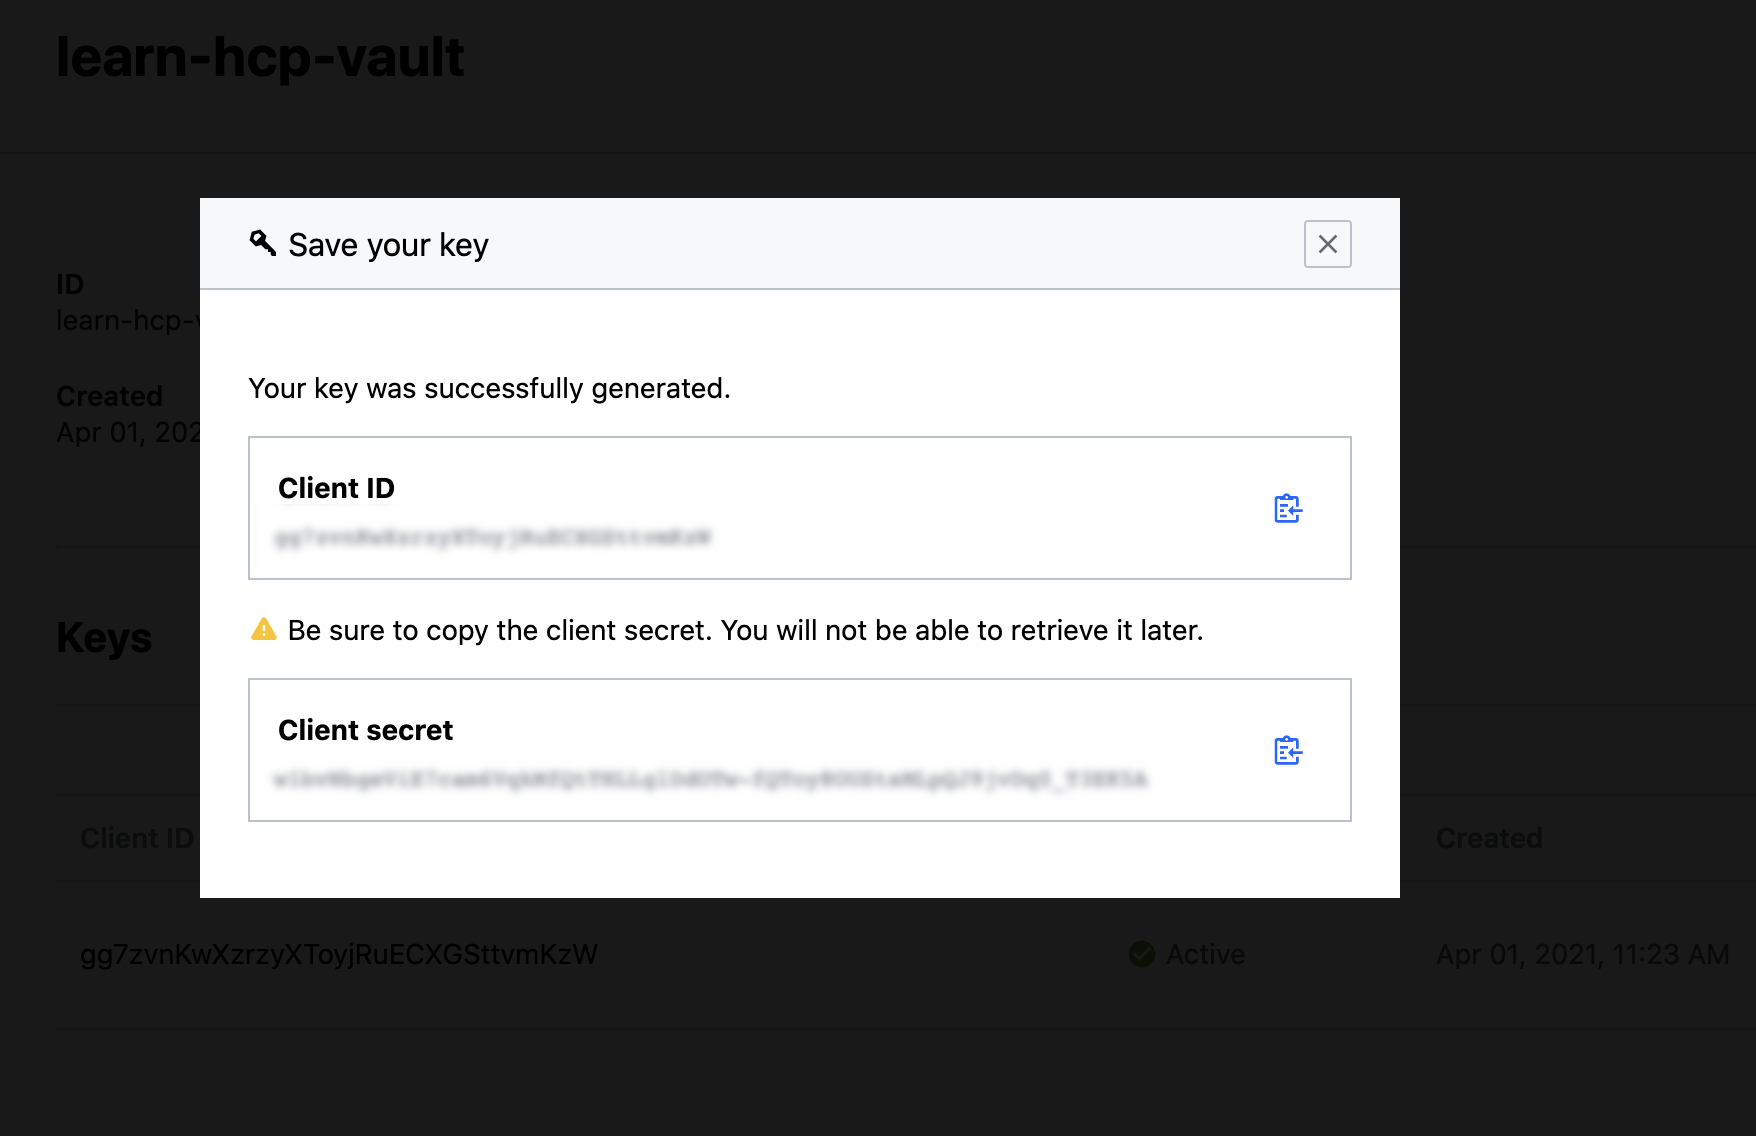
Copy the Client ID.
Open a new terminal and export an environment variable for the
HCP_CLIENT_ID.$ export HCP_CLIENT_ID=<client id value previously copied>Return to the HCP Portal and copy the Client secret.
Return to the terminal and export an environment variable for the
HCP_CLIENT_SECRET.$ export HCP_CLIENT_SECRET=<client secret value previously copied>
Clone Terraform configuration
Clone the learn-configure-hcp-vault-terraform repository to get the necessary Terraform configuration for the tutorial.
Change into your preferred working directory and clone the repository.
$ git clone https://github.com/hashicorp-education/learn-configure-hcp-vault-terraformChange into the directory containing the Terraform configuration for this tutorial.
$ cd learn-configure-hcp-vault-terraformVerify that you are in the correct directory before proceeding.
$ ls -1
config
LICENSE
README.md
hcpvault.tf
outputs.tf
vault-config
provider.tf
variables.tf
Run the commands for this tutorial from this directory.
Deploy HCP Vault cluster
This tutorial requires an HCP Vault cluster to demonstrate the ability to configure the cluster with Terraform.
Initialize Terraform.
$ terraform init

Initializing the backend...

Initializing provider plugins...
...snip...

Terraform has been successfully initialized!
Deploy the HCP Vault cluster using the
terraform applycommand.$ terraform apply -auto-approve Terraform used the selected providers to generate the following execution plan. Resource actions are indicated with the following symbols: + create <= read (data resources) Terraform will perform the following actions: # data.aws_arn.peer will be read during apply ...snip... hcp_vault_cluster.learn_hcp_vault: Still creating... [04m10s elapsed] hcp_vault_cluster.learn_hcp_vault: Still creating... [04m20s elapsed] hcp_vault_cluster.learn_hcp_vault: Still creating... [04m30s elapsed] ...snip... hcp_vault_cluster.learn_hcp_vault: Creation complete after 9m46s [id=/project/70d220a8-c83e-47bf-99a9-7a2ce0f98156/hashicorp.vault.cluster/learn-hcp-vault-cluster] Apply complete! Resources: 4 added, 0 changed, 0 destroyed. Outputs: namespace = "admin" primary_token = <sensitive> primary_vault_public_endpoint_url = "https://vault-cluster-primary-public-vault-gr33d8647.z1.hashicorp.cloud:8200"The Terraform configuration deploys an HVN and HCP Vault cluster. Unlike the previous tutorial, the concepts in this tutorial do not require peering to your selected cloud providers VPC.
Request an admin token
If you are already familiar with Vault, the admin token is the HCP Vault equivalent of the root token.
The admin token provides full access to all necessary HCP Vault endpoints to
manage your HCP Vault cluster's configuration. Certain endpoints, such as the
/sys/replication endpoint, are not accessible because you manage the
configuration for these features through the HCP Portal or the Terraform
provider for HCP.
You should use the admin token for initial configuration, or in the case of emergencies.
Terraform will use the admin token to authenticate to HCP Vault and apply the configuration.
Review the
hcpvault.tfconfiguration file.$ cat hcpvault.tf resource "time_sleep" "wait_30_primary" { depends_on = [hcp_vault_cluster.primary_cluster] create_duration = "30s" } resource "hcp_hvn" "primary_cluster_hvn" { hvn_id = var.primary_cluster_hvn cloud_provider = var.cloud_provider region = var.primary_region cidr_block = var.primary_cluster_hvn_cidr } resource "hcp_vault_cluster" "primary_cluster" { hvn_id = hcp_hvn.primary_cluster_hvn.hvn_id cluster_id = var.primary_cluster_id tier = var.tier public_endpoint = true } resource "hcp_vault_cluster_admin_token" "primary_cluster_token" { cluster_id = var.primary_cluster_id depends_on = [time_sleep.wait_30_primary] }You can use the HCP Portal or Terraform to request an admin token. The
hcp_vault_cluster_admin_tokenresource requests a token from the cluster defined by thecluster_idresource.Print the admin token generated during the initial deployment.
$ terraform output -raw primary_token

hvs.EXIBqkwDBlF7kIQCXiuu...snip...abDEzZWEuNVVRSkMQqwI
You can revoke the admin token using the
terraform destroycommand combined with the target parameter.$ terraform destroy -target="hcp_vault_cluster_admin_token.primary_cluster_token" -auto-approve ...snip... Terraform will perform the following actions: # hcp_vault_cluster_admin_token.primary_cluster_token will be destroyed - resource "hcp_vault_cluster_admin_token" "primary_cluster_token" { - cluster_id = "vault-cluster-primary" -> null - created_at = "2026-02-09T15:49:39-05:00" -> null - id = "/project/70d220a8-c83e-47bf-99a9-7a2ce0f98156/hashicorp.vault.cluster/vault-cluster-primary/token" -> null - token = (sensitive value) -> null } Plan: 0 to add, 0 to change, 1 to destroy. ...snip... Destroy complete! Resources: 1 destroyed.Using the
-targetparameter revokes the admin token, but does not destroy other resources deployed with the Terraform configuration. You can also create a separate Terraform configuration to manage the lifecycle of the token.Request a new admin token using the
terraform applycommand combined with the target parameter.$ terraform apply -target="hcp_vault_cluster_admin_token.primary_cluster_token" -auto-approve ...snip... Terraform will perform the following actions: # hcp_vault_cluster_admin_token.primary_cluster_token will be created + resource "hcp_vault_cluster_admin_token" "primary_cluster_token" { + cluster_id = "vault-cluster-primary" + created_at = (known after apply) + id = (known after apply) + project_id = (known after apply) + token = (sensitive value) } Plan: 1 to add, 0 to change, 0 to destroy. ...snip... Apply complete! Resources: 1 added, 0 changed, 0 destroyed. Outputs: namespace = "admin" primary_token = <sensitive> primary_vault_public_endpoint_url = "https://vault-cluster-primary-public-vault-51ccf744.58480830.z1.hashicorp.cloud:8200"Print the new admin token generated during the initial deployment.
$ terraform output -raw primary_token

hvs.NewIBqkwDBlF7kIQCXiuu...snip...abDEzZWEuNVVRSkMQqwI
Export the Terraform output as environment variables. This allows the Vault CLI and Terraform to authenticate with the HCP Vault cluster.
$ export VAULT_ADDR=$(terraform output -raw primary_vault_public_endpoint_url) && \
export VAULT_TOKEN=$(terraform output -raw primary_token) && \
export VAULT_NAMESPACE=admin
All HCP Vault clusters start from the admin namespace.
Verify you can run commands for the HCP Vault cluster.
$ vault auth list
Path      Type        Accessor                  Description                Version
----      ----        --------                  -----------                -------
token/    ns_token    auth_ns_token_d5df0532    token based credentials    n/a
All Vault clusters, including HCP Vault, have the token auth method enabled by default.
Configure Vault with Terraform
You can configure a Vault cluster using the Terraform provider for Vault.
The Terraform provider for Vault requires the Vault cluster to be accessible before
you can run a plan or apply. Because of this requirement, you must create a
separate Terraform configuration to deploy Vault, and configure Vault - you
cannot deploy and configure Vault in the same configuration.
Review the configuration in the
configdirectory.$ ls -1 config/* acl-policies.tf auth-methods.tf main.tf policies README.md secrets-engines.tf static-secrets.tf variables.tfReview the
auth-methods.tfconfiguration.$ cat config/auth-methods.tf resource "vault_auth_backend" "userpass" { type = "userpass" } # Create a user, 'admin' resource "vault_generic_endpoint" "admin" { depends_on = [vault_auth_backend.userpass] path = "auth/userpass/users/admin" ignore_absent_fields = true data_json = <<EOT { "policies": ["admins"], "password": "superS3cret!" } EOT } # Create a user, 'student' resource "vault_generic_endpoint" "student" { depends_on = [vault_auth_backend.userpass] path = "auth/userpass/users/student" ignore_absent_fields = true data_json = <<EOT { "policies": ["student-secrets"], "password": "ch4ngeMe~" } EOT }The
auth-methods.tfconfiguration enables the Vault userpass auth method, and creates two users. Each user has a unique policy applied that defines the users access to Vault.The userpass auth method, while simple in its configuration, is a useful fall back auth method to enable in addition to more common auth methods like the OIDC auth method. Having the userpass auth method enabled for a small subset of admin type users allows them to log into Vault if other auth method providers are unavailable due to outages.
Review the
acl-policy.hclconfiguration.$ cat config/acl-policies.tf # Admin capabilities within default namespace resource "vault_policy" "admin_policy" { name = "admins" policy = file("policies/admin-policy.hcl") } # Students are admins of kv-v2 secrets engine # and can also Read and list keys under transit # + encrypt & decrypt with the 'payment' key resource "vault_policy" "student_secrets_engines" { name = "student-secrets" policy = file("policies/student-secrets.hcl") }The
acl-policies.tfconfiguration creates the policies use by the userpass auth method. Theadmin-policy.hclpolicy file is an admin level policy with broad privileges that grants your Vault admins the ability to manage Vault.The
student-secrets.hclpolicy file is a limited scope policy, following the principle of least privilege, that grants the minimum privileges necessary to interact with certain secrets engines.When writing policies for your organization, take time to plan the policies so users are not given more access than their role requires.
Terraform attaches these policies to the users defined in the
auth-methods.tfconfiguration.Configure Vault using the Terraform configuration in the
configdirectory.$ terraform -chdir=config/ init && \ terraform -chdir=config/ apply \ -auto-approveExample output:
Initializing the backend...
Initializing provider plugins...
- Finding latest version of hashicorp/vault...
- Installing hashicorp/vault v5.7.0...
- Installed hashicorp/vault v5.7.0 (signed by HashiCorp)
Terraform has created a lock file .terraform.lock.hcl to record the provider
selections it made above. Include this file in your version control repository
so that Terraform can guarantee to make the same selections by default when
you run "terraform init" in the future.

Terraform has been successfully initialized!
...snip...
Plan: 11 to add, 0 to change, 0 to destroy.
vault_policy.admin_policy: Creating...
vault_mount.transit: Creating...
vault_policy.student_secrets_engines: Creating...
...snip...
vault_generic_secret.student_api_key: Creation complete after 1s [id=api-credentials/student/api-key]
vault_generic_secret.golden: Creation complete after 1s [id=api-credentials/student/golden]

Apply complete! Resources: 11 added, 0 changed, 0 destroyed.
Terraform authenticated to Vault using the environment variables you added earlier in the tutorial, and deployed the provided configuration from the
configdirectory.Run
vault auth listagain to see the changes to your Vault cluster.$ vault auth list Path Type Accessor Description Version ---- ---- -------- ----------- ------- token/ ns_token auth_ns_token_d5df0532 token based credentials n/a userpass/ userpass auth_userpass_e9fd24d9 n/a n/aIn addition to the token auth method listed earlier, Terraform enabled the userpass auth method.
Update Vault with Terraform
In addition to deploying HCP Vault, and applying the initial configuration, you can use Terraform to make changes to your existing HCP Vault configuration.
You should manage the Terraform configuration as you would for any other application source code through a version control system (VCS).
When you manage the lifecycle of your IaC configuration through a VCS you gain security benefits such as:
Peer review configuration changes: When you need to update your Vault configuration, update the Terraform configuration in a new branch and have other members of your team review the changes.
Roll back changes: If a configuration change causes issues, you can revert the change and apply the previous version of the Terraform configuration.
Scan the configuration for security vulnerabilities: Ensure you do not commit sensitive data such as leaked secrets.
While beyond the scope of this tutorial, you can connect services like HCP Vault Radar to your VCS to ensure your Terraform configurations do not contain secrets.
View the existing secrets engines enabled by applying the Terraform configuration.
$ vault secrets list

Path                Type            Accessor                 Description
----                ----            --------                 -----------
api-credentials/    kv              kv_a114b7e0              n/a
cubbyhole/          ns_cubbyhole    ns_cubbyhole_808c5755    per-token private secret storage
identity/           ns_identity     ns_identity_05fa6bd8     identity store
sys/                ns_system       ns_system_d6c93f30       system endpoints used for control, policy and debugging
transit/            transit         transit_3096ba54         n/a
There is a single
kvsecrets engine configured.Review the
secrets-engines.tfconfiguration.$ cat config/secrets-engines.tf # Enable K/V v2 secrets engine at the path 'kv-v2' resource "vault_mount" "kv-v2" { path = "api-credentials" type = "kv-v2" } # Enable Transit secrets engine at the path 'transit' resource "vault_mount" "transit" { path = "transit" type = "transit" } # Creating Transit secrets engine encryption key named 'payment' resource "vault_transit_secret_backend_key" "key" { depends_on = [vault_mount.transit] backend = "transit" name = "payment" deletion_allowed = true }The configuration enables the Vault K/V v2 and transit secrets engine.
Another team in your organization requested a solution to allow developers to create, manage, and retrieve secrets during the development lifecycle.
Add a module to the existing
secrets-engine.tfTerraform configuration to enable a second KV secrets engine.$ cat >> config/secrets-engines.tf -<<EOF module "vault-configure-kvv2" { source = "github.com/hashicorp-education/learn-vault-configuration/vault/kvv2" } EOFThe configuration now uses a module to enable the KV v2 secrets engine. Modules help you organize and reuse Terraform configurations without copying and pasting the same resources into multiple configurations. Using modules helps you maintain your Terraform configuration without having to edit multiple different configuration.
Run
terraform initto initialize the new module.$ terraform -chdir=config/ initRun
terraform planto review the changes.$ terraform -chdir=config/ plan ...snip... vault_generic_endpoint.admin: Refreshing state... [id=auth/userpass/users/admin] Terraform used the selected providers to generate the following execution plan. Resource actions are indicated with the following symbols: + create Terraform will perform the following actions: # module.vault-configure-kvv2.vault_kv_secret_v2.api_key will be created + resource "vault_kv_secret_v2" "api_key" { + cas = 1 + data = (sensitive value) + data_json = (sensitive value) + data_json_wo = (write-only attribute) + delete_all_versions = true + disable_read = false + id = (known after apply) + metadata = (known after apply) + mount = "kvv2" + name = "developer" + path = (known after apply) + custom_metadata { + max_versions = 5 } } ...snip... Plan: 2 to add, 0 to change, 0 to destroy. ──────────────────────────────────────────────────────────────────────────────────────────────────────── Note: You didn't use the -out option to save this plan, so Terraform can't guarantee to take exactly these actions if you run "terraform apply" now.The Terraform plan shows two new resources. The two new resources are from the Terraform module you added to your HCP Vault configuration.
Apply the updated configuration with
terraform apply.$ terraform -chdir=config/ apply -auto-approve ...snip... Plan: 2 to add, 0 to change, 0 to destroy. module.vault-configure-kvv2.vault_mount.kvv2: Creating... module.vault-configure-kvv2.vault_mount.kvv2: Creation complete after 0s [id=kvv2] module.vault-configure-kvv2.vault_kv_secret_v2.api_key: Creating... module.vault-configure-kvv2.vault_kv_secret_v2.api_key: Creation complete after 1s [id=kvv2/data/developer] Apply complete! Resources: 2 added, 0 changed, 0 destroyed.View the existing secrets engines enabled by applying the Terraform configuration again.
$ vault secrets list

Path                Type            Accessor                 Description
----                ----            --------                 -----------
api-credentials/    kv              kv_a114b7e0              n/a
cubbyhole/          ns_cubbyhole    ns_cubbyhole_808c5755    per-token private secret storage
identity/           ns_identity     ns_identity_05fa6bd8     identity store
kvv2/               kv              kv_0d35a0b5              KV Version 2 secret engine mount
sys/                ns_system       ns_system_d6c93f30       system endpoints used for control, policy and debugging
transit/            transit         transit_3096ba54         n/a
Terraform created the second
kvsecrets engine.
Clean up
Run
terraform destroyto destroy the provisioned Vault resources.$ terraform -chdir=config/ destroy -auto-approveRun
terraform destroyto destroy the provisioned HCP Vault cluster and HVN.$ terraform destroy -auto-approve
Summary
In this tutorial, you learned how to automate the configuration of an HCP Vault cluster using the Terraform provider for Vault. You also learned about the resources available with the provider to configure your own cluster.
You can find the full documentation for the Terraform provider for Vault in the Terraform registry documentation.
Next steps
In the next tutorial, you will learn how to manage advanced settings for your HCP Vault cluster using Terraform.