Manage HCP Vault Dedicated with Terraform
In the previous tutorial, you learned how to configure an HCP Vault Dedicated cluster using Terraform.
In this tutorial you will use Terraform and the Terraform
provider for HCP
to manage the lifecycle of your HCP Vault cluster. You will scale
the cluster up to support additional workload demands, add performance replication to
support peak workloads in different regions, and scale the cluster back down
when peak workloads complete.
Prerequisites
To complete the steps listed in this tutorial, you need:
- Vault CLI installed
- Terraform CLI installed
- An HCP account
gitinstalled
Set up the lab
This tutorial deploys an HCP Vault cluster using Terraform and an HCP service principal user to authenticate Terraform to HCP. If you do not have an existing service principal, follow the Create a service principal.
Create a service principal
The service principal you created in the Deploy HCP Vault with Terraform tutorial, uses the contributor role to deploy an HCP Vault cluster. Scaling a HCP Vault cluster requires the admin role. To maintain the principle of least privilege, you will create a dedicated service principal to manage cluster scaling.
Log in to the HCP portal.
From the navigation menu, select your organization and the project where you want to create the HCP Vault cluster.
Click Access control (IAM).
Click Service principals, and then click Create service principal.
Enter
learn-hcp-vault-scalingin the Service principal name field.Click the Select service pulldown menu and select Project name-of-your-project.
Click the Select role pulldown menu and select Admin.
Click Create service principal.
From the learn-hcp-vault-scaling page, click Keys.
Click Generate key.
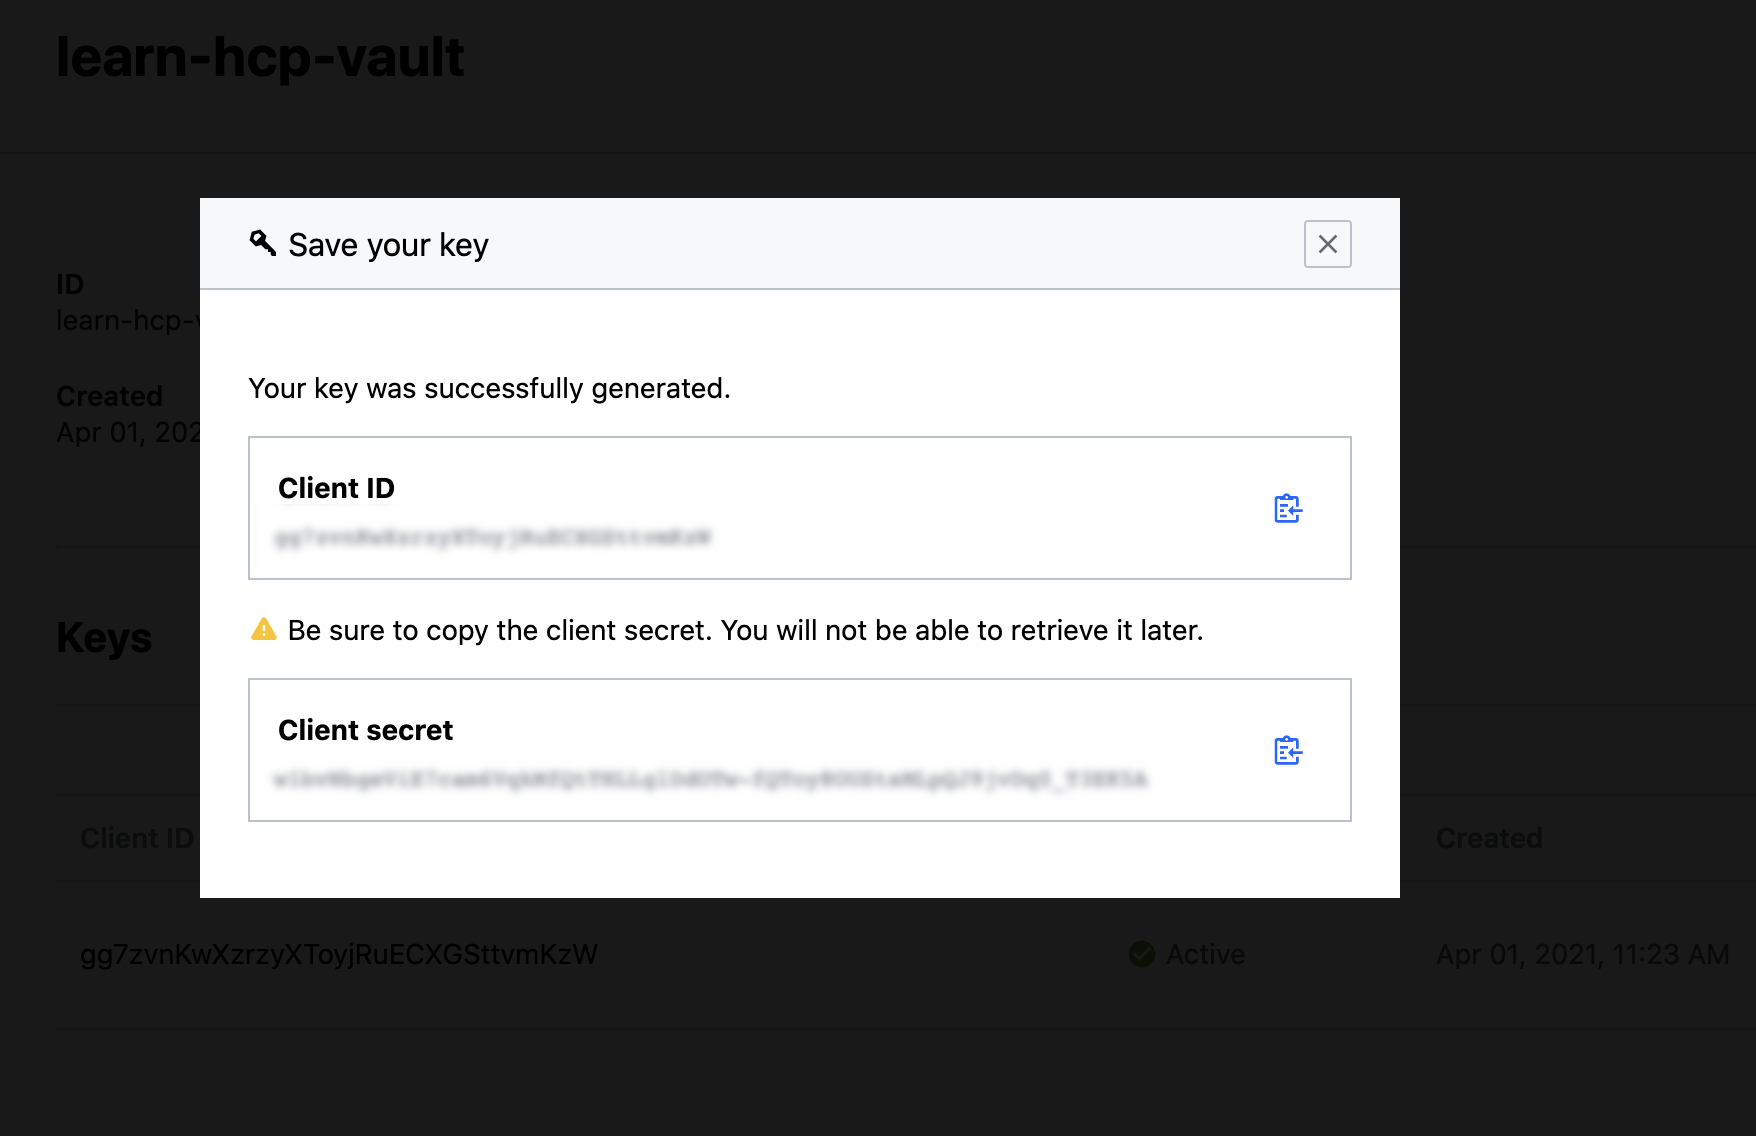
Copy the Client ID.
Open a new terminal.
Export an environment variable for the
HCP_CLIENT_ID.$ export HCP_CLIENT_ID=<client id value previously copied>Return to the HCP Portal and copy the Client secret.
Return to the terminal and export an environment variable for the
HCP_CLIENT_SECRET.$ export HCP_CLIENT_SECRET=<client secret value previously copied>
Clone Terraform configuration
Clone the learn-configure-hcp-vault-terraform repository to get the necessary Terraform configuration for the tutorial.
Change into your preferred working directory and clone the repository.
$ git clone https://github.com/hashicorp-education/learn-configure-hcp-vault-terraformChange into the directory containing the Terraform configuration for this tutorial.
$ cd learn-configure-hcp-vault-terraformVerify that you are in the correct directory before proceeding.
$ ls -1
config
LICENSE
README.md
hcpvault.tf
outputs.tf
vault-config
provider.tf
variables.tf
Run the commands for this tutorial from this directory.
Deploy an HCP Vault cluster
This tutorial requires an HCP Vault cluster to demonstrate the ability to manage the cluster lifecycle with Terraform.
Initialize Terraform.
$ terraform init

Initializing the backend...

Initializing provider plugins...
...snip...

Terraform has been successfully initialized!
Deploy the HCP Vault cluster using the
terraform applycommand.$ terraform apply -auto-approve Terraform used the selected providers to generate the following execution plan. Resource actions are indicated with the following symbols: + create <= read (data resources) Terraform will perform the following actions: # data.aws_arn.peer will be read during apply ...snip... hcp_vault_cluster.learn_hcp_vault: Still creating... [04m10s elapsed] hcp_vault_cluster.learn_hcp_vault: Still creating... [04m20s elapsed] hcp_vault_cluster.learn_hcp_vault: Still creating... [04m30s elapsed] ...snip... hcp_vault_cluster.learn_hcp_vault: Creation complete after 9m46s [id=/project/70d220a8-c83e-47bf-99a9-7a2ce0f98156/hashicorp.vault.cluster/learn-hcp-vault-cluster] Apply complete! Resources: 4 added, 0 changed, 0 destroyed. Outputs: namespace = "admin" primary_token = <sensitive> primary_vault_public_endpoint_url = "https://vault-cluster-primary-public-vault-gr33d8647.z1.hashicorp.cloud:8200"The Terraform configuration deploys an HVN and HCP Vault cluster.
Add HCP Vault Dedicated environment variables
Set up your local environment to authenticate with the HCP Vault cluster. By using the example Terraform configuration, you can get the required values from the Terraform output.
Export the Terraform output as environment variables. This allows the Vault CLI and Terraform to authenticate with the HCP Vault cluster.
$ export VAULT_ADDR=$(terraform output -raw primary_vault_public_endpoint_url) \
    VAULT_TOKEN=$(terraform output -raw primary_token) \
    VAULT_NAMESPACE=admin
Verify you can run commands for the HCP Vault cluster.
$ vault auth list
Path      Type        Accessor                  Description                Version
----      ----        --------                  -----------                -------
token/    ns_token    auth_ns_token_d5df0532    token based credentials    n/a
Deploy sample Vault configuration
When the cluster creation completes, apply the example configuration.
Initialize Terraform and deploy the configuration.
$ terraform -chdir=config/ init && \
    terraform -chdir=config/ apply -auto-approve
Example output:
Terraform used the selected providers to generate the following execution plan. Resource actions are indicated with the following symbols:
  + create

Terraform will perform the following actions:

  # vault_auth_backend.userpass will be created
  + resource "vault_auth_backend" "userpass" {
      + accessor = (known after apply)
      + id       = (known after apply)
      + path     = (known after apply)
      + tune     = (known after apply)
      + type     = "userpass"
    }

...snip...

vault_generic_secret.student_api_key: Creation complete after 0s [id=api-credentials/student/api-key]
vault_generic_secret.golden: Creation complete after 0s [id=api-credentials/student/golden]
vault_generic_secret.api-wizard-service: Creation complete after 0s [id=api-credentials/admin/api-wizard]

Apply complete! Resources: 11 added, 0 changed, 0 destroyed.
Run
vault auth listagain to see the changes to your Vault cluster.$ vault auth list Path Type Accessor Description Version ---- ---- -------- ----------- ------- token/ ns_token auth_ns_token_d5df0532 token based credentials n/a userpass/ userpass auth_userpass_e9fd24d9 n/a n/a
Review Terraform configuration
The Terraform configuration used by this tutorial are consistent with the Deploy HCP Vault with Terraform and Configure HCP Vault with Terraform tutorials. If you are not familiar with deploying HCP Vault, or configuring HCP Vault with Terraform, review those tutorials.
Review the cluster tier settings in
variables.tf.$ grep -A 4 tier variables.tf variable "tier" { description = "Tier of the HCP Vault cluster." type = string default = "dev" }The Terraform configuration sets the default HCP Vault cluster tier to
dev. The development tier is useful for isolated developer environments, testing Vault features, and performing initial configuration while the cluster is not responding to workload requests.To run a production grade HCP Vault cluster, you can scale the cluster up from the development tier to either the essentials or standard tier.
Review the cluster configuration in
hcpvault.tf.$ cat hcpvault.tf resource "time_sleep" "wait_30_primary" { depends_on = [hcp_vault_cluster.primary_cluster] create_duration = "30s" } resource "hcp_hvn" "primary_cluster_hvn" { hvn_id = var.primary_cluster_hvn cloud_provider = var.cloud_provider region = var.primary_region cidr_block = var.primary_cluster_hvn_cidr } resource "hcp_vault_cluster" "primary_cluster" { hvn_id = hcp_hvn.primary_cluster_hvn.hvn_id cluster_id = var.primary_cluster_id tier = var.tier public_endpoint = true } resource "hcp_vault_cluster_admin_token" "primary_cluster_token" { cluster_id = var.primary_cluster_id depends_on = [time_sleep.wait_30_primary] }The
hcpvault.tfconfiguration deploys a single HCP Vault cluster, and generates an admin token for the cluster.Challenge question:
Q: What tier will Terraform use for the HCP Vault cluster?
A: Terraform deploys a development tier cluster, using the variable
var.tierset to a default value ofdevin thevariables.tfconfiguration.
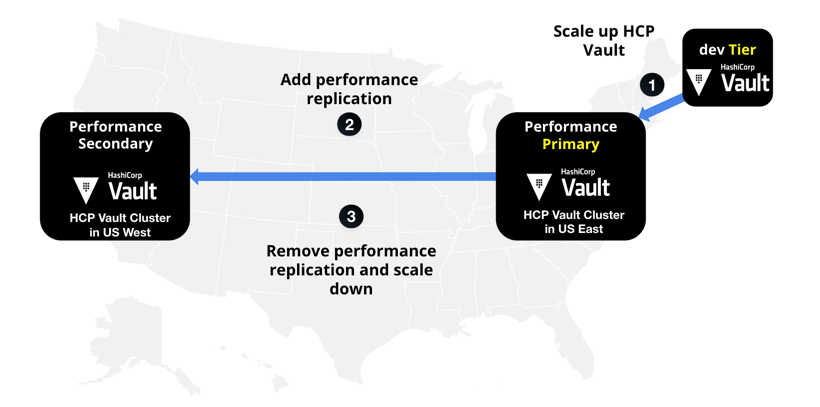
Scale up the HCP Vault Dedicated cluster
With HCP Vault, you can scale your cluster with a change to the
variables.tf file and re-applying the configuration. The underlying
infrastructure and associated management of that infrastructure is handled by
HashiCorp.
Change the tier from
devtoplus_smallin thevariables.tffile.$ sed -ibak "s/dev/plus_small/g" variables.tfThere are different ways to change the tier through Terraform. For temporary changes, you can override the default variable value during apply by passing
-var="tier=plus_small"or create aterraform.tfvarsfile. However, since the Terraform configuration in your version control system (VCS) is the source of truth for your HCP Vault cluster, this tutorial demonstrates changing the value directly in the Terraform configuration.Changing the Terraform configuration provides several benefits:
- Source of truth: Your running infrastructure matches your configuration files
- Code review: Team members can review and approve infrastructure changes
- Automation: CI/CD workflows can automatically trigger an apply when you commit changes
- Auditable: All changes tracked in version control history
Using
-varflags for permanent infrastructure changes creates drift between your configuration files and actual infrastructure state.Verify the updated configuration.
$ cat variables.tf | grep -A 4 tier

variable "tier" {
  description = "Tier of the HCP Vault cluster."
  type        = string
  default     = "plus_small"
}
Re-apply the configuration to change the tier.
$ terraform apply -auto-approve

Terraform used the selected providers to generate the following execution plan. Resource actions are indicated with the following symbols:
  ~ update in-place

Terraform will perform the following actions:

  # hcp_vault_cluster.primary_cluster will be updated in-place
  ~ resource "hcp_vault_cluster" "primary_cluster" {
        id                         = "/project/a2c4e6g-8920-4714-ba99-0242ac11000e/hashicorp.vault.cluster/vault-cluster-primary"
      ~ tier                       = "DEV" -> "plus_small"
        # (14 unchanged attributes hidden)
    }

Plan: 0 to add, 1 to change, 0 to destroy.
...snip...
hcp_vault_cluster.primary_cluster: Modifications complete after 30m36s [id=/project/70d220a8-c83e-47bf-99a9-7a2ce0f98156/hashicorp.vault.cluster/vault-cluster-primary]

Apply complete! Resources: 0 added, 1 changed, 0 destroyed.

Outputs:

namespace = "admin"
primary_token = <sensitive>
primary_vault_public_endpoint_url = "https://vault-cluster-primary-public-vault-5c448d42.723e7ba5.z1.hashicorp.cloud:8200"
The output shows that the cluster
will be updated in-place. You do not need to replace or stop the cluster to change the clusters tier or size.
Access the HCP Vault Dedicated cluster
One of the benefits of running your Vault cluster on HCP is HashiCorp manages most of the infrastructure related maintenance. While your cluster is scaling, applications that rely on Vault can still access Vault resources.
Log into the HCP Portal and navigate to the Vault clusters list while Terraform is upgrading the cluster.
Observe that your cluster is an
Updatingstate.
Click
vault-cluster-primaryto access details about the cluster.Information about the cluster is still available while the upgrade is in process.
Click the Public link under Cluster URLs to copy the URL.
Open a new browser tab and navigate to the copied URL. Vault is still accessible even during the upgrade.
Click the Method pull down menu and select Username.
Log in as
adminwith the passwordsuperS3cret!.Navigate to Secrets and click api-credentials.
Even though the HCP is upgrading the cluster, Vault is still available and accessible for incoming requests.
Add performance replication
You have scaled your cluster up from the dev tier to the standard tier to support increased Vault utilization.
To meet the demands of your applications running in the west region, you need to create a cluster in the west region by enabling performance replication.
Adding performance replication to an existing cluster is similar to creating a new HCP Vault cluster using Terraform. You will need to:
- Define an HVN in the same cloud provider, but in a different region
- Define a new HCP Vault cluster
- Associate the new cluster with your primary cluster
Add the required values for the new replica cluster to the
variables.tffile.$ cat >> variables.tf <<EOF variable "secondary_region" { description = "The region of the secondary cluster HCP HVN and Vault cluster." type = string default = "us-west-2" } variable "secondary_cluster_hvn" { description = "The ID of the HCP HVN." type = string default = "hvn-aws-us-west-2" } variable "secondary_cluster_hvn_cidr" { description = "The CIDR range of the HCP HVN." type = string default = "172.24.16.0/20" } variable "secondary_cluster_id" { description = "The ID of the Vault Dedicated cluster." type = string default = "vault-cluster-secondary" } EOFReview the
variables.tffile.$ cat variables.tf variable "cloud_provider" { description = "The cloud provider of the HCP HVN and Vault cluster." type = string default = "aws" } variable "tier" { description = "Tier of the Vault Dedicated cluster." type = string default = "dev" } variable "primary_region" { description = "The region of the primary cluster HCP HVN and Vault cluster." type = string default = "us-east-1" } variable "primary_cluster_hvn" { description = "The ID of the HCP HVN." type = string default = "hvn-aws-us-east-1" } variable "primary_cluster_hvn_cidr" { description = "The CIDR range of the HCP HVN." type = string default = "172.25.16.0/20" } variable "primary_cluster_id" { description = "The ID of the Vault Dedicated cluster." type = string default = "vault-cluster-primary" } variable "secondary_cluster_hvn" { description = "The ID of the HCP HVN." type = string default = "hvn-aws-us-west-2" } variable "secondary_cluster_hvn_cidr" { description = "The CIDR range of the HCP HVN." type = string default = "172.24.16.0/20" } variable "secondary_cluster_id" { description = "The ID of the Vault Dedicated cluster." type = string default = "vault-cluster-secondary" } variable "secondary_region" { description = "The region of the secondary cluster HCP HVN and Vault cluster." type = string default = "us-west-2" }Terraform now has the variables that support creating the performance replica secondary cluster in the
variables.tffile.Update
hcpvault.tfto add the required resource blocks for the new cluster.$ cat >> hcpvault.tf <<EOF resource "time_sleep" "wait_30_secondary" { depends_on = [hcp_vault_cluster.secondary_cluster] create_duration = "30s" } resource "hcp_hvn" "secondary_cluster_hvn" { hvn_id = var.secondary_cluster_hvn cloud_provider = var.cloud_provider region = var.secondary_region cidr_block = var.secondary_cluster_hvn_cidr } resource "hcp_vault_cluster" "secondary_cluster" { hvn_id = hcp_hvn.secondary_cluster_hvn.hvn_id cluster_id = var.secondary_cluster_id tier = var.tier primary_link = hcp_vault_cluster.primary_cluster.self_link public_endpoint = true } resource "hcp_vault_cluster_admin_token" "secondary_cluster_token" { cluster_id = var.secondary_cluster_id depends_on = [time_sleep.wait_30_secondary] } EOFReview the
hcpvault.tffile.$ cat hcpvault.tf resource "time_sleep" "wait_30_seconds" { depends_on = [hcp_vault_cluster.primary_cluster] create_duration = "30s" } resource "hcp_hvn" "primary_cluster_hvn" { hvn_id = var.primary_cluster_hvn cloud_provider = var.cloud_provider region = var.primary_region cidr_block = var.primary_cluster_hvn_cidr } resource "hcp_vault_cluster" "primary_cluster" { hvn_id = hcp_hvn.primary_cluster_hvn.hvn_id cluster_id = var.primary_cluster_id tier = var.tier public_endpoint = true } resource "hcp_vault_cluster_admin_token" "primary_cluster_token" { cluster_id = var.primary_cluster_id depends_on = [time_sleep.wait_30_seconds] } resource "hcp_hvn" "secondary_cluster_hvn" { hvn_id = var.secondary_cluster_hvn cloud_provider = var.cloud_provider region = var.secondary_region cidr_block = var.secondary_cluster_hvn_cidr } resource "hcp_vault_cluster" "secondary_cluster" { hvn_id = hcp_hvn.secondary_cluster_hvn.hvn_id cluster_id = var.secondary_cluster_id tier = var.tier primary_link = hcp_vault_cluster.primary_cluster.self_link public_endpoint = true } resource "hcp_vault_cluster_admin_token" "secondary_cluster_token" { cluster_id = var.secondary_cluster_id depends_on = [time_sleep.wait_30_seconds] }The Terraform configuration for HCP Vault now includes the resources to create the new cluster. Terraform associates the performance replica cluster using the
primary_linkparameter to associate the new cluster with the primary cluster.Add an output for the new clusters URL.
$ cat >> outputs.tf <<EOF

output "secondary_vault_public_endpoint_url" {
  value       = hcp_vault_cluster.secondary_cluster.vault_public_endpoint_url
  description = "The public IP address of the secondary cluster."
}
EOF
Create the new cluster by re-running
terraform apply.$ terraform apply -auto-approve ...snip... hcp_hvn.primary_cluster_hvn: Refreshing state... [id=/project/11eb3a47-8920-4714-ba99-0242ac11000e/hashicorp.network.hvn/hvn-aws-us-east-1] hcp_vault_cluster.primary_cluster: Refreshing state... [id=/project/11eb3a47-8920-4714-ba99-0242ac11000e/hashicorp.vault.cluster/vault-cluster-primary] time_sleep.wait_30_primary: Refreshing state... [id=2022-06-07T17:11:47Z] hcp_vault_cluster_admin_token.primary_cluster_token: Refreshing state... [id=/project/11eb3a47-8920-4714-ba99-0242ac11000e/hashicorp.vault.cluster/vault-cluster-primary/token] Terraform used the selected providers to generate the following execution plan. Resource actions are indicated with the following symbols: + create Terraform will perform the following actions: # hcp_hvn.secondary_cluster_hvn will be created + resource "hcp_hvn" "secondary_cluster_hvn" { ...snip... hcp_vault_cluster.secondary_cluster: Still creating... [17m1s elapsed] hcp_vault_cluster.secondary_cluster: Creation complete after 17m8s [id=/project/11eb3a47-8920-4714-ba99-0242ac11000e/hashicorp.vault.cluster/vault-cluster-secondary] time_sleep.wait_30_secondary: Creating... time_sleep.wait_30_secondary: Still creating... [10s elapsed] time_sleep.wait_30_secondary: Still creating... [20s elapsed] time_sleep.wait_30_secondary: Creation complete after 30s [id=2022-06-07T21:37:16Z] hcp_vault_cluster_admin_token.secondary_cluster_token: Creating... hcp_vault_cluster_admin_token.secondary_cluster_token: Creation complete after 3s [id=/project/11eb3a47-8920-4714-ba99-0242ac11000e/hashicorp.vault.cluster/vault-cluster-secondary/token] Apply complete! Resources: 4 added, 0 changed, 0 destroyed. Outputs: namespace = "admin" primary_token = <sensitive> primary_vault_public_endpoint_url = "https://vault-cluster-primary-public-vault-f0694e72.5f8f89a2.z1.hashicorp.cloud:8200" secondary_vault_public_endpoint_url = "https://vault-cluster-secondary-public-vault-d9915240.da3e83c2.z1.hashicorp.cloud:8200"Log into the HCP Portal and navigate to the Vault clusters list.

The HCP Portal displays both the primary and secondary cluster.
Unset the
VAULT_TOKENenvironment variable used to authenticate with the primary cluster.$ unset VAULT_TOKENLog into the secondary cluster using the Vault CLI.
$ vault login \
   -address=$(terraform output -json | jq -r '.secondary_vault_public_endpoint_url.value') \
   -method=userpass \
   username=admin \
   password=superS3cret!
Verify the status of the secondary Vault cluster.
$ vault status \
   -address=$(terraform output -json | jq -r '.secondary_vault_public_endpoint_url.value')
Example output:
Key                                    Value
---                                    -----
Seal Type                              awskms
Recovery Seal Type                     shamir
Initialized                            true
Sealed                                 false
Total Recovery Shares                  1
Threshold                              1
Version                                1.21.2+ent
Build Date                             2026-01-06T16:58:57Z
Storage Type                           raft
Cluster Name                           b9ad0b7b-9711-4df6-80be-54d03e41077e
Cluster ID                             0eacd8d6-134b-a93d-f766-1b77b375dbdf
Removed From Cluster                   false
HA Enabled                             true
HA Cluster                             https://172.24.24.12:8201
HA Mode                                standby
Active Node Address                    https://node-1-2.vault-cluster-secondary-private-vault-d0339141.3fd678d8.z1.hashicorp.cloud:8202
Performance Standby Node               true
Performance Standby Last Remote WAL    1154
Raft Committed Index                   3948
Raft Applied Index                     3948
You can verify this is the secondary cluster because the IP address is part of the address space defined for the secondary cluster HVN.
View available secrets engines.
$ vault secrets list \
   -address=$(terraform output -json | jq -r '.secondary_vault_public_endpoint_url.value')
Example output:
Path                Type            Accessor                 Description
----                ----            --------                 -----------
api-credentials/    kv              kv_e80f580b              n/a
cubbyhole/          ns_cubbyhole    ns_cubbyhole_ebc1e938    per-token private secret storage
identity/           ns_identity     ns_identity_647c3433     identity store
sys/                ns_system       ns_system_b24fbdca       system endpoints used for control, policy and debugging
transit/            transit         transit_d83dca00         n/a
All secrets engines were replicated from the primary cluster.
Add a path filter
Now that you have deployed performance replication, you need to remove the
transit secrets engine from the secondary cluster.
You add a path filter that denies a specific path from replication to the secondary cluster.
Add the
paths_filterparameter to the secondary clusters resource block inhcpvault.tf.$ sed -ibak '/primary_link/a\ paths_filter = ["transit"] ' hcpvault.tfRe-apply the Terraform configuration to prevent Vault from replicating the
transitsecrets engine to the secondary cluster.$ terraform apply -auto-approveVerify that the
transitsecrets engine is no longer available on the secondary cluster.$ vault secrets list \ -address=$(terraform output -json | jq -r '.secondary_vault_public_endpoint_url.value')Example output:
Path                Type            Accessor                 Description
----                ----            --------                 -----------
api-credentials/    kv              kv_e80f580b              n/a
cubbyhole/          ns_cubbyhole    ns_cubbyhole_ebc1e938    per-token private secret storage
identity/           ns_identity     ns_identity_647c3433     identity store
sys/                ns_system       ns_system_b24fbdca       system endpoints used for control, policy and debugging
The
transitsecrets engine is no longer listed.
Disable performance replication and scale down the cluster
You have scaled your HCP Vault cluster from the dev tier to the plus tier
and enabled performance replication. During peak business hours your
applications have the necessary access to HCP Vault to meet your SLOs.
To help manage cost, you want to remove the secondary cluster and scale down your cluster during non-peak hours.
Removing performance replication requires removing the resources block for the
secondary cluster. Similarly, scaling the cluster down to a smaller tier
requires changing the tier value in variables.tf.
Remove the secondary cluster resources from
hcpvault.tf.$ sed -ibak '24,$ d' hcpvault.tfRemove the secondary cluster URL from outputs.tf
$ sed -ibak '16,$ d' outputs.tfChange the tier from
plus_smalltostandard_small.$ sed -ibak "s/plus_small/standard_small/g" variables.tfRe-apply the Terraform configuration.
$ terraform apply -auto-approveExample output:
time_sleep.wait_30_secondary: Refreshing state... [id=2022-06-08T18:23:13Z]
hcp_vault_cluster_admin_token.secondary_cluster_token: Refreshing state... [id=/project/11eb3a47-8920-4714-ba99-0242ac11000e/hashicorp.vault.cluster/vault-cluster-secondary/token]
hcp_hvn.secondary_cluster_hvn: Refreshing state... [id=/project/11eb3a47-8920-4714-ba99-0242ac11000e/hashicorp.network.hvn/hvn-aws-us-west-2]
hcp_hvn.primary_cluster_hvn: Refreshing state... [id=/project/11eb3a47-8920-4714-ba99-0242ac11000e/hashicorp.network.hvn/hvn-aws-us-east-1]
hcp_vault_cluster.secondary_cluster: Refreshing state... [id=/project/11eb3a47-8920-4714-ba99-0242ac11000e/hashicorp.vault.cluster/vault-cluster-secondary]
hcp_vault_cluster.primary_cluster: Refreshing state... [id=/project/11eb3a47-8920-4714-ba99-0242ac11000e/hashicorp.vault.cluster/vault-cluster-primary]
time_sleep.wait_30_primary: Refreshing state... [id=2022-06-08T13:54:09Z]
hcp_vault_cluster_admin_token.primary_cluster_token: Refreshing state... [id=/project/11eb3a47-8920-4714-ba99-0242ac11000e/hashicorp.vault.cluster/vault-cluster-primary/token]

Terraform used the selected providers to generate the following execution plan. Resource actions are indicated with the following symbols:
  ~ update in-place
  - destroy

Terraform will perform the following actions:

  # hcp_hvn.secondary_cluster_hvn will be destroyed
  # (because hcp_hvn.secondary_cluster_hvn is not in configuration)

...snip...

hcp_vault_cluster.primary_cluster: Still modifying... [id=/project/11eb3a47-8920-4714-ba99-0242ac...rp.vault.cluster/vault-cluster-primary, 15m21s elapsed]
hcp_vault_cluster.primary_cluster: Modifications complete after 15m27s [id=/project/11eb3a47-8920-4714-ba99-0242ac11000e/hashicorp.vault.cluster/vault-cluster-primary]

Apply complete! Resources: 0 added, 1 changed, 4 destroyed.

Outputs:

namespace = "admin"
primary_token = <sensitive>
primary_vault_public_endpoint_url = "https://vault-cluster-primary-public-vault-d7a8ff49.edd3051f.z1.hashicorp.cloud:8200"
Log into the HCP Portal and navigate to the Vault clusters list. Terraform removed the secondary cluster and the cluster scaled down from
plus_smalltostandard_small.
Summary
By using simple, modular, and composable infrastructure as code with Terraform, you can manage the lifecycle of your HCP Vault clusters.
Clean up
Here are the steps you need to clean up the scenario content from your local environment.
Delete the HCP Vault configuration.
$ VAULT_TOKEN=$(terraform output -raw primary_token) terraform -chdir=config/ destroy -auto-approveDelete the HCP Vault cluster instance and HVN.
$ terraform destroy -auto-approveUnset the environment variables.
$ unset VAULT_ADDR VAULT_TOKEN VAULT_NAMESPACE