Manage access to secrets in HCP Vault Dedicated using policies
Policies are a declarative way to grant or forbid access to certain paths and operations in Vault. In this tutorial, Oliver will create a policy to manage access to secrets in HCP Vault.
Prerequisites
- Completed the Create a Vault Cluster on HashiCorp Cloud Platform (HCP) tutorial.
- Completed the Access your HCP Vault Dedicated cluster tutorial.
Create a policy
(Persona: operations)
You write ACL policies using the HashiCorp Configuration Language (HCL). Here is an example policy:
# Grant 'create', 'read' and 'update' permission to paths prefixed by 'secret/data/test/'
path "secret/data/test/*" {
  capabilities = [ "create", "read", "update" ]
}

# Manage namespaces
path "sys/namespaces/*" {
   capabilities = [ "create", "read", "update", "delete", "list" ]
}
The policy format uses a prefix matching system on the API path to determine access control. The most specific defined policy takes precedence, either an exact match or the longest-prefix glob match. Since everything in Vault uses the Vault API, this gives strict control over every aspect of Vault, including enabling secrets engines, enabling auth methods, authenticating, as well as secret access.
In the Vault UI, set the current namespace to
admin/.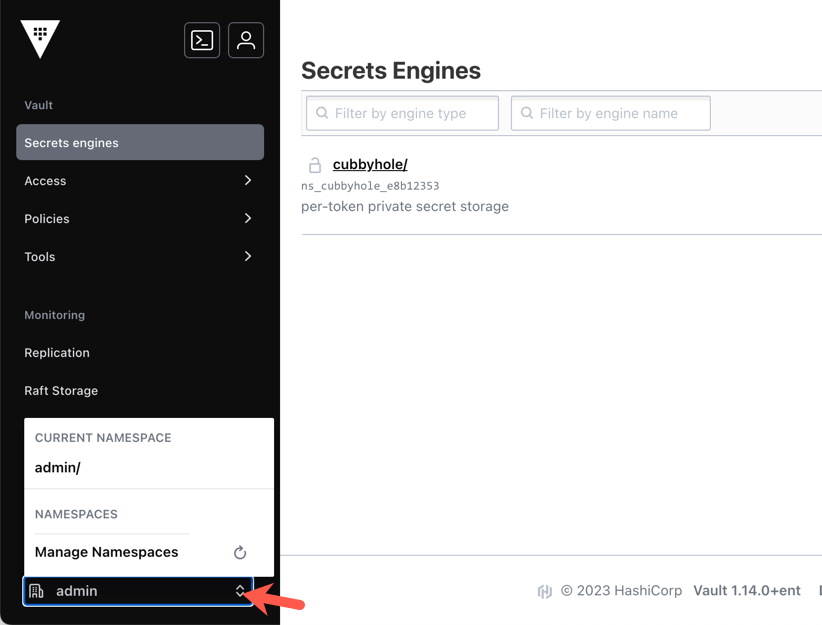
Click Policies.
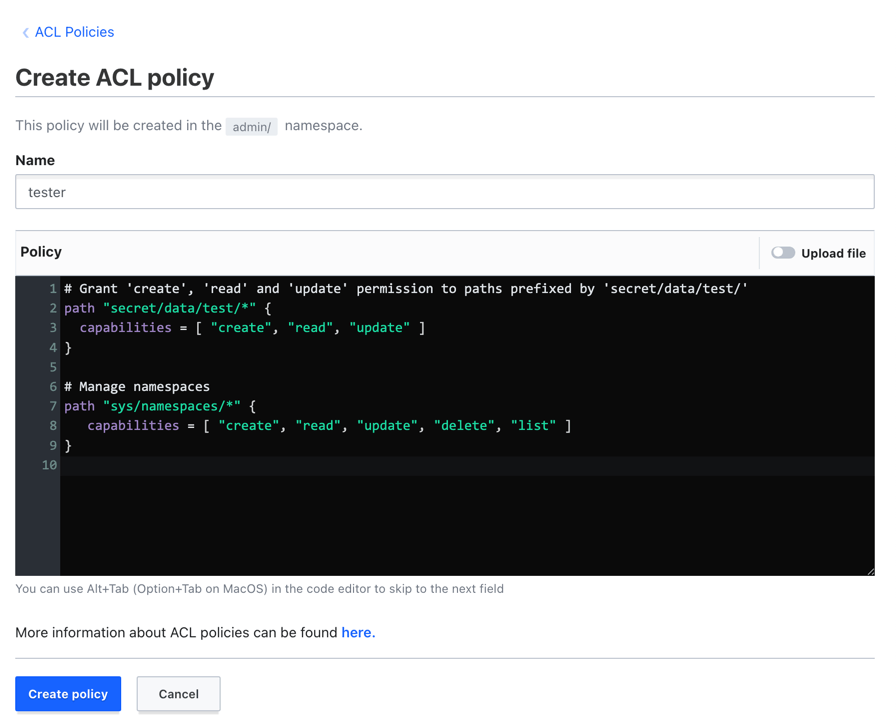
Select Create ACL policy.
Enter
testerin the Name field.Enter the following policy in the Policy textbox.
# Grant 'create', 'read' and 'update' permission to paths prefixed by 'secret/data/test/' path "secret/data/test/*" { capabilities = [ "create", "read", "update" ] } # Manage namespaces path "sys/namespaces/*" { capabilities = [ "create", "read", "update", "delete", "list" ] }Click Create policy at the bottom of the page.
Vault displays the policy name and contents.
Policies to access another namespace
(Persona: operations)
The policy path is relative to the namespace in which you create the policy. If
you want to access the database/ path in the admin/education/training
namespace from the admin namespace, the policy path must be
education/training/database/*.

The policy you deploy in the admin namespace must look similar to the
following:
# Grant CRUD operations against the path prefixed with 'database/' in the 'training' namespace
path "education/training/database/*" {
   capabilities = [ "create", "read", "update", "delete" ]
}
The policy you deploy in the admin/education namespace must look
similar to the following:
# Grant CRUD operations against the path prefixed with 'database/' in the 'training' namespace
path "training/database/*" {
   capabilities = [ "create", "read", "update", "delete" ]
}
To learn more, read the Secure Multi-Tenancy with Namespaces tutorial.
Summary
Oliver created a policy in HCP Vault. Vault attaches policies to tokens that Vault generates through its various authentication methods.
Policy authoring requires an understanding of paths which map to the Vault API endpoints, and the available actions for each path. Learn more about policies.
In addition to ACL policies, HCP Vault Dedicated standard tier also supports Sentinel policies to enable fine-grained, logic-based policy decisions.
Knowledge checks
A quiz to test your knowledge.
Which of the following statements about Vault policy evaluation is true?
🔘 Vault evaluates policies from the bottom up, applying the last rule it reads.
🔘 The most specific defined policy takes precedence, either an exact match or the longest-prefix glob match.
🔘 Vault policies explicitly deny access by default, and any policy matching the path will override the deny.
🔘 Wildcard characters are not allowed in Vault policy paths.
❌ Vault evaluates policies from the bottom up, applying the last rule it reads.
✅ The most specific defined policy takes precedence, either an exact match or the longest-prefix glob match.
❌ Vault policies explicitly deny access by default, and any policy matching the path will override the deny.
❌ Wildcard characters are not allowed in Vault policy paths.
What is the danger of editing the
hcp-rootpolicy in theadmin/namespace?🔘 It will delete all secrets stored in the
admin/namespace.🔘 It will force all active users to re-authenticate immediately.
🔘 It can prevent you from performing tasks that require admin privileges because the admin token relies on this policy.
🔘 It will permanently lock the
admin/namespace, requiring HashiCorp support to unlock it.❌ It will delete all secrets stored in the
admin/namespace.❌ It will force all active users to re-authenticate immediately.
✅ It can prevent you from performing tasks that require admin privileges because the admin token relies on this policy.
❌ It will permanently lock the
admin/namespace, requiring HashiCorp support to unlock it.How do you define a policy path to access resources located in a child namespace?
The policy path is relative to the namespace in which you create the policy. To access a resource in a child namespace, you must include the relative path to that child namespace, such as defining the path as
education/training/database/*when deploying the policy in theadminnamespace.
Next steps
Now that Oliver has created policies in HashiCups HCP Vault cluster, they must learn about enabling auth methods to allow users and applications to authenticate to Vault.