Self-hosted agents
Self-hosted HCP Terraform agents are lightweight agents that execute Terraform runs on behalf of HCP Terraform or Terraform Enterprise and report back the results.
There are three reasons for using self-hosted agents:
- To increase the number of concurrent Terraform runs.
- To access resources in restricted networks (where HCP Terraform or Terraform Enterprise do not have direct access).
- To provide additional tools to the Terraform runtime via hooks.
Specific to Terraform Enterprise
Deploying HCP Terraform agents and registering them with your Terraform Enterprise instance is one strategy to scale the capacity of your installation, with the other strategies being:
- Migrating to an active/active operational mode and increasing the number of Terraform Enterprise nodes.
- Add more resources to the virtual machines hosting the Terraform Enterprise nodes, and increasing the capacity configuration parameters (
TFE_CAPACITY_CONCURRENCY,TFE_CAPACITY_CPU,TFE_CAPACITY_MEMORY).
If you are facing capacity issues and have reached the limits of the two alternate scaling strategies, deploying HCP Terraform agents is your next logical step.
Once deployed and running, the HCP Terraform agent instance will register itself with Terraform Enterprise and start processing runs. When the agent is shut down, it will deregister itself from Terraform Enterprise and reduce the capacity of the instance to process Terraform runs.
Access resources in restricted networks
Some resources that you need to configure with Terraform are sometimes located in isolated networks for security reasons, or because they are in private data centers. Deploying an HCP Terraform agent in the isolated network and providing the agent outbound connectivity to HCP Terraform will solve this challenge.
The tutorial Manage Private Environments with HCP Terraform Agents illustrates how this capability works.
Customizing the tools available and support custom logic
In some cases, you may need additional tools available to the Terraform runtime, or you may need to execute custom processes during strategic points of a Terraform run (see the documentation on HCP Terraform agent hooks). If you are in either one of those situations, then adopting HCP Terraform agents is necessary.
Implementation guidance
There are two primary ways to deploy self-hosted agents. One is to run the agent on VMs managed by you (e.g EC2 instance), alternatively we provide a Kubernetes operator that can automate deployment of the agents. We recommend that customers who are skilled in Kubernetes choose the K8S operator since it provides additional capabilities such as autoscaling.
For more details please refer to the Agent documentation.
Building a custom agent image
Since one of the benefits of the self-hosted image is the ability to add custom pre/post hooks and other dependencies, having a pipeline to automate this is recommended.
New HCP Terraform agent versions are released regularly and you should be keeping up to date with those releases. We recommend automating image building using your CI/CD tool of choice to lower the burden of keeping up with the releases.
To get notified of new releases, you may use the following sources of information:
- Our documentation site (HCP Terraform Agent Changelog)
- The HashiCorp Releases API (Announcing the HashiCorp Releases API)
If you decide to deploy the HCP Terraform agent on a virtual machine, we recommend using Packer to build the images to deploy and the HCP Packer integration with HCP Terraform to deploy the HCP Terraform agent instances.
Deployment
Whether you have selected the virtual machine or container deployment mode, you must automate the deployment of HCP Terraform agent instances. There are two major steps in agent deployment:
- Create the agent pool and generate the registration token.
- Deploy the agent instance(s) in an agent pool.
Create Agent pools
HCP Terraform organizes agents into pools. Each workspace can specify which agent pool should run its workloads. If you’ve defined the default execution mode for the organization to be “Agent”, then you can assign a default agent pool for workspaces.
The creation of agent pools can be done using the WebUI, the API (see the documentation for HCP Terraform, and Terraform Enterprise), or the Terraform TFE provider (tfe_agent_pool, tfe_agent_pool_allowed_workspaces, tfe_agent_token). We recommend using the Terraform TFE provider to configure your HCP Terraform or Terraform Enterprise instance. Review the applicable security controls for the agent tokens as you will likely need to implement a token rotation schedule.
Design
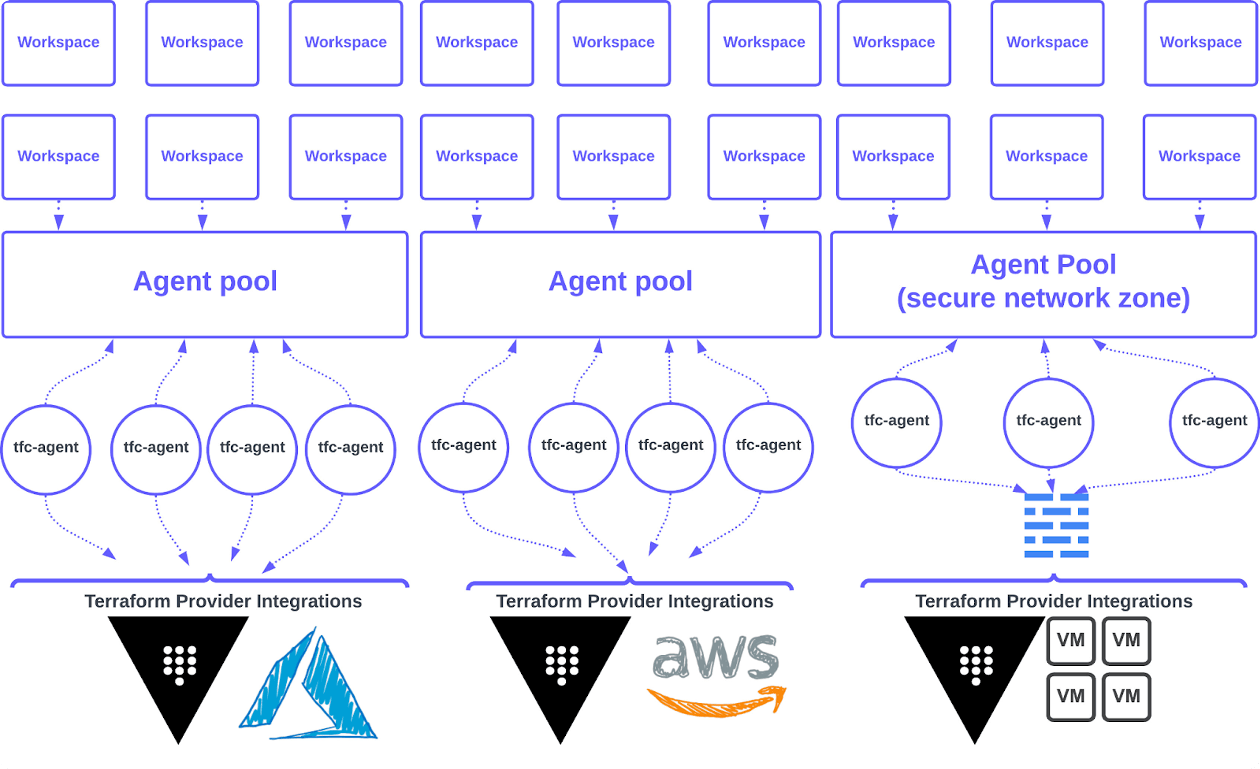
Your agent pool strategy will depend on a number of factors, the most common ones being:
- The limits of the product (HCP Terraform or Terraform Enterprise)
- The reason why you're implementing HCP Terraform agents.
- The cloud service providers you need to deploy infrastructure to.
- Your organization’s network segmentation strategy.
HCP Terraform and Terraform Enterprise have different constraints regarding the number of HCP Terraform agents running concurrently:
- HCP Terraform enforces run concurrency and self-hosted agent limits that very based on the chosen tier.
- Terraform Enterprise imposes no limit on the number of agents running concurrently.
When designing your agent pool setup, this aspect of the product must be considered, as well as the following:
- Cloud provider isolation: Dedicated agent pool(s) per cloud provider offer benefits such as a streamlined credential management process and, access to provider-specific resources that enhance security and efficiency.
- Environment isolation: Dedicated agent pools based on environment types prevent accidental changes across development, staging, and production, facilitating focused testing and validation efforts.
- Operations isolation: For highly privileged operations, separate pools enable granular permission management and efficient audit trail, mitigating security risks and ensuring compliance.
Naming convention
Establishing a consistent and intuitive naming convention for your agent pools is essential for maintaining clarity, organization, and ease of management across your infrastructure. Agent pool names must be unique and will be used by workspace administrators when linking workspaces to a specific agent pool.
In the remainder of this section, we’re covering a recommended naming convention pattern that incorporates various parameters such as team names, environment names, and cloud provider identifiers based on some of the factors discussed above.
The recommended agent pool naming convention is:
{environment}-{cloud service provider}-agentpool
Where:
{environment}is the name or abbreviation of the environment associated with the agent pool (for example,dev,staging,prod). This can be a prefix for each associated network perimeter.{cloud service provider}is a short identifier for the cloud provider associated with the agent pool (for exampleaws,azure,gcp).
Some examples of agent pool names following the recommended naming convention:
dev-aws-agentpoolstaging-azure-agentpoolprod-gcp-agentpool
Additional considerations are:
- Abbreviations. Consider using standardized abbreviations for team names, environment names, and cloud provider names to keep the naming format concise and consistent.
- Delimiters. Use hyphens or underscores as delimiters between different components of the name for readability and consistency.
- Lowercase. Keep the entire name in lowercase for uniformity and ease of use.
- Avoid special characters. Avoid using special characters or spaces in the names to ensure compatibility with various systems and automation tools.
Documentation and communication:
- Document the naming convention standards in your organization's documentation or internal wiki to ensure consistency and provide guidance to team members.
- Communicate the naming convention to all relevant stakeholders, including teams responsible for provisioning, managing, and monitoring agent pools.
By following a clear and standardized naming convention like the one outlined above, you can streamline the identification, management, and communication of agent pools across your organization's multi-cloud environments while promoting consistency and clarity. Adjust the convention as needed to align with your organization's specific requirements, preferences, and existing naming conventions.
Deploying agents into agent pool
The options to deploy HCP Terraform agent instances depend on the deployment mode (virtual machine or container).
Virtual machines
If you are deploying HCP Terraform agents on virtual machines, we recommend using HCP Terraform or Terraform Enterprise to manage the virtual machines, leveraging the integration with HCP Packer (see Get started with HCP Packer). We also recommend using an automated scaling solution such as an autoscaling group (AWS), a managed instance group (GCP) or a scale set (Azure). The rolling upgrade feature of those automated scaling solutions helps simplify management, even when there is only a single HCP Terraform agent instance running.
When making scaling decisions for virtual machine deployments, you can leverage metrics produced by the agents as well as API endpoints.
The following HCP Terraform agent metrics should be used to make scaling decisions:
tfc-agent.core.status.busywhich is the number of agents in busy status at a particular point in time.tfc-agent.core.status.idlewhich is the number of agents in idle status at a particular point in time.
The following API endpoints are also a source of valuable information to automate scaling decisions:
- List all the agent pools configured,
- List all workspaces using an agent pool,
- List of all pending runs,
- List all runs in a workspace.
Containers
If you are deploying HCP Terraform agents on containers, we recommend the following options:
- Deploy on a managed Kubernetes service using HCP Terraform Operator for Kubernetes.
- Deploy on a managed container orchestration tool such as ECS Fargate on AWS, Cloud Run on GCP, or ACI on Azure.
- Deploy on a managed OpenShift offering (for example ROSA on AWS or ARO on Azure).
A deployment on an orchestrator supported by the HCP Terraform Operator for Kubernetes is the option recommended by HashiCorp as it will solve both the deployment and dynamic scaling requirements.
Agent authentication
Agents and workspaces need to authenticate to the respective Cloud providers and tools to manage the lifecycle of the resources within those platforms. There are multiple ways to manage agent authentication to these platforms:
- Dynamic provider credentials: With the OIDC protocol, a trust relationship between the Cloud Provider or external tool and HCP Terraform or Terraform Enterprise can be set up to generate temporary credentials used to authenticate to the respective platform. Dynamic credentials permissions can be scoped based on the project, workspace and Terraform operation (plan or apply), making it the most flexible option.
- Cloud provider IAM roles attached to agents: Leverage the IAM roles attached to the underlying compute resources of the HCP Terraform agents to authenticate with the respective cloud provider.
- Vault provider for Terraform: Retrieve credentials from Vault (static or dynamic credentials) and use those credentials for authentication.
- Variables: Set static credentials as sensitive variables in workspaces. This approach can be extended and applied to multiple workspaces, projects or an organization as a whole by using variable sets. If necessary, use priority variable sets to prevent variables from more specific scopes from overwriting values set at less specific scope (for example, global or project scope).
Observability
HCP Terraform agents produce execution logs and it is important that you include them in the logs you already collect and analyze. Doing so will help ensure that you have a complete picture of the operations of Terraform Enterprise (or HCP Terraform) and can detect any issue or error that may arise.
By analyzing all the logs related to your Infrastructure as Code service together, you’ll be better equipped to make informed decisions about optimizing and improving your Terraform Enterprise or HCP Terraform deployment. Always remember to stay vigilant and monitor your logs to ensure the systems run smoothly and securely.
The HCP Terraform agent also exposes telemetry data using the OpenTelemetry protocol. This feature allows you to use a standard OpenTelemetry collector to push the metrics to a central monitoring solution that supports the protocol. OpenTelemetry is supported by a wide range of monitoring solutions, such as: Prometheus, DataDog, New Relic.
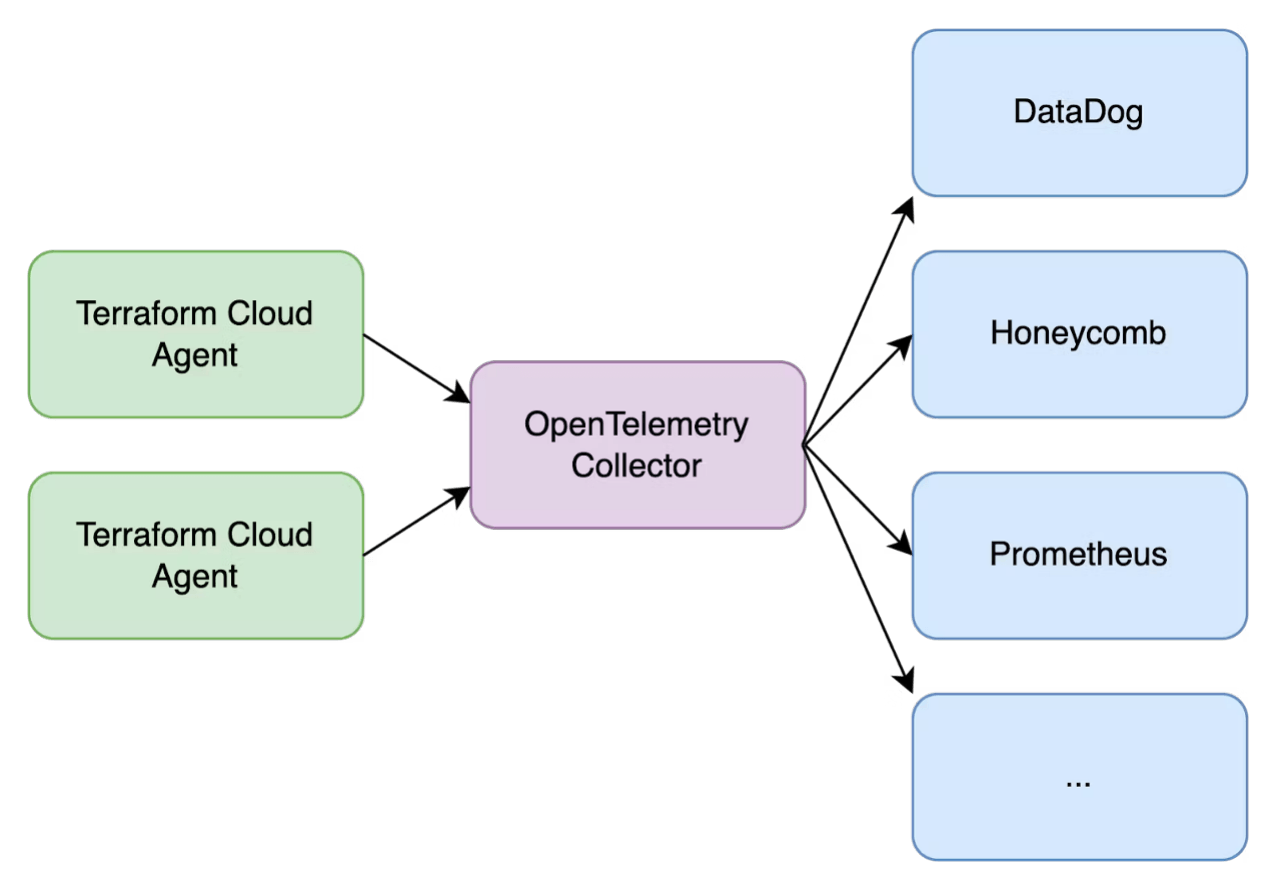
To use telemetry data from your HCP Terraform agents, you need:
- To deploy and run OpenTelemetry collectors
- A central monitoring system that can integrate with OpenTelemetry collectors
You can find additional information by following those links:
Agent Configuration
To configure your agent to emit telemetry data, you must include the -otlp-address flag or TFC_AGENT_OTLP_ADDRESS environment variable. This should be set to the host:port address of an OpenTelemetry collector. This address should be a GRPC server running an OLTP collector.
Optionally, you can pass the -otlp-cert-file or TFC_AGENT_OTLP_CERT_FILE. The agent will use a certificate at the path supplied to encrypt the client connection to the OpenTelemetry collector. When omitted, client connections are not secured.
Considerations for Terraform Enterprise
External access to metadata endpoints
To verify signed JWTs, cloud platforms must have inbound network access (via the same FQDN configured within Terraform Enterprise) to the following static OIDC metadata endpoints within Terraform Enterprise:
| Endpoint | Description |
|---|---|
/.well-known/openid-configuration | Standard OIDC metadata |
/.well-known/jwks | Public key(s) used by cloud platforms to verify the authenticity of tokens claiming to originate from the Terraform Enterprise instance. |
External Vault policy
If you are using an external Vault instance you must ensure that your Vault instance has the correct policies set up as detailed in the External Vault Requirements for Terraform Enterprise documentation.
Request Forwarding (HCP Terraform Only - Premium SKU)
Details can be found here https://developer.hashicorp.com/terraform/cloud-docs/agents/request-forwarding
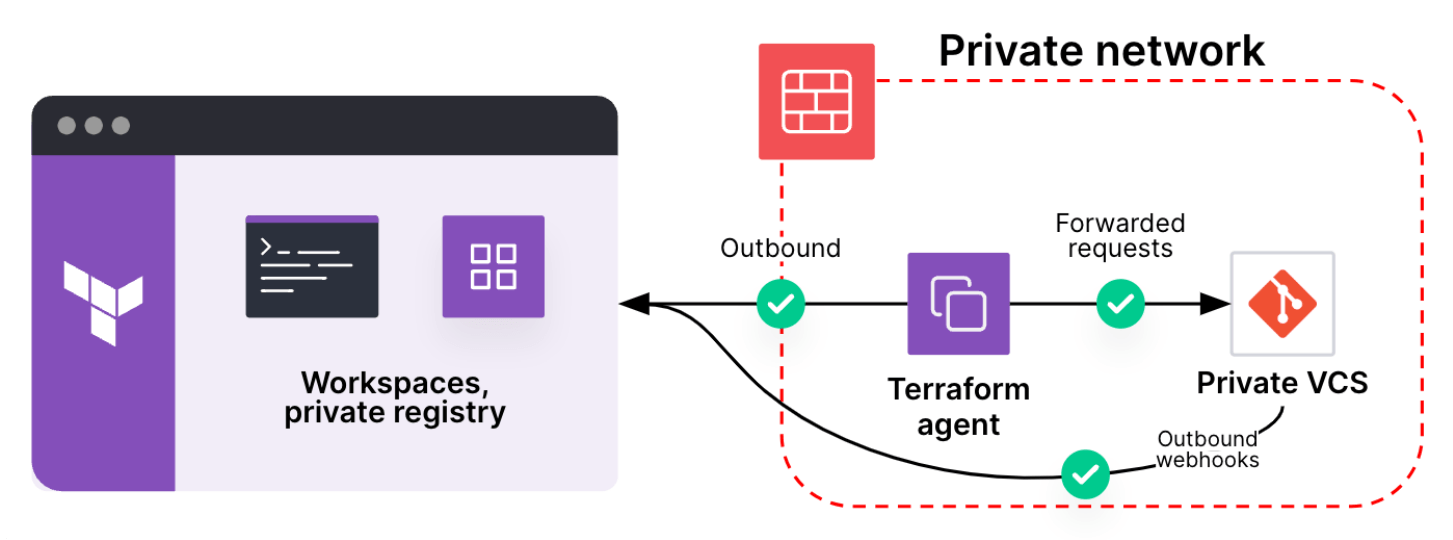
Request forwarding is an additional function that is used by HCP Terraform to access services in private networks, such as:
- A self-hosted version control system
- A service running a custom run task
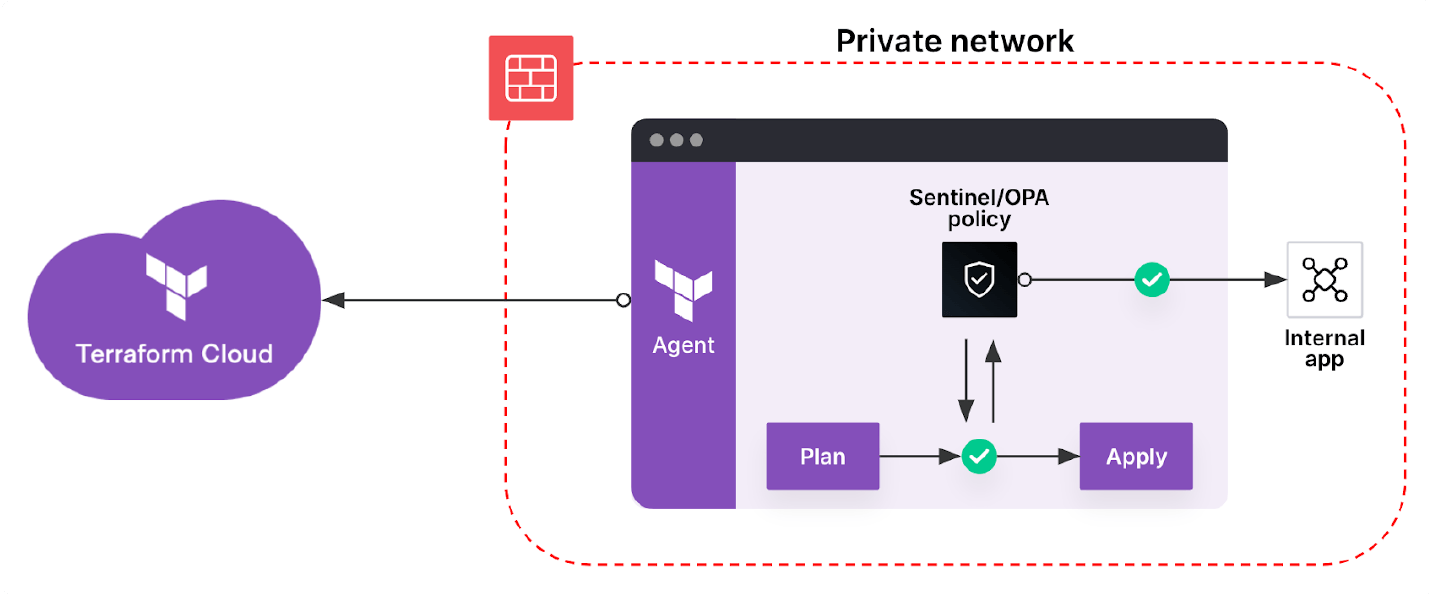
- A service used when executing a Sentinel or OPA policy check
There are legitimate reasons for an organization to keep these services unreachable from the public internet, but this poses an issue if they are required by HCP Terraform. Request forwarding solves the problem of allowing HCP Terraform to access those systems without exposing them to the internet.
To take advantage of this feature you must:
- Deploy the agent into a private network where they have access to the target service, and are allowed to connect to HCP Terraform via an outbound-only connection.
- Enable the feature on a per-agent basis using a command line flag or an environment variable.
Once you have enabled the feature, the agent will register with HCP Terraform via outbound-only connections. HCP Terraform holds these connections open and uses them to transmit requests and responses between the target service and HCP Terraform.

Once the connection is established, HCP Terraform can leverage it to access a self-hosted VCS, as illustrated below:
HCP Terraform an also use agent request forwarding to execute Sentinel or OPA policy checks on the agent (by default they run on the HCP Terraform infrastructure) as illustrated below:
If you choose to implement this feature, we recommend reviewing the documentation below:
Network requirements
When Terraform Enterprise servers or HCP Terraform agents are deployed in a completely air-gapped environment where outbound access to releases.hashicorp.com and registry.terraform.io is restricted, the Terraform binary and the provider installations need to be managed in an alternative way. Additionally, your organization would like to have security scans in place for each Terraform binary and provider installation used in your workflows and also control what providers can be used with their version restrictions. These requirements can be achieved using the following methods:
Network mirror: The provider network mirror protocol is an optional protocol that you can implement to provide an alternative installation source for Terraform providers, regardless of their origin registries.
Private registry: Private providers can be published to an organization’s private registry and can be referenced during Terraform runs. This does not manage Terraform binaries.
Detailed implementation steps can be found in the guide https://developer.hashicorp.com/terraform/cloud-docs/registry/publish-providers
In an air-gapped environment with restricted outbound connectivity, it is recommended to follow the network mirror approach for managing Terraform binaries and provider installations. Network mirrors allow you to manage the terraform binaries and provider installations separately in a private environment decoupled from each other.
Terraform uses network mirrors for provider installations only if you activate them explicitly in the CLI configuration's provider_installation block. When enabled, a network mirror can serve providers belonging to any registry hostname, allowing an organization to serve all of the Terraform providers they intend to use from an internal server, rather than from each provider's origin registry.
Terraform binary versions in Terraform Enterprise pointing to the Network Mirror source can be managed using the Admin API for Terraform Versions or by manually managing them through the Terraform Enterprise Admin UI.
Terraform binaries and providers referred via a network mirror must be stored in a remote File server discoverable by Terraform Enterprise. This file server MUST be HTTPS! (Can be a cloud provider object storage eg: S3, GCS, Blob Storage URLs)
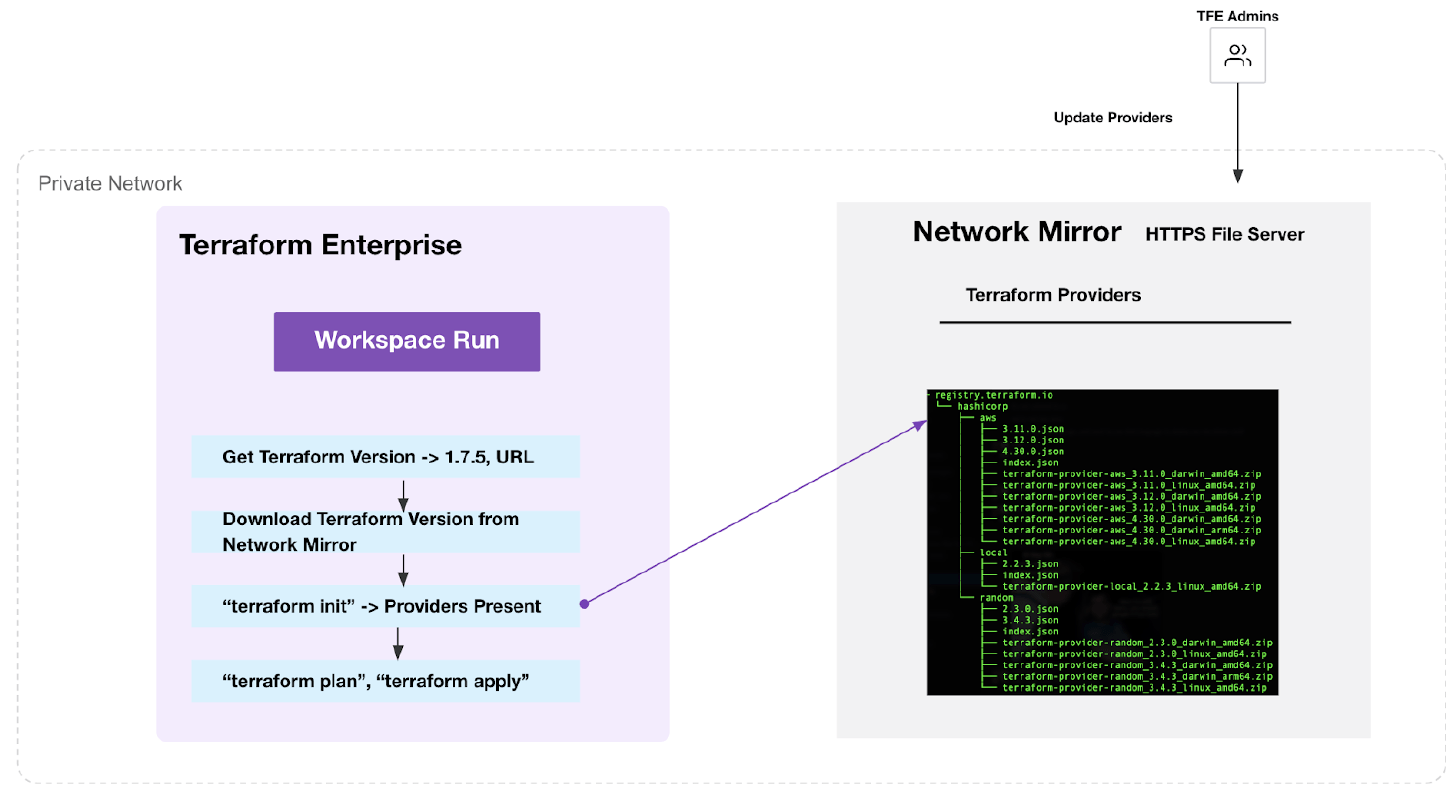
A summary of the steps are as follows:
- Download/create a mirror repository for the Terraform binaries by downloading the required versions of the Terraform binary from the official release repository
- Download/create mirror repository by using “terraform providers mirror” command.
- Sync/copy mirror directories of the binary and the providers to a file server.
- Configure the Terraform run (CLI) config to use network mirror (Options)
- HCP Terraform agents with the network mirror config appended to the “$HOME/.terraformrc” file via a custom hook.
- Remote CLI users would modify their Terraform CLI config ( “$HOME/.terraformrc”) to include the provider_installation block
- Create a Custom HCP Terraform agent image with network mirror settings for every Terraform run
- Add the Terraform version and its remote file server source via the Terraform Enterprise admin interface.
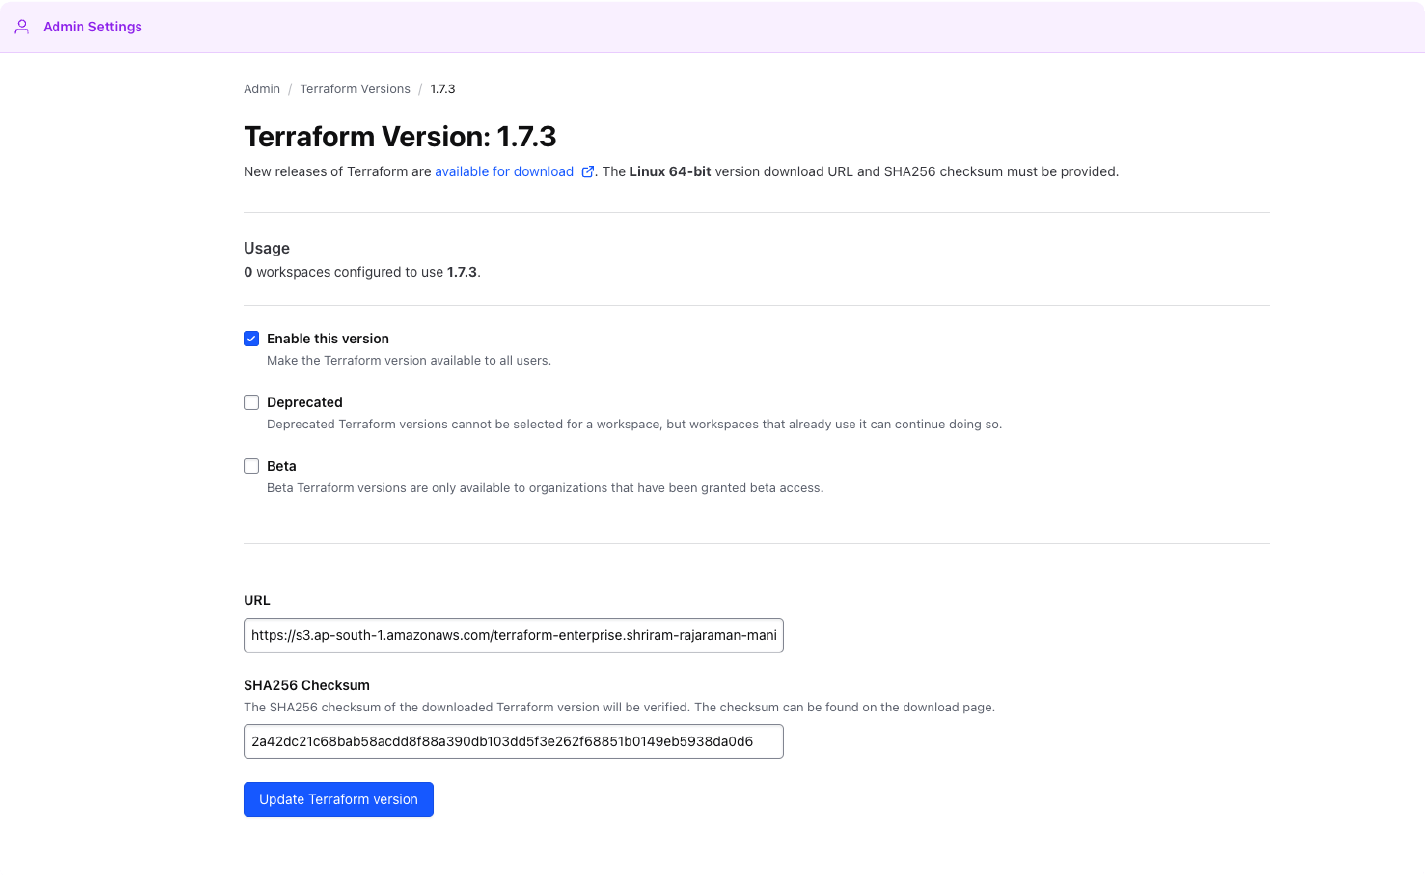
An automation process can be put in place to manage the various versions of the Terraform binaries and providers referenced using the network mirror. This can be a CI pipeline that updates the latest versions of the binaries and providers and publishes them to the remote source of the network mirror periodically according to your organization’s standards.
The Terraform CLI commands interact with the HashiCorp service Checkpoint to check for the availability of new versions and critical security bulletins about the current version. In an air-gapped environment where outbound access is restricted, this can be disabled using the environment variable CHECKPOINT_DISABLE and setting it to true or by adding the checkpoint setting disable_checkpoint=true in the CLI Configuration file used in the agent hooks.