Transparent sessions
Purpose of guide
This architectural guide presents a pattern for implementing HashiCorp Boundary Transparent Sessions. It focuses on best practices for platform operators and session users to follow when deploying and using Boundary Transparent Sessions in a production environment.
The main benefits of following this approach:
- Developer experience: Enhance user experience by allowing quick access to authorized targets without requiring users to change existing workflows or tools.
- Ensure compliance: Enforce strong, consistent, identity-based security controls with least privilege access to meet regulatory and organizational policies and service level agreements.
- Optimize security: Minimize the risk associated with static ports and credentials.
- Optimize costs: Minimize time to delivery by optimizing end user workflows.
Target audience
This guide targets organizations adopting a passive connection session establishment. It is relevant to the following roles:
- Platform operator: Maintains and scales Boundary from an infrastructure perspective. This role may reside within security-focused teams or broader infrastructure platform groups.
- Session user: Connects to authorized targets quickly through sessions. This role may reside within development teams, security-focused teams, or broader infrastructure teams.
Prerequisites
To complete the steps outlined in this guide, you need the following:
- Boundary deployment
- Aliases
- Client Agent
- Desktop Client (optional)
- Operating system
- macOS or Windows
Limitations
Please refer to the list of Known Issues that may affect Boundary Transparent Sessions.
Background and best practices
Boundary is a secure access management solution for accessing resources in private environments. Boundary Transparent Sessions provides developers with a seamless working experience by eliminating the need to remember resource IDs or ephemeral ports to connect to assets. Boundary accomplishes this by working in the background to handle authentication, authorization and to transparently grant access to the selected target through DNS interception and rerouting traffic through a session automatically.
Transparent Sessions requires Aliases and Boundary Client Agent to be able to run.
Aliases
As a globally unique DNS-like string, aliases enhance the developer experience by allowing the end user to indicate which target they wish to connect to through an alias value that maps back to a target ID. The end user can now initiate a session through remembrance of a human-readable alias such as boundary.dev, database.boundary and webserver.boundary. HashiCorp recommends not using single-word aliases such as database or webserver as single-word aliases do not work intuitively for Windows. We recommend that aliases include a separator (.). Aliases like database.boundary work, but database does not work.
When users initiate a connection to an authorized target using an alias, Boundary generates a session and transparently proxies the connection on behalf of the user. Aliases are not independent resources, they are metadata linked to a target. While aliases may exist without a link to a target, if you attempt to use them without configuring a link to a target, they do not function as intended.
For full guidance on Target Alias creation, please visit our documentation.
Boundary Client Agent
Boundary Client Agent is Boundary's DNS daemon. When run alongside an authenticated Boundary Client, the agent establishes itself as the primary resolver on the client machine and intercepts DNS requests to reroute through a session. If a host name matches a Boundary alias that you have authorization to access, Boundary transparently proxies the connection on behalf of the user. In instances where there is no match to a Boundary alias, Boundary's Client Agent performs recursive queries to the previously set DNS resolvers. The default configuration of the Client Agent is suitable for most users.
Client Agent logging
You can find the Client Agent log locally in the following folder:
/Library/ApplicationSupport/HashiCorp/Boundary/boundary-client-agent.log
Example of establishing Client Agent session:
2025-05-08T19:16:15.942-05:00
2024-05-08T14:42:16.704-0700 [INFO]  1827615645: found matching Boundary target: query name=ssh.boundary.dev. query type=1 target id=ttcp_TZ1fHSiAac port=22 client port=0 user id=503
2024-05-08T14:42:16.704-0700 [INFO]  1827615645: macos.(darwinIfaceImpl).AddIp: going to add address to interface: ip=100.68.11.191 interface-name=en0
2024-05-081T14:42:16.721-0700 [INFO]  1827615645: underlying listener: : addr=100.68.11.191:22
2024-05-08T14:42:16.721-0700 [INFO]  1827615645: adding cleanup at time: session_expiration="2024-04-01 05:42:16.679928 +0000 UTC" time until=7h59m59.958007s cleanup_time=28798
2024-05-08T14:42:16.721-0700 [INFO]  1827615645: matching qtype, continuing
2024-05-08T14:42:16.722-0700 [INFO]  1827615645: returning dns answer: qtype=1 ip=100.68.11.191
2024-05-08T14:42:16.724-0700 [INFO]  1827615645: starting proxy for : target name=ssh.boundary.dev. entry addr=100.68.11.191 listener addr=100.68.11.191:22
Example of Client Agent log showing user connection to an already established session:
2025-05-08T12:57:14.804-0700 [INFO]  User successfully authenticated: UserId=503
2024-05-08T12:57:24.950-0700 [INFO]  1256893734: handling request: question=ssh.boundary.dev. local-addr-net=udp local-addr=100.93.11.86:53
2024-05-08T12:57:24.957-0700 [INFO]  3664984977: handling request: question=ssh.boundary.dev. local-addr-net=tcp local-addr=100.93.11.86:53
2024-05-08T12:57:24.957-0700 [INFO]  3664984977: existing session found
2024-05-08T12:57:24.957-0700 [INFO]  3664984977: incoming info: qtype=1 local addr=100.93.11.86
2024-05-08T12:57:24.957-0700 [INFO]  3664984977: existing info: qtype=1 addr=100.68.11.191
2024-05-08T12:57:24.957-0700 [INFO]  3664984977: matching qtype, continuing
2024-05-08T12:57:24.957-0700 [INFO]  3664984977: returning dns answer: qtype=1 ip=100.68.11.191
Validated architecture
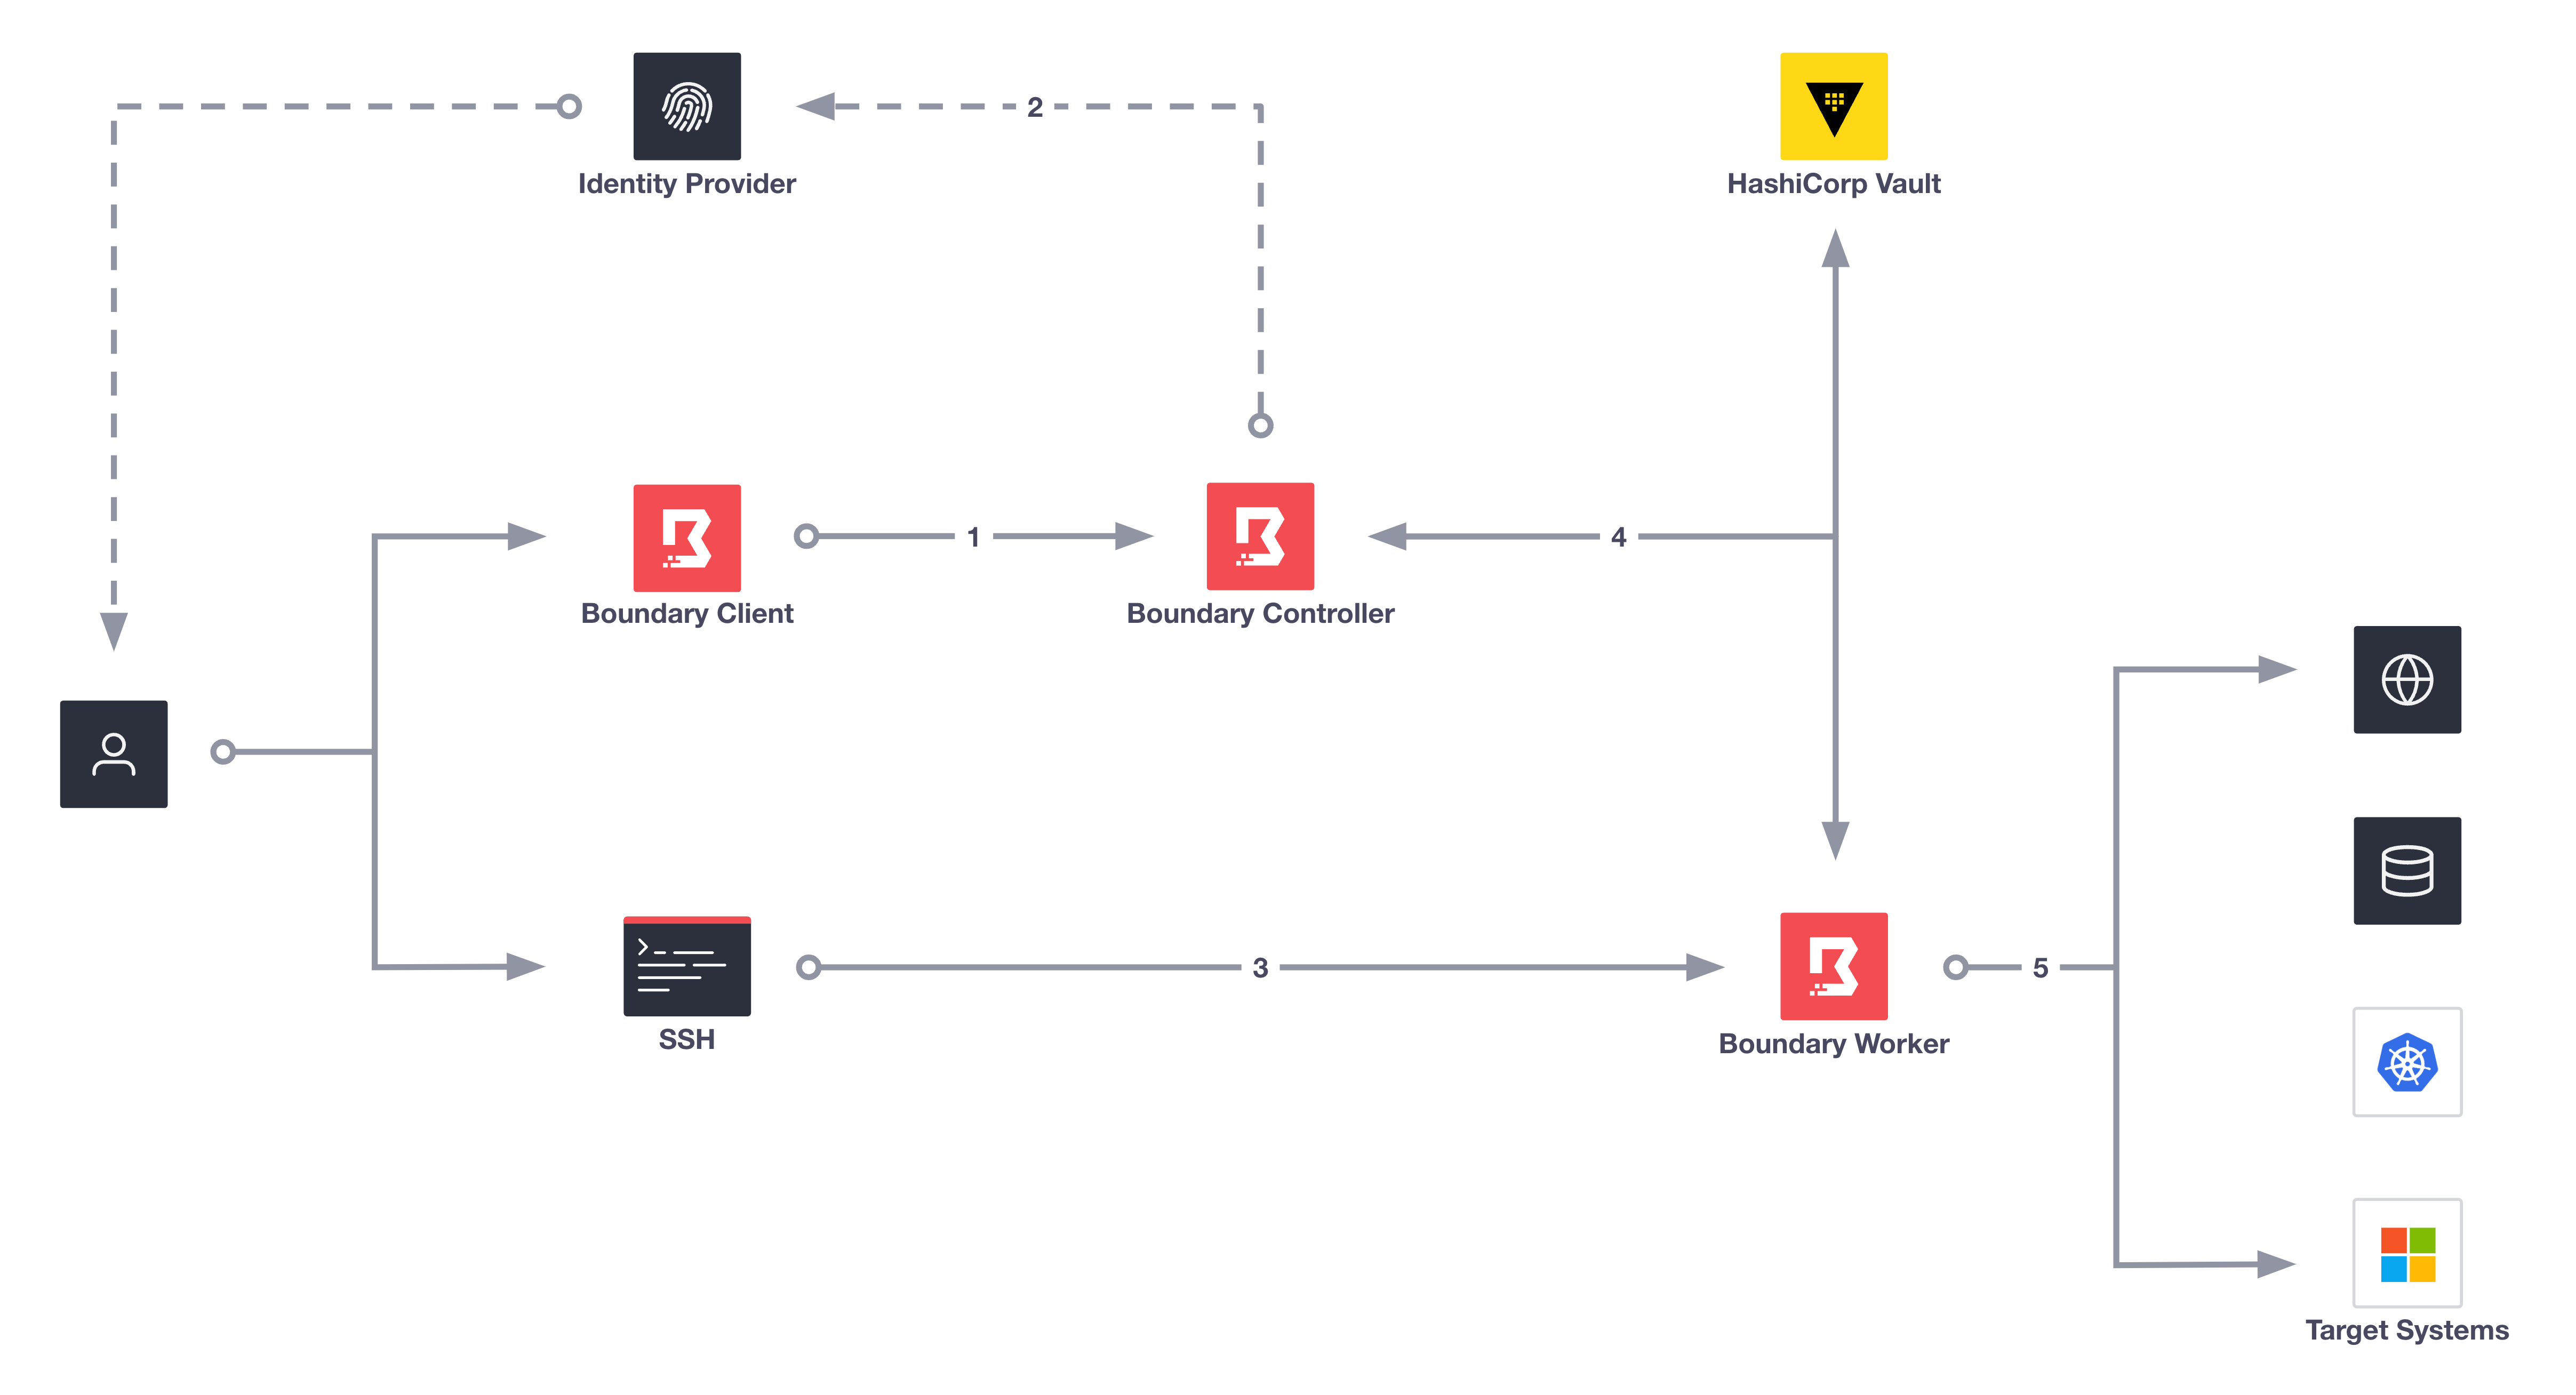
In the above diagram, Boundary works in the background to authenticate the user, authorize the user's login, and connect them to their target. Key steps, such as four and five, occur without end-user visibility, as Boundary brokers these steps machine to machine. We dive into one of the key components for Transparent Session in the next diagram.
- User logs onto Boundary Controller using Boundary client.
- If using an external Identity provider, Boundary redirects users to authenticate with an Identity Provider.
- User uses preferred client tool (SSH terminal, browser, etc) to connect to Target.
- Boundary controller retrieves credentials from Vault and sends them to the Boundary Worker.
- Boundary establishes a connection and injects dynamic credentials into the session.
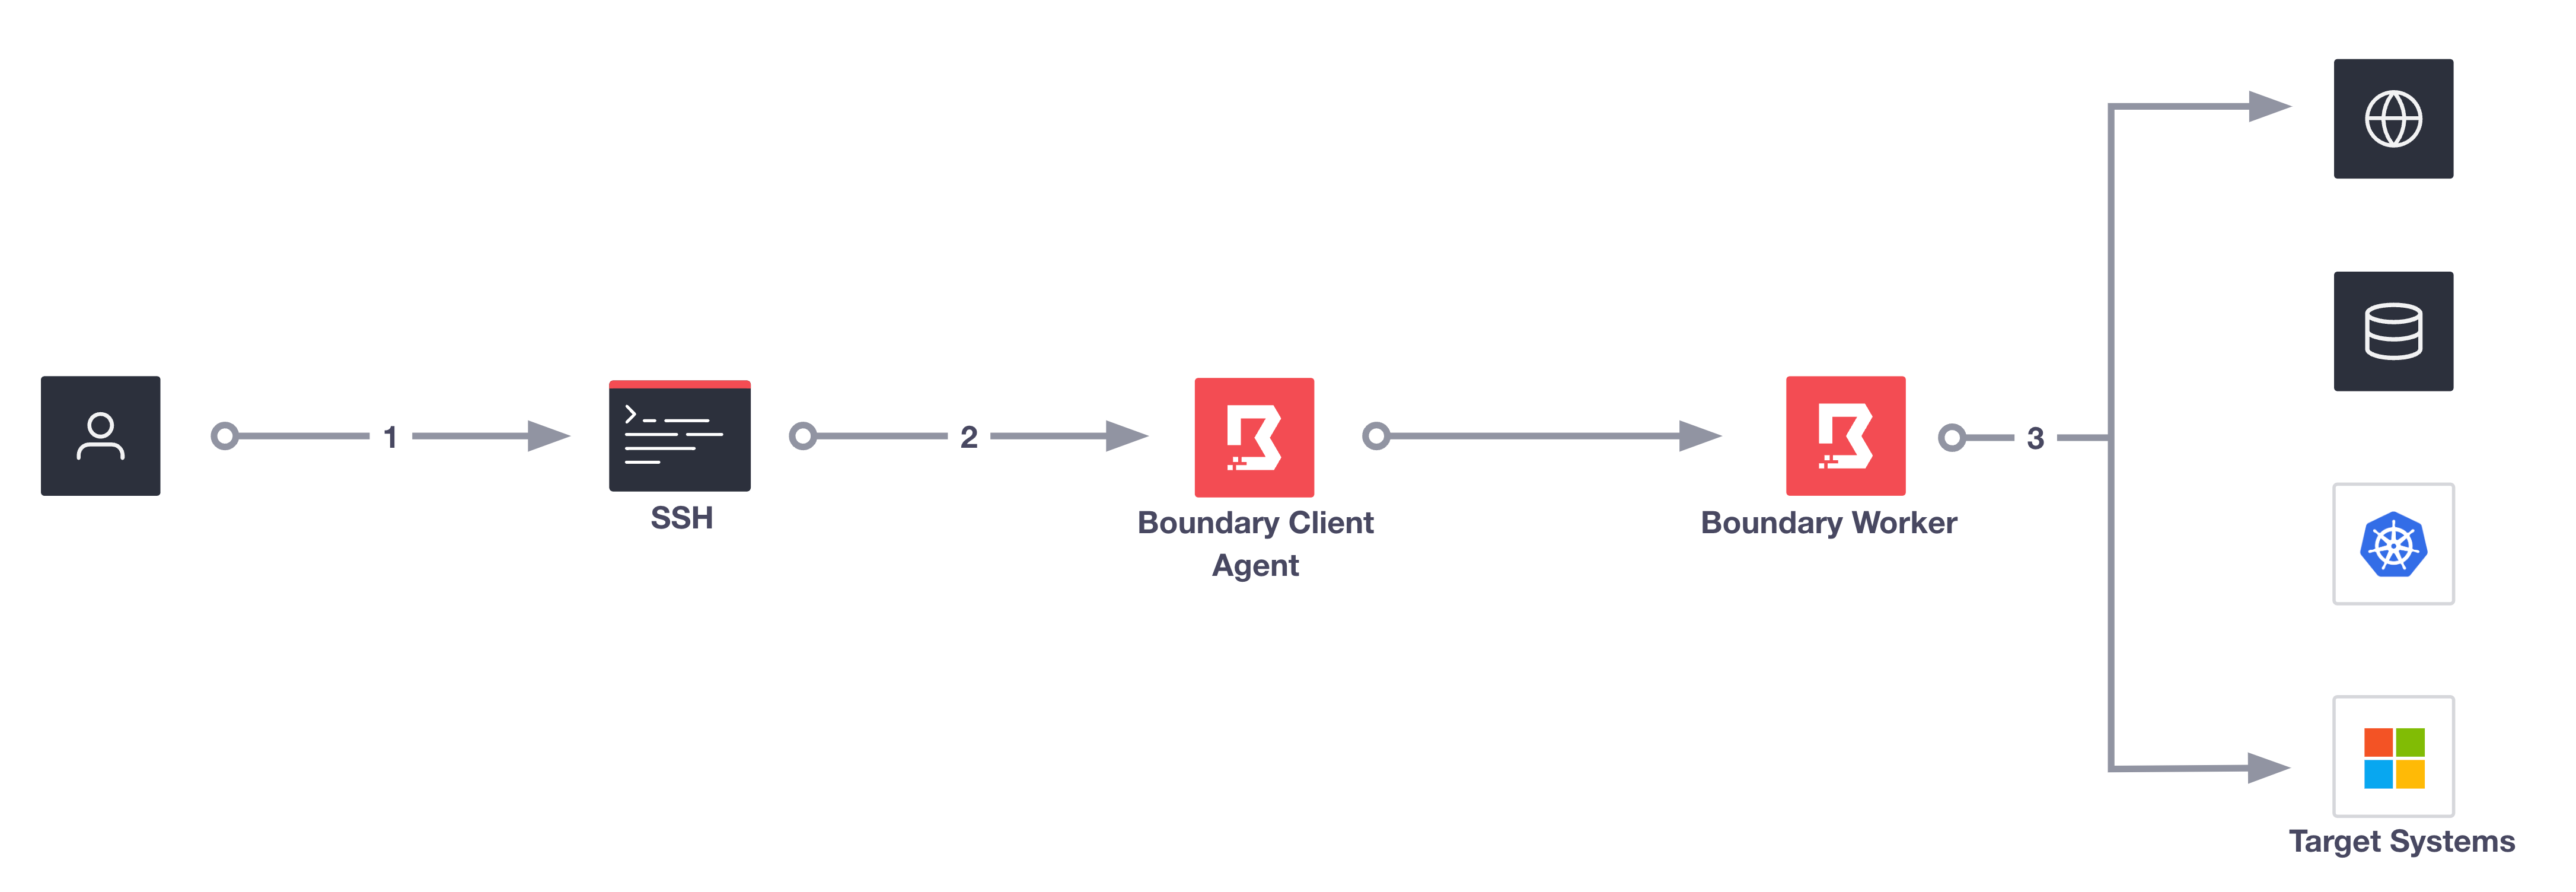
In the above diagram, Boundary Client-Agent establishes itself as the primary resolver on the client machine and intercepts DNS requests made by the end user on the system. Once the client agent intercepts the DNS request it checks if Boundary manages the alias. If the alias does exist, and the end-user has authorization to connect to the target, the client agent reroutes traffic through a Boundary session automatically. In the above diagram, the user has already authenticated.
- End-user uses preferred client tool (SSH terminal, browser, etc) to connect to the target.
- Client agent intercepts the DNS request.
- Client agent reroutes traffic through a session automatically.
Workflow
Checklist
In order for users to transparently access authorized targets, platform operators must ensure that the following is in place:
- Boundary installed on end user's machine:
- macOS : Boundary Installer
- Windows: Boundary Installer
- Configure Boundary (Controllers, Workers). If you have not configured Boundary yet, we recommend you follow our Boundary HVD before continuing.
- Enable IPv4 and IPv6 protocols.
- Uninstall any previous versions of the Boundary Desktop or CLI client in your local environment before you install the latest Boundary installer.
- For Windows workflows ensure target aliases use (.) within their naming convention. Single-name aliases do not work intuitively on Windows. For example, an alias of
mytargetdoes not work butmytarget.does.
Platform operator
Configure aliases for targets
The Client Agent periodically requests an updated list of aliases from the controller. The alias might not work immediately after creation. Allowing a two-minute pause (or time delay) often resolves any connection issues. If connection issues persist after waiting two minutes, please visit our Client Agent troubleshooting guide.
You must enable both IPv4 and IPv6 protocols for your environment to ensure the Client Agent can start and perform DNS queries. The Client Agent requires access over UDP and TCP on port 53 for both IPv4 and IPv6.
If your cluster is running a version of Boundary less than 0.16.0, add the necessary grants for listing resolvable aliases. This ensures that the client agent can populate the local alias cache. Please review the grant section in our Boundary HVD.
As an example, you could add the grant: type=user;actions=list-resolvable-aliases;ids=*.
After authenticating to Boundary with the CLI or the Admin UI, create an alias during target creation:
Example aliases are database.boundary. webserver.boundary, or hostname.host-set.project.org.
boundary targets create ssh \
    -name 'Example Boundary SSH target' \
    -description 'This is an example ssh target' \
    -scope-id global \
    -with-alias-authorize-session-host-id hst_1234567890 \
    -with-alias-scope-id global \
    -with-alias-value example.alias.boundary
Alternatively, if the target already exists, you can create an alias for an existing target with:
boundary aliases create target \
    -name 'Example Boundary alias' \
    -description 'This is an example alias for target tcp_1234567890' \
    -scope-id global \
    -destination-id tcp_1234567890 \
    -value example.alias.boundary \
    -authorize-session-host-id hst_1234567890
Parameter authorize-session-host-id specifies a particular host ID when authorizing a session. This becomes vitally important when you want to direct a session to a specific host within a target's host set. Typically Boundary selects a host at random from the set for a session. When using authorize-session-host-id you override this behavior and explicitly choose which host to connect to.
Once the target and alias exist, you can connect to the target via the alias using any client tool:
ssh example.alias.boundary
So long as you have authorization to access the target, Boundary transparently proxies the connection of the end user in the background.
Session users
For session users, using Boundary Transparent Sessions elevates the developer experience as they do not need to know IP addresses, port numbers of their target. They do not need to change their existing workflows or preferred client tools. They have little to zero interaction with the Boundary client tools. Lastly, when you enable credential injection, the user gets a completely password-less experience.
Confirm the Boundary Client Agent
Next, confirm that you have installed Boundary Client Agent
boundary client-agent status
Secure Shell Protocol sessions
- Authenticate to Boundary
- Open Boundary Desktop or CLI client and find the target alias
- Connect to the target using SSH
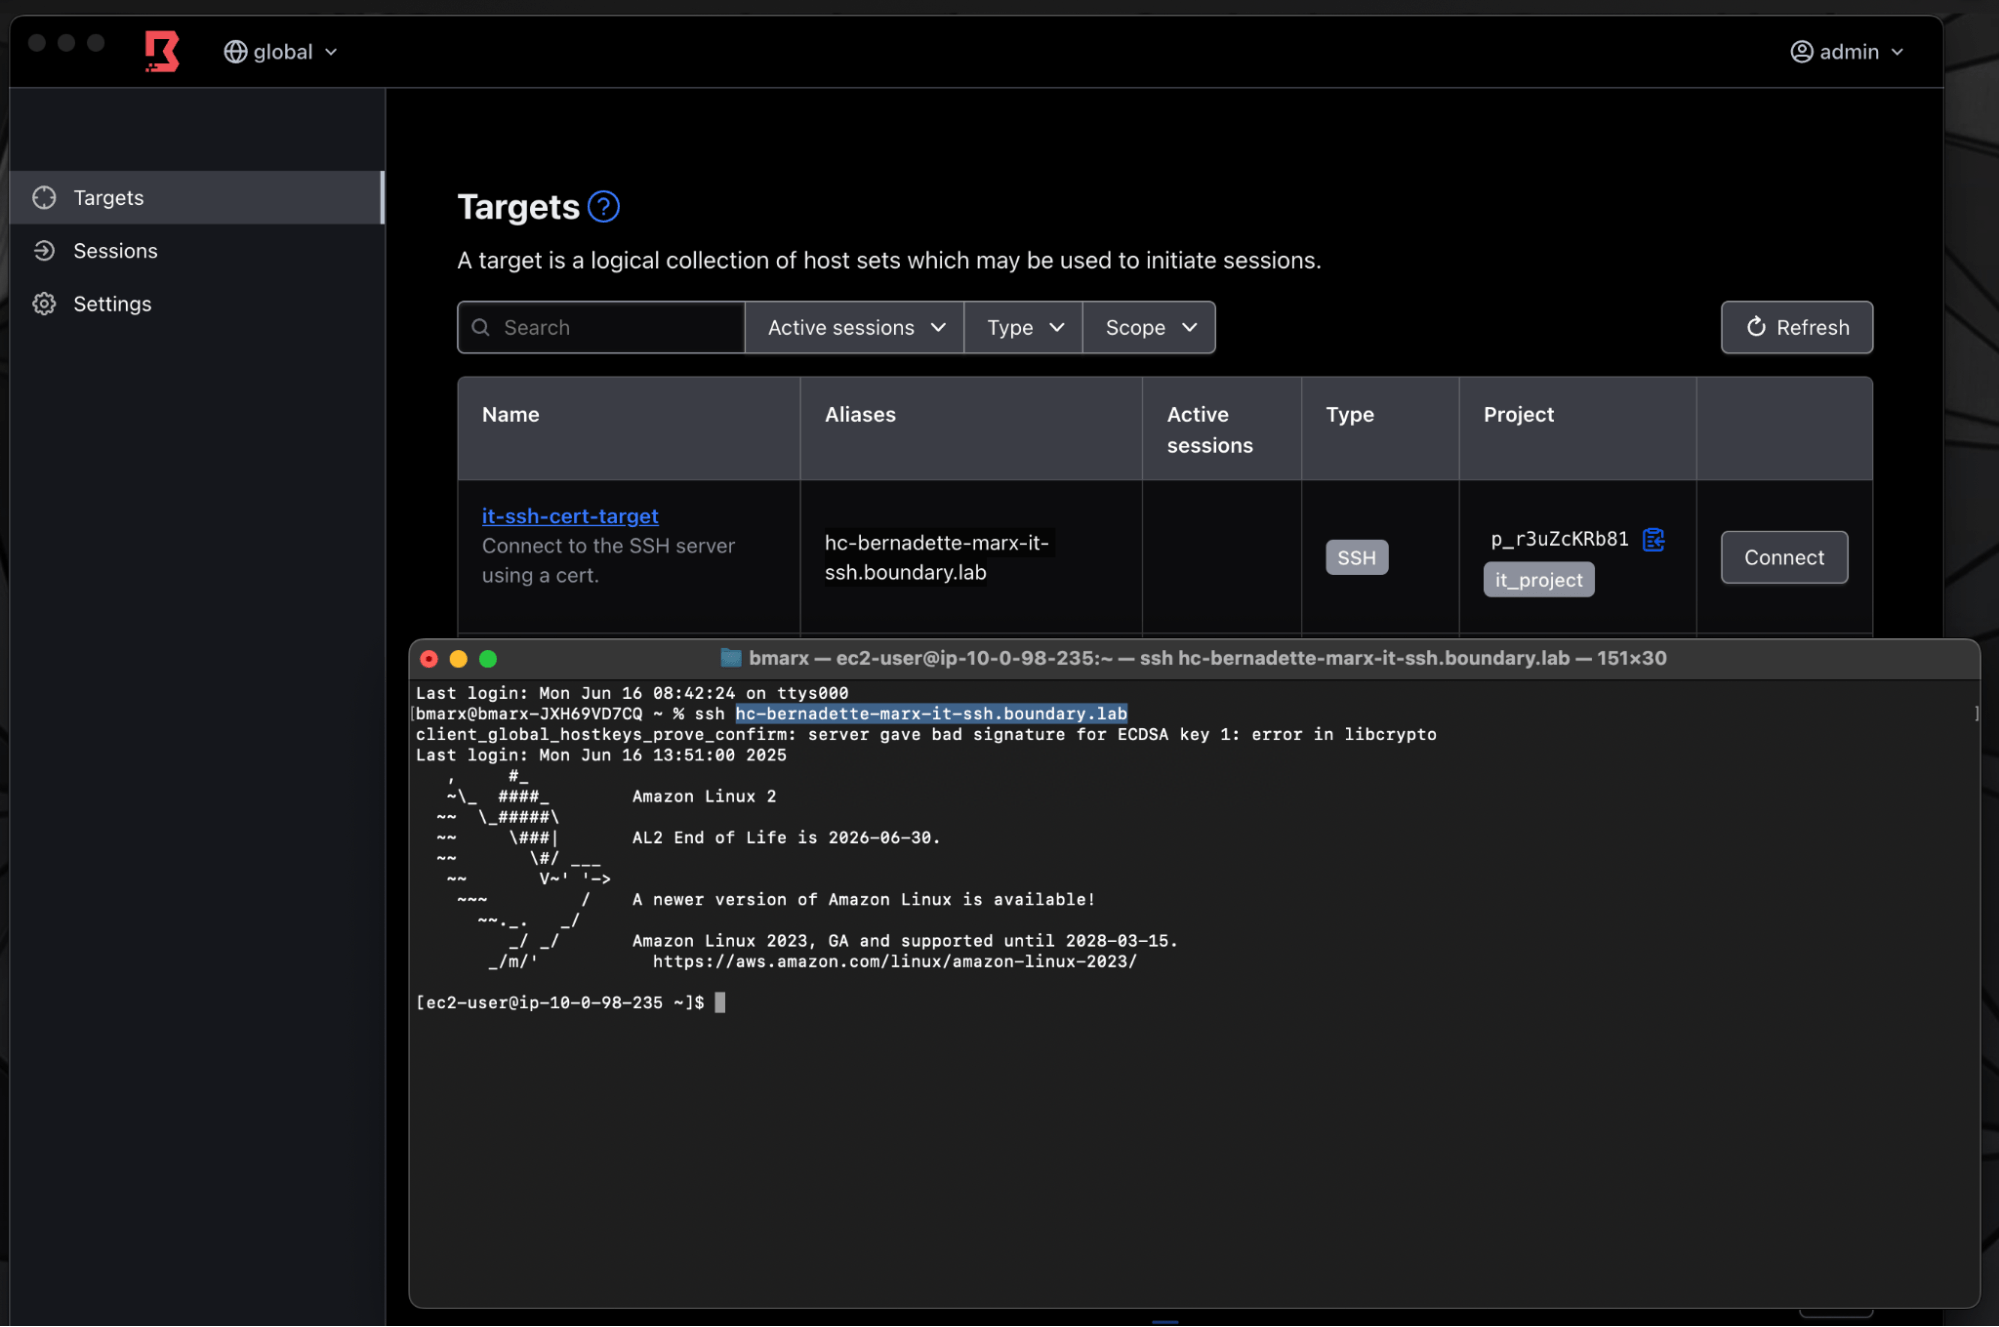
Access the target through SSH with target alias.
Remote Desktop Protocol sessions
- Authenticate to Boundary
- Open Boundary Desktop or CLI client and find the target alias
- Connect to the target using RDP

Access the target through RDP with target alias.
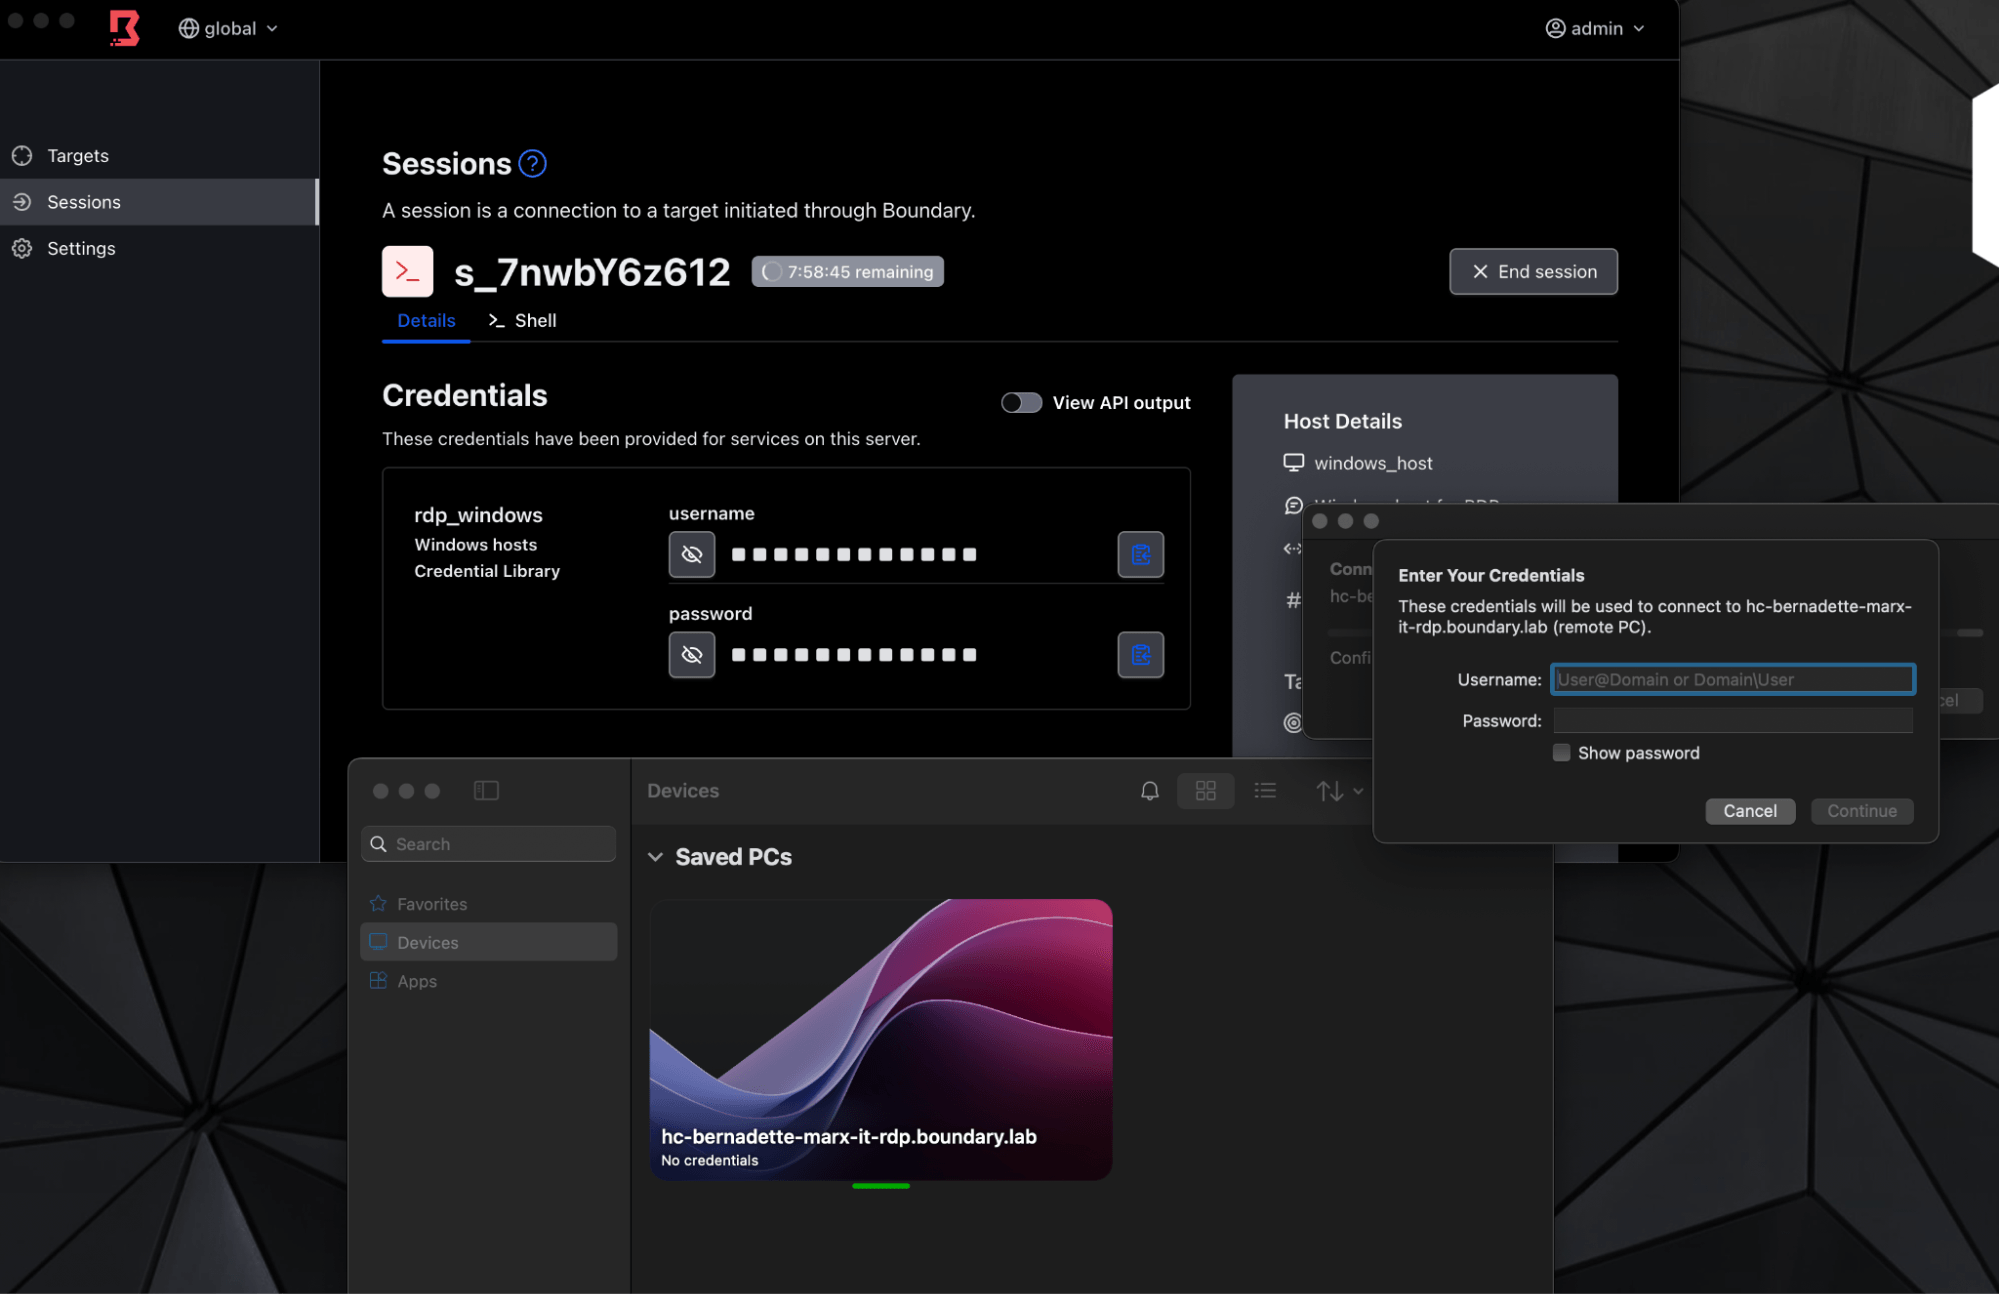
Enter credentials for the connection, provided by Boundary (prompted for redirect through notifications).
Web access
- Authenticate to Boundary
- Open Boundary Desktop or CLI client and find the target alias
- Enter alias into browser
- If the certificate's Subject Alternative Name uses wildcards or matches the alias, SSL/TLS remains intact
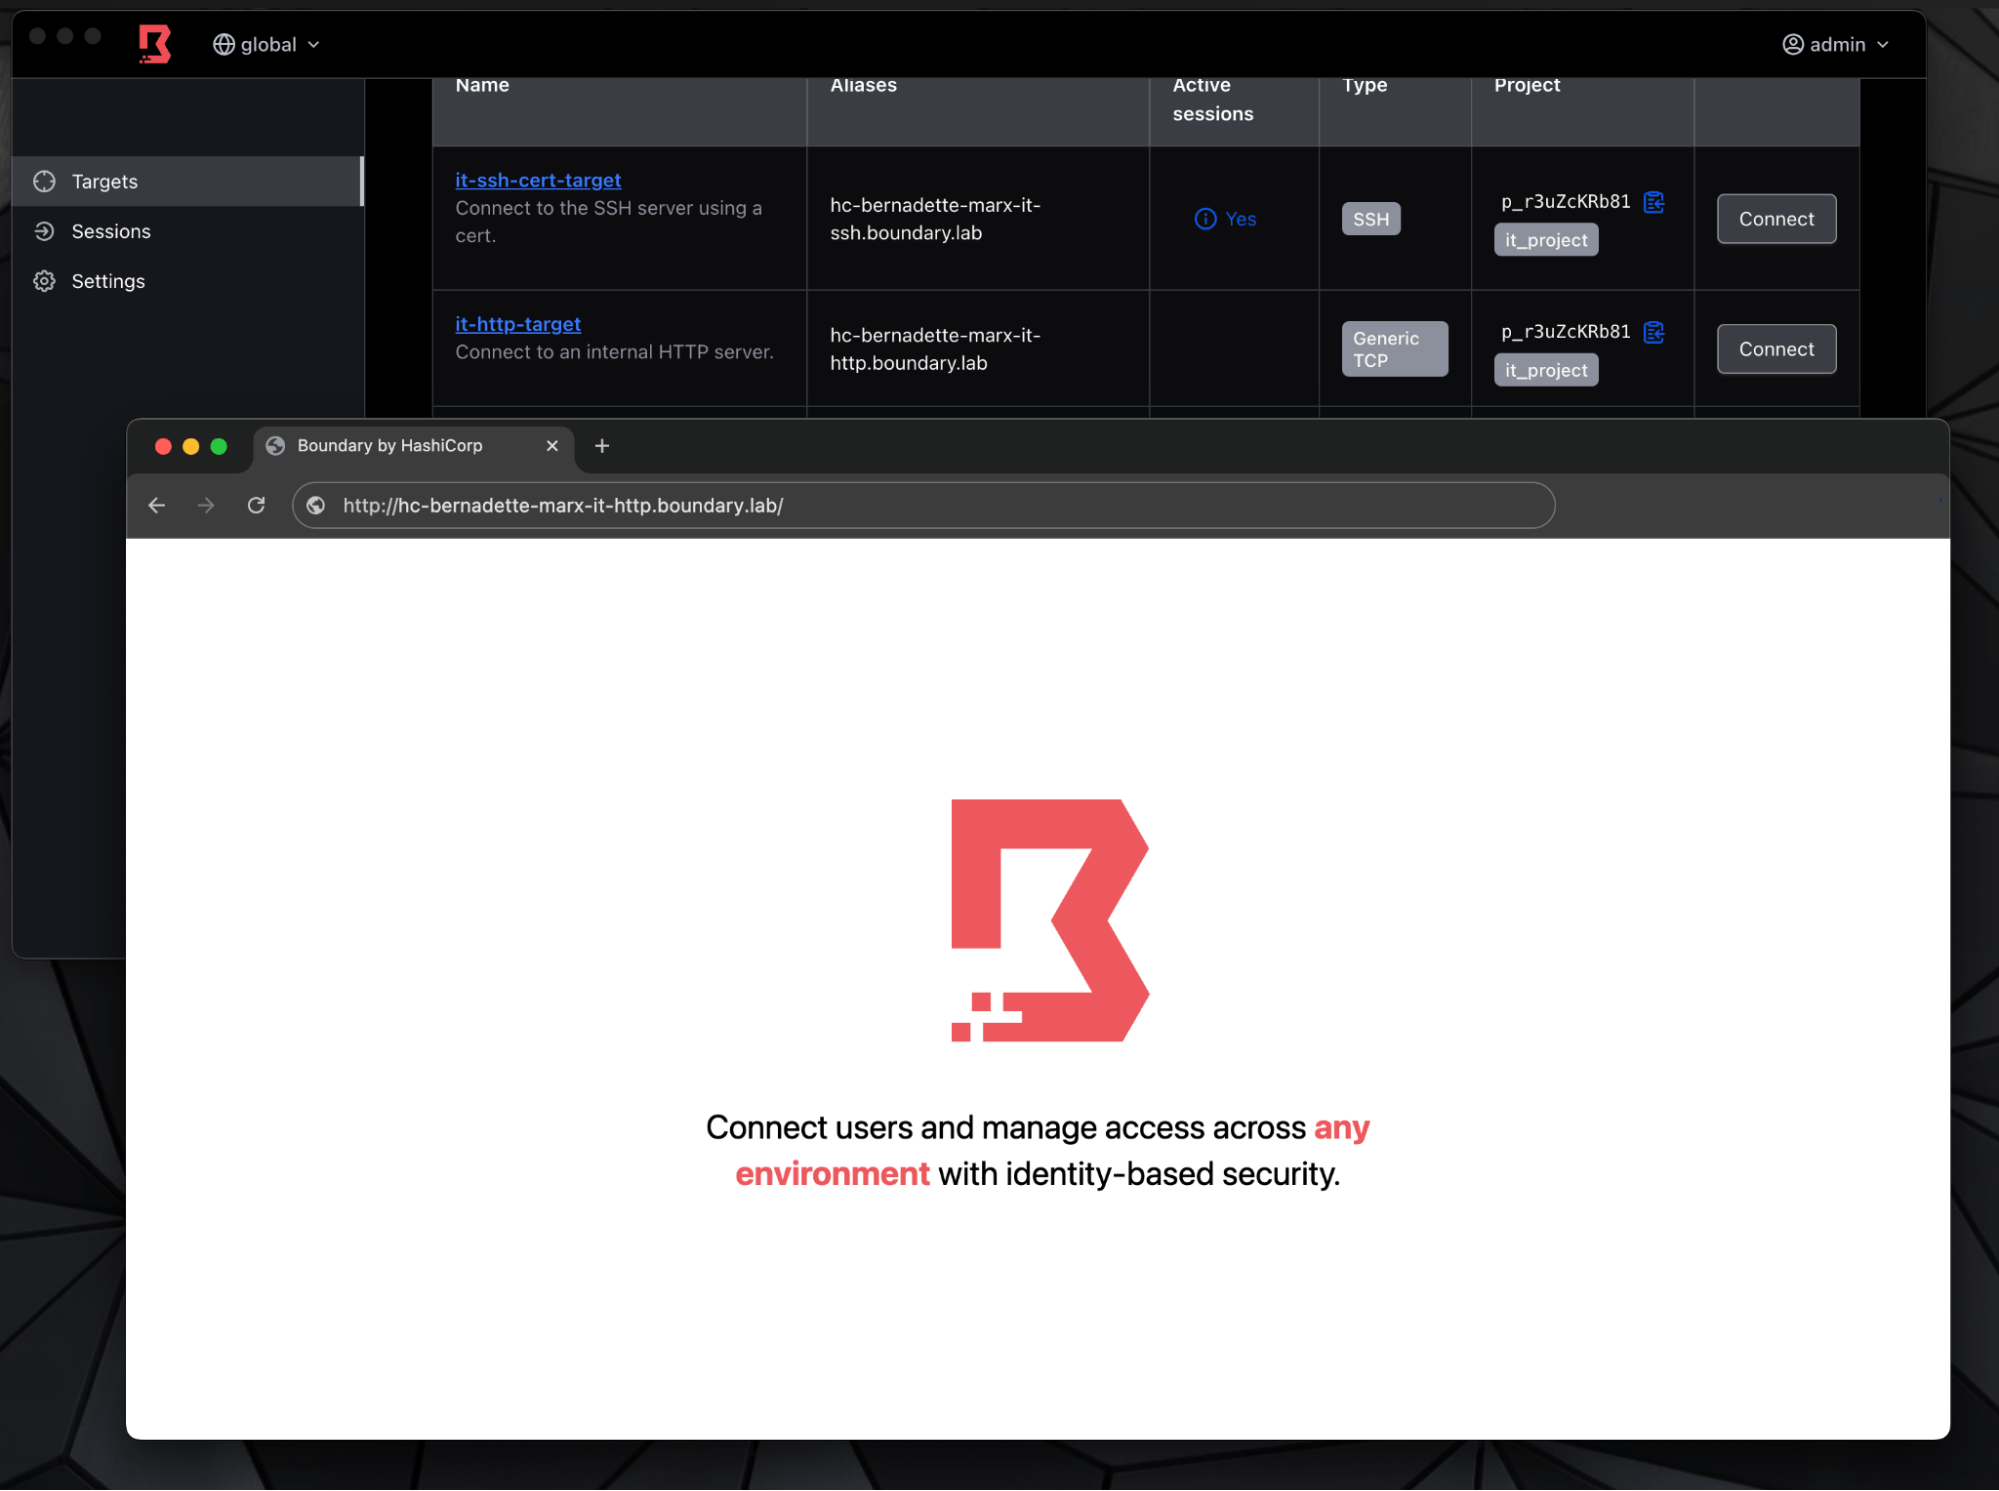
Access the target through HTTP by adding http:// in front of the alias target name.
Conclusion
The above guidance shows how to configure and connect to targets with Boundary's Transparent Sessions on macOS and Windows. Transparent Sessions offers a seamless experience for developers and non-technical business users.
Refer to our Boundary documentation to learn the known issues before deploying in production.
To learn more about using Transparent Sessions, check out the following resources: