Deploy an app with Nomad service discovery
Service discovery is a method of automatically detecting services running on a host machine with the intent of making them available to other services connected to the host. Tools that offer these functionalities expose the service's address and port for communication by way of a service name or endpoint. Consul is one of these tools that takes care of routing requests sent to the service name endpoint and forwarding them on to the application running on a specific host and port.
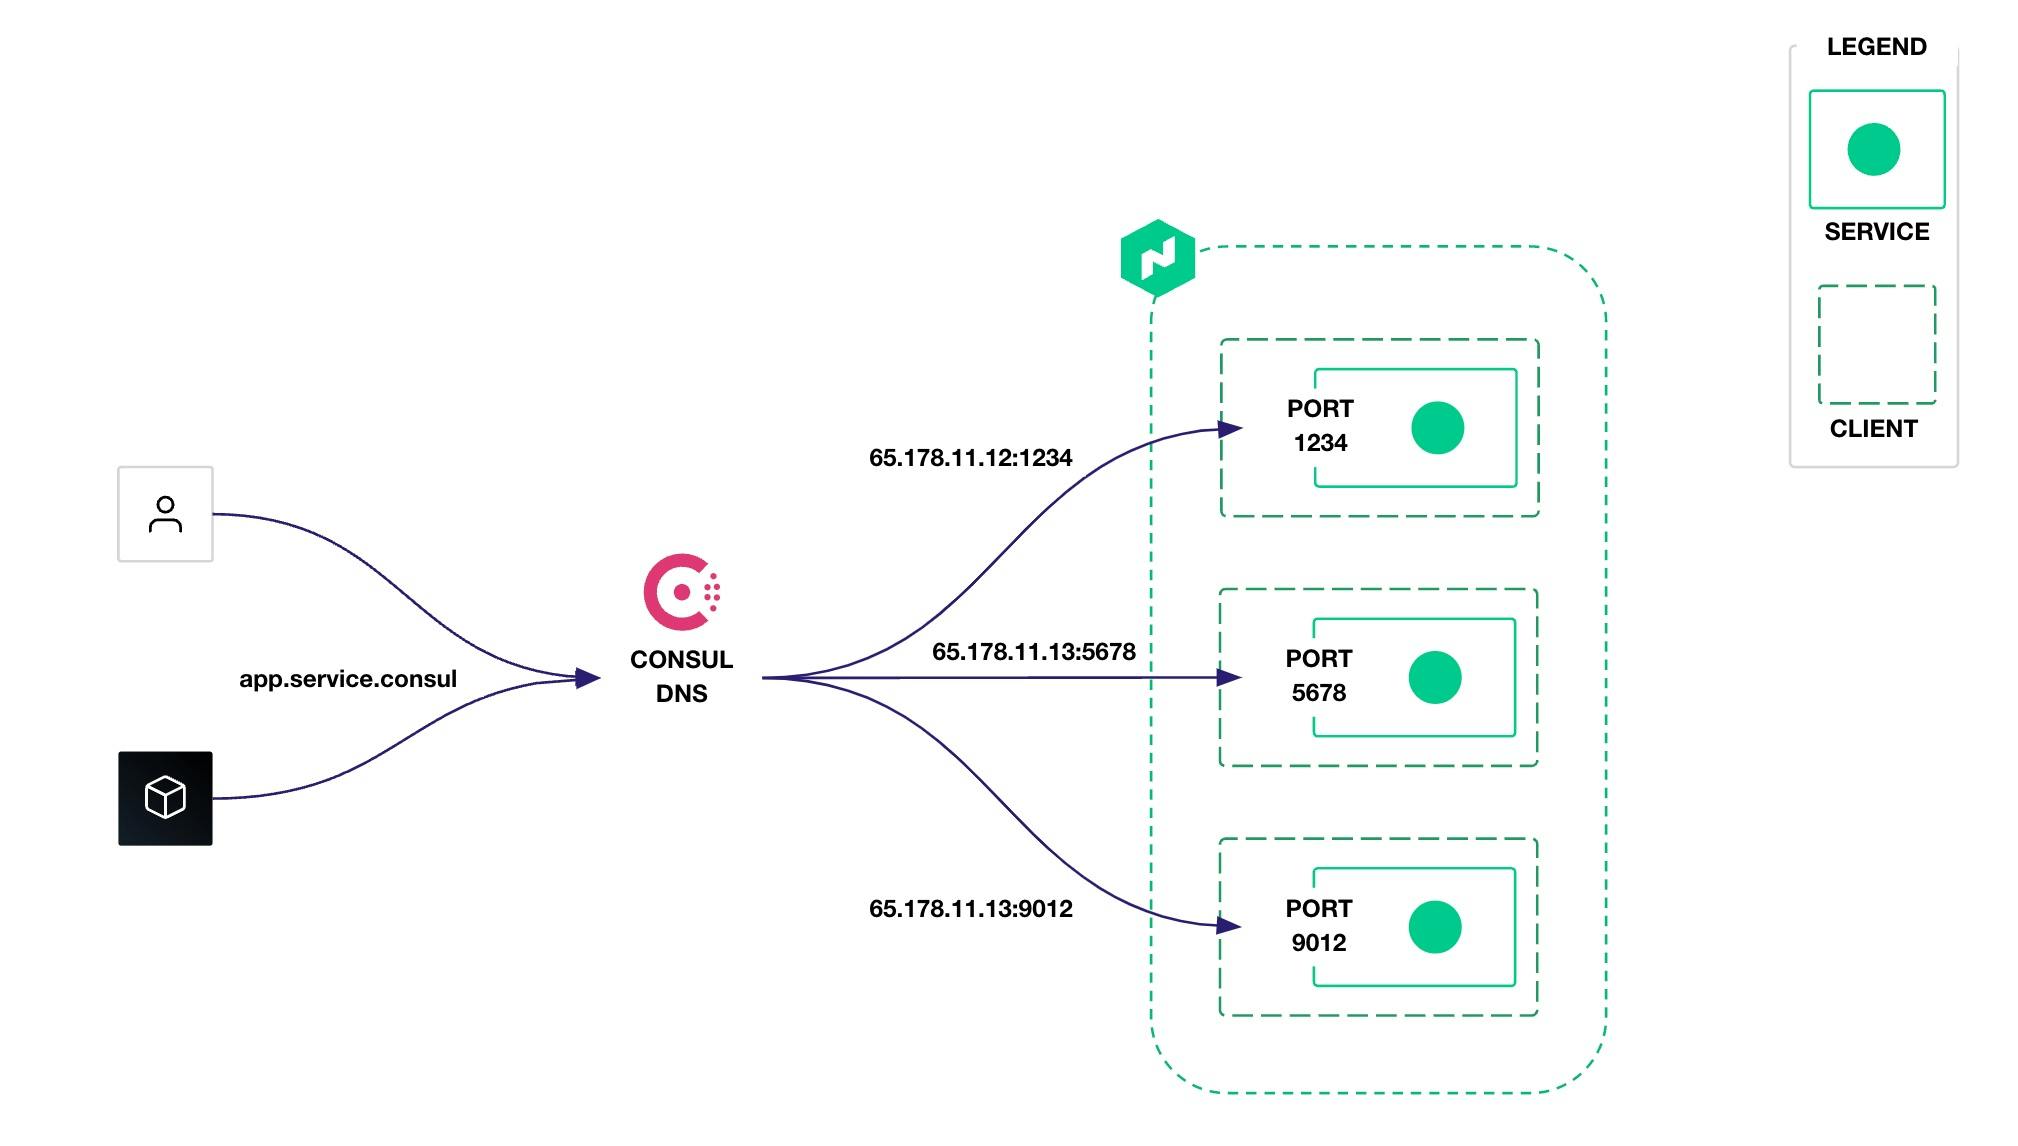
Nomad offers an easy-to-use integration with Consul that abstracts away a lot of the configuration necessary for service discovery, requiring only a few lines of configuration in the Nomad job spec file.
Consul service definition in a Nomad job file
job "example-job" {
  task "simple-task" {
    service {
      name = "simple-service"
      port = "8080"
    }
  }
}
However, this means that Consul must either be installed separately alongside Nomad on the host or running somewhere else, such as in HCP. Including Consul in your environment adds another layer of complexity to the deployment and, depending on the application, additional complexity that may not be worth the effort.
Nomad v1.3 added built-in native service discovery (SD), making Consul or other third-party tools unnecessary. Nomad's service discovery is not meant to be a replacement for those tools. Rather, it is an alternative for easier testing and deployments with simpler architectures.
Read on to see how you can easily connect your services together that are running in Nomad.
Prerequisites
For this tutorial, you will need:
- Nomad v1.3.3 or later installed locally
- Terraform v1.2.0 or later installed locally
- An AWS account with credentials set as local environment variables and an AWS keypair
- An AMI available in your AWS region created by following the steps in the Nomad Cluster Setup on AWS tutorial
Service discovery usage
The Nomad job spec file defines services and service queries but you can also interact with the catalog and find information about services through the Nomad CLI tool. Each of these options are shown in the examples below.
Service definition
The service block enables a Nomad service for discovery by setting the provider attribute to nomad. By default, the value is set to consul implicitly.
Service definition example
job "example-job" {
  task "simple-task" {
    service {
      name = "simple-service"
      port = "8080"
      provider = "nomad"
    }
  }
}
Service query
A template block can specify a function to query a service's address and port. This is a similar procedure for querying services registered in Consul. The following example uses the nomadService function.
Service query example
job "example-job" {
    group "db" {
        network {
            port "db" {
                static = 5432
            }
        }
        task "db" {
            service {
                name = "database"
                provider = "nomad"
                port = "db"
                address  = attr.unique.platform.aws.public-ipv4
            }
        }
    }
    group "product-api" {
        task "product-api" {
        ## ...
            template {
                data        = <<EOH
{{ range nomadService "database" }}
DB_CONNECTION="host={{ .Address }} port={{ .Port }} user=user password=password dbname=db_name"
{{ end }}
EOH
                destination = "local/env.txt"
                env         = true
            }
        }
    }
}
Service commands
Once a service is registered, you can interact with it via the service command of the Nomad CLI.
Listing registered services
$ nomad service list
Service Name  Tags
database      []
frontend      []
nginx         []
payments-api  []
product-api   []
public-api    []
Getting more information about a registered service
$ nomad service info nginx
Job ID     Address                                        Tags  Node ID   Alloc ID
hashicups  ec2-18-233-100-132.compute-1.amazonaws.com:80  []    340e27c3  8e7e0db5
Load balancing
Nomad balances service workloads by selecting an allocation of the referenced service (e.g. database) when the upstream service (e.g. product-api) allocation is created. Nomad selects from available allocations of the referenced service that have not previously been selected from any of the upstream service’s currently active allocations.
Load balancing setup example
job "example-job" {
    group "db" {
        network {
            port "db" {
                static = 5432
            }
        }
        task "db" {
            service {
                name = "database"
                provider = "nomad"
                port = "db"
                address  = attr.unique.platform.aws.public-ipv4
            }
        }
    }
    group "product-api" {
        task "product-api" {
        ## ...
            template {
                data = <<EOH
{{ $allocID := env "NOMAD_ALLOC_ID" }}
{{ $service := nomadService 1 $allocID "database" }}
[product-api]
server = {{ $service.Address }}
ports = [ {{ $service.Port }} ]
                EOH

            destination = "config.toml"
            }
        }
    }
}
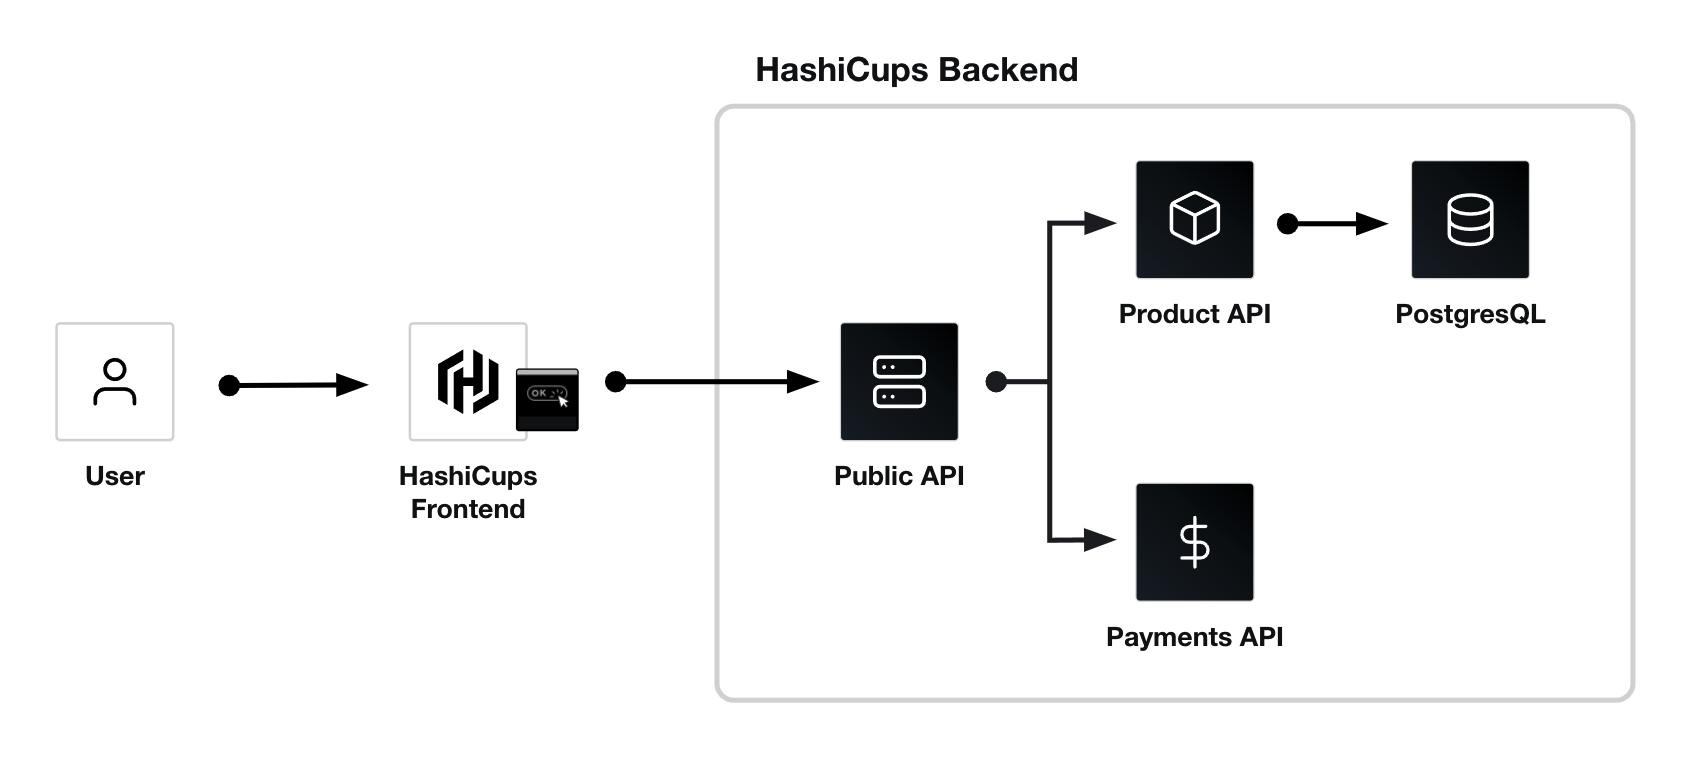
HashiCups with Nomad SD
In this tutorial, you will deploy HashiCups, a demo coffee shop application made up of several microservices running on Docker. Each of the services configured in the HashiCups job spec file use the native service discovery feature to retrieve downstream service connection information.
Additionally, you will modify the application after the initial deployment to integrate the load balancing feature of the native service discovery.
You can read more about the HashiCups application in the HashiCups overview.
Clone the example repository
The example repository contains Terraform configuration to set up a cluster and a Nomad job spec file (hashicups.hcl) containing the entire HashiCups application.
Clone the example repository.
$ git clone https://github.com/hashicorp-education/learn-nomad-sd
Navigate to the cloned repository folder.
$ cd learn-nomad-sd
Check out the v0.1 tag of the repository as a local branch named nomad-hashicups-sd.
$ git checkout tags/v0.1 -b nomad-hashicups-sd
Switched to a new branch 'nomad-hashicups-sd'
Deploy Nomad cluster
Rename the example variables file from terraform.tfvars.example to terraform.tfvars.
$ mv terraform.tfvars.example terraform.tfvars
The module in main.tf requires an Amazon Machine Image (AMI) for provisioning the cluster's servers and clients. Copy the AMI ID that you created as part of the prerequisites and replace the placeholder value for ami in the terraform.tfvars with it.
terraform.tfvars
name                      = "nomad"
key_name                  = "us-east-1-ssh-key"
region                    = "us-east-1"
ami                       = "ami-012345678901234567"
allowlist_ip              = "0.0.0.0/0"
nomad_consul_token_id     = "123e4567-e89b-12d3-a456-426614174000"
nomad_consul_token_secret = "123e4567-e89b-12d3-a456-426614174000"
Replace the region and key_name values with the AWS region that contains the AMI from above and SSH key registered in that region. Replace the allowlist_ip value with a range of IP addresses if you want to limit access to the virtual machines.
terraform.tfvars
name                      = "nomad"
key_name                  = "us-east-1-ssh-key"
region                    = "us-east-1"
ami                       = "ami-012345678901234567"
allowlist_ip              = "0.0.0.0/0"
nomad_consul_token_id     = "123e4567-e89b-12d3-a456-426614174000"
nomad_consul_token_secret = "123e4567-e89b-12d3-a456-426614174000"
Finally, generate UUIDs for the nomad_consul_token_id and nomad_consul_token_secret and replace the placeholder values for them in terraform.tfvars.
terraform.tfvars
name                      = "nomad"
key_name                  = "us-east-1-ssh-key"
region                    = "us-east-1"
ami                       = "ami-012345678901234567"
allowlist_ip              = "0.0.0.0/0"
nomad_consul_token_id     = "123e4567-e89b-12d3-a456-426614174000"
nomad_consul_token_secret = "123e4567-e89b-12d3-a456-426614174000"
Provision the Nomad cluster
Initialize Terraform so that it retrieves any required plugins and sets up the workspace.
$ terraform init
Initializing modules...
Downloading github.com/hashicorp/learn-nomad-cluster-setup for nomad-cluster...
- nomad-cluster in .terraform/modules/nomad-cluster

Initializing the backend...

Initializing provider plugins...
- Finding latest version of hashicorp/aws...
- Finding latest version of hashicorp/template...
- Installing hashicorp/template v2.2.0...
- Installed hashicorp/template v2.2.0 (signed by HashiCorp)
- Installing hashicorp/aws v4.25.0...
- Installed hashicorp/aws v4.25.0 (signed by HashiCorp)

Terraform has created a lock file .terraform.lock.hcl to record the provider
selections it made above. Include this file in your version control repository
so that Terraform can guarantee to make the same selections by default when
you run "terraform init" in the future.

Terraform has been successfully initialized!
Provision the resources. Respond yes to the prompt to confirm the operation and then press the Enter key to start the process. This will take a few minutes to provision.
$ terraform apply
Apply complete! Resources: 15 added, 0 changed, 0 destroyed.

Outputs:

IP_Addresses = <<EOT

Client public IPs: 3.98.57.19, 3.96.66.175, 35.183.78.6

Server public IPs: 99.79.73.235, 3.99.241.240, 15.223.77.39

The Consul UI can be accessed at http://ar-nomad-server-lb-2016482221.ca-central-1.elb.amazonaws.com:8500/ui
with the bootstrap token: 8f94ee77-bc50-4ba1-bf75-132ed6b9366e

EOT
consul_bootstrap_token_secret = "8f94ee77-bc50-4ba1-bf75-132ed6b9366e"
lb_address_consul_nomad = "http://ar-nomad-server-lb-2016482221.ca-central-1.elb.amazonaws.com"
Set up access to Nomad
Run the post-setup.sh script to complete the setup process.
$ ./post-setup.sh
The Nomad user token has been saved locally to nomad.token and deleted from the Consul KV store.

Set the following environment variables to access your Nomad cluster with the user token created during setup:

export NOMAD_ADDR=$(terraform output -raw lb_address_consul_nomad):4646
export NOMAD_TOKEN=$(cat nomad.token)


The Nomad UI can be accessed at http://ar-nomad-server-lb-2016482221.ca-central-1.elb.amazonaws.com:4646/ui
with the bootstrap token: 0853c07b-5718-8b0a-dad8-e3d6715bbd9f
Copy the export commands from the output, paste them into your terminal, and press the Enter key.
$ export NOMAD_ADDR=$(terraform output -raw lb_address_consul_nomad):4646 && export NOMAD_TOKEN=$(cat nomad.token)
Finally, verify connectivity to the cluster by running a Nomad command.
$ nomad node status
ID        DC   Name              Class   Drain  Eligibility  Status
0c40d12b  dc1  ip-172-31-12-109  <none>  false  eligible     ready
d51c20d9  dc1  ip-172-31-7-192   <none>  false  eligible     ready
bacfe7b3  dc1  ip-172-31-7-84    <none>  false  eligible     ready
Add security groups for HashiCups
The Nomad cluster module sets up the minimum amount of ingress rules necessary for Nomad and Consul to function by opening up access to Consul on port 8500 and Nomad on port 4646 through AWS security groups. Additional rules for the HashiCups ports (80, 3000, 5432, 8080, 8081, and 9090) need to be added for the application to run properly.
Open the secgroups.tf file, add the following configuration to the end of it, and save the file. This attaches the security group defined in the same file to the Nomad clients running in the cluster.
resource "aws_network_interface_sg_attachment" "sg_attachment" {
  for_each = toset(module.nomad-cluster.nomad_client_network_ids)
  security_group_id    = aws_security_group.clients_security_group.id
  network_interface_id = each.value
}
Run Terraform again to update the client machines. Respond yes to the prompt to confirm the operation.
$ terraform apply
Terraform will perform the following actions:

  # aws_network_interface_sg_attachment.sg_attachment["eni-04fa961abdea856cc"] will be created
  + resource "aws_network_interface_sg_attachment" "sg_attachment" {
      + id                   = (known after apply)
      + network_interface_id = "eni-04fa961abdea856cc"
      + security_group_id    = "sg-00dfa5b3b913d7418"
    }

  # aws_network_interface_sg_attachment.sg_attachment["eni-08c88cf16277e295d"] will be created
  + resource "aws_network_interface_sg_attachment" "sg_attachment" {
      + id                   = (known after apply)
      + network_interface_id = "eni-08c88cf16277e295d"
      + security_group_id    = "sg-00dfa5b3b913d7418"
    }

  # aws_network_interface_sg_attachment.sg_attachment["eni-0abedc09c1e159842"] will be created
  + resource "aws_network_interface_sg_attachment" "sg_attachment" {
      + id                   = (known after apply)
      + network_interface_id = "eni-0abedc09c1e159842"
      + security_group_id    = "sg-00dfa5b3b913d7418"
    }

Plan: 3 to add, 0 to change, 0 to destroy.

aws_network_interface_sg_attachment.sg_attachment["eni-08c88cf16277e295d"]: Creating...
aws_network_interface_sg_attachment.sg_attachment["eni-0abedc09c1e159842"]: Creating...
aws_network_interface_sg_attachment.sg_attachment["eni-04fa961abdea856cc"]: Creating...
aws_network_interface_sg_attachment.sg_attachment["eni-0abedc09c1e159842"]: Creation complete after 0s [id=sg-00dfa5b3b913d7418_eni-0abedc09c1e159842]
aws_network_interface_sg_attachment.sg_attachment["eni-04fa961abdea856cc"]: Creation complete after 0s [id=sg-00dfa5b3b913d7418_eni-04fa961abdea856cc]
aws_network_interface_sg_attachment.sg_attachment["eni-08c88cf16277e295d"]: Creation complete after 0s [id=sg-00dfa5b3b913d7418_eni-08c88cf16277e295d]

Apply complete! Resources: 3 added, 0 changed, 0 destroyed.
Deploy HashiCups
The hashicups.hcl job spec file configures the HashiCups application.
Submit the job file to Nomad. Some services may report as unhealthy at first but will become healthy soon after.
$ nomad job run hashicups.hcl
==> 2022-08-10T14:57:06-04:00: Monitoring evaluation "972d3a90"
    2022-08-10T14:57:06-04:00: Evaluation triggered by job "hashicups"
    2022-08-10T14:57:06-04:00: Allocation "2b71c82b" created: node "bacfe7b3", group "product-api"
    2022-08-10T14:57:06-04:00: Allocation "39b4797d" created: node "bacfe7b3", group "db"
    2022-08-10T14:57:06-04:00: Allocation "8c7efb80" created: node "d51c20d9", group "nginx"
    2022-08-10T14:57:06-04:00: Allocation "9c6ce57a" created: node "d51c20d9", group "public-api"
    2022-08-10T14:57:06-04:00: Allocation "ddc0691d" created: node "d51c20d9", group "frontend"
    2022-08-10T14:57:06-04:00: Allocation "e75d82a7" created: node "bacfe7b3", group "payments-api"
    2022-08-10T14:57:07-04:00: Evaluation within deployment: "852e99c4"
    2022-08-10T14:57:07-04:00: Evaluation status changed: "pending" -> "complete"
==> 2022-08-10T14:57:07-04:00: Evaluation "972d3a90" finished with status "complete"
==> 2022-08-10T14:57:07-04:00: Monitoring deployment "852e99c4"
  ✓ Deployment "852e99c4" successful

    2022-08-10T14:58:42-04:00
    ID          = 852e99c4
    Job ID      = hashicups
    Job Version = 0
    Status      = successful
    Description = Deployment completed successfully

    Deployed
    Task Group    Desired  Placed  Healthy  Unhealthy  Progress Deadline
    db            1        1       1        0          2022-08-10T19:07:41Z
    frontend      1        1       1        0          2022-08-10T19:07:38Z
    nginx         1        2       1        1          2022-08-10T19:08:40Z
    payments-api  1        1       1        0          2022-08-10T19:07:41Z
    product-api   1        2       1        1          2022-08-10T19:08:14Z
    public-api    1        1       1        0          2022-08-10T19:07:28Z
When the deployment is complete, list the HashiCups services.
$ nomad service list
Service Name  Tags
database      []
frontend      []
nginx         []
payments-api  []
product-api   []
public-api    []
Inspect the nginx service, copy the public address listed, and open it in your browser to see the HashiCups application.
$ nomad service info nginx
Job ID     Address                                                Tags  Node ID   Alloc ID
hashicups  ec2-3-96-66-175.ca-central-1.compute.amazonaws.com:80  []    bacfe7b3  382cdc86
Enable service load balancing
To see the service load balancing available in Nomad, you will modify the HashiCups job spec to create an additional instance of the frontend and nginx services. Each of the nginx services will communicate with a different instance of frontend.
Modify the HashiCups job
Open hashicups.hcl. Add the count attribute to the frontend service group.
hashicups.hcl
group "frontend" {
  count = 2
  network {
    port "frontend" {
      static = var.frontend_port
    }
  }
  # ...
}
Then, add the same attribute to the nginx group.
hashicups.hcl
group "nginx" {
  count = 2
  network {
    port "nginx" {
      static = var.nginx_port
    }
  }
  # ...
}
Finally, in the template block of the nginx group, add a line for the $allocID variable and modify the nomadService to match the highlighted example below. Save the file.
hashicups.hcl
group "nginx" {
  # ...
  task "nginx" {
    # ...
    template {
        data =  <<EOF
proxy_cache_path /var/cache/nginx levels=1:2 keys_zone=STATIC:10m inactive=7d use_temp_path=off;
upstream frontend_upstream {
  {{ $allocID := env "NOMAD_ALLOC_ID" }}
  {{ range nomadService 1 $allocID "frontend" }}
    server {{ .Address }}:{{ .Port }};
  {{ end }}
}
    }
  }
  # ...
}
Submit the job file to Nomad.
$ nomad job run hashicups.hcl
==> 2022-08-10T15:01:24-04:00: Monitoring evaluation "601e50cd"
    2022-08-10T15:01:24-04:00: Evaluation triggered by job "hashicups"
    2022-08-10T15:01:24-04:00: Allocation "e75d82a7" modified: node "bacfe7b3", group "payments-api"
    2022-08-10T15:01:24-04:00: Allocation "2eef23d1" created: node "0c40d12b", group "nginx"
    2022-08-10T15:01:24-04:00: Allocation "db819fd3" created: node "0c40d12b", group "frontend"
    2022-08-10T15:01:24-04:00: Allocation "a5bbf109" modified: node "d51c20d9", group "product-api"
    2022-08-10T15:01:24-04:00: Allocation "39b4797d" modified: node "bacfe7b3", group "db"
    2022-08-10T15:01:24-04:00: Allocation "9c6ce57a" modified: node "d51c20d9", group "public-api"
    2022-08-10T15:01:24-04:00: Allocation "ddc0691d" modified: node "d51c20d9", group "frontend"
    2022-08-10T15:01:25-04:00: Evaluation within deployment: "ea8bfb0f"
    2022-08-10T15:01:25-04:00: Evaluation status changed: "pending" -> "complete"
==> 2022-08-10T15:01:25-04:00: Evaluation "601e50cd" finished with status "complete"
==> 2022-08-10T15:01:25-04:00: Monitoring deployment "ea8bfb0f"
  ✓ Deployment "ea8bfb0f" successful

    2022-08-10T15:01:54-04:00
    ID          = ea8bfb0f
    Job ID      = hashicups
    Job Version = 1
    Status      = successful
    Description = Deployment completed successfully

    Deployed
    Task Group    Desired  Placed  Healthy  Unhealthy  Progress Deadline
    db            1        1       1        0          2022-08-10T19:11:34Z
    frontend      2        2       2        0          2022-08-10T19:11:48Z
    nginx         2        2       2        0          2022-08-10T19:11:53Z
    payments-api  1        1       1        0          2022-08-10T19:11:34Z
    product-api   1        1       1        0          2022-08-10T19:11:34Z
    public-api    1        1       1        0          2022-08-10T19:11:34Z
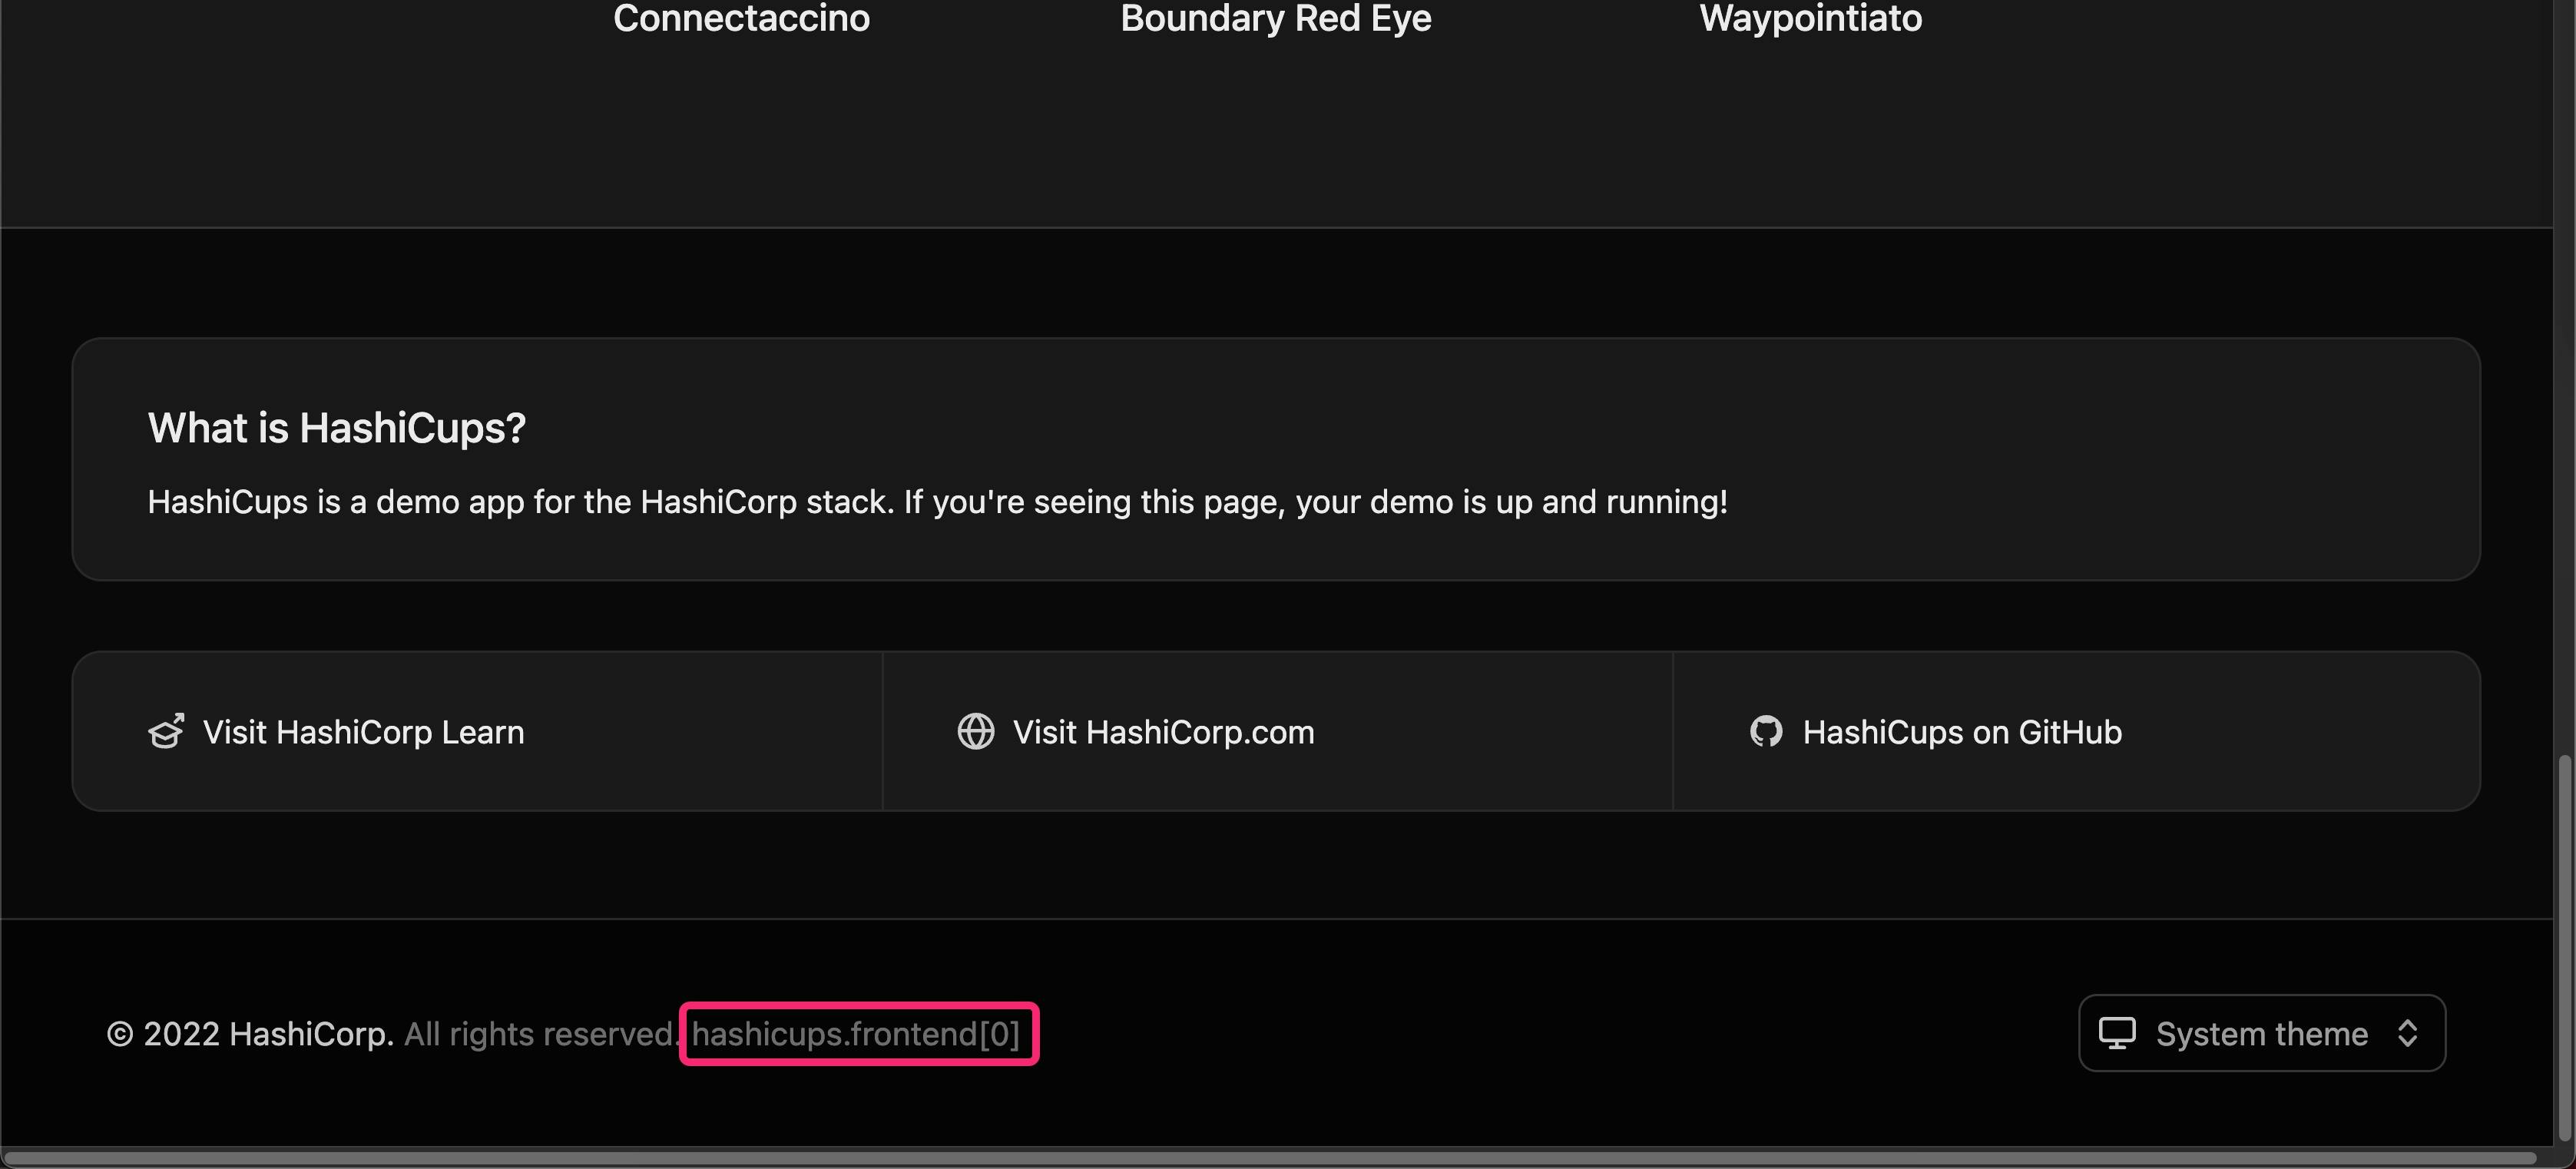
When the deployment is complete, inspect the nginx service. Note that there are two instances. Copy each address and open them in a different browser tab.
$ nomad service info nginx
Job ID     Address                                                Tags  Node ID   Alloc ID
hashicups  ec2-35-183-78-6.ca-central-1.compute.amazonaws.com:80  []    0c40d12b  2eef23d1
hashicups  ec2-3-96-66-175.ca-central-1.compute.amazonaws.com:80  []    bacfe7b3  61934d47
Scroll down to the bottom of the page. The text in the footer shows which instance of the frontend service the Nginx instance is using. Note that they are different as Nomad attaches each one to a specific nginx instance during the job creation process.

Next steps
In this tutorial, you learned about the native service discovery present in Nomad and deployed an application that uses it.
Continue onto the next tutorial in the collection to learn how to convert from Nomad to Consul service discovery.