Deploy a Nomad Enterprise cluster
This deployment tutorial covers the steps required to install and configure a single Nomad Enterprise cluster as defined in the Nomad Enterprise Reference Architecture.
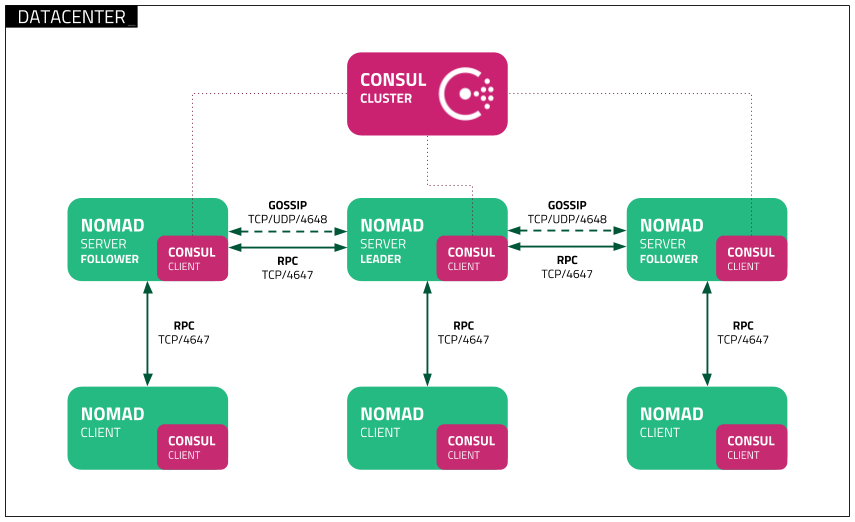
This deployment tutorial is designed to work in combination with the Nomad Reference Architecture and Consul Deployment Guide. Although it is not a strict requirement to follow the Nomad Reference Architecture, ensure you are familiar with the overall architecture design. For example, installing Nomad server agents on multiple physical or virtual (with correct anti-affinity) hosts for high-availability.
To provide a highly available single cluster architecture, we recommend Nomad server agents be deployed to more than one host, as shown in the Nomad Reference Architecture.
These instructions are for installing and configuring Nomad on Linux hosts running the systemd system and service manager.
These setup steps should be completed on all Nomad hosts:
Download Nomad
Nomad binaries for the current version are available at the Nomad website, older versions can be found at https://releases.hashicorp.com/nomad/, and Nomad Enterprise binaries are available for download by following the instructions made available to HashiCorp Enterprise customers.
You may perform checksum verification of the zip packages using the SHA256SUMS and SHA256SUMS.sig files available for the specific release version. HashiCorp provides a tutorial on checksum verification for precompiled binaries.
$ export NOMAD_VERSION="1.1.0"
$ curl --silent --remote-name https://releases.hashicorp.com/nomad/${NOMAD_VERSION}/nomad_${NOMAD_VERSION}_linux_amd64.zip
Install Nomad
Unzip the downloaded package and move the nomad binary to /usr/local/bin/.
Check nomad is available on the system path.
$ unzip nomad_${NOMAD_VERSION}_linux_amd64.zip
$ sudo chown root:root nomad
$ sudo mv nomad /usr/local/bin/
$ nomad version
The nomad command features opt-in autocompletion for flags, subcommands, and
arguments (where supported). Enable autocompletion.
$ nomad -autocomplete-install
$ complete -C /usr/local/bin/nomad nomad
Create a data directory for Nomad.
$ sudo mkdir --parents /opt/nomad
Create a unique, non-privileged system user to run Nomad.
$ sudo useradd --system --home /etc/nomad.d --shell /bin/false nomad
Configure systemd
systemd uses documented reasonable defaults so only
non-default values must be set in the configuration file.
Create a Nomad service file at /etc/systemd/system/nomad.service.
$ sudo touch /etc/systemd/system/nomad.service
Add this configuration to the Nomad service file:
[Unit]
Description=Nomad
Documentation=https://www.nomadproject.io/docs/
Wants=network-online.target
After=network-online.target

# When using Nomad with Consul it is not necessary to start Consul first. These
# lines start Consul before Nomad as an optimization to avoid Nomad logging
# that Consul is unavailable at startup.
#Wants=consul.service
#After=consul.service

[Service]

# Nomad server should be run as the nomad user. Nomad clients
# should be run as root
User=nomad
Group=nomad

ExecReload=/bin/kill -HUP $MAINPID
ExecStart=/usr/local/bin/nomad agent -config /etc/nomad.d
KillMode=process
KillSignal=SIGINT
LimitNOFILE=65536
LimitNPROC=infinity
Restart=on-failure
RestartSec=2

## Configure unit start rate limiting. Units which are started more than
## *burst* times within an *interval* time span are not permitted to start any
## more. Use `StartLimitIntervalSec` or `StartLimitInterval` (depending on
## systemd version) to configure the checking interval and `StartLimitBurst`
## to configure how many starts per interval are allowed. The values in the
## commented lines are defaults.

# StartLimitBurst = 5

## StartLimitIntervalSec is used for systemd versions >= 230
# StartLimitIntervalSec = 10s

## StartLimitInterval is used for systemd versions < 230
# StartLimitInterval = 10s

TasksMax=infinity
OOMScoreAdjust=-1000

[Install]
WantedBy=multi-user.target
The following parameters are set for the [Unit] stanza:
Description- Free-form string describing the Nomad serviceDocumentation- Link to the Nomad documentationWants- Configure a dependency on the network serviceAfter- Configure an ordering dependency on the network service being started before the Nomad service
The following parameters are set for the [Service] stanza:
User,Group- Nomad servers should run as the nomad user. Nomad clients should run as root.ExecReload- Send Nomad aSIGHUPsignal to trigger a configuration reloadExecStart- Start Nomad with theagentargument and path to a directory of configuration filesKillMode- Treat Nomad as a single processLimitNOFILE,LimitNPROC- Disable limits for file descriptors and processesRestartSec- Restart Nomad after 2 seconds of it being considered 'failed'Restart- Restart Nomad unless it returned a clean exit codeStartLimitBurst,StartLimitIntervalSec- Configure unit start rate limitingTasksMax- Disable task limits (only available in systemd >= 226)
The following parameters are set for the [Install] stanza:
WantedBy- Creates a weak dependency on Nomad being started by the multi-user run level
Configure Nomad
Nomad uses documented reasonable defaults so only non-default values must be set in the configuration file. Configuration can be read from multiple files and is loaded in lexical order. See the full description for more information about configuration loading and merge semantics.
Some configuration settings are common to both server and client Nomad agents, while some configuration settings must only exist on one or the other. Follow the common configuration guidance on all hosts and then the specific guidance depending on whether you are configuring a Nomad server or client.
Common configuration
Create a configuration file at /etc/nomad.d/nomad.hcl:
$ sudo mkdir --parents /etc/nomad.d
$ sudo chmod 700 /etc/nomad.d
$ sudo touch /etc/nomad.d/nomad.hcl
Add this configuration to the nomad.hcl configuration file:
datacenter = "dc1"
data_dir = "/opt/nomad"
datacenter- The datacenter in which the agent is running.data_dir- The data directory for the agent to store state.
Server configuration
Create a configuration file at /etc/nomad.d/server.hcl:
$ sudo touch /etc/nomad.d/server.hcl
Add this configuration to the server.hcl configuration file:
server {
  enabled = true
  bootstrap_expect = 3
}
This server stanza contains the following parameters:
enabled- Specifies if this agent should run in server mode. All other server options depend on this value being set.bootstrap_expect- The number of expected servers in the cluster. Either this value should not be provided or the value must agree with other servers in the cluster.
Client configuration
Create a configuration file at /etc/nomad.d/client.hcl:
$ sudo touch /etc/nomad.d/client.hcl
Add this configuration to the client.hcl configuration file:
client {
  enabled = true
}
This client stanza contains the following parameters:
enabled- Specifies if this agent should run in client mode. All other client options depend on this value being set.
ACL configuration
The Access Control collection of tutorials provides instructions on configuring and enabling ACLs.
TLS configuration
Securing Nomad's cluster communication with mutual TLS (mTLS) is recommended for production deployments and can even ease operations by preventing mistakes and misconfigurations. Nomad clients and servers should not be publicly accessible without mTLS enabled.
The Securing Nomad with TLS tutorial provides instructions on configuring and enabling TLS.
Start Nomad
Enable and start Nomad using the systemctl command responsible for controlling systemd managed services. Check the status of the nomad service using systemctl.
$ sudo systemctl enable nomad
$ sudo systemctl start nomad
$ sudo systemctl status nomad
Next steps
Read Outage Recovery to learn the steps required to recover from a Nomad cluster outage.
Read Autopilot to learn about features in Nomad 0.8 to allow for automatic operator-friendly management of Nomad servers.