Vault
Deploy HCP Vault Dedicated with Terraform
In the HCP Vault Dedicated quickstart, you learned about the basics of deploying, accessing and managing a cluster. This series of tutorials focuses on a practical approach to managing your HCP Vault Dedicated cluster.
HashiCorp Cloud Platform (HCP) portal features a web user interface to deploy and manage resources, including HCP Vault Dedicated deployments. If you prefer to automate the Vault Dedicated deployment, the recommended approach is to use HashiCorp Terraform with the HCP provider.
You can use the Terraform CLI and the HCP provider with your HCP account credentials from a terminal session to successfully deploy a Vault Dedicated cluster. This enables you to leverage HCP to rapidly and reliably deploy Vault clusters, while offloading the operations burden of running Vault to SRE experts at HashiCorp.
The tutorial example scenario automatically deploys an AWS VPC, and peers the provisioned HashiCorp Virtual Network (HVN).
Prerequisites
To complete the steps listed in this tutorial, you need:
Terraform CLI installed
An HCP account
An AWS account
gitinstalledAWS IAM credentials configured locally
Example:
$ export AWS_ACCESS_KEY_ID="<YOUR_AWS_ACCESS_KEY_ID>" AWS_SECRET_ACCESS_KEY="<YOUR_AWS_SECRET_ACCESS_KEY>"
Create a service principal and key
Log in to the HCP portal to create a service principal and associated key that you will use with Terraform to deploy the Vault Dedicated cluster.
From the navigation menu, select your organization, then select Access control (IAM).
Select Service principals, and then click Create service principal.
Enter
learn-hcp-vaultin the Service principal name field.Choose
Contributorfrom the Role pull down menu, and click Create service principal.
The Service principal is created and displays the overview page.
Click Create service principal key.

Copy the Client ID.
Open a terminal and export an environment variable for the
HCP_CLIENT_ID.$ export HCP_CLIENT_ID=<client id value previously copied>Terraform authenticates with HCP using this ID.
Return to the HCP Portal and copy the Client secret.
Return to the terminal and export an environment variable for the
HCP_CLIENT_SECRET.$ export HCP_CLIENT_SECRET=<client secret value previously copied>Terraform authenticates with HCP using this secret.
Clone learn-terraform-hcp-vault repository
Clone the learn-terraform-hcp-vault repository to get the necessary Terraform configuration for the example scenarios.
Ensure that you are in a directory that you wish to work through this tutorial in, and clone the repository.
$ git clone https://github.com/hashicorp-education/learn-terraform-hcp-vaultChange into the directory containing the base example scenario Terraform configuration.
$ cd learn-terraform-hcp-vaultVerify that you are in the correct directory before proceeding.
$ ls -1
variables.tf
vault.tf
vpc-peering.tf
Review the Terraform configuration
The configuration in hcp-vault-vpc is the minimum configuration necessary to deploy Vault Dedicated using the
Terraform HCP provider with peered VPC, as an example for this tutorial. You will need to significantly
expand on this example to build a more advanced configurations for production use cases.
Review variables
The variables.tf file defines all Terraform variables for the project expressed in HashiCorp Configuration Language (HCL).
You can edit the variables.tf file to change attributes for the Vault Dedicated cluster. You can learn more about the available options in
the Terraform HCP provider documentation.
Examine the
variables.tffile. Note the description values to understand each variable.variables.tf
variable "hvn_id" {
  description = "The ID of the HCP HVN."
  type        = string
  default     = "learn-hcp-vault-hvn"
}

variable "cluster_id" {
  description = "The ID of the Vault Dedicated cluster."
  type        = string
  default     = "learn-hcp-vault-cluster"
}

variable "peering_id" {
  description = "The ID of the HCP peering connection."
  type        = string
  default     = "learn-peering"
}

variable "route_id" {
  description = "The ID of the HCP HVN route."
  type        = string
  default     = "learn-hvn-route"
}

variable "region" {
  description = "The region of the HCP HVN and Vault cluster."
  type        = string
  default     = "us-west-2"
}

variable "cloud_provider" {
  description = "The cloud provider of the HCP HVN and Vault cluster."
  type        = string
  default     = "aws"
}

variable "tier" {
  description = "Tier of the Vault Dedicated cluster. Valid options for tiers."
  type        = string
  default     = "dev"
}
Line 37 through 41 defines the values for Vault Dedicated cluster tier. This is an optional parameter and the default value is
dev; therefore, you can omit this parameter. However, if you wish to create a cluster other than a dev tier cluster, overwrite this value by creating aterraform.tfvarsfile.Example:
$ tee terraform.tfvars -<<EOF tier = "standard_small" EOFMake the necessary changes for your environment before proceeding.
Define the HashiCorp Virtual Network
Before you can deploy the Vault Dedicated cluster, you need to first configure a HashiCorp Virtual Network (HVN).
An HVN is defined by the hcp_hvn resource.
Examine the
vault.tffile. Lines 1 through 5 define the HVN used in this tutorial.vault.tf
resource "hcp_hvn" "learn_hcp_vault_hvn" {
  hvn_id         = var.hvn_id
  cloud_provider = var.cloud_provider
  region         = var.region
}

resource "hcp_vault_cluster" "learn_hcp_vault" {
  hvn_id     = hcp_hvn.learn_hcp_vault_hvn.hvn_id
  cluster_id = var.cluster_id
  tier       = var.tier
  #public_endpoint = true
}
The configuration creates an HVN resource named
learn_hcp_vault_hvnthat uses the variable values from thevariables.tfto declare the HVN ID, the cloud provider, and cloud provider region.
Define HCP Vault Dedicated cluster
In this tutorial you will deploy a single Vault cluster.
Examine the
vault.tffile. Lines 7 through 12 define the Vault Dedicated cluster used in this tutorial.vault.tf
resource "hcp_hvn" "learn_hcp_vault_hvn" {
  hvn_id         = var.hvn_id
  cloud_provider = var.cloud_provider
  region         = var.region
}

resource "hcp_vault_cluster" "learn_hcp_vault" {
  hvn_id     = hcp_hvn.learn_hcp_vault_hvn.hvn_id
  cluster_id = var.cluster_id
  tier       = var.tier
  #public_endpoint = true
}
The configuration specifies an Vault Dedicated cluster resource named
learn_hcp_vaultthat uses the variable values fromvariables.tfto declare the HVN ID, and set the cluster ID tolearn-hcp-vault-cluster.The
public_endpointparameter is commented out at line 11. See the Enable public cluster address section for more details about this optional parameter.
Metric and audit log streaming
You can configure your Vault Dedicated cluster to stream audit logs and metrics to supported providers.
Configuring metric and audit log streaming is beyond the scope of this tutorial, but provided as a reference.
Metrics are configured using the metrics_config parameter for the hcp_vault_cluster resource.
Example:
resource "hcp_vault_cluster" "example" {
  cluster_id = "vault-cluster"
  hvn_id     = hcp_hvn.example.hvn_id
  tier       = "standard_large"
  metrics_config {
    datadog_api_key = "test_datadog"
    datadog_region  = "us1"
  }
}
Audit logs are configured using the audit_log_config parameter for the hcp_vault_cluster resource.
Example:
resource "hcp_vault_cluster" "example" {
  cluster_id = "vault-cluster"
  hvn_id     = hcp_hvn.example.hvn_id
  tier       = "standard_large"
  audit_log_config {
    datadog_api_key = "test_datadog"
    datadog_region  = "us1"
  }
}
Refer to the hcp_vault_cluster
documentation in the Terraform Registry for more information.
Define VPC peering
Examine the
vpc-peering.tffile.vpc-peering.tf
provider "aws" {
  region = var.region
}

resource "aws_vpc" "peer" {
  cidr_block = "172.31.0.0/16"
}

data "aws_arn" "peer" {
  arn = aws_vpc.peer.arn
}

resource "hcp_aws_network_peering" "peer" {
  hvn_id              = hcp_hvn.learn_hcp_vault_hvn.hvn_id
  peering_id          = var.peering_id
  peer_vpc_id         = aws_vpc.peer.id
  peer_account_id     = aws_vpc.peer.owner_id
  peer_vpc_region     = data.aws_arn.peer.region
}

resource "hcp_hvn_route" "peer_route" {
  hvn_link         = hcp_hvn.learn_hcp_vault_hvn.self_link
  hvn_route_id     = var.route_id
  destination_cidr = aws_vpc.peer.cidr_block
  target_link      = hcp_aws_network_peering.peer.self_link
}

resource "aws_vpc_peering_connection_accepter" "peer" {
  vpc_peering_connection_id = hcp_aws_network_peering.peer.provider_peering_id
  auto_accept               = true
}
After making any necessary changes to
vpc-peering.tf, proceed to deploy the infrastructure.
Deploy infrastructure
After you have cloned the repository and defined the environment variables for HCP (and optionally AWS), you are ready to deploy the HCP resources and peer them with your AWS account.
Initialize terraform; this downloads the necessary providers and initializes the backend.
$ terraform init

Initializing the backend...

Initializing provider plugins...
...snip...

Terraform has been successfully initialized!
Verify the resources that will be created using
terraform plan.$ terraform plan An execution plan has been generated and is shown below. Resource actions are indicated with the following symbols: ...snip... Plan: 6 to add, 0 to change, 0 to destroy.You should note resources listed in the output, and at the end a summary that lists 5 resources to add.
Deploy the resources with
terraform apply.$ terraform apply ...snip... Do you want to perform these actions? Terraform will perform the actions described above. Only 'yes' will be accepted to approve. Enter a value:Confirm the run by entering
yes.Once confirmed, it will take a few minutes to complete the deployment. If the deployment was successful, you should observe output at the end resembling this example.
Apply complete! Resources: 6 added, 0 changed, 0 destroyed.
Access Vault
Return to the HCP portal to inspect the newly created Vault cluster.
From the navigation menu within the Resources section, select Vault.

Click learn-hcp-vault-cluster to access cluster details.
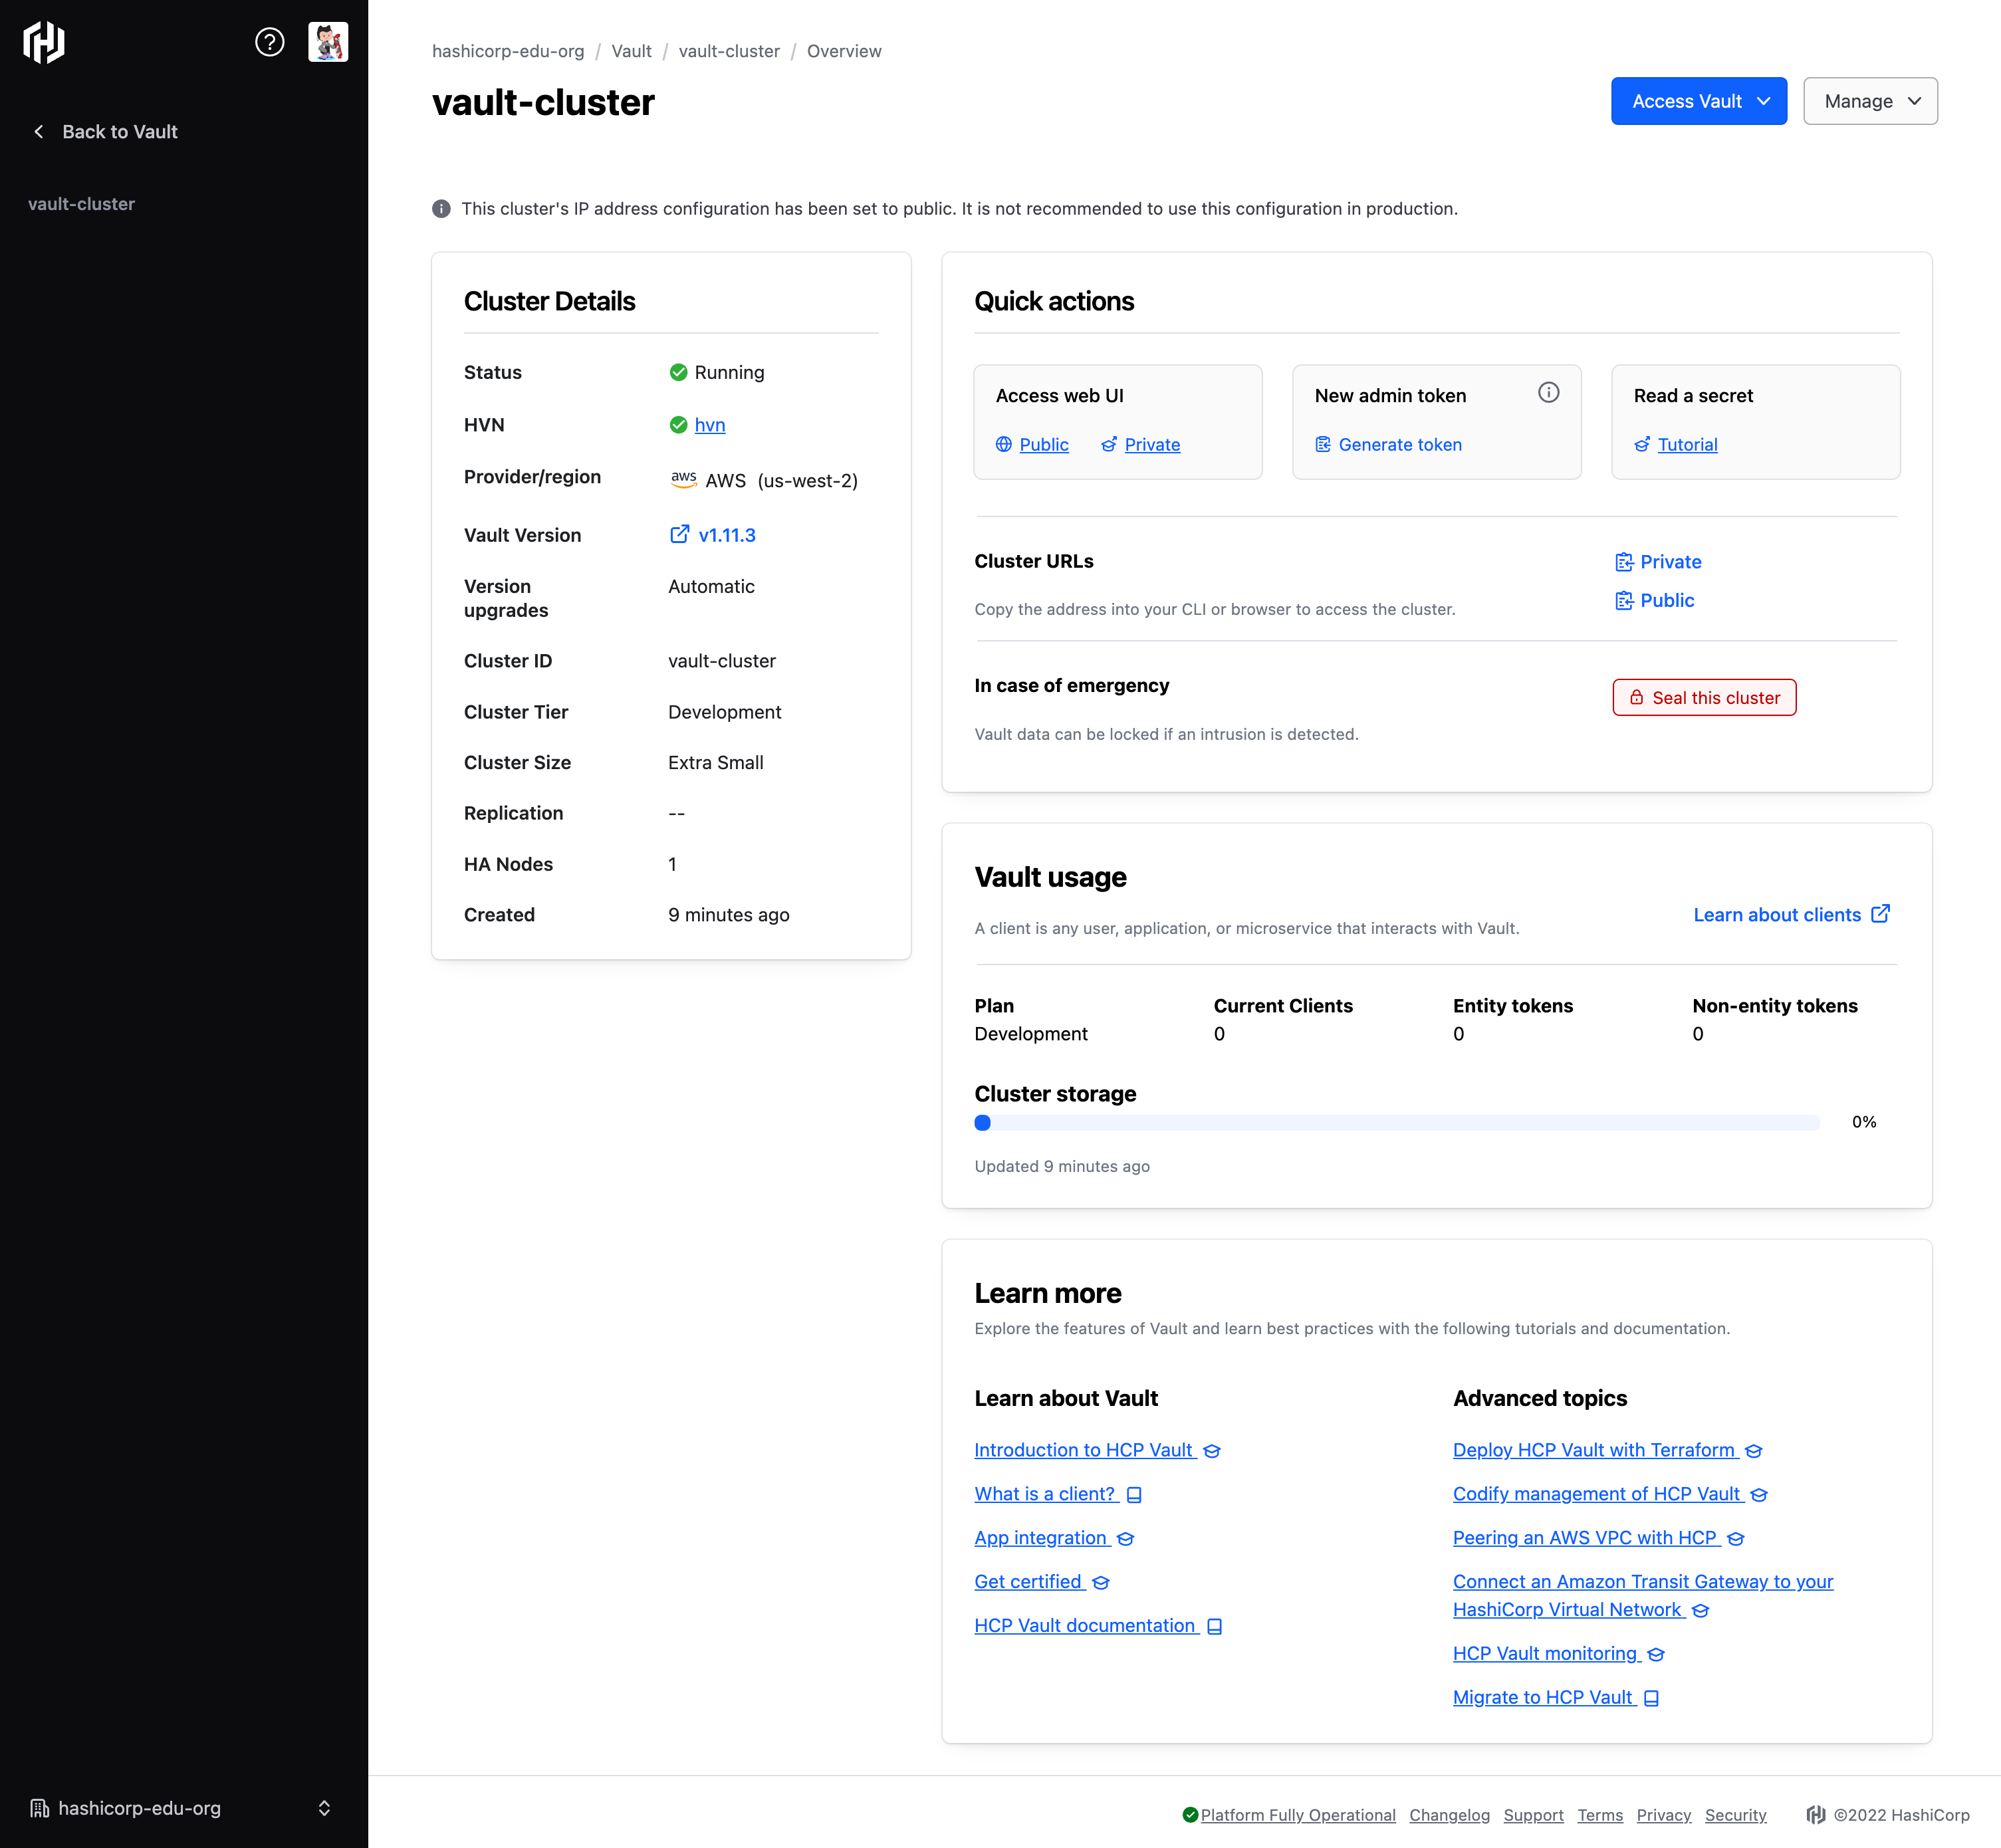
The Vault Dedicated cluster overview is shown and the State is
Running. You can interact with the cluster from this overview to perform a range of operational tasks.To confirm the HVN to VPC peering status, return to the main menu, and select HashiCorp Virtual Network.

Click learn-hcp-vault-hvn to access the HVN details.
Click Peering connections.

Select the learn-peering link.

The details for the VPC peering connection you deployed are shown. The HVN and VPC are peered and ready to use.
Additional discussion
VPC peering
When you establish a VPC peering connection from your AWS VPC and the HCP HVN you ensure only trusted clients (users, applications, containers, etc.) running inside the VPC connect to Vault and prevent systems outside of your selected network from connecting.

Follow the Peering an AWS VPC with HashiCorp Cloud Platform
(HCP) tutorial to
create and establish a VPC peering. Vault clients running in the VPC can connect
to learn-hcp-vault-cluster using the private cluster URL.

Updating AWS security groups
Once your AWS VPC is peered with the HVN, you will need to consider how to manage access from your AWS workloads to connect to Vault Dedicated.
When creating a new security group through the AWS console or AWS CLI, the default behavior is to create an egress or outbound
rule that permits all traffic from the AWS workload to any destination, represented by the 0.0.0.0/0 CIDR notation.
However, if you manage your AWS security groups using Terraform, the default Terraform behavior is to remove the default egress rule. Once the default egress rule is removed, you need to explicitly add a rule to permit traffic from your AWS workloads to the desired destination.
How you utilize security groups in your organization will guide you on the best way to approach managing access to your Vault Dedicated cluster.
If you are already using Terraform to manage your AWS security groups, one option is to add an egress rule that will permit TCP traffic
on port 8200 using the aws_security_group_rule
resource to an existing security group.
resource "aws_security_group_rule" "example" {
  type              = "egress"
  from_port         = 8200
  to_port           = 8200
  protocol          = "tcp"
  cidr_blocks       = ["172.25.16.0/20"]
  security_group_id = "sg-123456"
}
- Line 2: The
typeparameter allows you to define whether the rule is foringress(inbound) oregress(outbound). - Line 3-4: The
from_portandto_portparameters allow you to define one or more port numbers. For Vault, clients will connect on port8200. - Line 5: The
protocolfield specifies the type of traffic allowed. - Line 6: The
cidr_blocksfield contains the IP address the rule will permit access to, or from and should match the CIDR of your HVN. - Line 7: The
security_group_idis the ID of the security group you want to update.
If you are not familiar with AWS security groups, refer to the AWS documentation on Control traffic to resources using security groups.
Enable public cluster address
If you want to enable the public cluster address, update the vault.tf file with
public_endpoint set to true for the hcp_vault_cluster resource.
vault.tf
resource "hcp_hvn" "learn_hcp_vault_hvn" {
  hvn_id         = var.hvn_id
  cloud_provider = var.cloud_provider
  region         = var.region
}

resource "hcp_vault_cluster" "learn_hcp_vault" {
  hvn_id     = hcp_hvn.learn_hcp_vault_hvn.hvn_id
  cluster_id = var.cluster_id
  public_endpoint = true
}
Re-run the terraform apply command.
$ terraform apply
When prompted, enter yes to continue.
Plan: 0 to add, 1 to change, 0 to destroy.

Do you want to perform these actions?
  Terraform will perform the actions described above.
  Only 'yes' will be accepted to approve.

  Enter a value: yes
When it completes, you can access your Vault Dedicated cluster using its public address.

Clean up
Use terraform destroy to clean up all of the resources that you created.
$ terraform destroy
Terraform will prompt you for confirmation.
Do you really want to destroy all resources?
  Terraform will destroy all your managed infrastructure, as shown above.
  There is no undo. Only 'yes' will be accepted to confirm.

  Enter a value:
Confirm by entering yes.
Once you confirm, it will take a few minutes to complete the destroy. When successful, you should observe output resembling the following example.
Destroy complete! Resources: 6 destroyed.
In this tutorial you learned how to automate the deployment of an Vault Dedicated cluster using the Terraform HCP provider. You also learned about some of the resources available with the provider.
You can find the full documentation for the HashiCorp Cloud Platform Terraform provider in the Terraform registry documentation.
Next steps
From here you can learn more about HCP Vault Dedicated including Vault Operation Tasks specific to Vault Dedicated.
With Vault in your HVN, and your HVN peered to an AWS VPC, you can deploy further AWS resources into the same VPC and access Vault with them through the Vault HTTP API or CLI.