Generate tokens for machine authentication with AppRole
Before a client can interact with Vault, it must authenticate against an auth method to get a token. The polices attached to the token limits the behavior of the client to the capabilities defined in the policy.
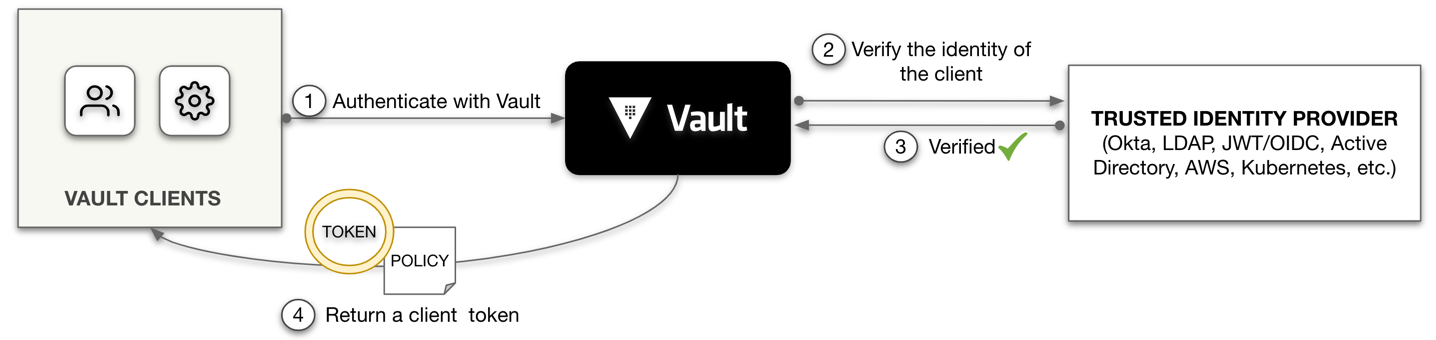
Since tokens are the core method for authentication within Vault, there is a token auth method (often referred to as token store). This is a special auth method responsible for creating and storing tokens.
Auth methods
Auth methods perform authentication to verify the user or machine-supplied information. Some supported auth methods target users while others target machines or apps. For example, the LDAP auth method enables user authentication using an existing LDAP server while AppRole auth method enables machines or apps to authenticate.
The GitHub auth method documentation explains how to configure the GitHub auth method for user authentication.
This introductory tutorial focuses on generating tokens for machines or apps by enabling the AppRole auth method.
Personas
The end-to-end scenario described in this tutorial involves two personas:
adminwith privileged permissions to configure an auth methodappis the consumer of secrets stored in Vault
Challenge
Think of a scenario where a DevOps team wants to configure Jenkins to read secrets from Vault. Jenkins can inject the secrets to an app's environment variables like MYSQL_DB_HOST at deployment time.
Instead of hard coding secrets in each build script as plain text, Jenkins retrieves secrets from Vault.
As a user, you can authenticate with Vault using your LDAP credentials, and Vault generates a token. This token has policies allowing you to perform the appropriate operations.
How can a Jenkins server programmatically request a token so that it can read secrets from Vault?
Solution
Enable the AppRole auth method so that the Jenkins server can request a Vault token with appropriate policies attached. Since each AppRole has attached policies, you can write fine-grained policies limiting which app can access which path.
Prerequisites
To perform the tasks described in this tutorial, you need to have a Vault environment. Refer to the Vault install guide to install Vault. Make sure that your Vault server has been initialized and unsealed.
Launch Terminal
This tutorial includes a free interactive command-line lab that lets you follow along on actual cloud infrastructure.

Policy requirements
To perform all tasks demonstrated in this tutorial, your policy must include the following permissions:
# Mount the AppRole auth method
path "sys/auth/approle" {
  capabilities = [ "create", "read", "update", "delete", "sudo" ]
}

# Configure the AppRole auth method
path "sys/auth/approle/*" {
  capabilities = [ "create", "read", "update", "delete" ]
}

# Create and manage roles
path "auth/approle/*" {
  capabilities = [ "create", "read", "update", "delete", "list" ]
}

# Write ACL policies
path "sys/policies/acl/*" {
  capabilities = [ "create", "read", "update", "delete", "list" ]
}

# Write test data
# Set the path to "secret/data/mysql/*" if you are running `kv-v2`
path "secret/mysql/*" {
  capabilities = [ "create", "read", "update", "delete", "list" ]
}
If you are not familiar with policies, complete the policies tutorial.
Scenario introduction
AppRole is an authentication mechanism within Vault to allow machines or apps to get a token to interact with Vault. It uses RoleID and SecretID for login.
The basic workflow is:
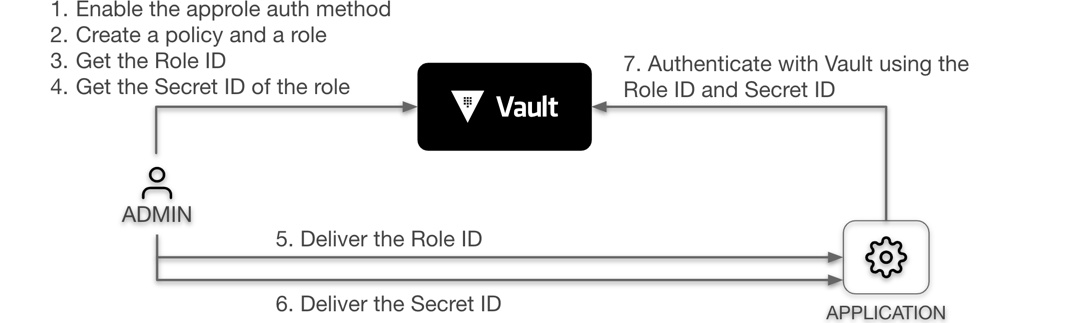
In this tutorial, you are going to perform the following steps:
- Enable AppRole auth method
- Create a role with policy attached
- Get RoleID and SecretID
- Log in with RoleID & SecretID
- Read secrets using the AppRole token
Perform part 1 through 3 as an admin user. Part 4 and 5 describe
the commands that an app runs to get a token and read secrets from Vault.
Lab setup
Launch the HCP Portal and login.
Click Vault in the left navigation pane.
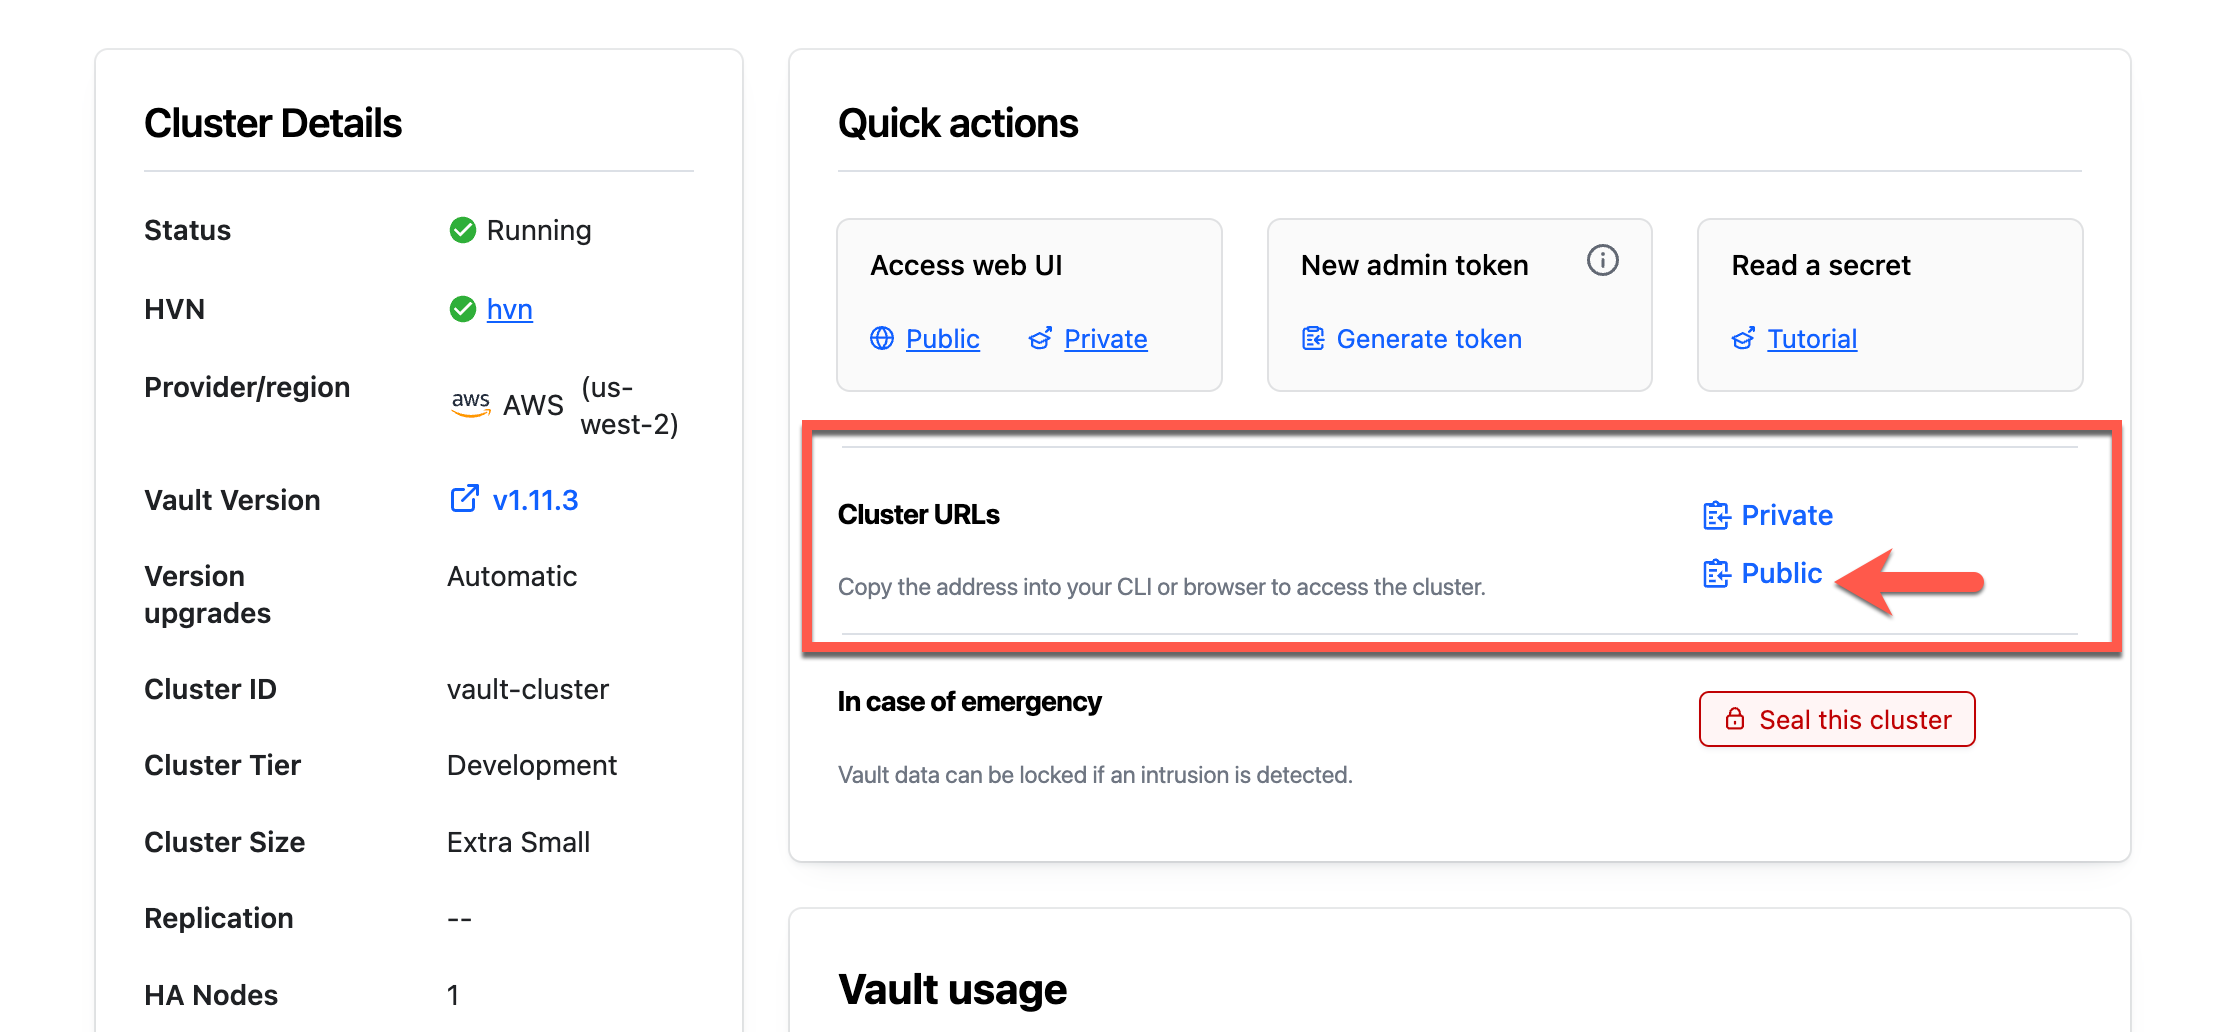
In the Vault clusters pane, click vault-cluster.
Under Cluster URLs, click Public Cluster URL.
In a terminal, set the
VAULT_ADDRenvironment variable to the copied address.$ export VAULT_ADDR=<Public_Cluster_URL>Return to the Overview page and click Generate token.
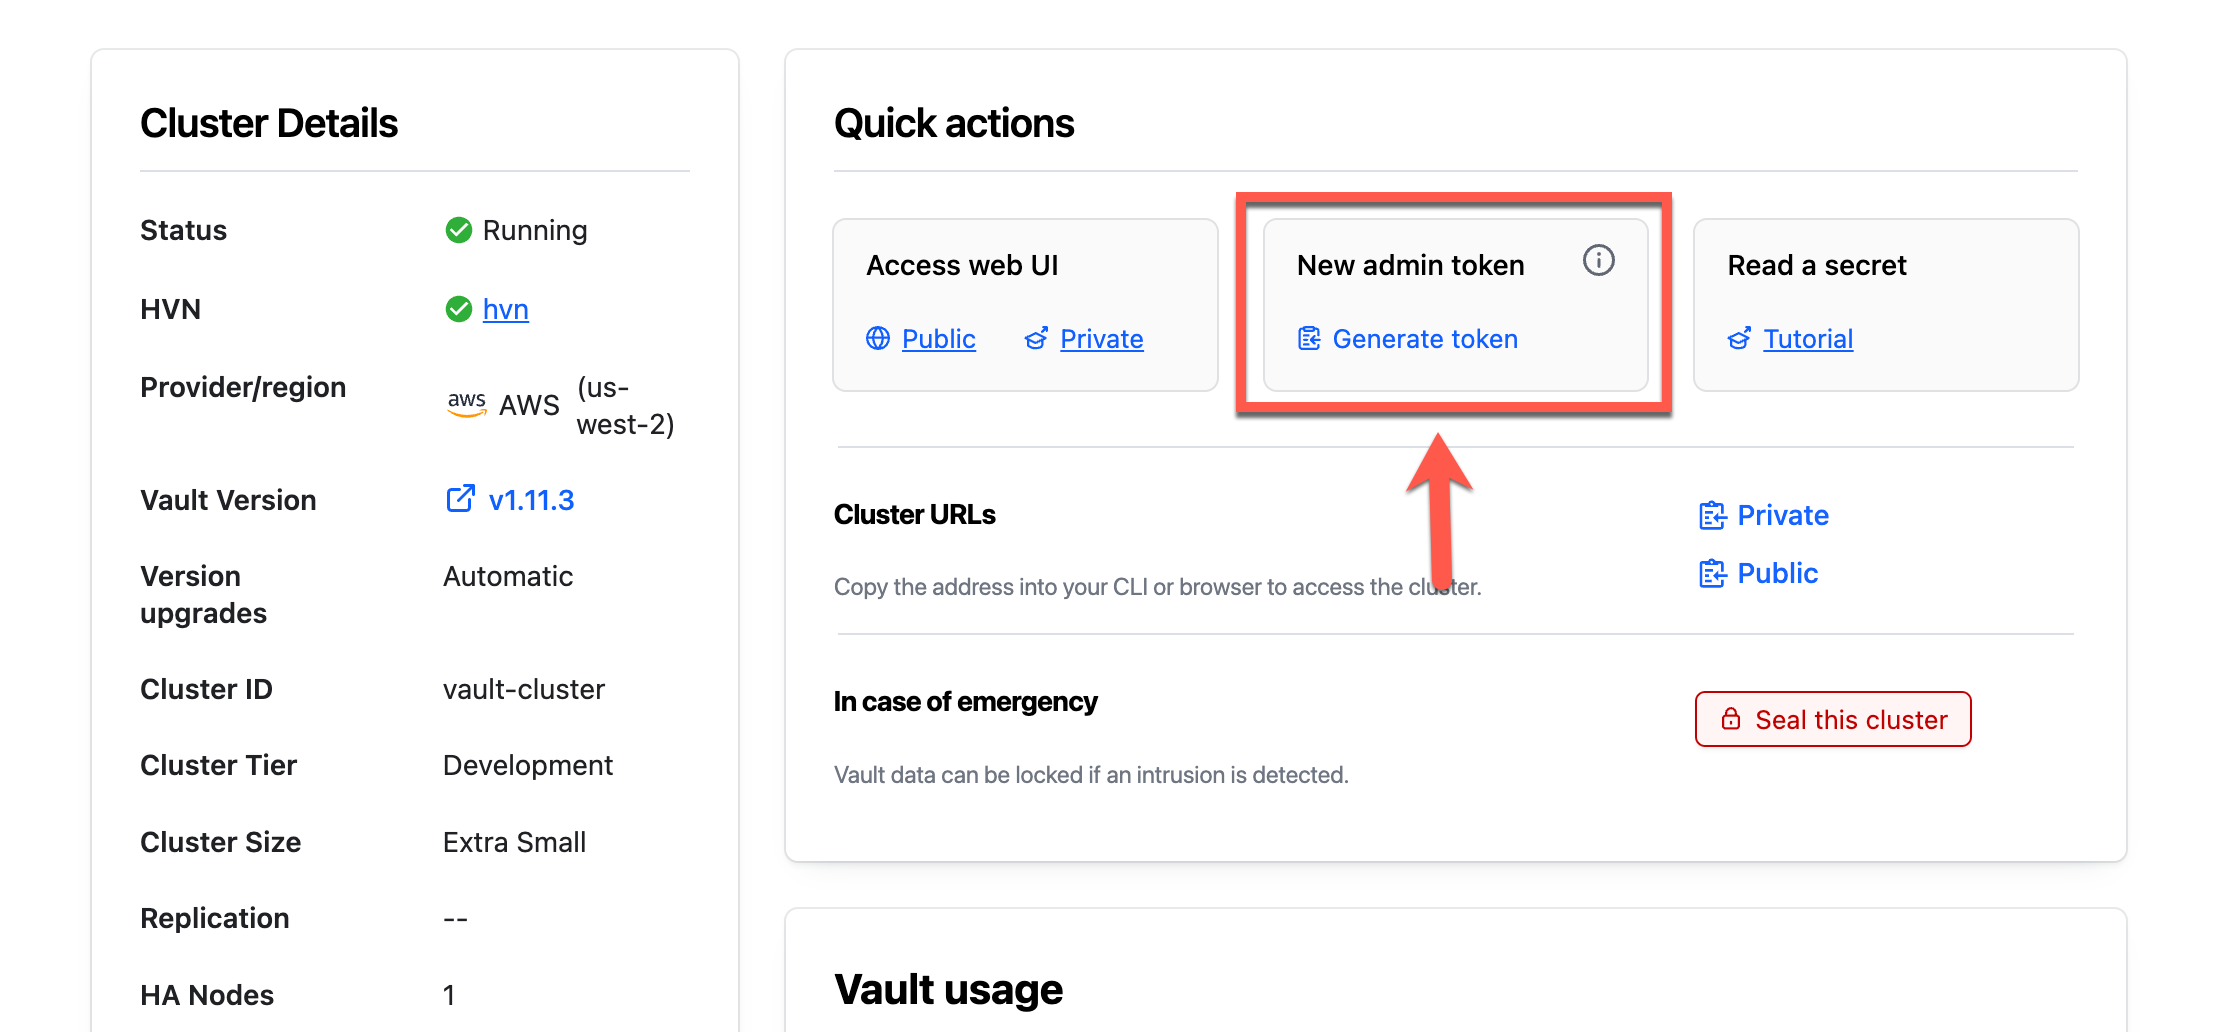
Copy the Admin Token.
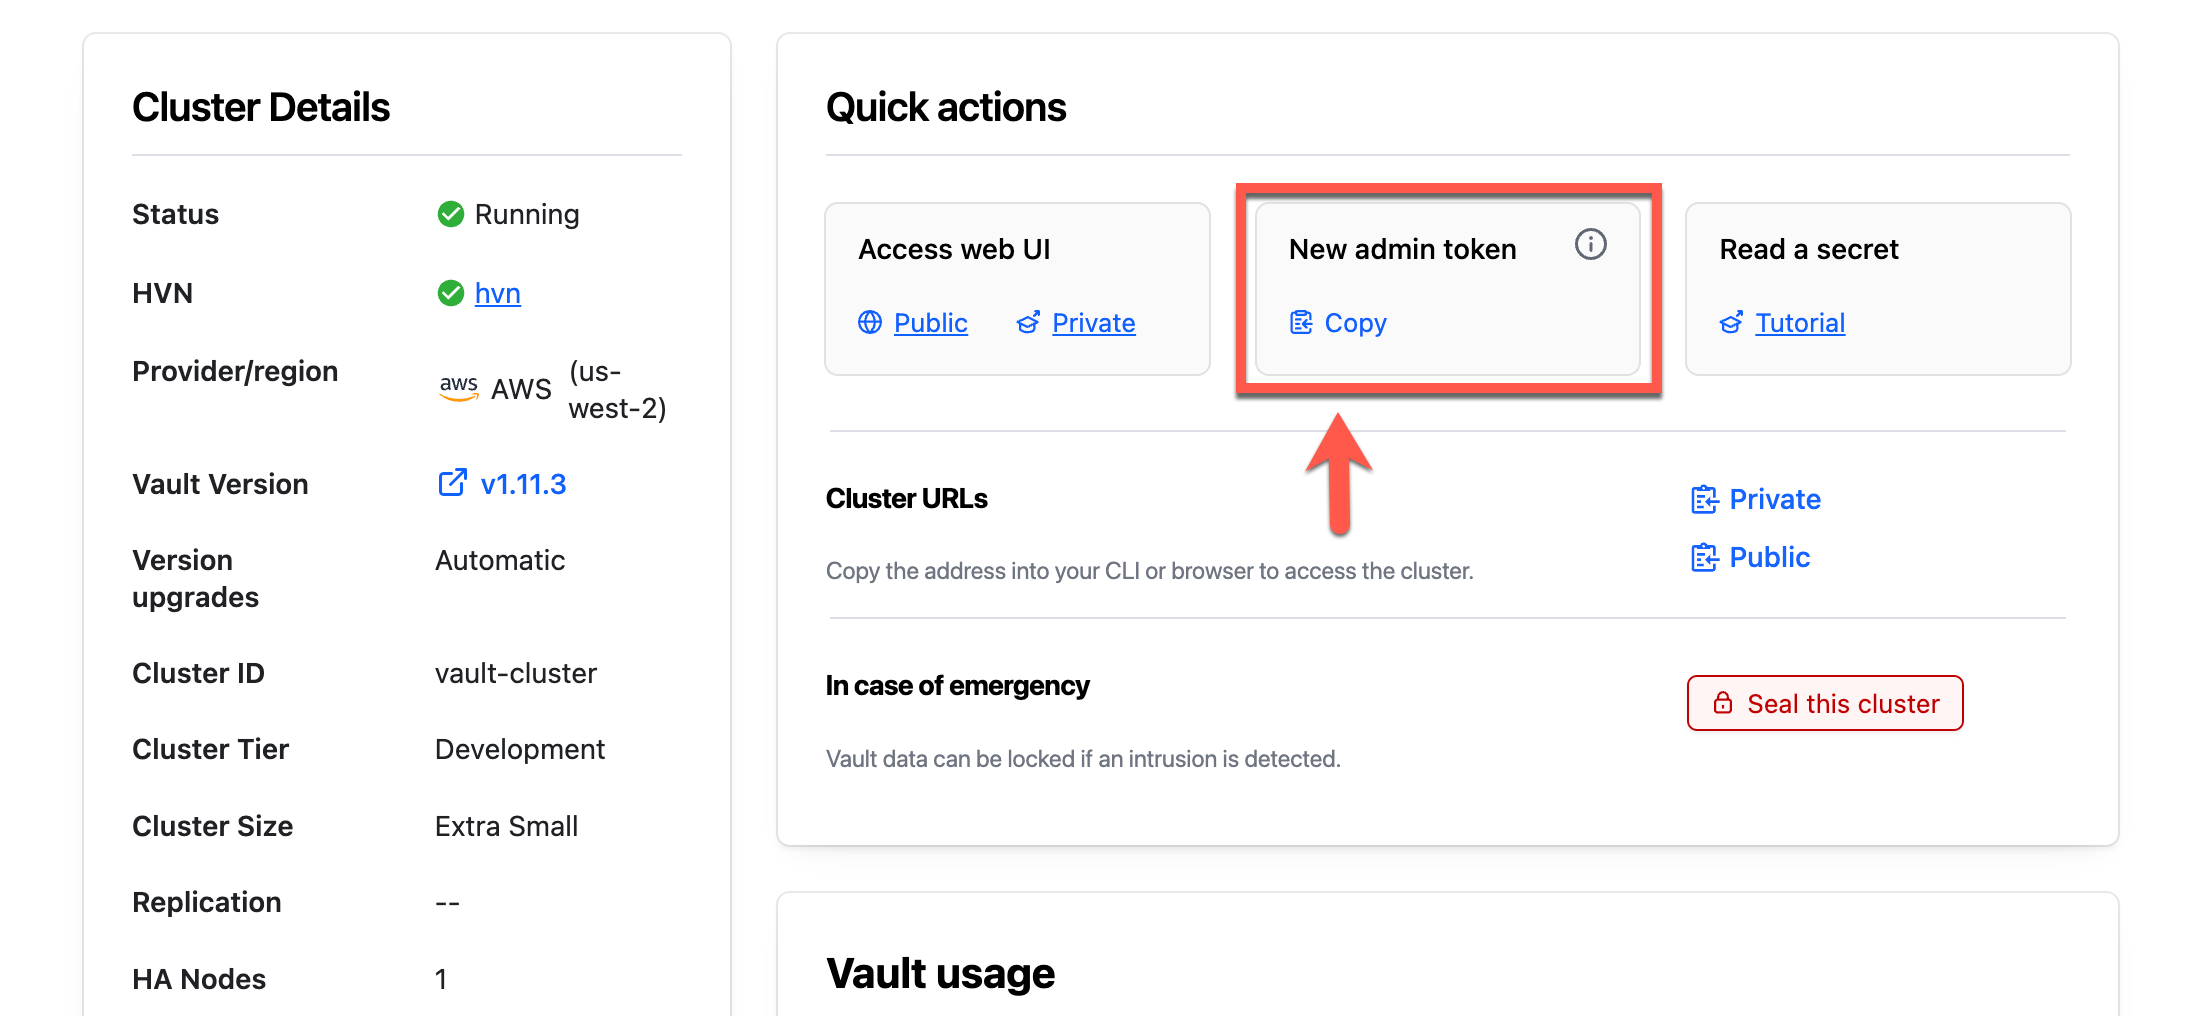
Return to the terminal and set the
VAULT_TOKENenvironment variable.$ export VAULT_TOKEN=<token>Set the
VAULT_NAMESPACEenvironment variable toadmin.$ export VAULT_NAMESPACE=adminThe
adminnamespace is the top-level namespace automatically created by HCP Vault. All CLI operations default to use the namespace defined in this environment variable.Type
vault statusto verify your connectivity to the Vault cluster.$ vault status Key Value --- ----- Recovery Seal Type shamir Initialized true Sealed false Total Recovery Shares 1 Threshold 1 Version 1.9.2+ent Storage Type raft ...snipped...Enable the K/V secrets engine
$ vault secrets enable --version=2 --path=secret kvCreate some test data.
$ vault kv put secret/mysql/webapp db_name="users" username="admin" password="passw0rd"Example output:
Key              Value
---              -----
created_time     2021-06-08T02:34:23.182299Z
deletion_time    n/a
destroyed        false
version          1
The HCP Vault Dedicated server is ready.
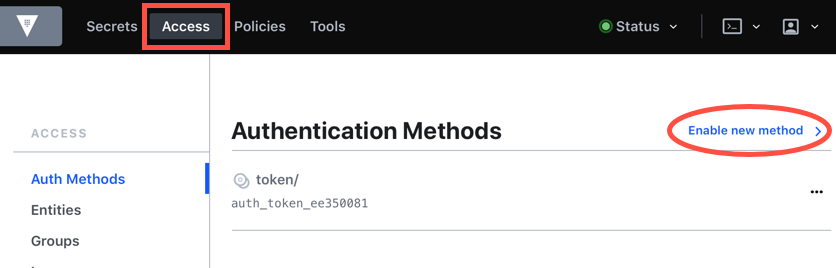
Enable AppRole auth method
(Persona: admin)
Enable the AppRole auth method before configuring it.
Enable approle auth method by executing the following command.
$ vault auth enable approle
Success! Enabled approle auth method at: approle/

Create a role with policy attached
(Persona: admin)
When you enabled the AppRole auth method, it gets mounted at the /auth/approle
path. In this example, you are going to create a role for the app persona
(jenkins in this scenario).
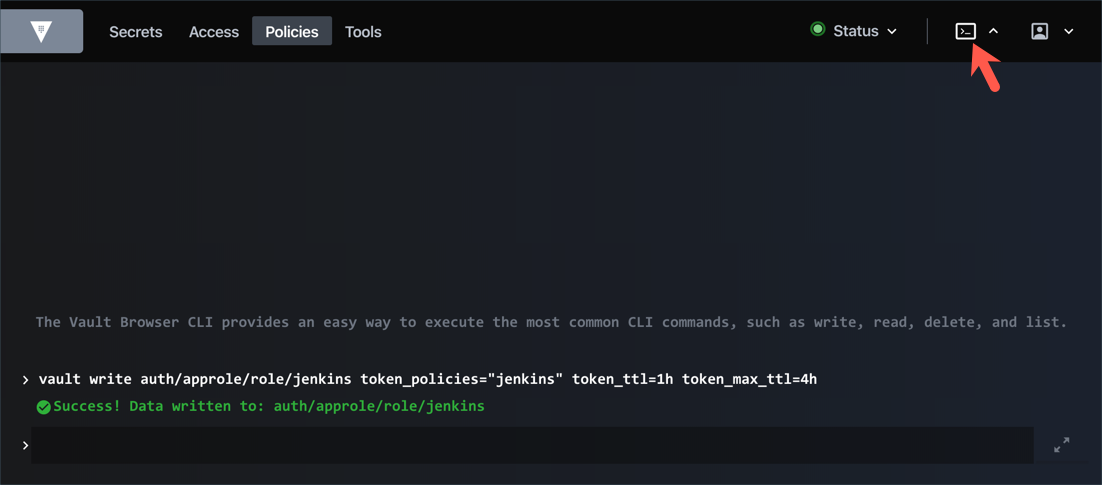
First, create a policy named jenkins with following definition.
# Read-only permission on secrets stored at 'secret/data/mysql/webapp'
path "secret/data/mysql/webapp" {
  capabilities = [ "read" ]
}
Before creating a role, create a
jenkinspolicy.$ vault policy write jenkins -<<EOF # Read-only permission on secrets stored at 'secret/data/mysql/webapp' path "secret/data/mysql/webapp" { capabilities = [ "read" ] } EOFOutput:
Success! Uploaded policy: jenkinsCreate a role named
jenkinswith thejenkinspolicy attached. Set the generated token's time-to-live (TTL) to 1 hour and renewable for up to 4 hours after its first creation. (NOTE: This example creates a role which operates in pull mode.)$ vault write auth/approle/role/jenkins token_policies="jenkins" \ token_ttl=1h token_max_ttl=4hOutput:
Success! Data written to: auth/approle/role/jenkinsTo attach multiple policies, pass the policy names as a comma separated string:
token_policies="jenkins,anotherpolicy".The command to create a new AppRole is:
$ vault write auth/approle/role/<ROLE_NAME> [parameters]You can review the parameters that you can set on a role. If you want to limit the use of the generated secret ID, set
secret_id_num_usesorsecret_id_ttlparameter values. Similarly, you can specifytoken_num_usesandtoken_ttl. You may never want the app token to expire. In such a case, specify theperiodso that the token generated by this AppRole is a periodic token. To learn more about periodic tokens, refer to the Tokens tutorial.Read the
jenkinsrole you created to verify.$ vault read auth/approle/role/jenkinsExample output:
Key Value --- ----- bind_secret_id true local_secret_ids false secret_id_bound_cidrs <nil> secret_id_num_uses 0 secret_id_ttl 0s token_bound_cidrs [] token_explicit_max_ttl 0s token_max_ttl 4h token_no_default_policy false token_num_uses 0 token_period 0s token_policies [jenkins] token_ttl 1h token_type default
Get RoleID and SecretID
The RoleID and SecretID are like a username and password that a machine or app uses to authenticate.
Since the example created a jenkins role which operates in pull mode, Vault
will generate the SecretID. You can set properties such as usage-limit, TTLs (time to live),
and expiration on the SecretIDs to control its lifecycle.
To retrieve the RoleID, invoke the auth/approle/role/<ROLE_NAME>/role-id
endpoint. To generate a new SecretID, invoke the
auth/approle/role/<ROLE_NAME>/secret-id endpoint.
Now, you need to fetch the RoleID and SecretID of a role.
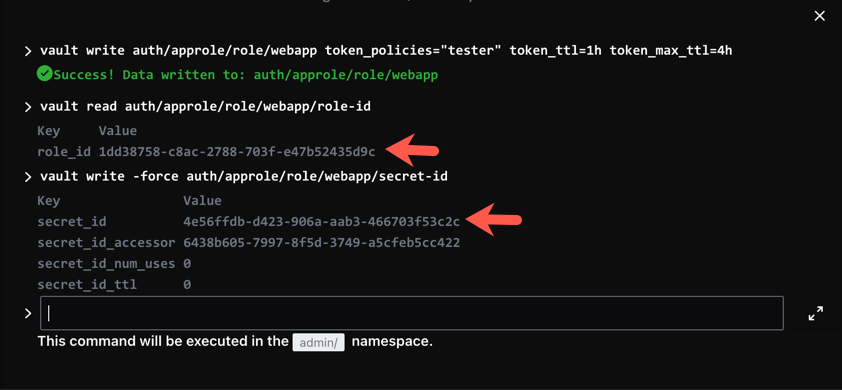
Execute the following command to retrieve the RoleID for the
jenkinsrole.$ vault read auth/approle/role/jenkins/role-id Key Value --- ----- role_id 675a50e7-cfe0-be76-e35f-49ec009731eaExecute the following command to generate a SecretID for the
jenkinsrole.$ vault write -force auth/approle/role/jenkins/secret-id Key Value --- ----- secret_id ed0a642f-2acf-c2da-232f-1b21300d5f29 secret_id_accessor a240a31f-270a-4765-64bd-94ba1f65703cThe
-force(or-f) flag forces thewriteoperation to continue without any data values specified. Or you can set parameters such ascidr_list.If you specified
secret_id_ttl,secret_id_num_uses, orbound_cidr_liston the role in Create a role with policy attached, the generated SecretID carries out the conditions.
Log in with RoleID & SecretID
(Persona: app)
The client (in this case, Jenkins) uses the RoleID and SecretID passed by the admin to authenticate with Vault. If Jenkins did not receive the RoleID and/or SecretID, the admin needs to investigate.
To login, use the auth/approle/login endpoint by passing the RoleID and
SecretID.
Example:
$ vault write auth/approle/login role_id="675a50e7-cfe0-be76-e35f-49ec009731ea" \
secret_id="ed0a642f-2acf-c2da-232f-1b21300d5f29"
Example output:
Key Value
--- -----
token s.ncEw5bAZJqvGJgl8pBDM0C5h
token_accessor gIQFfVhUd8fDsZjC7gLBMnQu
token_duration 1h
token_renewable true
token_policies ["default" "jenkins"]
identity_policies []
policies ["default" "jenkins"]
token_meta_role_name jenkins
Vault returns a client token with default and jenkins policies attached.
Store the generated token value in an environment variable named, APP_TOKEN.
Example:
$ export APP_TOKEN="s.ncEw5bAZJqvGJgl8pBDM0C5h"
Read secrets using the AppRole token
(Persona: app)
Once receiving a token from Vault, the client can make future requests using this token.
Verify that you can access the secrets at secret/mysql/webapp.
$ VAULT_TOKEN=$APP_TOKEN vault kv get secret/mysql/webapp
====== Metadata ======
Key Value
--- -----
created_time 2021-06-08T02:34:23.182299Z
deletion_time n/a
destroyed false
version 1
====== Data ======
Key Value
--- -----
db_name users
password passw0rd
username admin
The app has a read-only access, so the following delete command will fail.
$ VAULT_TOKEN=$APP_TOKEN vault kv delete secret/mysql/webapp
The error message indicates a permission error.
Error deleting secret/mysql/webapp: Error making API request.
URL: DELETE http://127.0.0.1:8200/v1/secret/data/mysql/webapp
Code: 403. Errors:
* 1 error occurred:
* permission denied
Response wrap the SecretID
The RoleID is like a username, and SecretID is the corresponding password. The app needs both to log in with Vault. Naturally, the next question becomes how to deliver those values to the client securely.
A common solution involves three personas instead of two: admin, app, and
trusted entity. The trusted entity delivers the RoleID and SecretID to the
client by separate means.
For example, Terraform as a trusted entity can deliver the RoleID onto the virtual machine. When the app runs on the virtual machine, the RoleID already exists on the virtual machine.
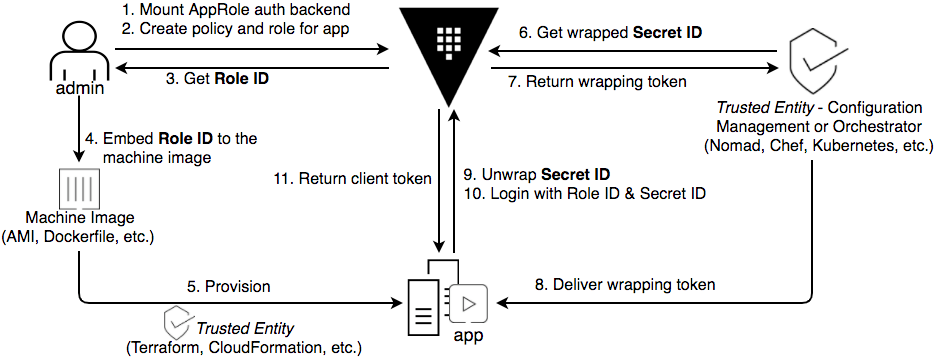
SecretID is like a password. To keep the SecretID confidential, use response wrapping so that the expecting client alone can unwrap the SecretID.
In Get RoleID and SecretID, you executed the following command to retrieve the SecretID:
$ vault write -force auth/approle/role/jenkins/secret-id
Instead, use response wrapping by passing the -wrap-ttl parameter.
$ vault write -wrap-ttl=60s -force auth/approle/role/jenkins/secret-id
Key Value
--- -----
wrapping_token: s.yzbznr9NlZNzsgEtz3SI56pX
wrapping_accessor: Smi4CO0Sdhn8FJvL8XvOT30y
wrapping_token_ttl: 1m
wrapping_token_creation_time: 2021-06-07 20:02:01.019838 -0700 PDT
wrapping_token_creation_path: auth/approle/role/jenkins/secret-id
Send this wrapping_token to the client to unwrap the response
and obtain the SecretID.
$ VAULT_TOKEN="s.yzbznr9NlZNzsgEtz3SI56pX" vault unwrap
Key Value
--- -----
secret_id c4086c73-4569-90c9-fd73-72c879e3b7b4
secret_id_accessor 3a2e9483-a7d2-dc19-7480-b1a025daeccc
secret_id_ttl 0s
Limit the SecretID usages
Treat the SecretID like a password rotate it after a specific number of uses.
Update the role definition with secret_id_num_uses set to 10.
$ vault write auth/approle/role/jenkins token_policies="jenkins" \
token_ttl=1h token_max_ttl=4h \
secret_id_num_uses=10
In this example, you can use the SecretID of the jenkins role up to 10 times to authenticate and fetch a client token. After reaching the set number of uses, the SecretID expires and you would need to generate a new one. This is like forcing a password rotation.