Automate HCP Terraform workflows
The TFE Terraform provider can codify your HCP Terraform workspaces, teams and processes.
In this tutorial, you will use the TFE provider to automate the creation and configuration of the HCP Terraform workspaces in the Deploy Consul and Vault on Kubernetes with Run Triggers tutorial.
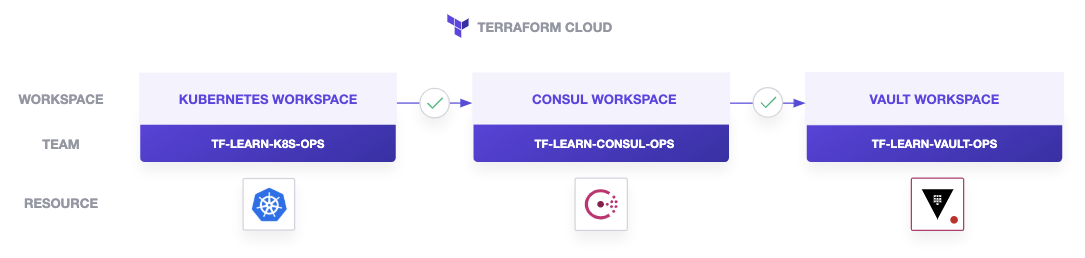
In this tutorial, you use the TFE provider to automate the following:
- Deploy three version-control backed workspaces in HCP Terraform
- Create three Terraform teams to manage their respective workspaces. This is a new addition to the Deploy Consul and Vault on Kubernetes with Run Triggers tutorial.
- Configure run triggers for each workspace to automate the process.
You will then trigger the deployment of a Consul-backed Vault cluster on Google Kubernetes Engine (GKE).
Prerequisites
This tutorial shows you how to use the TFE provider to automate your HCP Terraform workflows and assumes that you are familiar with the standard Terraform workflow, HCP Terraform, run triggers, and provisioning a Kubernetes cluster using Terraform.
If you are unfamiliar with any of these topics, reference their respective tutorials.
- Provision GKE cluster using Terraform — Provision a GKE Cluster (Google Cloud)
- Run Triggers to deploy Consul and Vault on Kubernetes — Deploy Consul and Vault on Kubernetes with Run Triggers
For this tutorial, you will need:
- a Google Cloud (GCP) account with access to Compute Admin and Kubernetes Engine Admin
- an HCP Terraform with the Standard plan or Terraform Enterprise account
- an HCP Terraform user. Refer to Manage Permissions in HCP Terraform to learn how to invite a user to an HCP Terraform organization.
- a GitHub account
- Github.com added as a VCS provider to HCP Terraform. Refer to the Configure GitHub.com Access through OAuth tutorial to learn how to do this.
- jq
If you do not have your GCP credentials as a JSON document or your credentials do not have access to Compute Admin and Kubernetes Engine Admin, reference the GCP Documentation to generate a new service account with the correct permissions.
If you are using a GCP service account, your account must be assigned the Service Account User role.
Fork workspace repositories
You will need to fork three GitHub repositories, one for each workspace — Kubernetes, Consul, Vault. The Terraform configuration to create your workspaces will reference these repositories.
Fork Kubernetes repository
Fork the learn-terraform-pipelines-k8s repository, which contains example configuration for the GKE cluster.
Fork Consul workspace
Fork the learn-terraform-pipelines-consul
repository,
which contains Terraform configuration for the Consul Helm release.
The main.tf file contains the configuration for Terraform remote state (to retrieve values from the Kubernetes workspace), the Kubernetes provider, and the Helm provider.
Fork Vault repository
Fork the Learn Terraform Pipelines Vault repository.
The main.tf file contains the configuration for Terraform remote state (to retrieve values from the Kubernetes and Consul
workspaces) and the Helm provider.
Clone repository
Clone the Learn Terraform TFE Provider Run Triggers GitHub repository. This repository contains configuration to define and configure your HCP Terraform workspaces and teams to manage them.
$ git clone https://github.com/hashicorp-education/learn-terraform-tfe-provider-run-triggers
Review configuration
Navigate to the cloned repository.
$ cd learn-terraform-tfe-provider-run-triggers
This directory contains the configuration to create the HCP Terraform workspaces and teams needed to deploy and manage a Consul-backed Vault on Kubernetes.
Here, you will find the following files:
main.tfdefines the TFE provider and random provider inrequired_providerblock.random.tfcontains the configuration to generate a random value to append to your HCP Terraform team and workspace name. This is to ensure there are no name conflicts.variables.tfcontains the variables used in the configuration. This file has comments, breaking it into 6 sections — Google, GitHub, HCP Terraform organization/team names, and workspace names and variables for the Kubernetes, Consul and Vault workspaces.assets/*contains the list ofcsvfiles used to populate each workspace's team members. You will add your JSON GCP credentials to this directory. The.gitignorefile containsgcp-creds.jsonand will prevent you from committing your GCP credentials to version control.tfc.tfcontains the configuration to reference users to the HCP Terraform organization. If these users are not part of the teams defined above, they won't be able to apply any runs in the Kubernetes, Consul or Vault workspaces. In addition, this configuration defines the run triggers between the Kubernetes and Consul workspaces and the Consul and Vault workspaces.admin.tfcontains the configuration to create theadminteam and gives itadminaccess to the Kubernetes, Consul and Vault workspaces.
In addition, the workspace-k8s.tf, workspace-consul.tf and workspace-vault.tf define their respective workspaces and do the following:
- Create a team to manage its particular workspace.
- Add members listed in
assets/*.csvto the team, where*is the workspace. - Create the workspace, linking it with its respective forked repository. The workspaces will not queue runs when created. The Kubernetes and Consul workspaces define
remote_state_consumer_ids. This allows the Consul and Vault workspaces to access the Kubernetes workspace's remote state, and the Vault workspace to access the Consul workspace's remote state. - Grant write permission to workspace's admin team.
- Define the workspace's Terraform and environment variables.
Customize Configuration
To use this configuration, you must:
- configure input variables
- update the
assets/*.csvfiles with your own email address - add your Google Cloud credentials to the
assetsdirectory.
Update variables
Update the terraform.tfvars file with your values.
google_project_id- Update the default value with your Google Project ID.vcs_oauth_token_id- Update the default value with your HCP Terraform VCS Provider's OAuth Token ID.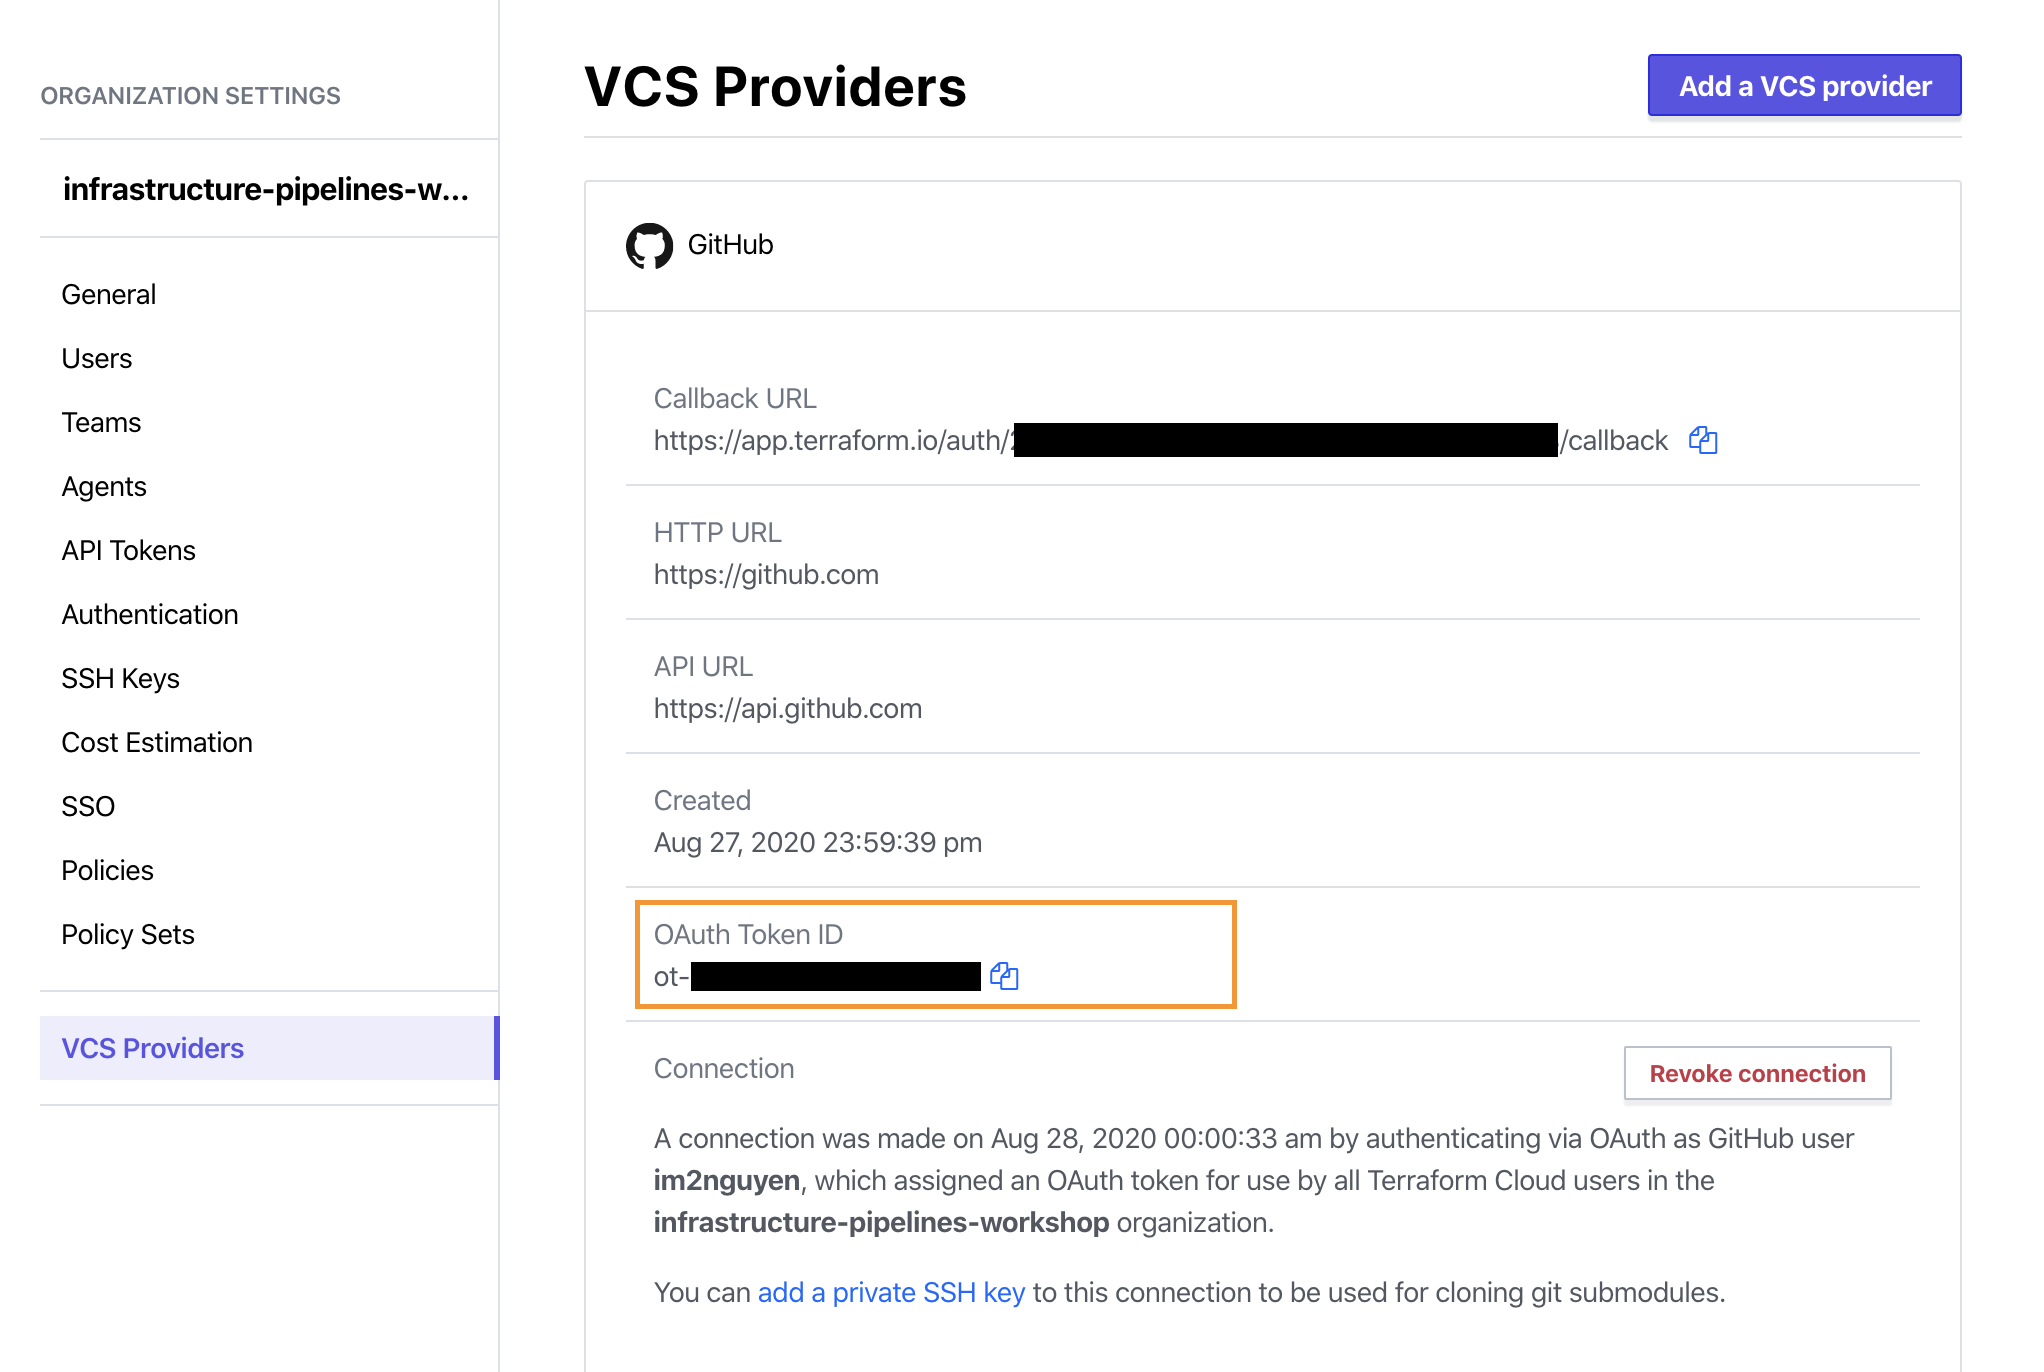
github_username- The Github account under to which you forked the example repositories.tfc_org- Update the default value with your HCP Terraform's organization name.
Update team CSV files
The assets directory contains all.csv, admin.csv, k8s.csv, consul.csv and vault.csv.
all.csv is a superset of *.csv files and should contain email addresses that exists in HCP Terraform. The admin.csv should contain email addresses that will have access to all three workspaces (Kubernetes, Consul, Vault). The k8s.csv, consul.csv, and vault.csv should contain email addresses that will have access to their respective workspaces.
Update the email address for all the csv files in the assets directory. The following command will replace the existing email address for all files with your email. Replace EMAIL_ADDRESS with your email address. This email address must already be a user in your HCP Terraform organization.
Alternatively, you can update each file with a different email address to test HCP Terraform team permissions.
$ sed -i '' 's/test@hashicorp\.com/EMAIL_ADDRESS/g' ./assets/*
Add Google Cloud Credentials
Add your GCP credentials to the assets directory in a file named gcp-creds.json.
You must flatten the JSON (remove newlines) before pasting it into HCP Terraform. The command below flattens the JSON using jq, removes the trailing newline and writes it to assets/gcp-creds.json.
$ cat <key_file>.json | jq -c | tr -d '\n' > assets/gcp-creds.json
If you do not have your GCP credentials as a JSON or your credentials do not have access to Compute Admin and Kubernetes Engine Admin, reference the GCP Documentation to generate a new service account and with the right permissions.
Apply configuration
Before you can apply your configuration, you need to authenticate to HCP Terraform.
Go to the Tokens page in HCP Terraform and generate an API token.
Add the generated API token as an environment variable named TFE_TOKEN.
$ export TFE_TOKEN=
Initialize your configuration.
$ terraform init
Apply your configuration.
$ terraform apply

An execution plan has been generated and is shown below.
Resource actions are indicated with the following symbols:
  + create

Terraform will perform the following actions:

## ...

Plan: 34 to add, 0 to change, 0 to destroy.

Do you want to perform these actions?
  Terraform will perform the actions described above.
  Only 'yes' will be accepted to approve.

  Enter a value:
Remember to confirm your apply with a yes.
Deploy Kubernetes cluster
Now that you have successfully configured all three workspaces (Kubernetes, Consul, and Vault), you can deploy your Kubernetes cluster.
Select your Kubernetes workspace and click Start new plan under the Actions menu. If the plan is successful, HCP Terraform will display a notice that a run will automatically queue a plan in the Consul workspace, and ask you to confirm and apply.
Click "Confirm & Apply" to apply this configuration. This process should take about 10 minutes to complete.
Deploy Consul
Navigate to the Consul workspace, view the run plan, then click "Confirm & Apply". This will deploy Consul onto your cluster using the Helm provider. The plan retrieves the Kubernetes cluster authentication information from the Kubernetes workspace to configure both the Kubernetes and Helm provider.
This process will take about 2 minutes to complete.
Notice that this run will also queue a plan for the learn-terraform-pipelines-vault workspace once the apply completes.
Deploy Vault
Navigate to the Vault workspace, view the run plan, then click "Confirm & Apply". This will deploy Vault onto your cluster using the Helm provider and configure it to use Consul as the backend. The plan retrieves the Kubernetes namespace from the Consul workspace's remote state and deploys Vault to the same workspace.
This process will take about 2 minutes to complete.
Next steps
Congratulations — you have created and configured HCP Terraform workspaces to deploy a Consul-backed Vault on a GKE cluster using the TFE Provider.
Refer to the Deploy Consul and Vault on Kubernetes with Run Triggers tutorial for instructions on how to verify and view your Consul and Vault deployments.
Clean up resources
To clean up the resources and destroy the infrastructure you have provisioned in this track, go to each workspace in the reverse order you created them in (Vault, Consul, Kubernetes), queue a destroy plan, and apply it.
For a more detailed guide on destroying resources on HCP Terraform, reference the Clean up Cloud Resources guide.
After you have destroyed your resources, navigate to your TFE provider configuration.
Destroy the resources. This will remove members and destroy the HCP Terraform workspaces and teams created in this tutorial. Remember to confirm your apply with a yes.
$ terraform destroy

Terraform used the selected providers to generate the following execution plan. Resource actions are indicated with the following symbols:
  - destroy

  Terraform will perform the following actions:
    ##...
    Plan: 0 to add, 0 to change, 36 to destroy.

    Do you really want to destroy all resources?
        Terraform will destroy all your managed infrastructure, as shown above.
        There is no undo. Only 'yes' will be accepted to confirm.

        Enter a value: yes

    ##..

Destroy complete! Resources: 36 destroyed.
Helpful Links
To learn more about the TFE provider, reference the TFE Provider Registry page.
To learn how to get started with Consul Service Mesh, visit the Getting Started with Consul Service Mesh Learn track.
To learn how to leverage Vault features on Kubernetes, visit the Vault Kubernetes tutorials.