Provision an EKS cluster (AWS)
AWS's Elastic Kubernetes Service (EKS) is a managed service that lets you deploy, manage, and scale containerized applications on Kubernetes.
In this tutorial, you will deploy an EKS cluster using Terraform. Then, you will configure kubectl using Terraform output and verify that your cluster is ready to use.
Why deploy with Terraform?
While you could use the built-in AWS provisioning processes (UI, CLI, CloudFormation) for EKS clusters, Terraform provides you with several benefits:
Unified Workflow - If you already use Terraform to deploy AWS infrastructure, you can use the same workflow to deploy both EKS clusters and applications into those clusters.
Full Lifecycle Management - Terraform creates, updates, and deletes tracked resources without requiring you to inspect an API to identify those resources.
Graph of Relationships - Terraform determines and observes dependencies between resources. For example, if an AWS Kubernetes cluster needs a specific VPC and subnet configurations, Terraform will not attempt to create the cluster if it fails to provision the VPC and subnet first.
Prerequisites
The tutorial assumes some basic familiarity with Kubernetes and kubectl but does
not assume any pre-existing deployment.
You can complete this tutorial using the same workflow with either Terraform Community Edition or HCP Terraform. HCP Terraform is a platform that you can use to manage and execute your Terraform projects. It includes features like remote state and execution, structured plan output, workspace resource summaries, and more.
Select the Terraform Community Edition tab to complete this tutorial using Terraform Community Edition.
This tutorial assumes that you are familiar with the Terraform and HCP Terraform workflows. If you are new to Terraform, complete the Get Started collection first. If you are new to HCP Terraform, complete the HCP Terraform Get Started tutorials first.
For this tutorial, you will need:
- Terraform v1.3+ installed locally.
- an HCP Terraform account and organization.
- HCP Terraform locally authenticated.
- an HCP Terraform variable set configured with your AWS credentials.
- an AWS account
- the AWS CLI v2.7.0/v1.24.0 or newer, installed and configured
- AWS IAM Authenticator
- kubectl v1.24.0 or newer
Set up and initialize your Terraform workspace
In your terminal, clone the example repository for this tutorial.
$ git clone https://github.com/hashicorp-education/learn-terraform-provision-eks-cluster
Change into the repository directory.
$ cd learn-terraform-provision-eks-cluster
This example repository contains configuration to provision a VPC, security groups, and an EKS cluster with the following architecture:
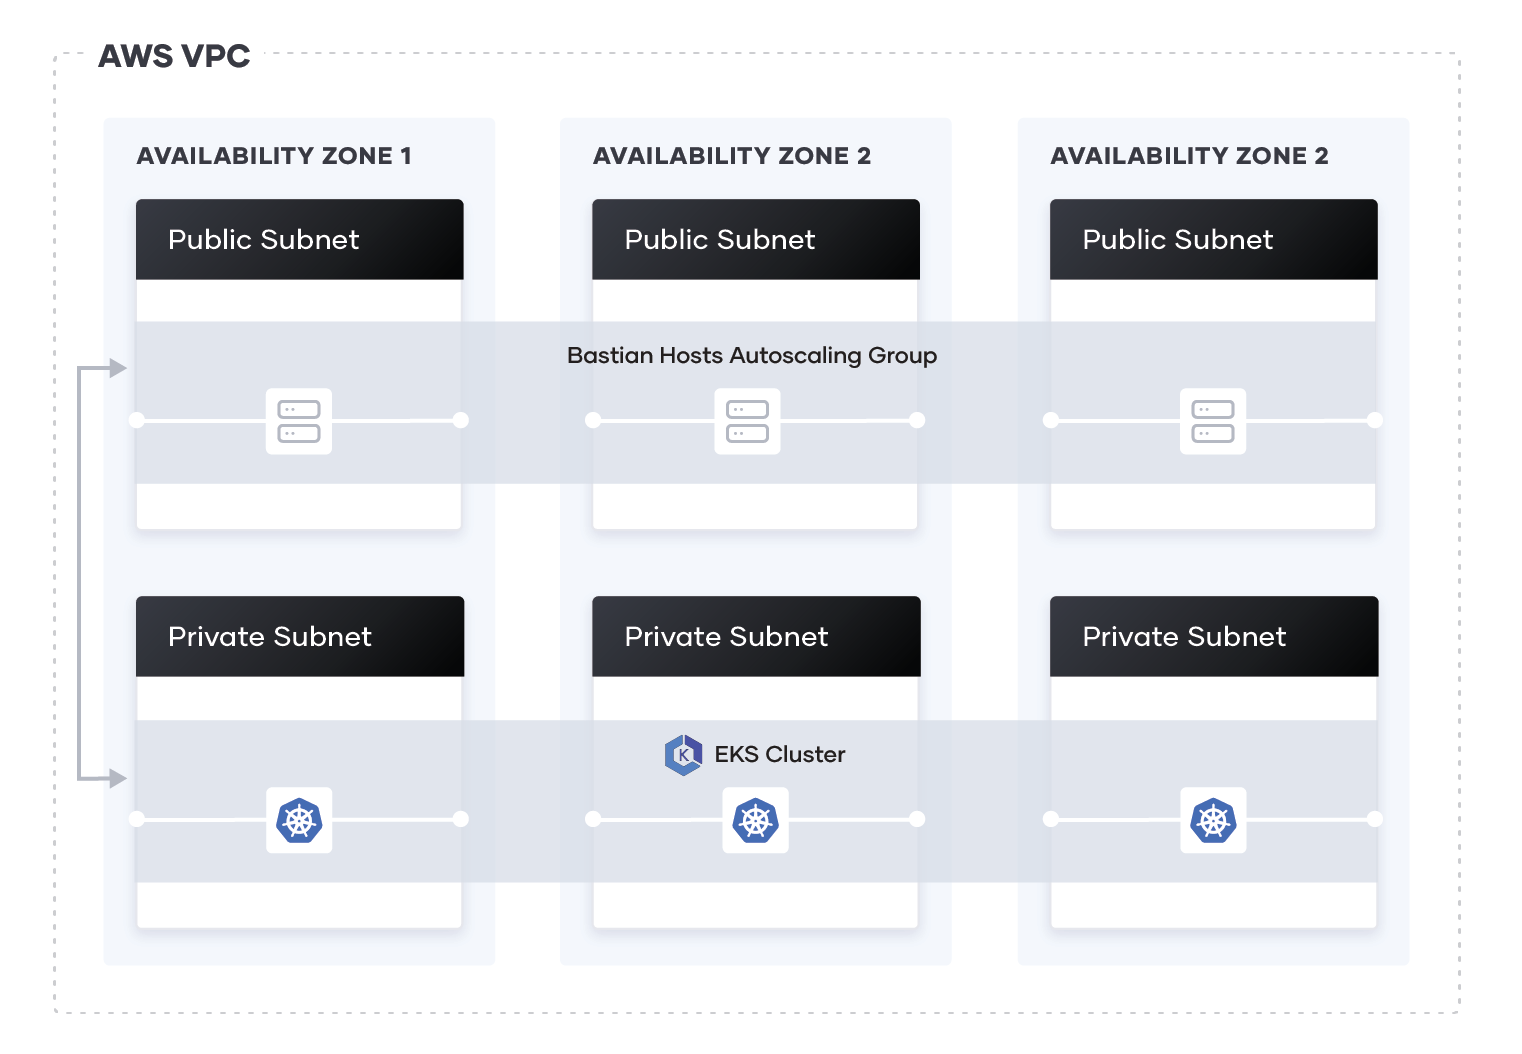
The configuration defines a new VPC in which to provision the cluster, and uses the public EKS module to create the required resources, including Auto Scaling Groups, security groups, and IAM Roles and Policies.
Open the main.tf file to review the module configuration. The eks_managed_node_groups parameter configures the cluster with three nodes across two node groups.
main.tf
eks_managed_node_groups = {
one = {
    name = "node-group-1"

    instance_types = ["t3.small"]

    min_size     = 1
    max_size     = 3
    desired_size = 2
}

two = {
    name = "node-group-2"

    instance_types = ["t3.small"]

    min_size     = 1
    max_size     = 2
    desired_size = 1
}
}
Initialize configuration
Set the TF_CLOUD_ORGANIZATION environment variable to your HCP Terraform
organization name. This will configure your HCP Terraform integration.
$ export TF_CLOUD_ORGANIZATION=
Initialize your configuration. Terraform will automatically create the learn-terraform-eks workspace in your HCP Terraform organization.
$ terraform init
Initializing HCP Terraform...
Initializing provider plugins...
- Reusing previous version of hashicorp/aws from the dependency lock file
- Installing hashicorp/aws v5.7.0...
- Installed hashicorp/aws v5.7.0 (signed by HashiCorp)
HCP Terraform has been successfully initialized!
You may now begin working with HCP Terraform. Try running "terraform plan" to
see any changes that are required for your infrastructure.
If you ever set or change modules or Terraform Settings, run "terraform init"
again to reinitialize your working directory.
Provision the EKS cluster
Run terraform apply to create your cluster and other necessary resources.
Confirm the operation with a yes.
This process can take up to 10 minutes. Upon completion, Terraform will print your configuration's outputs.
$ terraform apply

## ...

Terraform used the selected providers to generate the following execution plan. Resource actions are indicated with the following symbols:
  + create
 <= read (data resources)

Terraform will perform the following actions:

## ...

Plan: 63 to add, 0 to change, 0 to destroy.

Changes to Outputs:
  + cluster_endpoint          = (known after apply)
  + cluster_name              = (known after apply)
  + cluster_security_group_id = (known after apply)
  + region                    = "us-east-2"

Do you want to perform these actions in workspace "learn-terraform-eks"?
  Terraform will perform the actions described above.
  Only 'yes' will be accepted to approve.

  Enter a value: yes

## ...

Apply complete! Resources: 63 added, 0 changed, 0 destroyed.

Outputs:

cluster_endpoint = "https://128CA2A0D737317D36E31D0D3A0C366B.gr7.us-east-2.eks.amazonaws.com"
cluster_name = "education-eks-IKQYD53K"
cluster_security_group_id = "sg-0f836e078948afb70"
region = "us-east-2"
Configure kubectl
After provisioning your cluster, you need to configure kubectl to interact with it.
First, open the outputs.tf file to review the output values. You will use the region and cluster_name outputs to configure kubectl.
outputs.tf
output "cluster_endpoint" {
  description = "Endpoint for EKS control plane"
  value       = module.eks.cluster_endpoint
}

output "cluster_security_group_id" {
  description = "Security group ids attached to the cluster control plane"
  value       = module.eks.cluster_security_group_id
}

output "region" {
  description = "AWS region"
  value       = var.region
}

output "cluster_name" {
  description = "Kubernetes Cluster Name"
  value       = module.eks.cluster_name
}
Run the following command to retrieve the access credentials for your cluster
and configure kubectl.
$ aws eks --region $(terraform output -raw region) update-kubeconfig \
    --name $(terraform output -raw cluster_name)
You can now use kubectl to manage your cluster and deploy Kubernetes configurations to it.
Verify the Cluster
Use kubectl commands to verify your cluster configuration.
First, get information about the cluster.
$ kubectl cluster-info
Kubernetes control plane is running at https://128CA2A0D737317D36E31D0D3A0C366B.gr7.us-east-2.eks.amazonaws.com
CoreDNS is running at https://128CA2A0D737317D36E31D0D3A0C366B.gr7.us-east-2.eks.amazonaws.com/api/v1/namespaces/kube-system/services/kube-dns:dns/proxy

To further debug and diagnose cluster problems, use 'kubectl cluster-info dump'.
Notice that the Kubernetes control plane location matches the cluster_endpoint value from the terraform apply output above.
Now verify that all three worker nodes are part of the cluster.
$ kubectl get nodes
NAME                                       STATUS   ROLES    AGE     VERSION
ip-10-0-1-50.us-east-2.compute.internal    Ready    <none>   6m20s   v1.24.7-eks-fb459a0
ip-10-0-3-158.us-east-2.compute.internal   Ready    <none>   6m41s   v1.24.7-eks-fb459a0
ip-10-0-3-46.us-east-2.compute.internal    Ready    <none>   6m14s   v1.24.7-eks-fb459a0
You have verified that you can connect to your cluster using kubectl and that all three worker nodes are healthy. Your cluster is ready to use.
Clean up your workspace
You have now provisioned an EKS cluster, configured kubectl,
and verified that your cluster is ready to use.
To learn how to manage your EKS cluster using the Terraform Kubernetes Provider, leave your cluster running and continue to the Kubernetes provider tutorial.
Destroy the resources you created in this tutorial to avoid incurring extra charges. Respond yes to the prompt to confirm the operation.
$ terraform destroy

## ...

Plan: 0 to add, 0 to change, 63 to destroy.

Changes to Outputs:
  - cluster_endpoint          = "https://128CA2A0D737317D36E31D0D3A0C366B.gr7.us-east-2.eks.amazonaws.com" -> null
  - cluster_name              = "education-eks-IKQYD53K" -> null
  - cluster_security_group_id = "sg-0f836e078948afb70" -> null
  - region                    = "us-east-2" -> null

Do you really want to destroy all resources?
  Terraform will destroy all your managed infrastructure, as shown above.
  There is no undo. Only 'yes' will be accepted to confirm.

  Enter a value: yes

## ...

Destroy complete! Resources: 63 destroyed.
If you used HCP Terraform for this tutorial, after destroying your resources, delete the learn-terraform-eks workspace from your HCP Terraform organization.
Next steps
For more information on the EKS module, visit the EKS module page in the Terraform Registry.
To learn how to manage Kubernetes resources, your EKS cluster, or existing Kubernetes clusters, visit the Kubernetes provider tutorial.
You can also use the Kubernetes provider to deploy custom resources.
For a more in-depth Kubernetes example, see Deploy Consul and Vault on a Kubernetes Cluster using Run Triggers (this tutorial is GKE based).