Deploy infrastructure with the HCP Terraform Operator v2
The HCP Terraform Operator for Kubernetes allows you to manage the lifecycle of cloud and on-prem infrastructure through a single Kubernetes custom resource.
You can create application-related infrastructure from a Kubernetes cluster by adding the operator to your Kubernetes namespace. The operator uses a Kubernetes Custom Resource Definition (CRD) to manage HCP Terraform workspaces. These workspaces execute an HCP Terraform run to provision Terraform modules. By using HCP Terraform, the operator leverages its proper state handling and locking, sequential execution of runs, and established patterns for injecting secrets and provisioning resources.
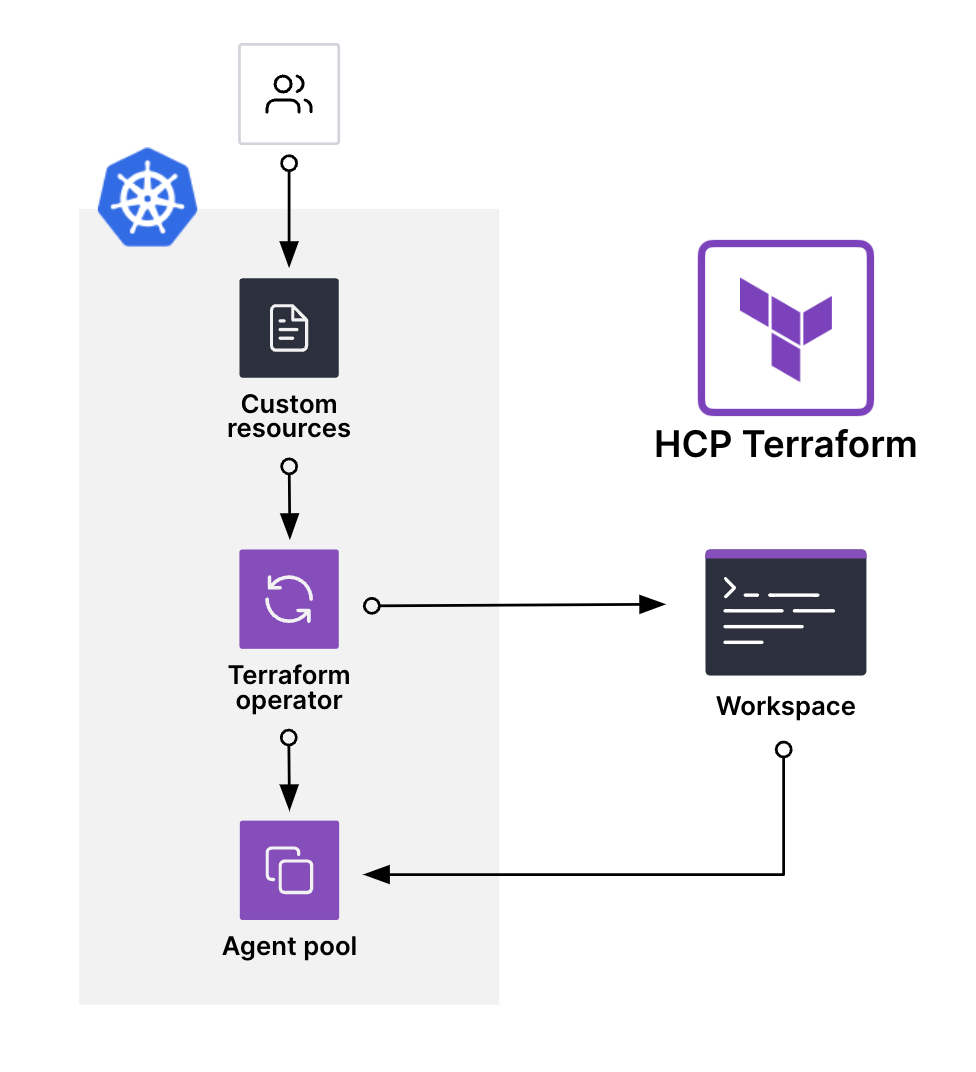
In this tutorial, you will configure and deploy the operator to a Kubernetes cluster and use it to create an HCP Terraform workspace. You will also use the operator to provision a message queue that the example application needs for deployment to Kubernetes.
Prerequisites
The tutorial assumes some basic familiarity with Kubernetes and kubectl.
You should also be familiar with:
- The Terraform workflow — All Get Started tutorials
- HCP Terraform — All Get Started with HCP Terraform tutorials
For this tutorial, you will need:
An HCP Terraform account
An AWS account and AWS Access Credentials
Install and configure kubectl
To install the kubectl (Kubernetes CLI), follow these instructions or choose a package manager based on your operating system.
Use the package manager homebrew to install kubectl.
$ brew install kubernetes-cli
You will also need a sample kubectl config. We recommend using kind to provision a local Kubernetes cluster and using that config for this tutorial.
Use the package manager homebrew to install kind.
$ brew install kind
Then, create a kind Kubernetes cluster called terraform-learn.
$ kind create cluster --name terraform-learn
Creating cluster "terraform-learn" ...
 ✓ Ensuring node image (kindest/node:v1.25.3) 🖼
 ✓ Preparing nodes 📦
 ✓ Writing configuration 📜
 ✓ Starting control-plane 🕹️
 ✓ Installing CNI 🔌
 ✓ Installing StorageClass 💾
Set kubectl context to "kind-terraform-learn"
You can now use your cluster with:

kubectl cluster-info --context kind-terraform-learn

Have a nice day! 👋
Verify that your cluster exists by listing your kind clusters.
$ kind get clusters
terraform-learn
Then, point kubectl to interact with this cluster.
$ kubectl cluster-info --context kind-terraform-learn
Kubernetes master is running at https://127.0.0.1:32769
KubeDNS is running at https://127.0.0.1:32769/api/v1/namespaces/kube-system/services/kube-dns:dns/proxy

To further debug and diagnose cluster problems, use 'kubectl cluster-info dump'.
Clone repository
In your terminal, clone the Learn HCP Terraform Operator for Kubernetes repository.
$ git clone https://github.com/hashicorp-education/learn-terraform-kubernetes-operator
Navigate into the v2 directory in the repository.
$ cd learn-terraform-kubernetes-operator/v2
This repository contains the following files.
.
├── aws-sqs-test
│   ├── Dockerfile
│   └── message.sh
├── main.tf
├── operator
│   ├── agentpool.yml
│   ├── application.yml
│   ├── configmap.yml
│   ├── module.yml
│   ├── project.yml
│   └── workspace.yml
├── terraform.tfvars.example
└── tfvars.gotemplate
- The root of this directory contains the Terraform configuration for a Kubernetes namespace and the operator helm chart.
- The
operatordirectory contains the Kubernetes.ymlfiles that you will use to create an HCP Terraform workspace using the operator. - The
aws-sqs-testdirectory contains the files that build the Docker image that tests the message queue. This is provided as reference only. You will use an image from DockerHub to test the message queue.
Configure the operator
The operator must have access to HCP Terraform and your AWS account. It also needs to run in its own Kubernetes namespace. Below you will configure the operator and deploy it into your Kubernetes cluster using a Terraform configuration that we have provided for you.
Configure HCP Terraform access
The operator must authenticate to HCP Terraform. To do this, you must create an HCP Terraform Team API token, then add it as a secret for the operator to access.
First, sign into your HCP Terraform account, navigate to your organization's Settings page, then click Teams.
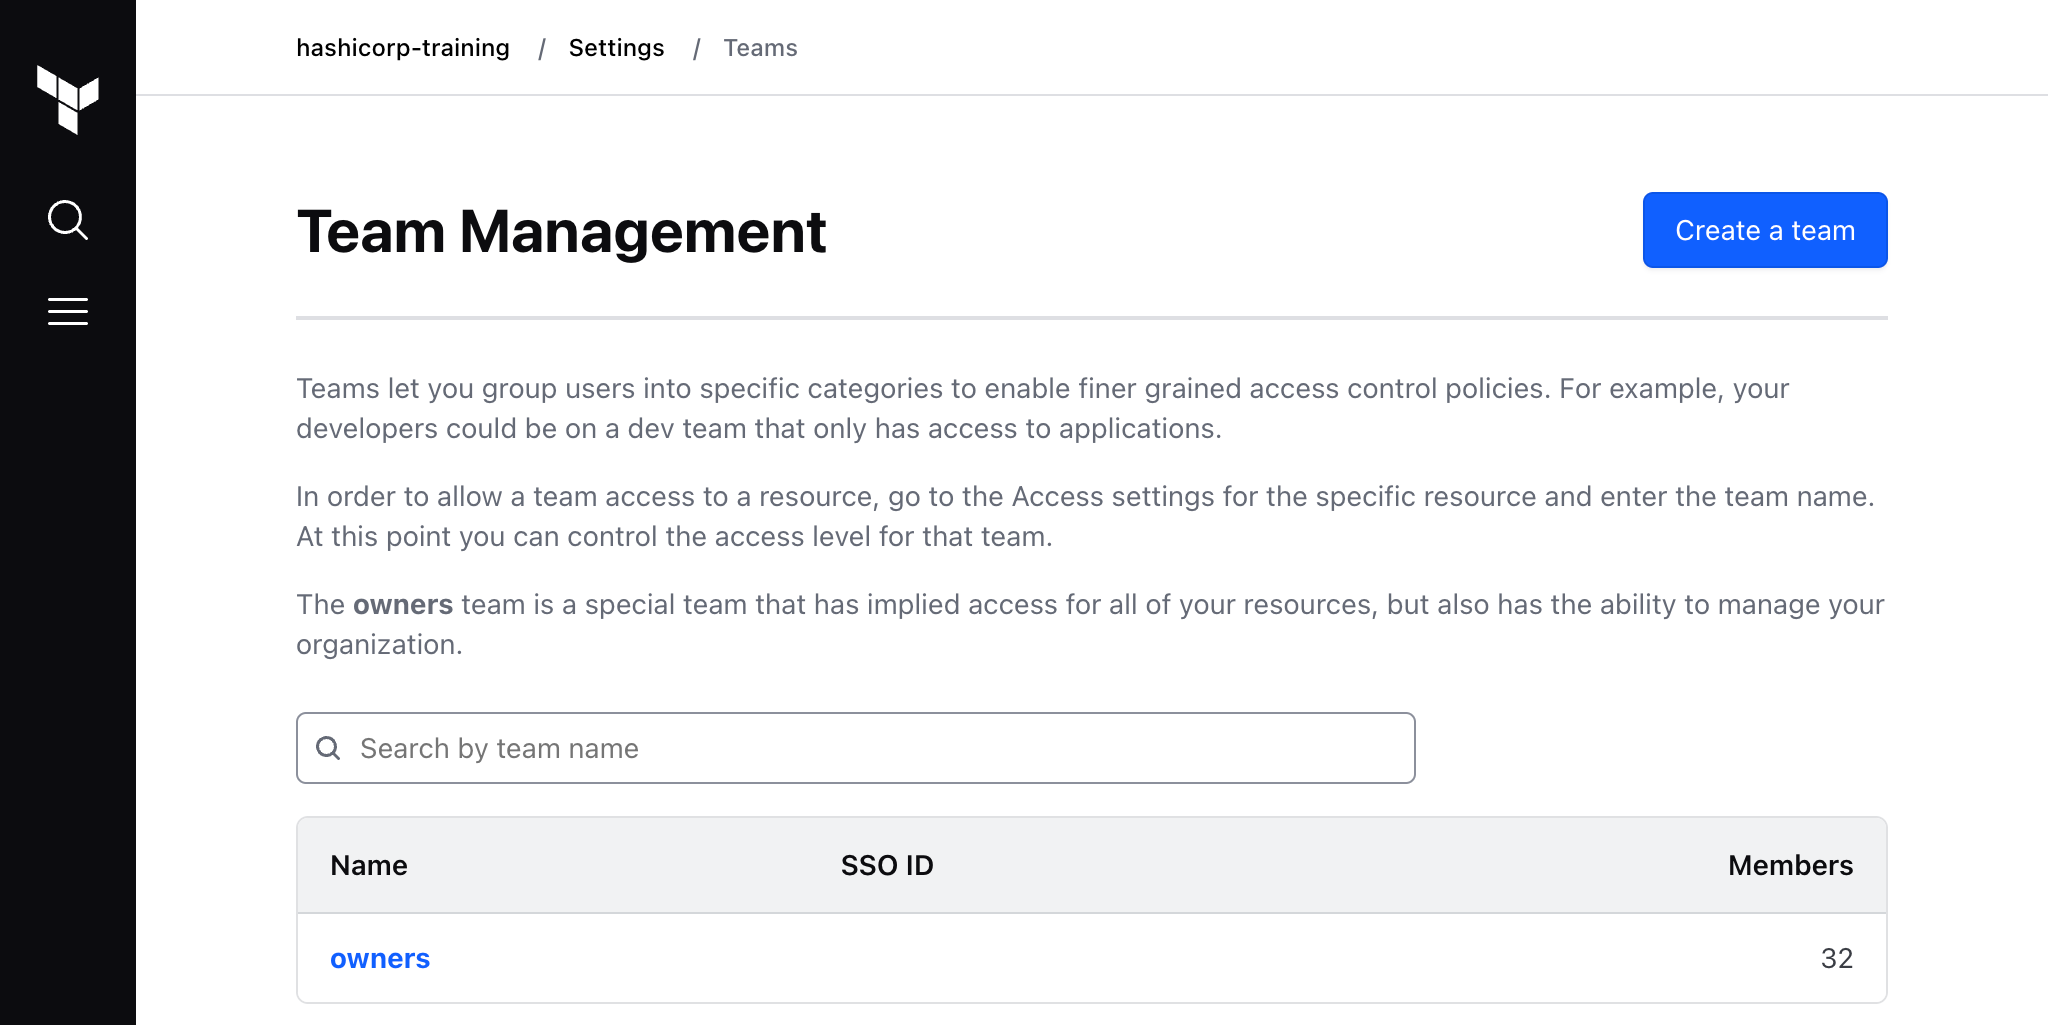
If you use a free HCP Terraform organization, HCP Terraform shows the team settings for the "owners". This is the only available team and it has full access to the HCP Terraform API.
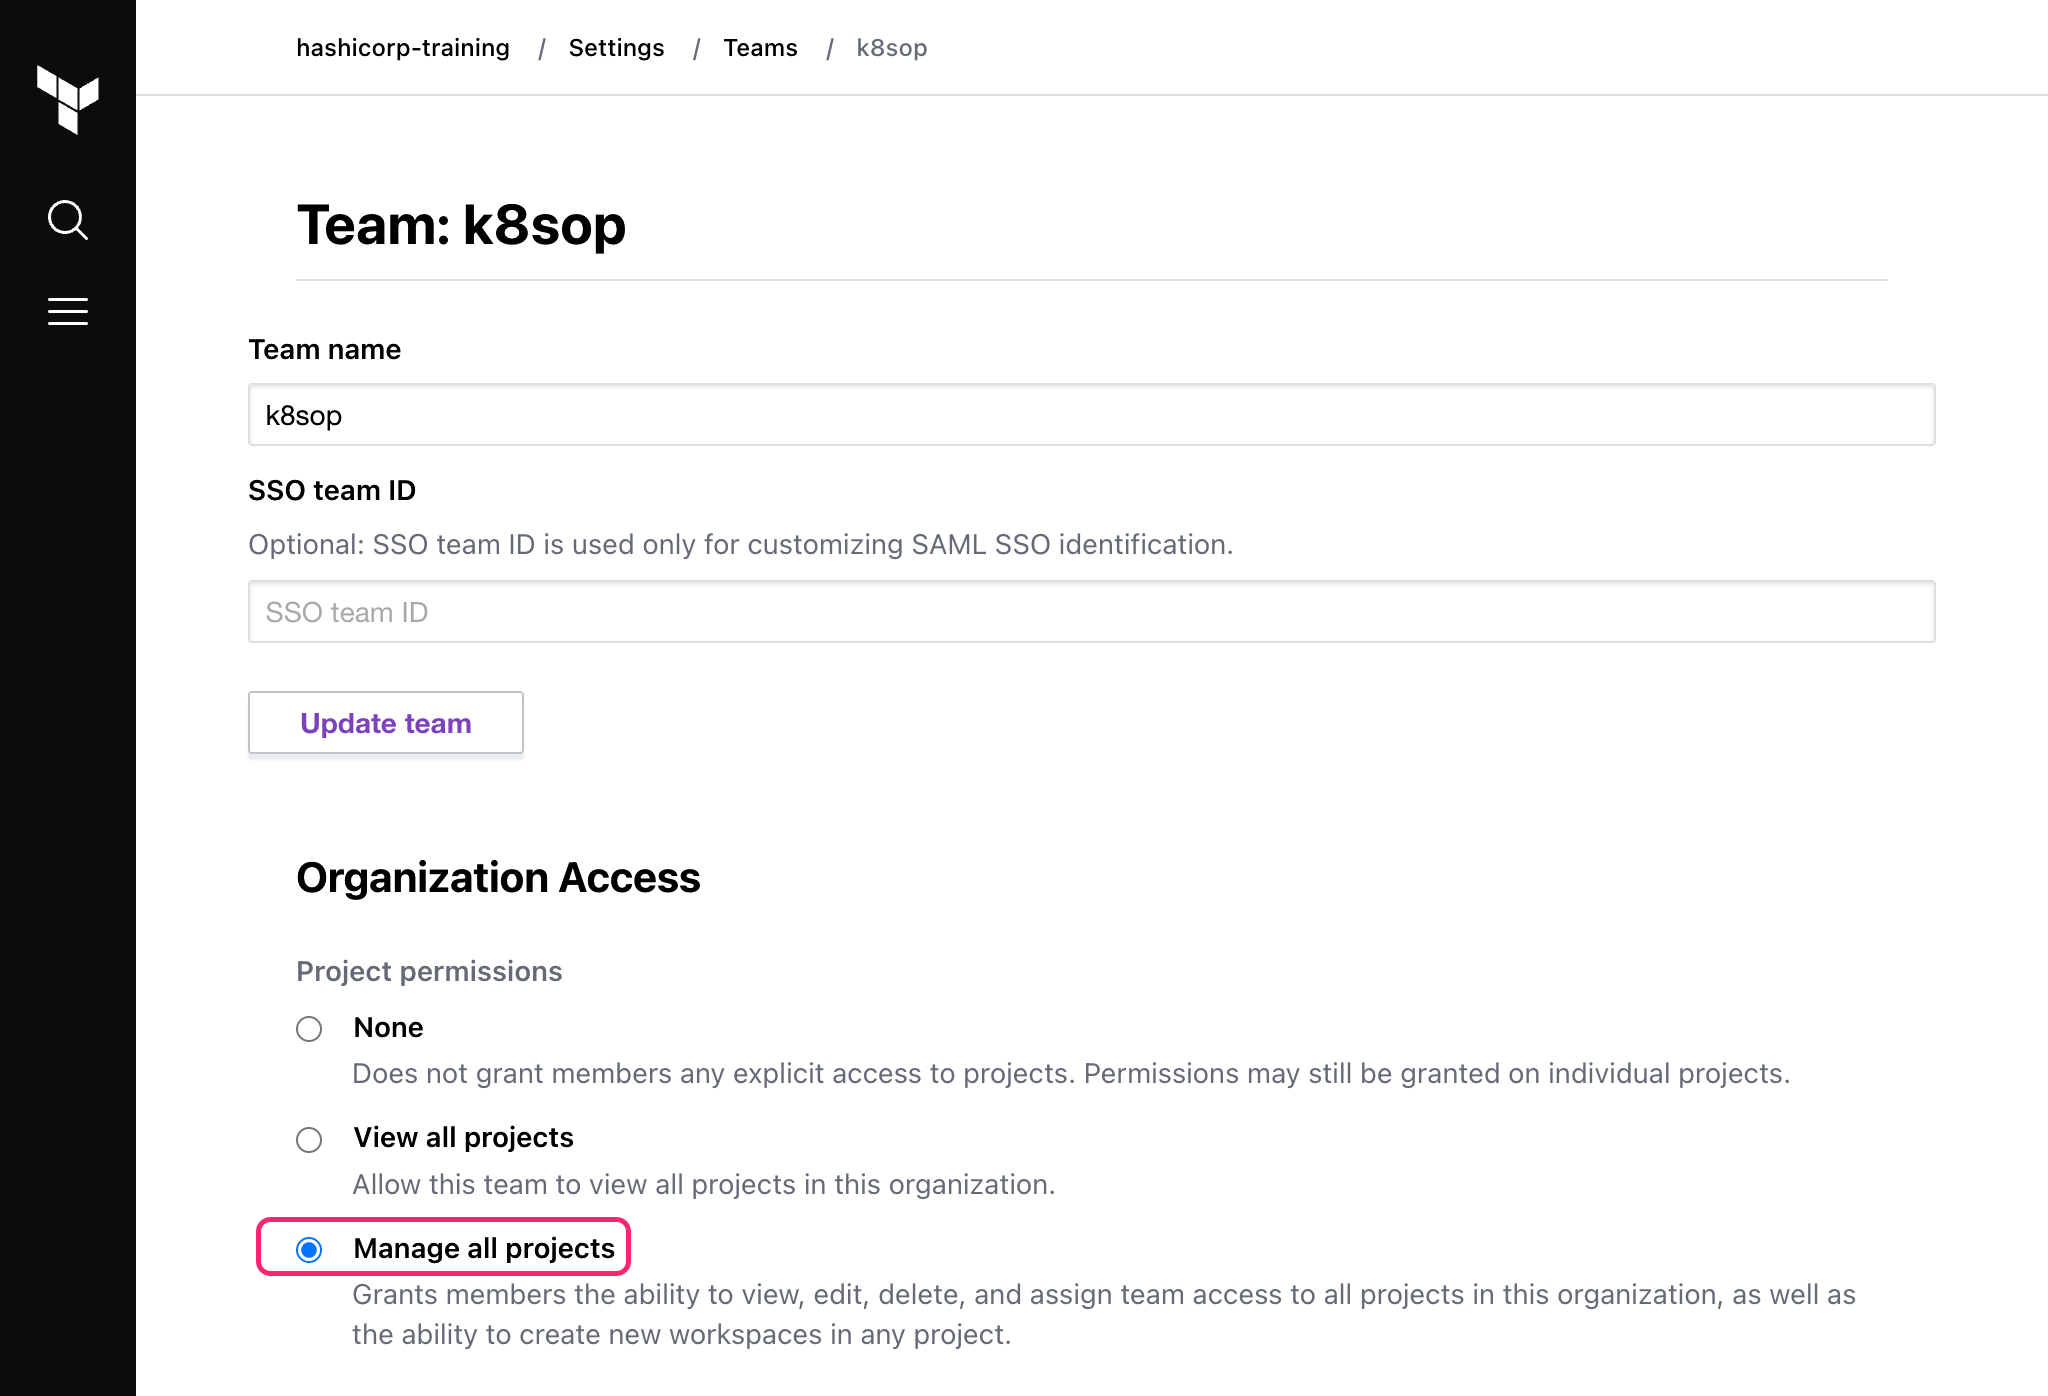
If you use HCP Essentials, Standard, or Terraform Enterprise, HCP Terraform shows the team management page. Click Create a team and name the team
k8sop. Under Organization Access, enable the Manage all projects permission. Click Update team organization access to save your settings.
Scroll to the Team API Token section. Click on Create a team token and choose an expiration for the token. We recommend that all team tokens have a specified expiration, such as 30 days. Click Generate token to generate a new team token. Copy this token and store it somewhere secure for usage later in this tutorial.
Click on the API tokens option in the left navigation, and then choose the Team Tokens tab.
Click Create a team token. If you use a free HCP Terraform organization, choose the owners team. If you use HCP Essentials or Standard, choose your k8sop team. Choose an Expiration of 30 days and then click Create.
Click Copy token to copy the token string. You will use this token in the next section.
Explore Terraform configuration
The main.tf file has Terraform configuration that will deploy the operator into your Kubernetes cluster. It includes:
Two Kubernetes namespaces. The operator will be deployed in the
tfc-operator-systemnamespace and the workspace, module, and application will be deployed in theedunamespace.main.tf
resource "kubernetes_namespace" "tfc-operator-system" {
  metadata {
    name = "tfc-operator-system"
  }
}

resource "kubernetes_namespace" "edu" {
  metadata {
    name = "edu"
  }
}
A
terraformrcgeneric secret for your team API token. The workspace and module that you create later in this tutorial reference this secret.main.tf
resource "kubernetes_secret" "terraformrc" {
  metadata {
    name      = "terraformrc"
    namespace = kubernetes_namespace.edu.metadata[0].name
  }

  data = {
    "token" = var.tfc_token
  }
}
A generic secret named
workspacesecretscontaining your AWS credentials. In addition to the HCP Terraform Teams token, HCP Terraform needs your cloud provider credentials to create infrastructure. This configuration adds your credentials to the namespace, which is used when you create a workspace. You will add the credential values as variables and create a workspace later in this tutorial.main.tf
resource "kubernetes_secret" "workspacesecrets" {
  metadata {
    name      = "workspacesecrets"
    namespace = kubernetes_namespace.edu.metadata[0].name
  }

  data = {
    "AWS_ACCESS_KEY_ID"     = var.aws_access_key_id
    "AWS_SECRET_ACCESS_KEY" = var.aws_secret_access_key
  }
}
The operator Helm Chart. This is the configuration for the operator. It is configured to watch the
edunamespace for changes such as creating and modifying workspaces. If you use Terraform Enterprise, uncomment the finalsetblock, which specifies the installation endpoint using an input variable.main.tf
resource "helm_release" "operator" {
  name       = "terraform-operator"
  repository = "https://helm.releases.hashicorp.com"
  chart      = "hcp-terraform-operator"
  version    = "2.6.0"

  namespace        = kubernetes_namespace.tfc-operator-system.metadata[0].name
  create_namespace = true

  set {
    name  = "operator.watchedNamespaces"
    value = "{${kubernetes_namespace.edu.metadata[0].name}}"
  }

  /* Uncomment to deploy to Terraform Enterprise
  set {
    name  = "operator.tfeAddress"
    value = var.tfe_address
  }
  */
}
If your Terraform Enterprise installation uses a TLS certificate signed by a custom Certificate Authority, pass the custom CA bundle root certificate to the Helm chart by adding another set block to the helm_release resource. Update the value to the path of your CA bundle on your local machine.
main.tf
set {
  name = "customCAcertificates"
  value = "/path/to/cert-bundle.crt"
}
In order to use this configuration, you need to define the variables that authenticate to the kind cluster, AWS, and HCP Terraform.
Run the following command. It will generate a terraform.tfvars file with your kind cluster configuration.
$ kubectl config view --minify --flatten --context=kind-terraform-learn -o go-template-file=tfvars.gotemplate > terraform.tfvars
Open terraform.tfvars and set the aws_access_key_id, aws_secret_access_key, and tfc_token variables to your AWS and HCP Terraform credentials. For Terraform Enterprise installations, set the tfe_address variable.
You should end up with something similar to the following.
terraform.tfvars
host                   = "https://127.0.0.1:32768"
client_certificate     = "LS0tLS1CRUdJTiB..."
client_key             = "LS0tLS1CRUdJTiB..."
cluster_ca_certificate = "LS0tLS1CRUdJTiB..."
aws_access_key_id      = "REDACTED"
aws_secret_access_key  = "REDACTED"
tfc_token              = "REDACTED"
tfe_address            = "REDACTED"
Deploy the operator
Now that you have defined the variables, you are ready to create the Kubernetes resources.
Initialize your configuration.
$ terraform init
Apply your configuration. Remember to confirm your apply with a yes.
$ terraform apply
## ...
kubernetes_namespace.edu: Creating...
kubernetes_namespace.tfc-operator-system: Creating...
kubernetes_namespace.tfc-operator-system: Creation complete after 0s [id=tfc-operator-system]
kubernetes_namespace.edu: Creation complete after 0s [id=edu]
kubernetes_secret.terraformrc: Creating...
kubernetes_secret.workspacesecrets: Creating...
kubernetes_secret.terraformrc: Creation complete after 0s [id=edu/terraformrc]
kubernetes_secret.workspacesecrets: Creation complete after 0s [id=edu/workspacesecrets]
helm_release.operator: Creating...
helm_release.operator: Still creating... [10s elapsed]
helm_release.operator: Creation complete after 13s [id=terraform-operator]

Apply complete! Resources: 5 added, 0 changed, 0 destroyed.
Verify the operator pods are running.
$ kubectl get -n tfc-operator-system pods
NAME                                                           READY   STATUS    RESTARTS   AGE
terraform-operator-hcp-terraform-operator-6549bb49cd-lq7h4   2/2     Running   0          72s
terraform-operator-hcp-terraform-operator-6549bb49cd-m8n6p   2/2     Running   0          72s
In addition to deploying the operator, the Helm chart adds custom resource definitions for workspaces, modules, and agent pools.
$ kubectl get crds
NAME                          CREATED AT
agentpools.app.terraform.io   2023-01-26T18:32:42Z
modules.app.terraform.io      2023-01-26T18:32:42Z
projects.app.terraform.io     2023-01-26T18:32:42Z
workspaces.app.terraform.io   2023-01-26T18:32:42Z
Explore the specifications
Now you are ready to create infrastructure using the operator.
First, navigate to the operator directory.
$ cd operator
Open project.yml. This specification creates an HCP Terraform project that you will create your workspace in. Replace ORGANIZATION_NAME with your HCP Terraform organization name.
project.yml
apiVersion: app.terraform.io/v1alpha2
kind: Project
metadata:
  name: greetings-project
spec:
  organization: ORGANIZATION_NAME
  token:
    secretKeyRef:
      name: terraformrc
      key: token
  name: greetings-project
Open workspace.yml, the workspace specification, and customize it with your HCP Terraform organization name. The workspace specification both creates an HCP Terraform workspace, and uses it to deploy your application's required infrastructure.
You can find the following items in workspace.yml, which you use to apply the Workspace custom resource to a Kubernetes cluster.
The workspace name suffix. The workspace name is a combination of your namespace and
metadata.name(in this case:edu-greetings)workspace.yml
metadata:
  name: greetings
The HCP Terraform organization. This organization must match the one you generate the Teams token for. Replace
ORGANIZATION_NAMEwith your HCP Terraform organization name.workspace.yml
spec:
  organization: ORGANIZATION_NAME
The HCP Terraform project. This is the project that you defined in the
project.ymlfile. The project must exist before you create the workspace. You can omit this item to create the workspace in the default project.workspace.yml
spec:
  project:
    name: greetings-project
The HCP Terraform token. The Workspace spec expects a
tokenvalue, which can be accessed in theterraformrcsecret at the keytokenworkspace.yml
token:
  secretKeyRef:
    name: terraformrc
    key: token
Terraform and Environment variables. For variables that must be passed to the module, the
terraformVariableskey in the specification must match the name of the module variable. Environment variables can be set using theenvironmentVariableskey. You can indicate that a variable is sensitive by settingsensitivetotrue. The value can either be set directly with thevalueor by using ConfigMaps or with a Secret with thevalueFromkey. We have set reasonable defaults for these values which you will review in a later step.workspace.yml
terraformVariables:
  - name: name
    value: greetings.fifo
  - name: fifo_queue
    value: "true"
environmentVariables:
  - name: AWS_DEFAULT_REGION
    sensitive: false
    valueFrom:
      configMapKeyRef:
        name: aws-configuration
        key: region
  - name: AWS_ACCESS_KEY_ID
    sensitive: false
    valueFrom:
      secretKeyRef:
        name: workspacesecrets
        key: AWS_ACCESS_KEY_ID
  - name: AWS_SECRET_ACCESS_KEY
    sensitive: true
    valueFrom:
      secretKeyRef:
        name: workspacesecrets
        key: AWS_SECRET_ACCESS_KEY
  - name: CONFIRM_DESTROY
    sensitive: false
    value: "1"
Explore configmap.yml
In workspace.yml, the AWS_DEFAULT_REGION variable is defined by a ConfigMap named aws-configuration.
Open configmap.yml. Here you will find the specifications for the aws-configuration ConfigMap.
configmap.yml
apiVersion: v1
kind: ConfigMap
metadata:
  name: aws-configuration
data:
  region: us-east-2
Explore module.yml
Open module.yml. This specification is equivalent to the following Terraform configuration:
module.yml
module "queue" {
  source = "terraform-aws-modules/sqs/aws"
  version = "4.0.1"
  name = var.name
  fifo_queue = var.fifo_queue
}
You can also find the following items in module.yml, which you use to apply the Module custom resource to a Kubernetes cluster.
The HCP Terraform organization. This organization must match the one you generate the Teams token for. Replace
ORGANIZATION_NAMEwith your HCP Terraform organization name.module.yml
spec:
  organization: ORGANIZATION_NAME
Outputs you would like to find in the Kubernetes status. The example stores the
queue_idwhich you will use in a later step.module.yml
outputs:
    - name: queue_id
Create the message queue
Create an environment variable named NAMESPACE and set it to edu.
$ export NAMESPACE=edu
Apply the ConfigMap specifications to the namespace.
$ kubectl apply -n $NAMESPACE -f configmap.yml
configmap/aws-configuration created
Next, apply the Project specifications to the namespace.
$ kubectl apply -n edu -f project.yml
project.app.terraform.io/greetings-project created
Then, apply the Workspace specifications to the namespace.
$ kubectl apply -n $NAMESPACE -f workspace.yml
workspace.app.terraform.io/greetings created
Next, apply the Module specifications to the namespace.
$ kubectl apply -n $NAMESPACE -f module.yml
module.app.terraform.io/greetings created
Debug the operator by accessing its logs and checking if the workspace creation ran into any errors.
$ kubectl logs deployment/terraform-operator-hcp-terraform-operator -n tfc-operator-system -f
## ...
{"level":"info","ts":1613124305.9530287,"logger":"terraform-k8s","msg":"Run incomplete","Organization":"hashicorp-training","RunID":"run-xxxxxxxxxxxxxxxx","RunStatus":"applying"}
{"level":"info","ts":1613124306.7574627,"logger":"terraform-k8s","msg":"Checking outputs","Organization":"hashicorp-training","WorkspaceID":"ws-xxxxxxxxxxxxxxxx","RunID":"run-xxxxxxxxxxxxxxxx"}
{"level":"info","ts":1613124307.0337532,"logger":"terraform-k8s","msg":"Updated outputs","Organization":"hashicorp-training","WorkspaceID":"ws-xxxxxxxxxxxxxxxx"}
{"level":"info","ts":1613124307.0339234,"logger":"terraform-k8s","msg":"Updating secrets","name":"greetings-outputs"}
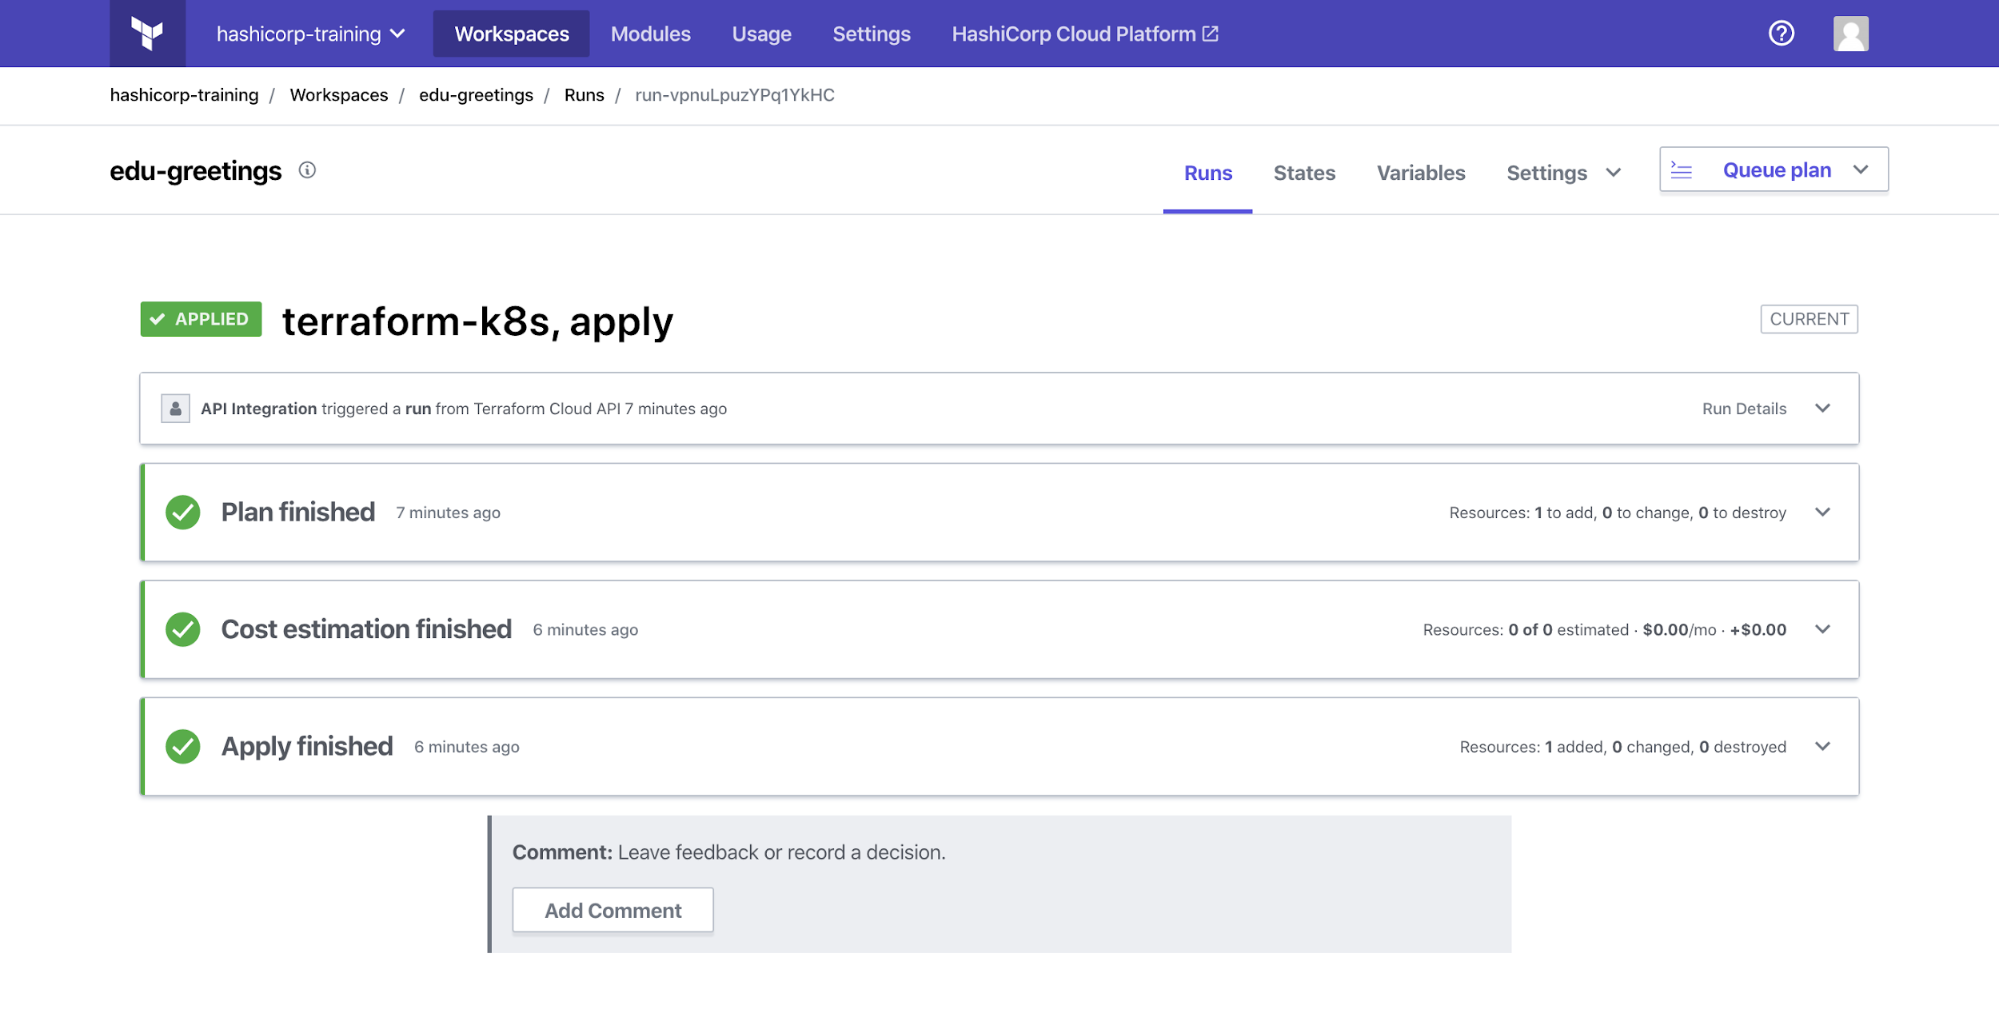
Check the status of the workspace via kubectl or the HCP Terraform web UI to determine the run status, outputs, and run identifiers.
The Workspace custom resource reflects that the run was applied.
$ kubectl describe -n $NAMESPACE workspace greetings
Name:         greetings
Namespace:    edu
## ...
Status:
  Observed Generation:  1
  Run Status:
  Terraform Version:  1.6.3
  Update At:          1710427284
  Workspace ID:       ws-xxxxxxxxxxxxxxxx
You can also access the status directly.
$ kubectl get -n $NAMESPACE module greetings --subresource=status
NAME        CV STATUS   RUN STATUS
greetings   uploaded    applied
In addition to the workspace status, the operator creates a Kubernetes ConfigMap containing the outputs of the HCP Terraform workspace. The operator formats the ConfigMap name as <workspace_name>-outputs.
$ kubectl describe -n $NAMESPACE configmap greetings-outputs
Name:         greetings-outputs
Namespace:    edu
Labels:       workspaceID=ws-xxxxxxxxxxxxxxxx
              workspaceName=greetings
Annotations:  <none>

Data
====
queue_id:
----
https://sqs.us-east-2.amazonaws.com/REDACTED/greetings.fifo
Verify message queue
Now that you have deployed the queue, you will now send and receive messages on the queue.
The application.yml contains a spec that runs a containerized application in your kind cluster. That app calls a script called message.sh, which sends and receives messages from the queue, using the same AWS credentials that the operator used.
To give the script access to the queue's location, the application.yml spec creates a new environment variable named QUEUE_URL, and sets it to the Kubernetes ConfigMap containing the queue url from the HCP Terraform workspace output.
application.yml
- name: QUEUE_URL
  valueFrom:
    secretKeyRef:
      name: greetings-outputs
      key: queue_id
Open aws-sqs-test/message.sh. This bash script tests the message queue. To access the queue, it creates environment variables with your AWS credentials and the queue URL. Since HCP Terraform outputs from the Kubernetes Secret contain double quotes, the script strips the double quotes from the output (QUEUE_URL) to ensure the script works as expected.
aws-sqs-test/message.sh
## ...
export SQS_URL=$(eval echo $QUEUE_URL | sed 's/"//g')
## ...
Deploy the job and examine the logs from the pod associated with the job.
$ kubectl apply -n $NAMESPACE -f application.yml
job.batch/greetings created
View the job's logs.
$ kubectl logs -n $NAMESPACE $(kubectl get pods -n $NAMESPACE --selector "app=greetings" -o jsonpath="{.items[0].metadata.name}")
https://sqs.us-east-1.amazonaws.com/REDACTED/greetings.fifo
sending a sdfgsdf message to queue https://sqs.us-east-1.amazonaws.com/REDACTED/greetings.fifo
{
    "MD5OfMessageBody": "fc3ff98e8c6a0d3087d515c0473f8677",
    "SequenceNumber": "xxxxxxxxxxxxxxxx",
    "MessageId": "xxxxxxxxxxxxxxxx"
}
reading a message from queue https://sqs.us-east-1.amazonaws.com/REDACTED/greetings.fifo
{
    "Messages": [
        {
            "Body": "hello world!",
            "ReceiptHandle": "xxxxxxxxxxxxxxxx",
            "MD5OfBody": "fc3ff98e8c6a0d3087d515c0473f8677",
            "MessageId": "xxxxxxxxxxxxxxxx"
        }
    ]
}
Create a notification
You can create notifications in HCP Terraform by defining them in your Workspace specification. Add the following to the workspace.yml file to create an email notification and replace USER_EMAIL with your HCP Terraform email address. You must be a member of the organization to be added as a recipient.
workspace.yml
apiVersion: app.terraform.io/v1alpha2
kind: Workspace
metadata:
  name: greetings
spec:
  ## ...
  notifications:
  - name: run-notifications
    type: email
    triggers:
    - run:applying
    - run:planning
    - run:completed
    - run:errored
    emailUsers:
    - USER_EMAIL
Apply the updated workspace configuration.
$ kubectl apply -n $NAMESPACE -f workspace.yml
workspace.app.terraform.io/greetings configured
You will now receive notifications for each new run in the greetings workspace.
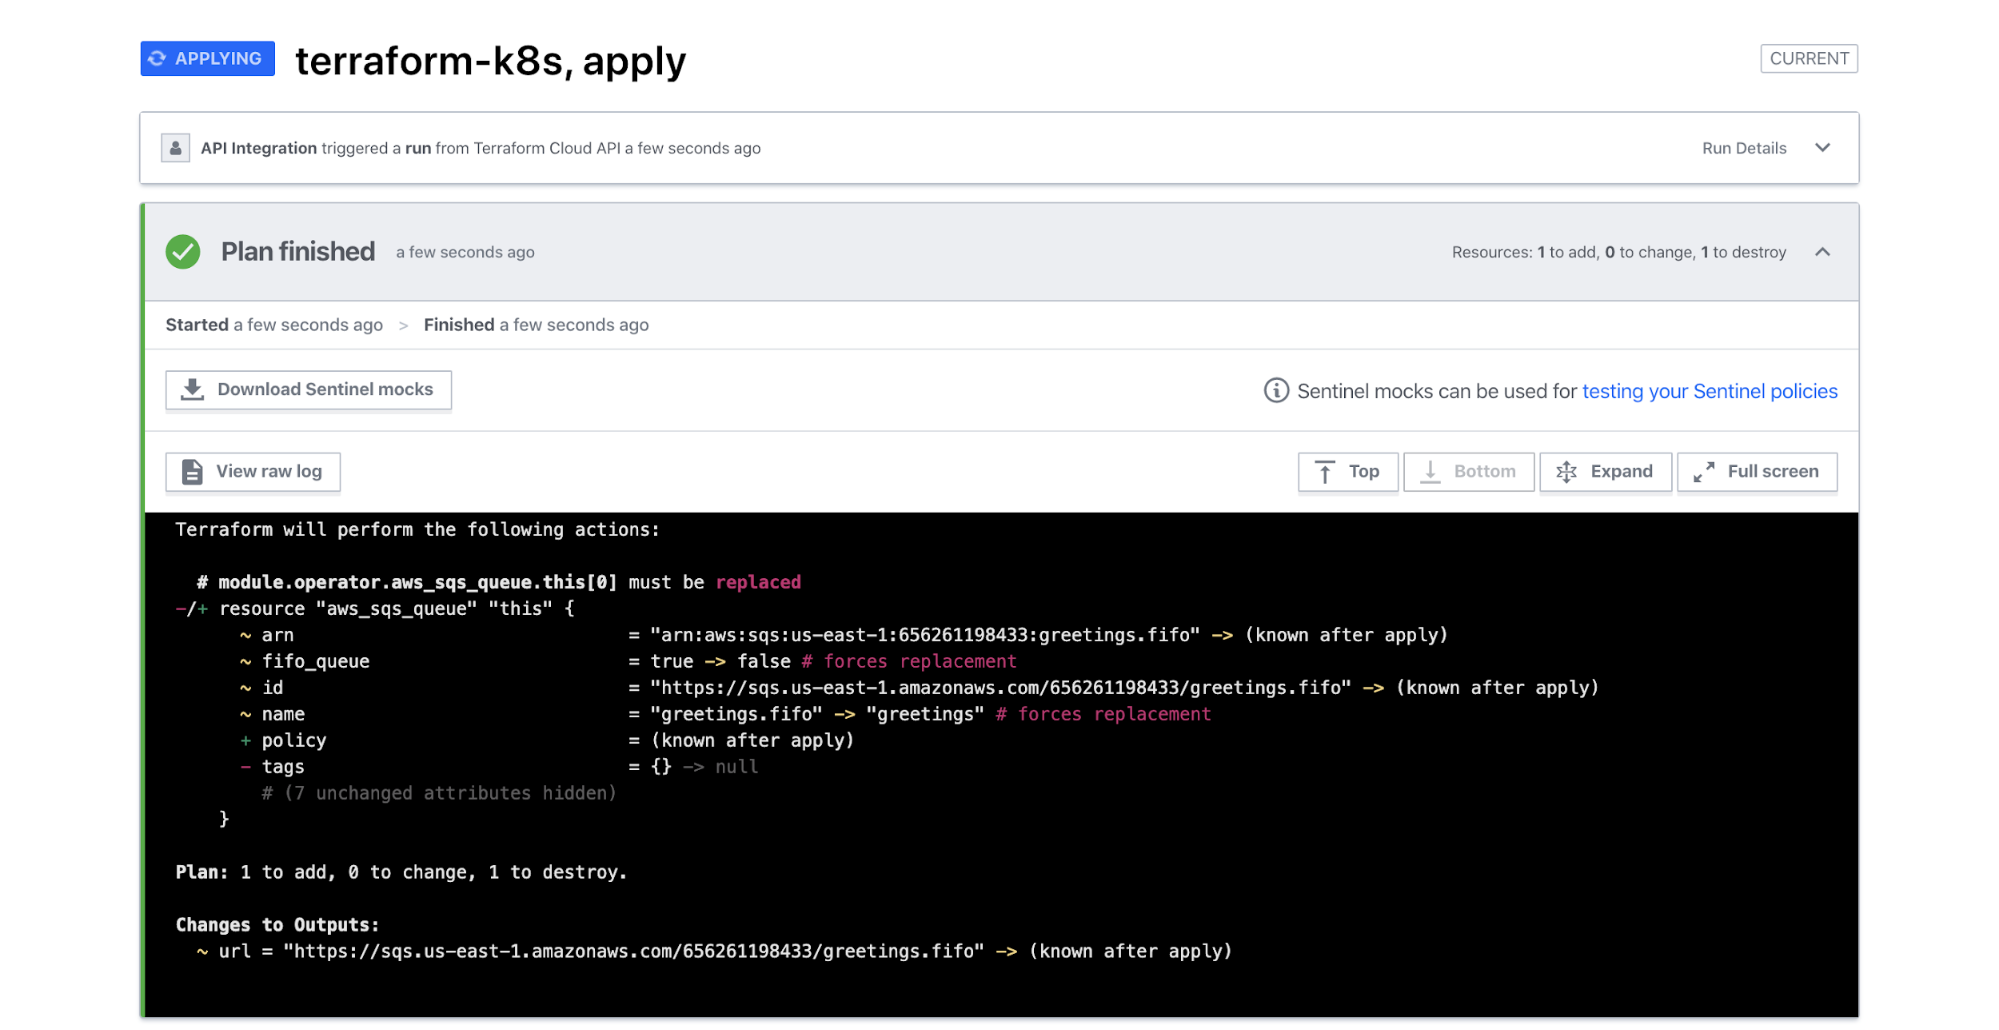
Change the queue name
Once your infrastructure is running, you can use the operator to modify it. Update the workspace.yml file to change the queue's name, and the type of the queue from FIFO to standard.
workspace.yml
apiVersion: app.terraform.io/v1alpha2
kind: Workspace
metadata:
  name: greetings
spec:
  ## ...
  terraformVariables:
    - name: name
-      value: greetings.fifo
+      value: greetings
    - name: fifo_queue
-      value: "true"
+      value: "false"
  ## ...
Apply the updated workspace configuration. The operator retrieves the configuration update and updates the variables in the workspace.
$ kubectl apply -n $NAMESPACE -f workspace.yml
workspace.app.terraform.io/greetings configured
A new run won't be ran unless there is a change to the Module resource. To trigger a new one, make a small change by updating the restartedAt value of the specification.
$ kubectl -n $NAMESPACE annotate workspace greetings workspace.app.terraform.io/run-new="true" --overwrite
workspace.app.terraform.io/greetings annotate
Examine the run for the workspace in the HCP Terraform UI. The plan indicates that HCP Terraform replaced the queue.
Since you configured a notification for this workspace, you will also receive an email for each stage of the run.
You can audit updates to the workspace from the operator through HCP Terraform, which maintains a history of runs and the current state.
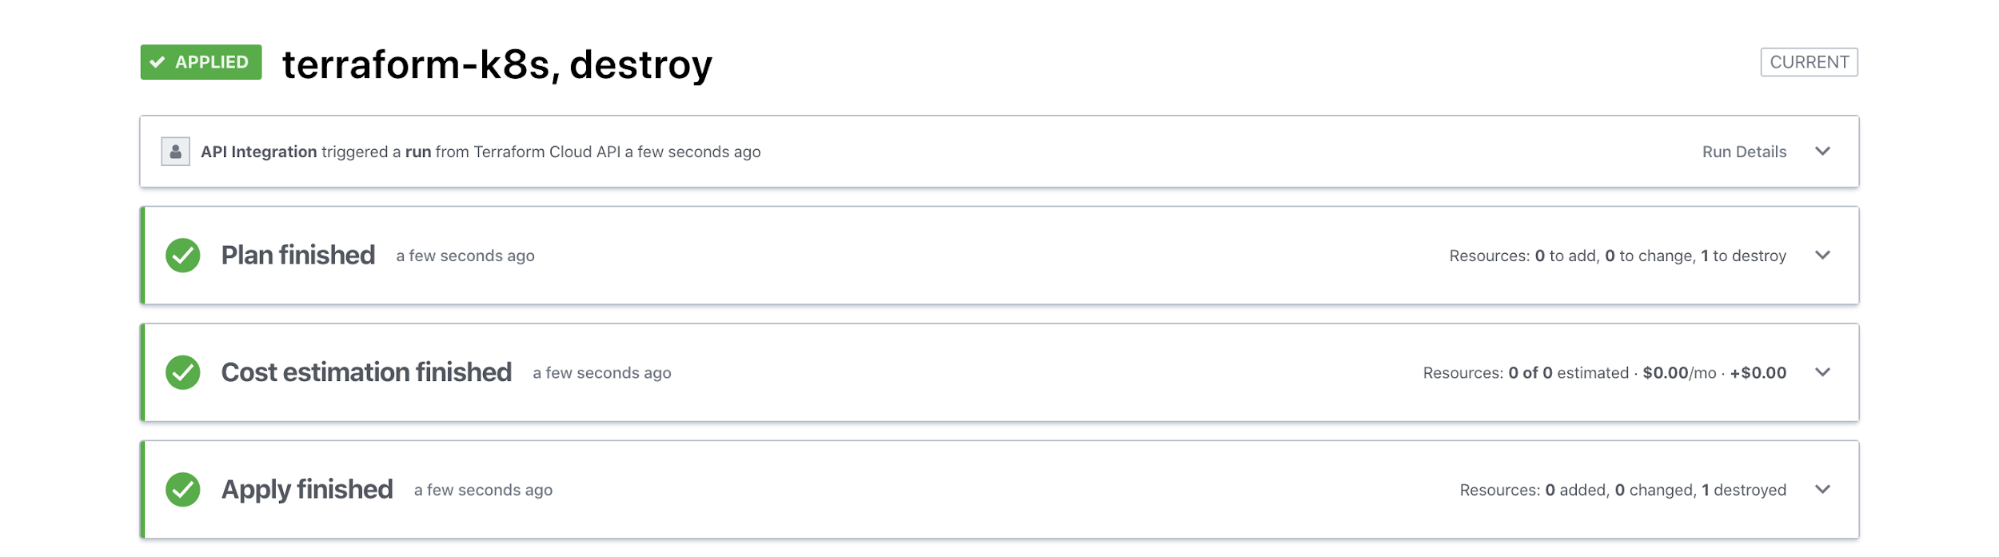
Clean up resources
Now that you have created and modified an HCP Terraform workspace using the operator, delete the module and workspace.
Delete the application
Delete the job used to test the SQS queue.
$ kubectl delete -n $NAMESPACE job greetings
job.app.terraform.io "greetings" deleted
Delete the module
Delete the Module custom resource.
$ kubectl delete -n $NAMESPACE module greetings
module.app.terraform.io "greetings" deleted
You may notice that the command hangs for a few minutes. This is because the operator executes a finalizer, a pre-delete hook. It executes a terraform destroy on workspace resources.
Once the finalizer completes, Kubernetes will delete the Module custom resource.
Delete the workspace
Delete the Workspace custom resource.
$ kubectl delete -n $NAMESPACE workspace greetings
workspace.app.terraform.io "greetings" deleted
Delete the project
Delete the Project custom resource.
$ kubectl delete -n $NAMESPACE project greetings-project
workspace.app.terraform.io "greetings" deleted
Delete resources and kind cluster
Navigate to the v2 directory.
$ cd ..
Destroy the namespace, secrets and the operator. Remember to confirm the destroy with a yes.
$ terraform destroy
Finally, delete the kind cluster.
$ kind delete cluster --name terraform-learn
Deleting cluster "terraform-learn" ...
Next steps
In this tutorial, you configured and deployed the operator to a Kubernetes namespace, created a Terraform workspace, and deployed a message queue using the operator. This pattern can extend to other application infrastructure, such as DNS servers, databases, and identity and access management rules.
Visit the following resources to learn more about the HCP Terraform Operator for Kubernetes.
- To learn more about the operator and its design, check out the hashicorp/hcp-terraform-operator repository.
- To discover more about managing Kubernetes with Terraform, review the Hashicorp Kubernetes tutorials.
- Learn how to Manage agent pools with the HCP Terraform Operator v2.