Configure ServiceNow Service Graph Connector for HCP Terraform
The ServiceNow Service Graph Connector for Terraform lets you import cloud infrastructure resources managed by HCP Terraform or Terraform Enterprise into your ServiceNow Configuration Management Database (CMDB), so you can maintain a clean, complete system of record of your resources and services. Terraform is an infrastructure-as-code tool that lets teams safely and reliably provision and maintain cloud infrastructure. By connecting Terraform to ServiceNow, you can manage and search for your Terraform-allocated resources alongside the rest of your company's infrastructure.
In this tutorial you will provision a cloud resource with HCP Terraform, configure the Service Graph Connector for Terraform, and import the resource into the ServiceNow CMDB.
Prerequisites
This tutorial assumes that you are familiar with the Terraform and HCP Terraform workflows. If you are new to Terraform, complete the Get Started collection first. If you are new to HCP Terraform, complete the HCP Terraform Get Started tutorials first.
For this tutorial, you will need:
- Terraform v1.3+ installed locally.
- An AWS account.
- An HCP Terraform or Terraform Enterprise account and organization.
- An HCP Terraform variable set configured with your AWS credentials.
- A ServiceNow instance of version "San Diego" or newer and an account with
adminorx_hashi_service_gr.terraform_useraccess.
Install ServiceNow Service Graph Connector for Terraform
In the ServiceNow Store, search for Service Graph Connector for Terraform published by HashiCorp Inc and click Install.
Create and scope Terraform API token
In order for ServiceNow to interact with HCP Terraform, you must give it an HCP Terraform API token. The permissions of this token determine what resources the service graph connector will import into the CMDB. While you could use a user API token, it could import resources from multiple organizations. By providing a team API token, you can scope permissions to only import resources from specified workspaces within a single organization.
Visit your organization’s Settings > API Tokens page. Click Create a team token. Under Team, choose your team name and choose an Expiration of 30 days. Click Create.
Save this token in a safe place; HCP Terraform only displays it once. You will use it to configure ServiceNow later in this tutorial.
Configure Service Graph Connector for Terraform API token
In the top navigation of your ServiceNow instance's control panel, click on All, search for Service Graph Connector for Terraform, and click Setup. Next, click Get Started.
Next, in the Configure the Terraform connection section, click Get Started.
In the Configure Terraform authentication credentials section, click Configure. Set the API Key to the HCP Terraform team API token that you created earlier in this tutorial and click Update.
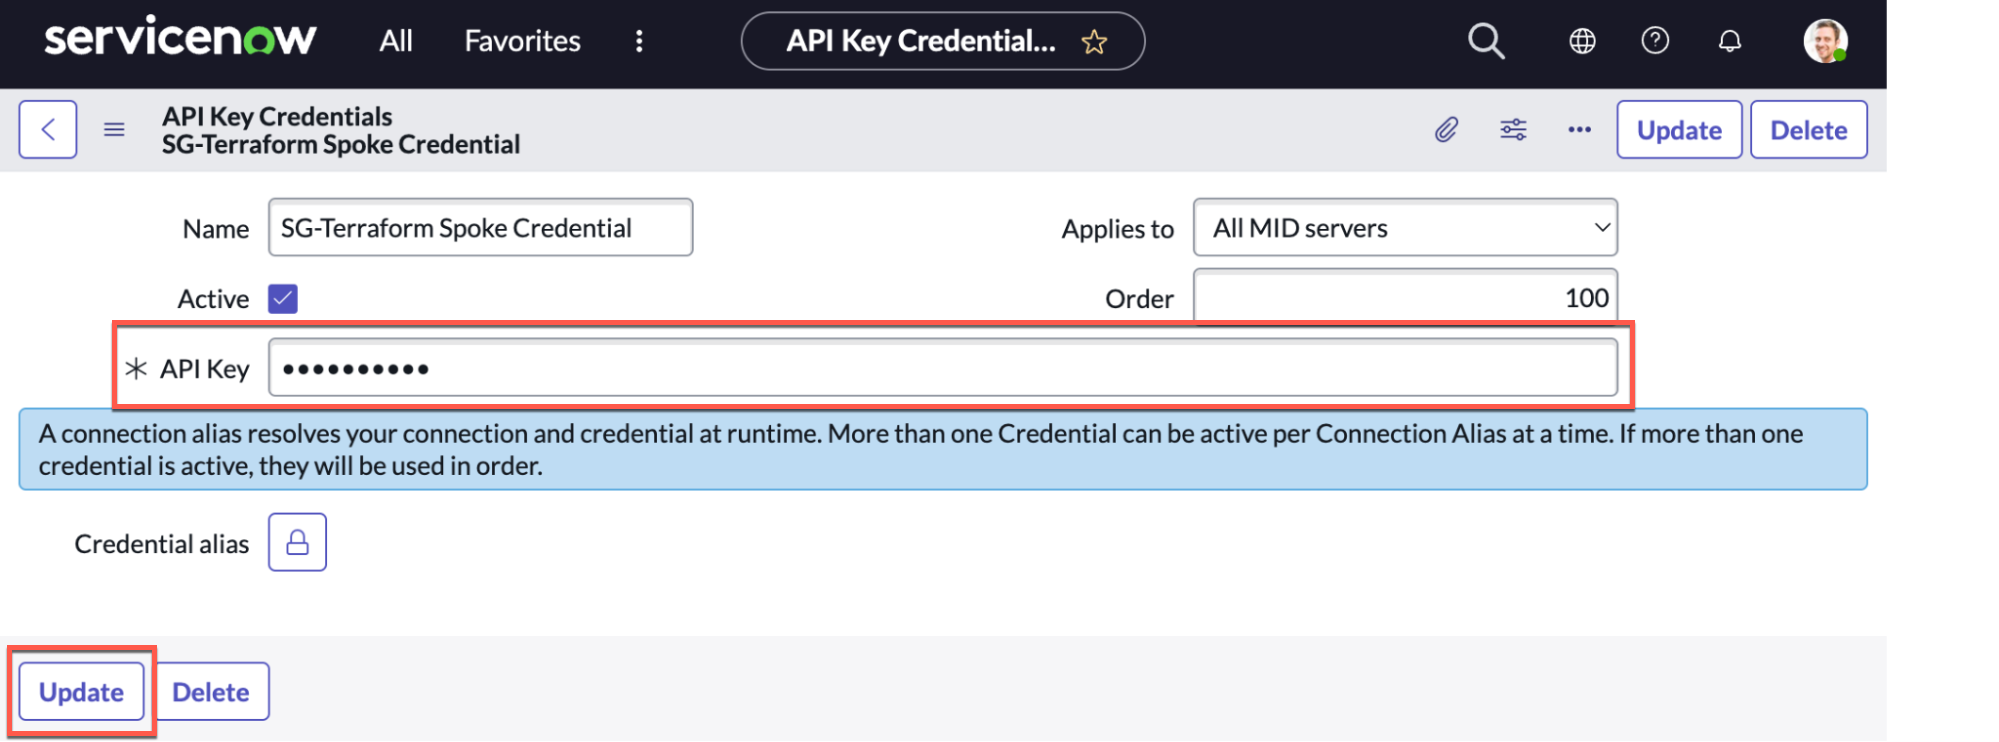
In the Configure Terraform authentication credentials section, click Mark as Complete.
Configure Terraform Webhook Notification token
To improve security, HCP Terraform includes an HMAC signature on all generic webhook notifications using a user-provided token. This token is an arbitrary secret string that HCP Terraform uses to sign each webhook notification. ServiceNow uses the same token to verify the request authenticity. Refer to Notification Authenticity for more information.
Create a token and save it in a safe place. This secret token can be any value but should be treated as sensitive.
In the Configure Terraform Webhook token section, click Configure. In the Token field, enter the secret token that will be shared between the HCP Terraform and your ServiceNow instance and click Update.
In the Configure Terraform Webhook token section, click Mark as Complete.
Configure Terraform connection
In the Configure Terraform connection section, click Configure.
If you are using Terraform Enterprise, set the Connection URL to the URL of your Terraform Enterprise instance. If you are using HCP Terraform, leave the Connection URL as the default value of https://app.terraform.io.
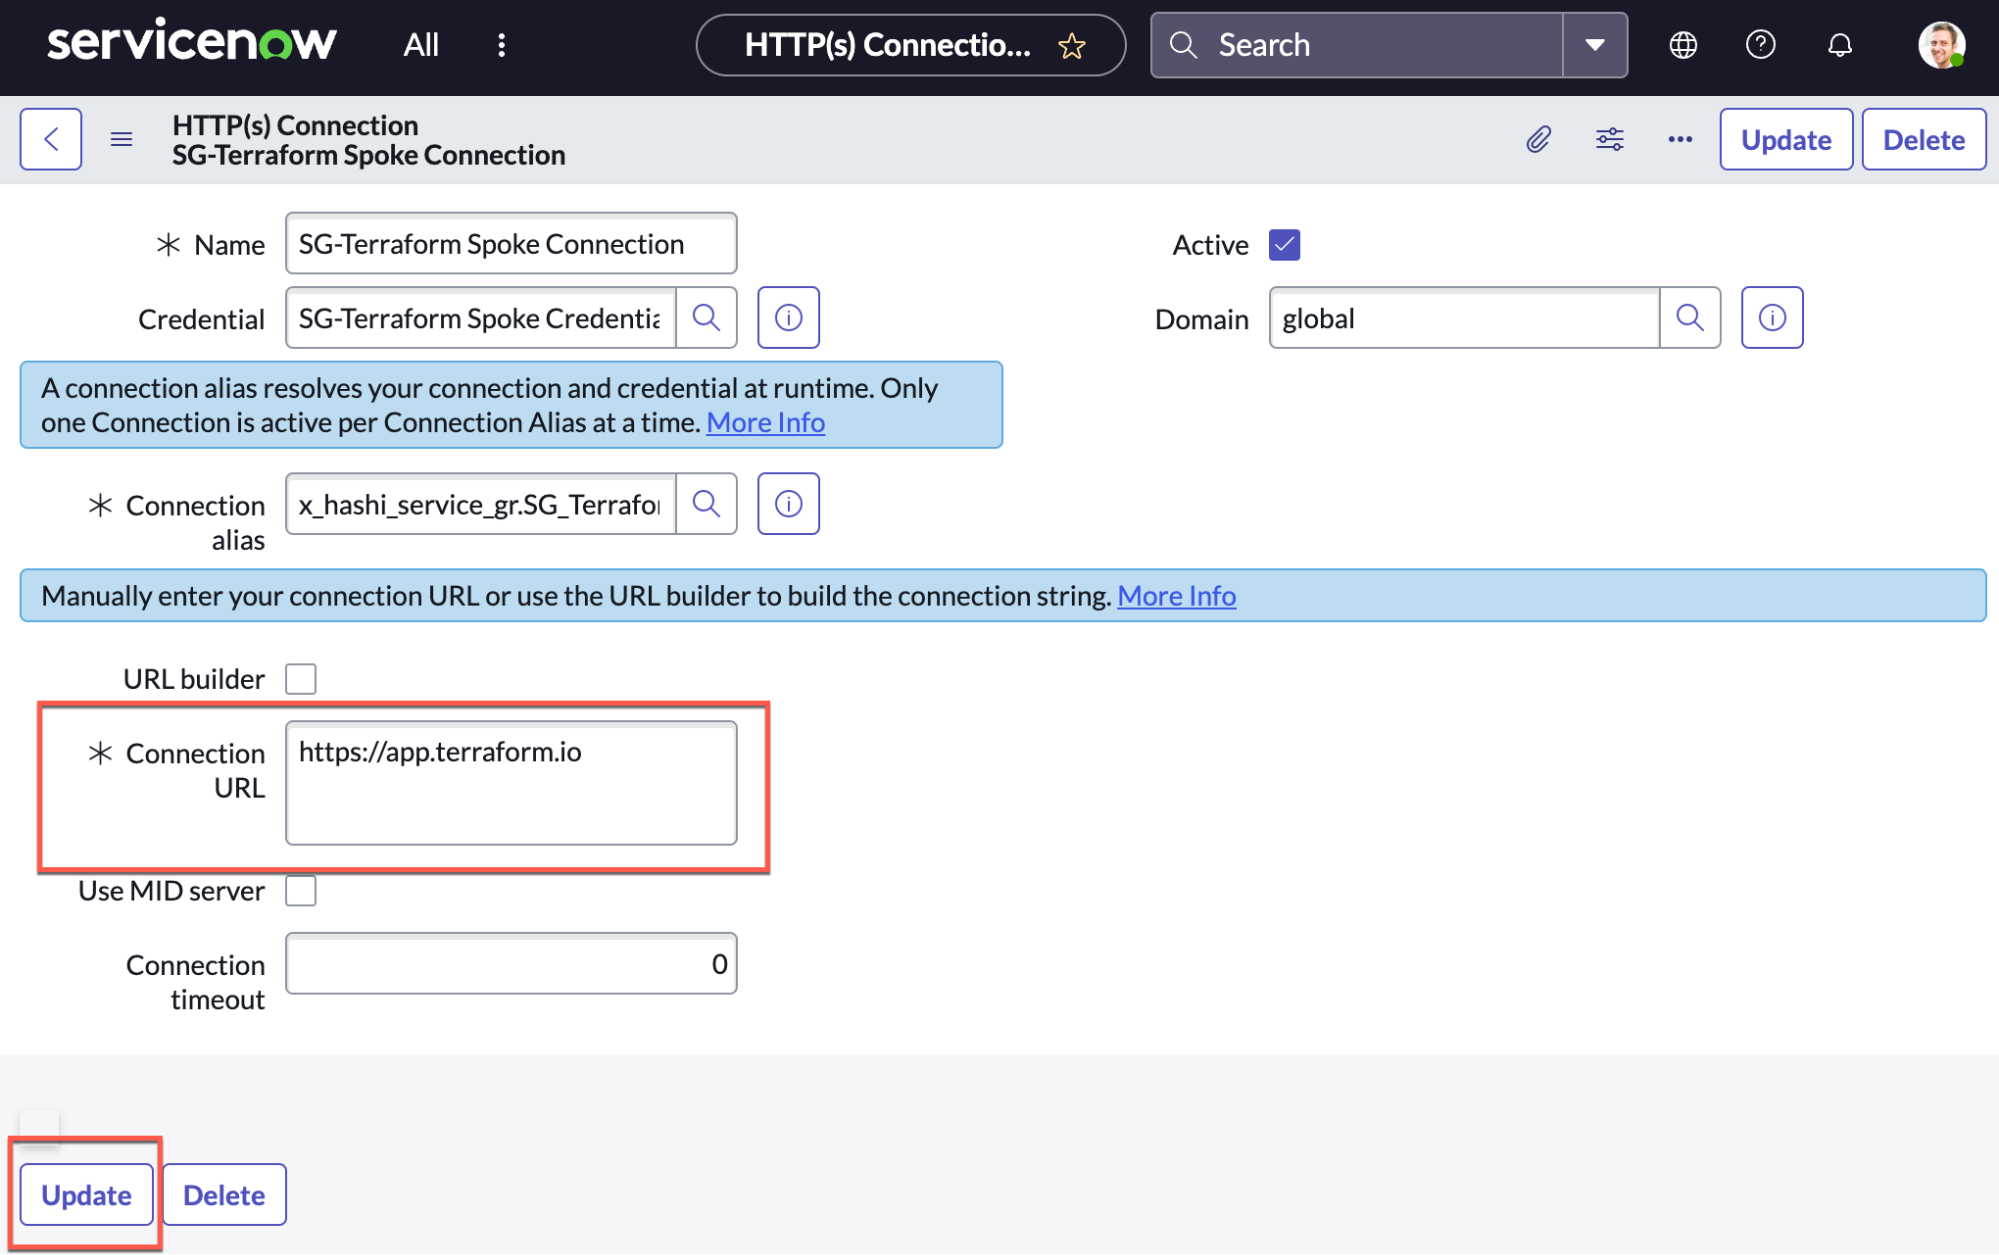
Click Update to save these settings. In the Configure Terraform connection section, click Mark as Complete.
Enable ServiceNow webhook
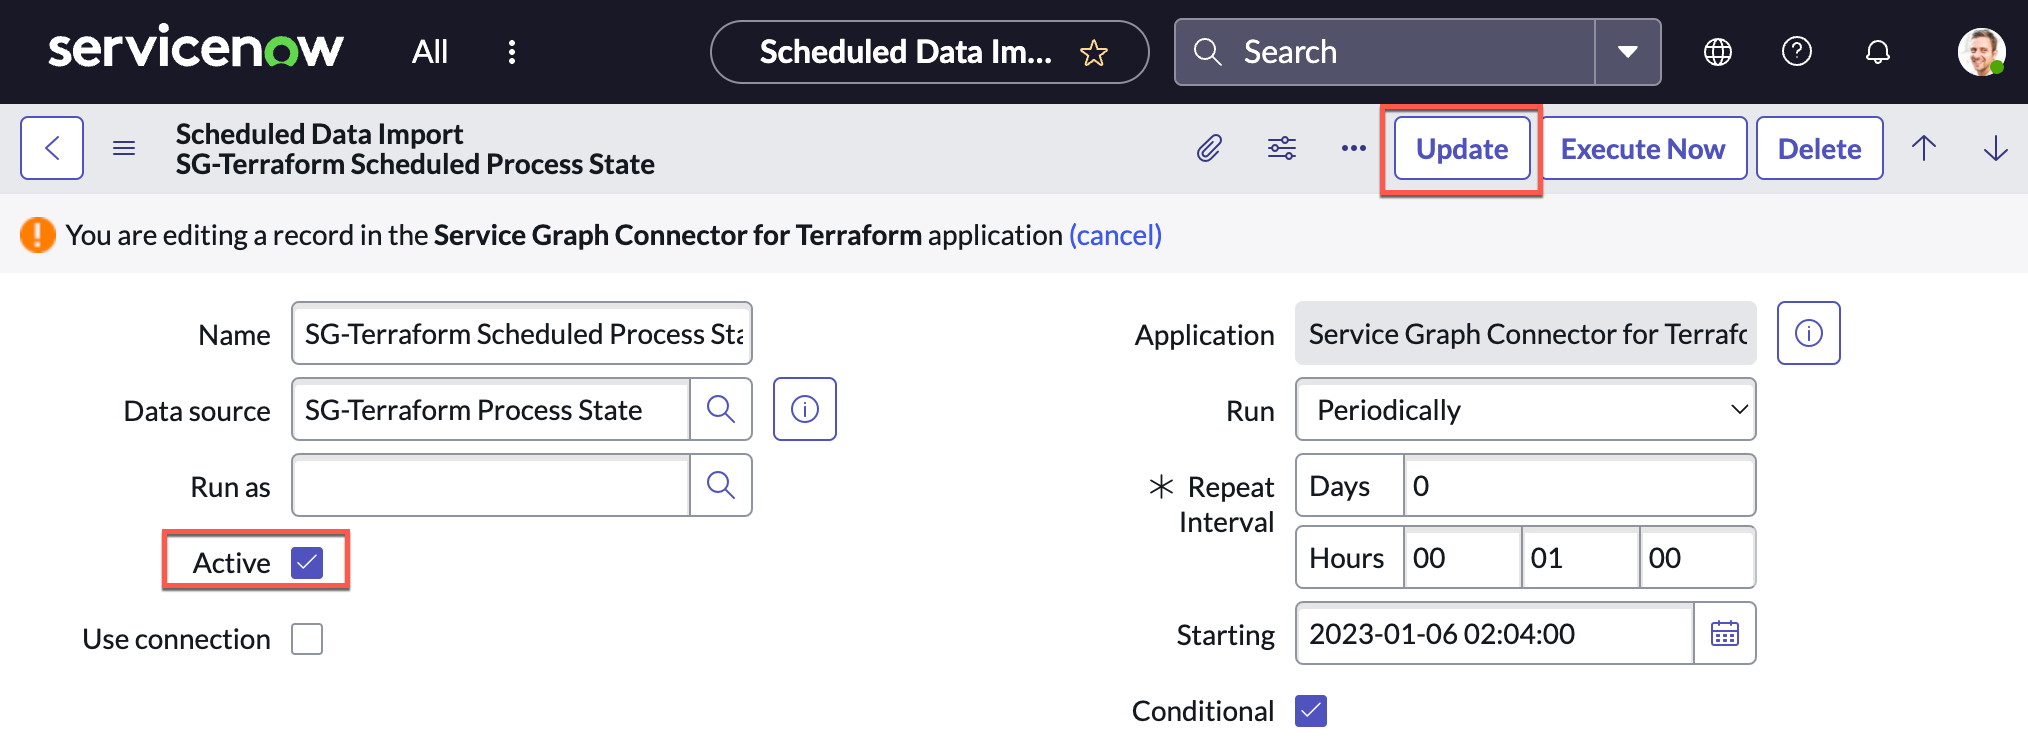
In the top navigation, click on All, search for Scheduled Imports, and click on Scheduled Imports.
Select the SG-Terraform Scheduled Process State record, then click To edit this record click To edit the record click here.
Click the Active checkbox to enable it, then click Update.
Create workspace and webhook
Clone the example configuration for this tutorial.
$ git clone https://github.com/hashicorp-education/learn-terraform-snow-sgc
Change into the repository directory.
$ cd learn-terraform-snow-sgc
Open the main.tf file in your code editor to review it. It contains the following resources:
- The AWS Terraform provider
- An EC2 instance of size
t2.micro - The AMI that the EC2 instance will use
- An output that will provide the instance ID
Tip: If multiple users in your HCP Terraform organization will run this tutorial, add a unique suffix to the workspace name in main.tf.
Set your HCP Terraform organization name as an environment variable.
$ export TF_CLOUD_ORGANIZATION=
Initialize your configuration. As part of initialization, Terraform creates a workspace titled learn-terraform-snow-sgc.
$ terraform init

Initializing HCP Terraform...

Initializing provider plugins...
- Finding hashicorp/aws versions matching "~> 4.45"...
- Installing hashicorp/aws v4.45.0...
- Installed hashicorp/aws v4.45.0 (signed by HashiCorp)

Terraform has created a lock file .terraform.lock.hcl to record the provider
selections it made above. Include this file in your version control repository
so that Terraform can guarantee to make the same selections by default when
you run "terraform init" in the future.

HCP Terraform has been successfully initialized!

You may now begin working with HCP Terraform. Try running "terraform plan" to
see any changes that are required for your infrastructure.

If you ever set or change modules or Terraform Settings, run "terraform init"
again to reinitialize your working directory.
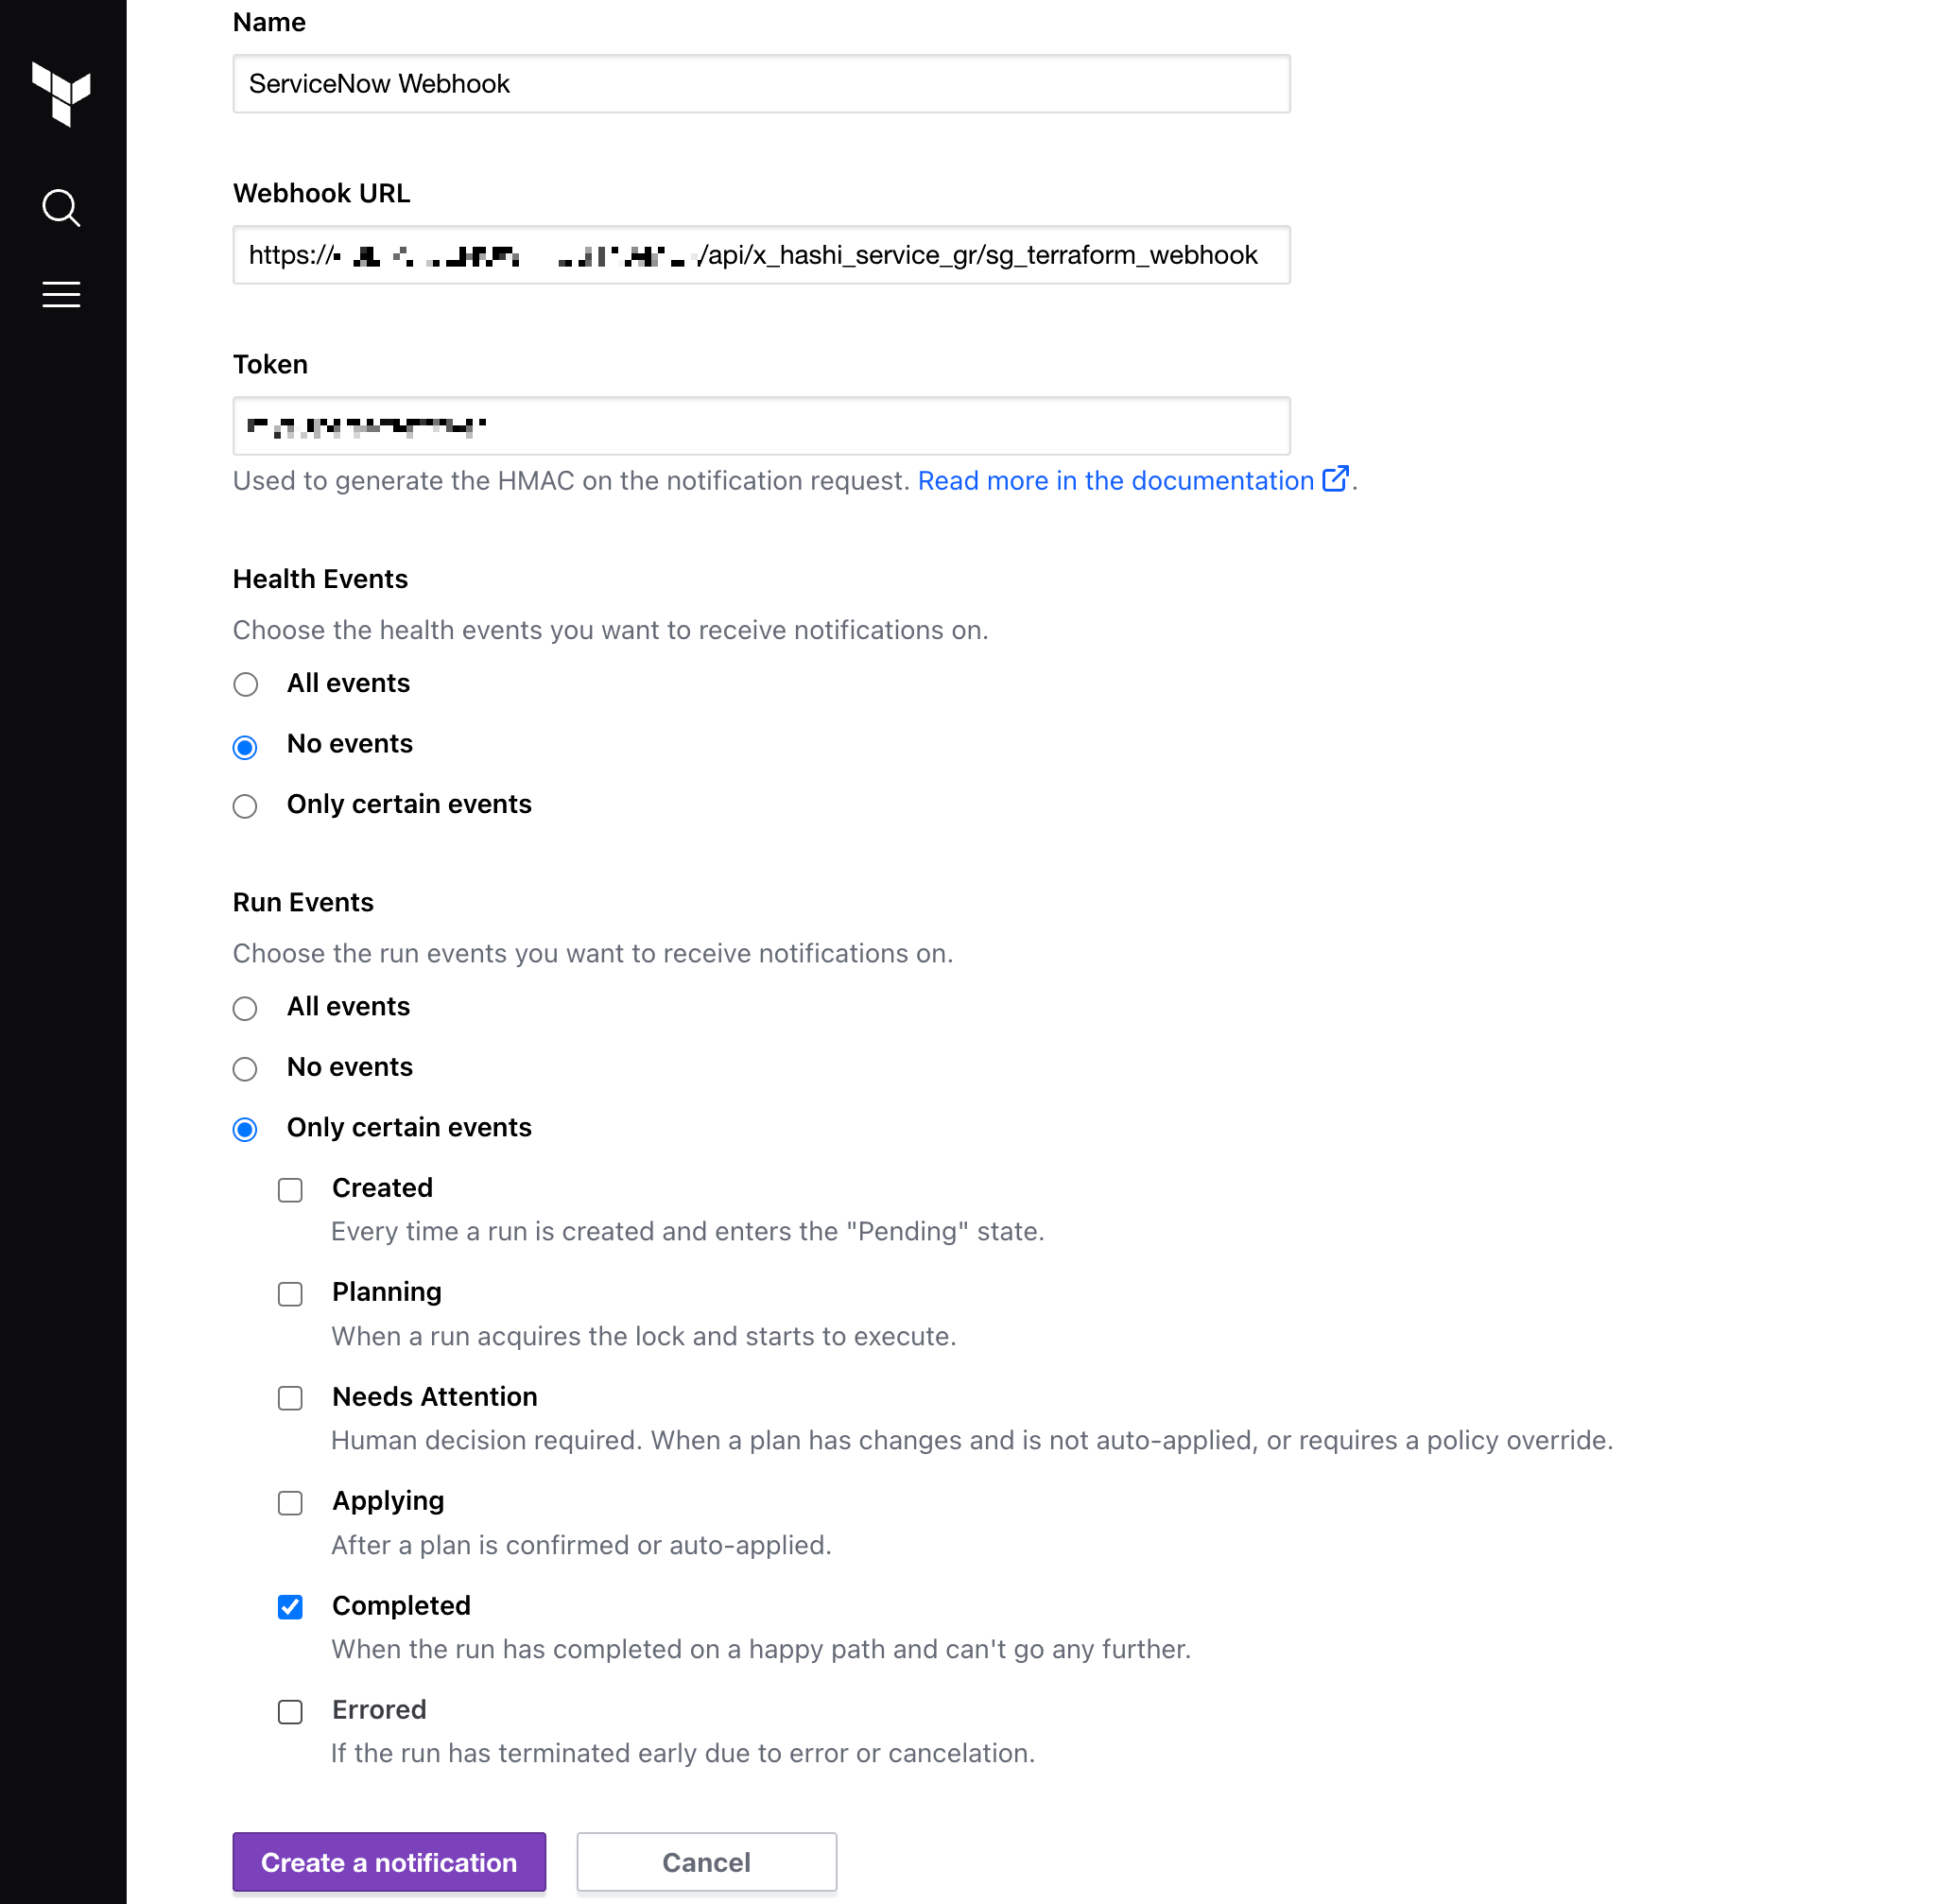
Next, create the webhook in HCP Terraform. Navigate to the learn-terraform-snow-sgc workspace and click Settings > Notifications. Click Create a Notification.
Keep the Destination as the default option of Webhook. Choose a descriptive name Name.
For the Webhook URL enter https://<SERVICENOW_HOSTNAME>/api/x_hashi_service_gr/sg_terraform_webhook and replace <SERVICENOW_HOSTNAME> with the hostname of your ServiceNow instance.
In the Token field, enter the same string you provided in Terraform Webhook token section the of the Service Graph guided setup form.
Under Workspace Events choose No events.
Under Run Events choose Only certain events and enable notifications only on Completed runs. Click Create Notification.
Apply configuration
Now in your terminal apply your Terraform configuration. When prompted, type yes to confirm the operation.
$ terraform apply
Running apply in HCP Terraform. Output will stream here. Pressing Ctrl-C
will cancel the remote apply if it's still pending. If the apply started it
will stop streaming the logs, but will not stop the apply running remotely.

Preparing the remote apply...

To view this run in a browser, visit:
https://app.terraform.io/app/hashicorp-training/learn-terraform-snow-sgc/runs/run-abc123

Waiting for the plan to start...

Terraform v1.3.6
on linux_amd64
Initializing plugins and modules...
data.aws_ami.instance_ami: Reading...
data.aws_ami.instance_ami: Read complete after 0s [id=ami-0a05040be81434d40]

Terraform used the selected providers to generate the following execution
plan. Resource actions are indicated with the following symbols:
  + create

Terraform will perform the following actions:

  # aws_instance.app_server will be created
  + resource "aws_instance" "app_server" {
    + ami                               = "ami-0a05040be81434d40"
##…

Plan: 1 to add, 0 to change, 0 to destroy.

Changes to Outputs:
  + instance_id     = (known after apply)

Do you want to perform these actions in workspace "learn-terraform-snow-sgc"?
  Terraform will perform the actions described above.
  Only 'yes' will be accepted to approve.

  Enter a value: yes

##...

Apply complete! Resources: 1 added, 0 changed, 0 destroyed.

Outputs:

instance_id = "i-00efdcec697539585"
The instance_id output lets you identify your instance in ServiceNow.
View resources in ServiceNow
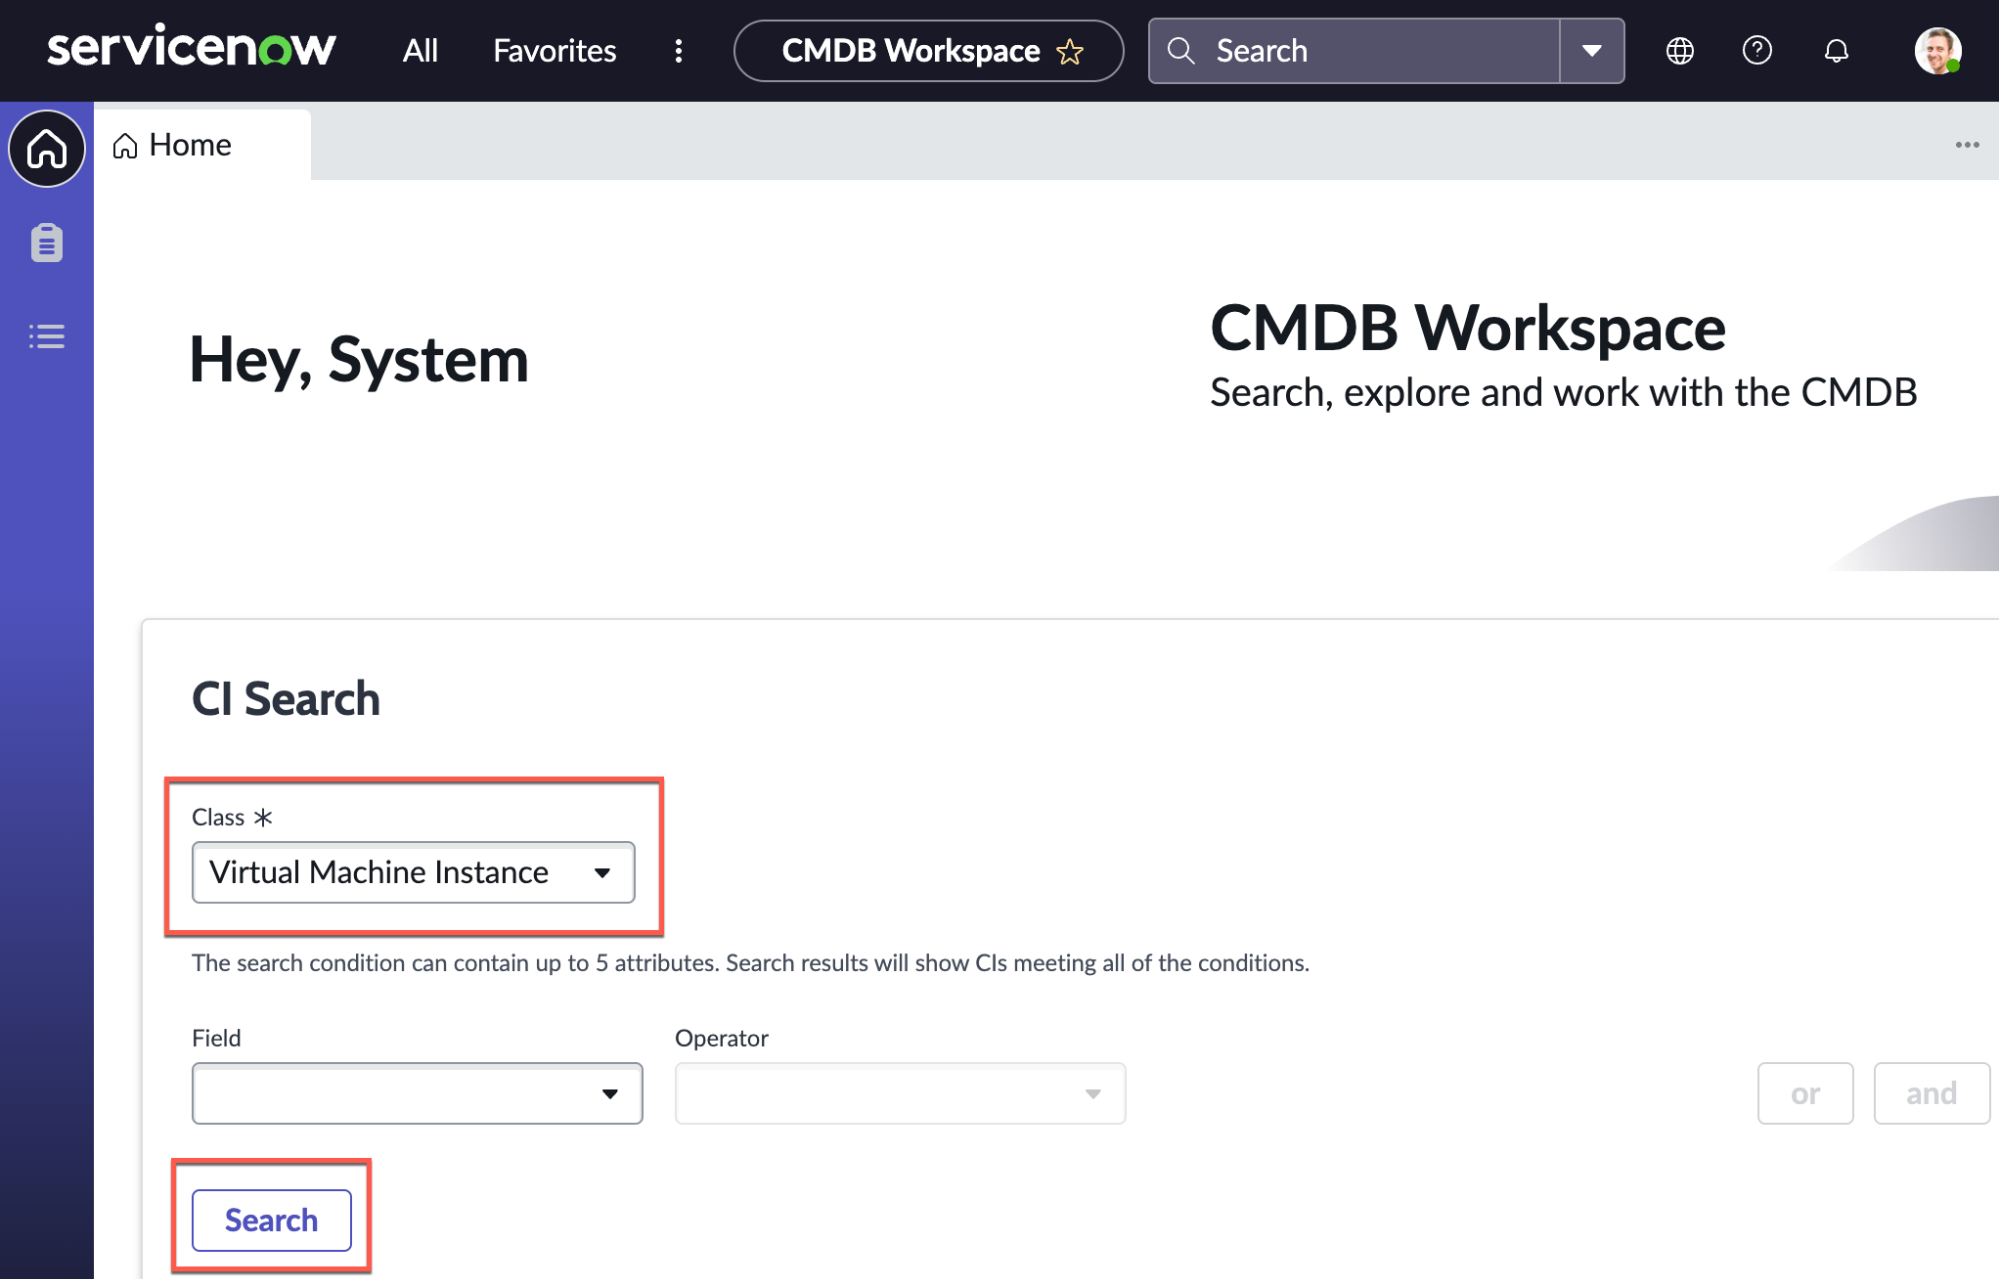
In the top navigation of ServiceNow, click on All and search for CMDB Workspace, and click on CMDB Workspace.
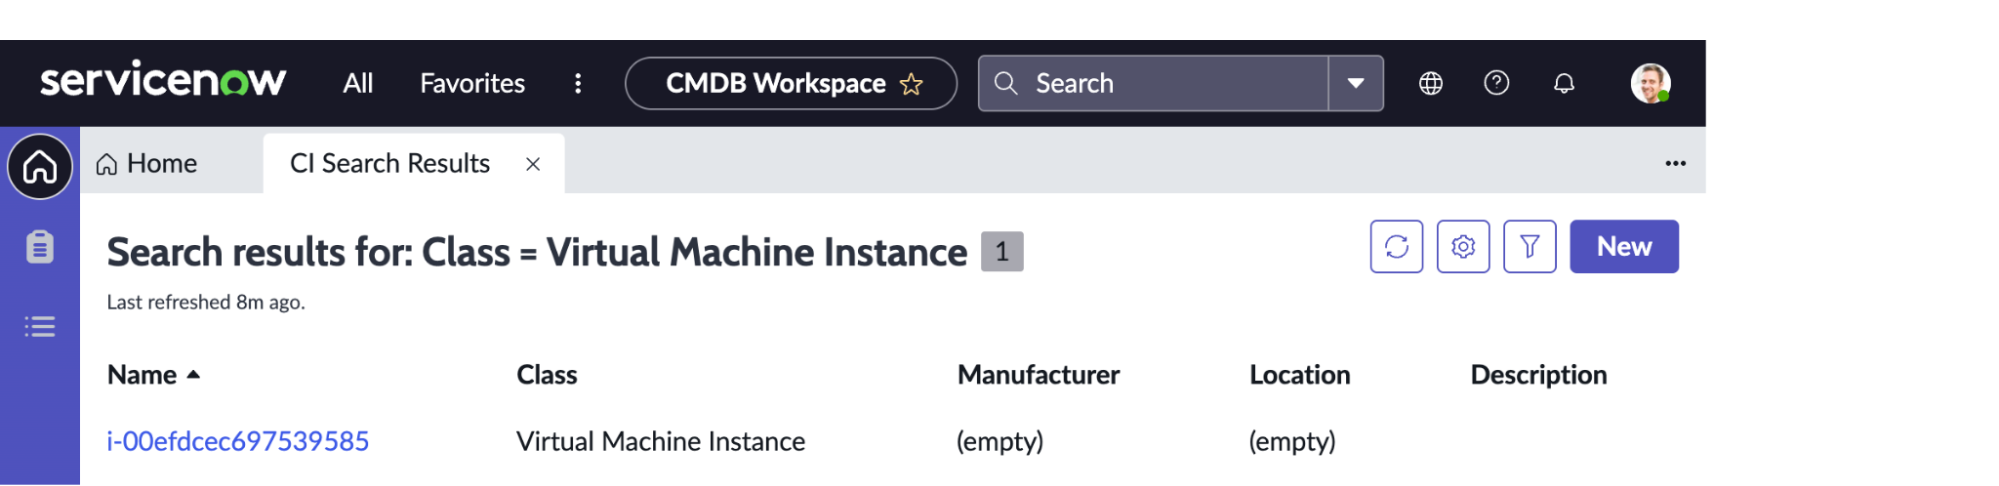
Perform a Configuration Item (CI) search by selecting Virtual Machine Instance under Class and clicking Search
A few minutes after applying your Terraform configuration, you should see an entry for an instance with an ID that matches the Terraform output from the beginning of this tutorial.
Clean up infrastructure
Destroy the resources that you created in this tutorial. When prompted, type yes to confirm the operation.
$ terraform destroy
##...

Terraform used the selected providers to generate the following execution
plan. Resource actions are indicated with the following symbols:
  - destroy

Terraform will perform the following actions:
##...
Plan: 0 to add, 0 to change, 1 to destroy.

Changes to Outputs:
  - instance_id = "i-00efdcec697539585" -> null

Do you really want to destroy all resources in workspace "learn-terraform-snow-sgc"?
  Terraform will destroy all your managed infrastructure, as shown above.
  There is no undo. Only 'yes' will be accepted to confirm.


  Enter a value: yes
##...
Apply complete! Resources: 0 added, 0 changed, 1 destroyed.
Optionally, delete your learn-terraform-snow-sgc workspace in your Terraform organization.
The Service Graph Connector automatically marks the deleted EC2 instance as Non-Operational in the ServiceNow CMDB.
Next steps
In this tutorial, you installed and configured the ServiceNow Service Graph Connector for Terraform and imported Terraform-managed resources into the ServiceNow CMDB. To learn more about how you can use HCP Terraform or Terraform Enterprise to build and manage your infrastructure, check out the following resources:
- Learn more about Terraform Enterprise.
- Learn how to deploy resources with Terraform in ServiceNow with the Terraform ServiceNow Service Catalog Integration.
- Read about ServiceNow Service Graph Connectors.
- Read about the ServiceNow Configuration Management Database.