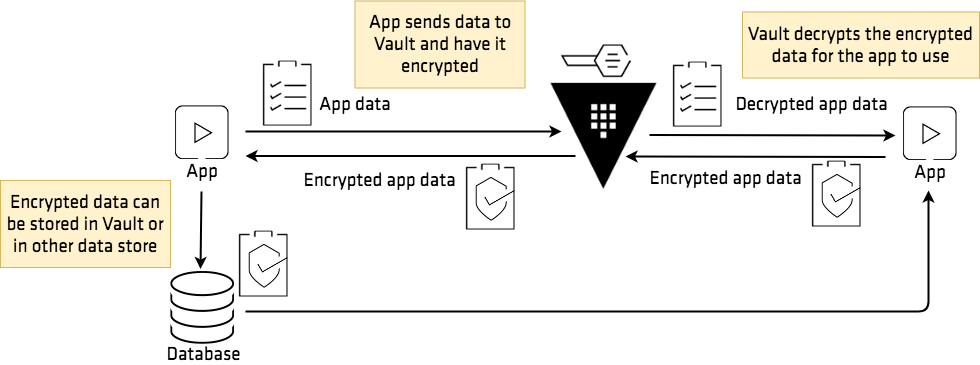
Encrypt data in transit with Vault
The transit secrets engine primary use case is to encrypt data. This relieves the burden of data encryption and decryption from the application developers and moves the burden to Vault. The transit secrets engine also provides the following features:
- Sign and verify data
- Generate hashes and HMACs of data
- Act as a source of random bytes
Vault's transit secrets engine handles cryptographic functions on data-in-transit. Vault doesn't store the data sent to the secrets engine, so it can also be viewed as encryption as a service.
Challenge
Example Inc. recently made headlines for a massive data breach which exposed millions of their users' payment card accounts online. When they tracked down the problem they found that a new HVAC system with management software had been put into their data centers. This new system introduced vulnerabilities in their networks and exposed ports and IP addresses to the databases publicly.
Solutions
The transit secrets engine enables security teams to encrypt data in transit and at rest. If an intrusion occurs, your data is encrypted with AES-GCM with a 256-bit AES key or other supported key types. Even if an attacker were able to access the raw data, they would only have encrypted bits. This means attackers would need to compromise multiple systems before exfiltrating data.
This tutorial demonstrates the basics of the transit secrets engine.
Launch Terminal
This tutorial includes a free interactive command-line lab that lets you follow along on actual cloud infrastructure.

Personas
The end-to-end scenario described in this tutorial involves two personas:
- admin with privileged permissions to manage the encryption keys
- apps with un-privileged permissions encrypt/decrypt secrets via APIs
Prerequisites
To perform the tasks described in this tutorial, you need to have the following:
- Vault installed
- Complete the lab setup section to use either a Vault dev mode server or HCP Vault Dedicated cluster
- jq installed
Policy requirements
To perform all tasks demonstrated in this tutorial, your policy must include the following permissions.
# Enable transit secrets engine
path "sys/mounts/transit" {
  capabilities = [ "create", "read", "update", "delete", "list" ]
}

# To read enabled secrets engines
path "sys/mounts" {
  capabilities = [ "read" ]
}

# Manage the transit secrets engine
path "transit/*" {
  capabilities = [ "create", "read", "update", "delete", "list" ]
}
If you are not familiar with policies, complete the policies tutorial.
Lab setup
Launch the HCP Portal and login.
Click Vault in the left navigation pane.
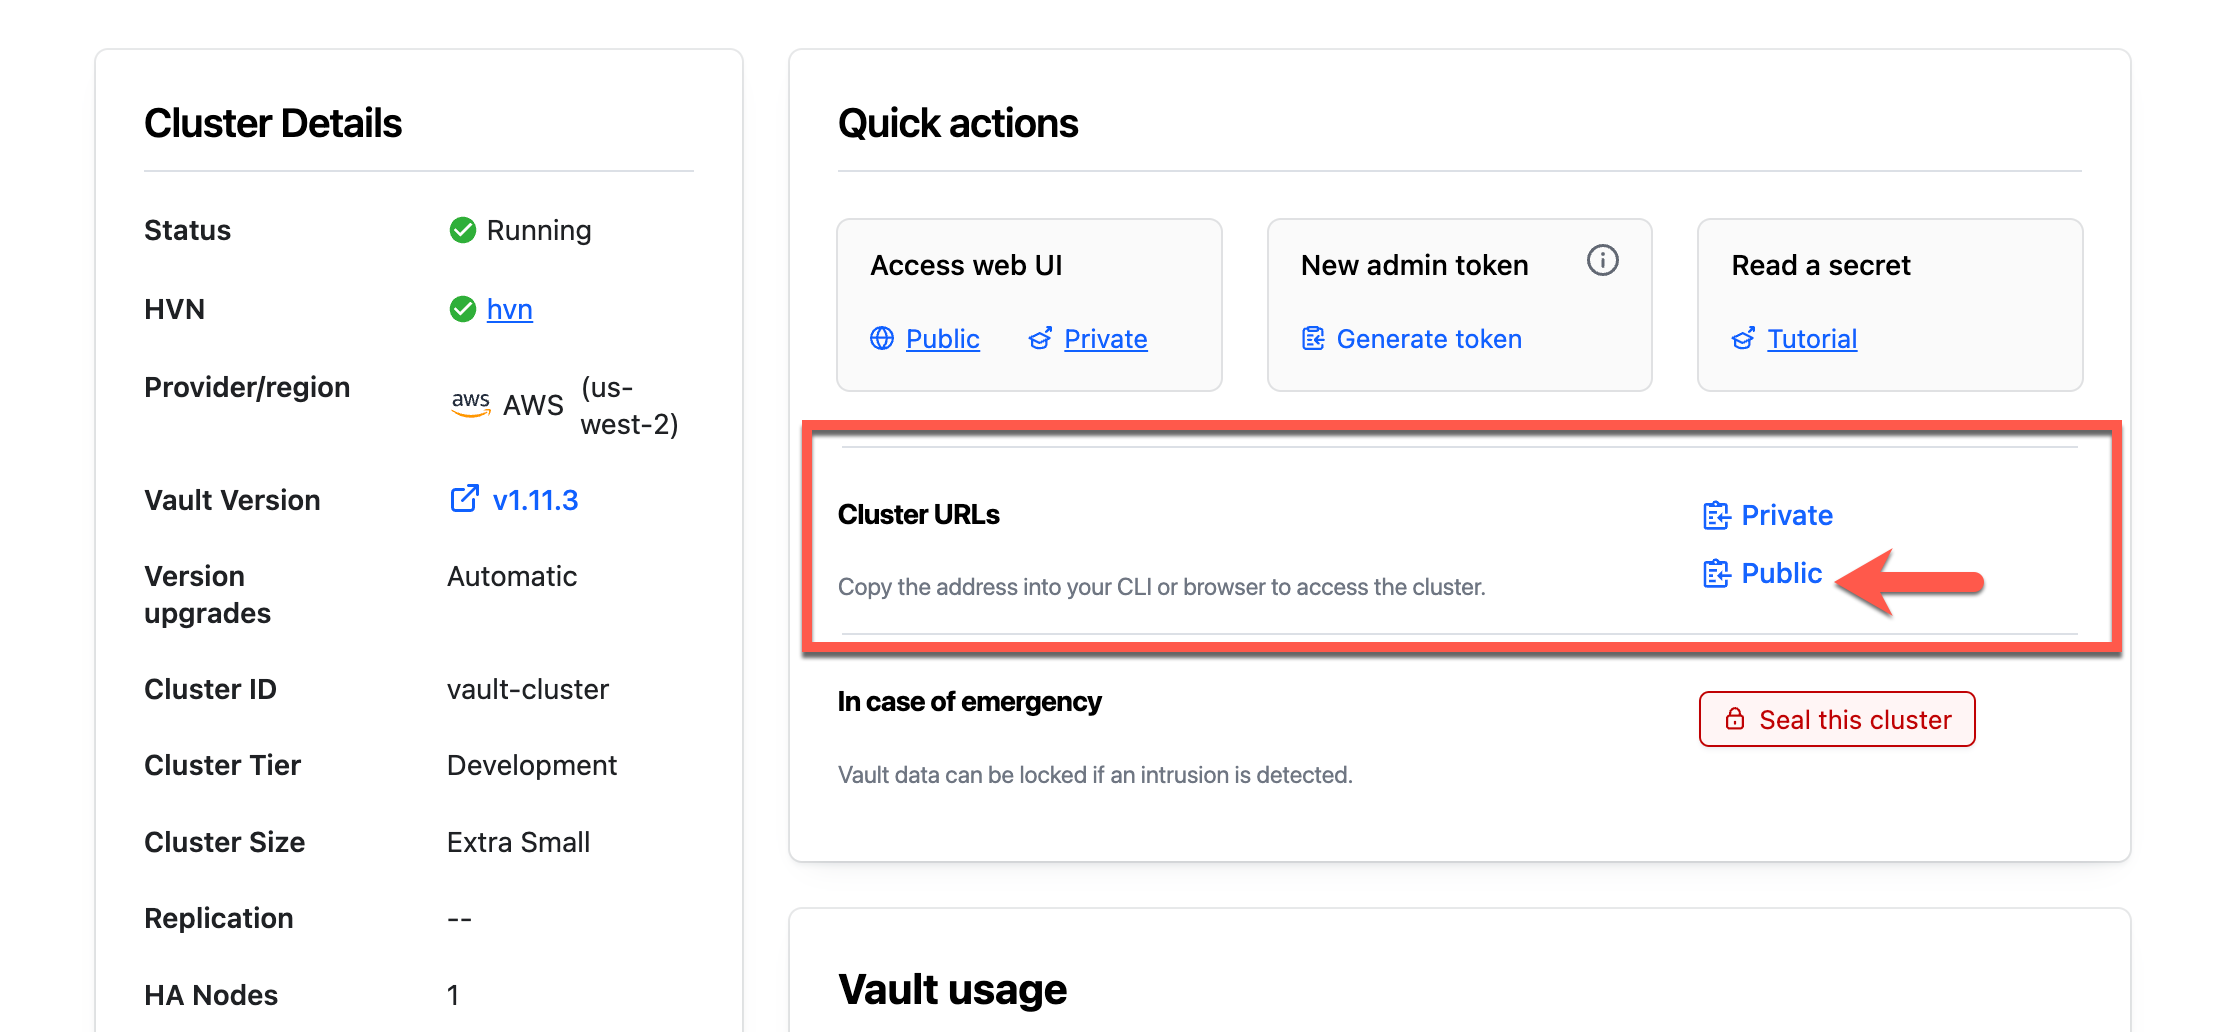
In the Vault clusters pane, click vault-cluster.
Under Cluster URLs, click Public Cluster URL.
In a terminal, set the
VAULT_ADDRenvironment variable to the copied address.$ export VAULT_ADDR=<Public_Cluster_URL>Return to the Overview page and click Generate token.
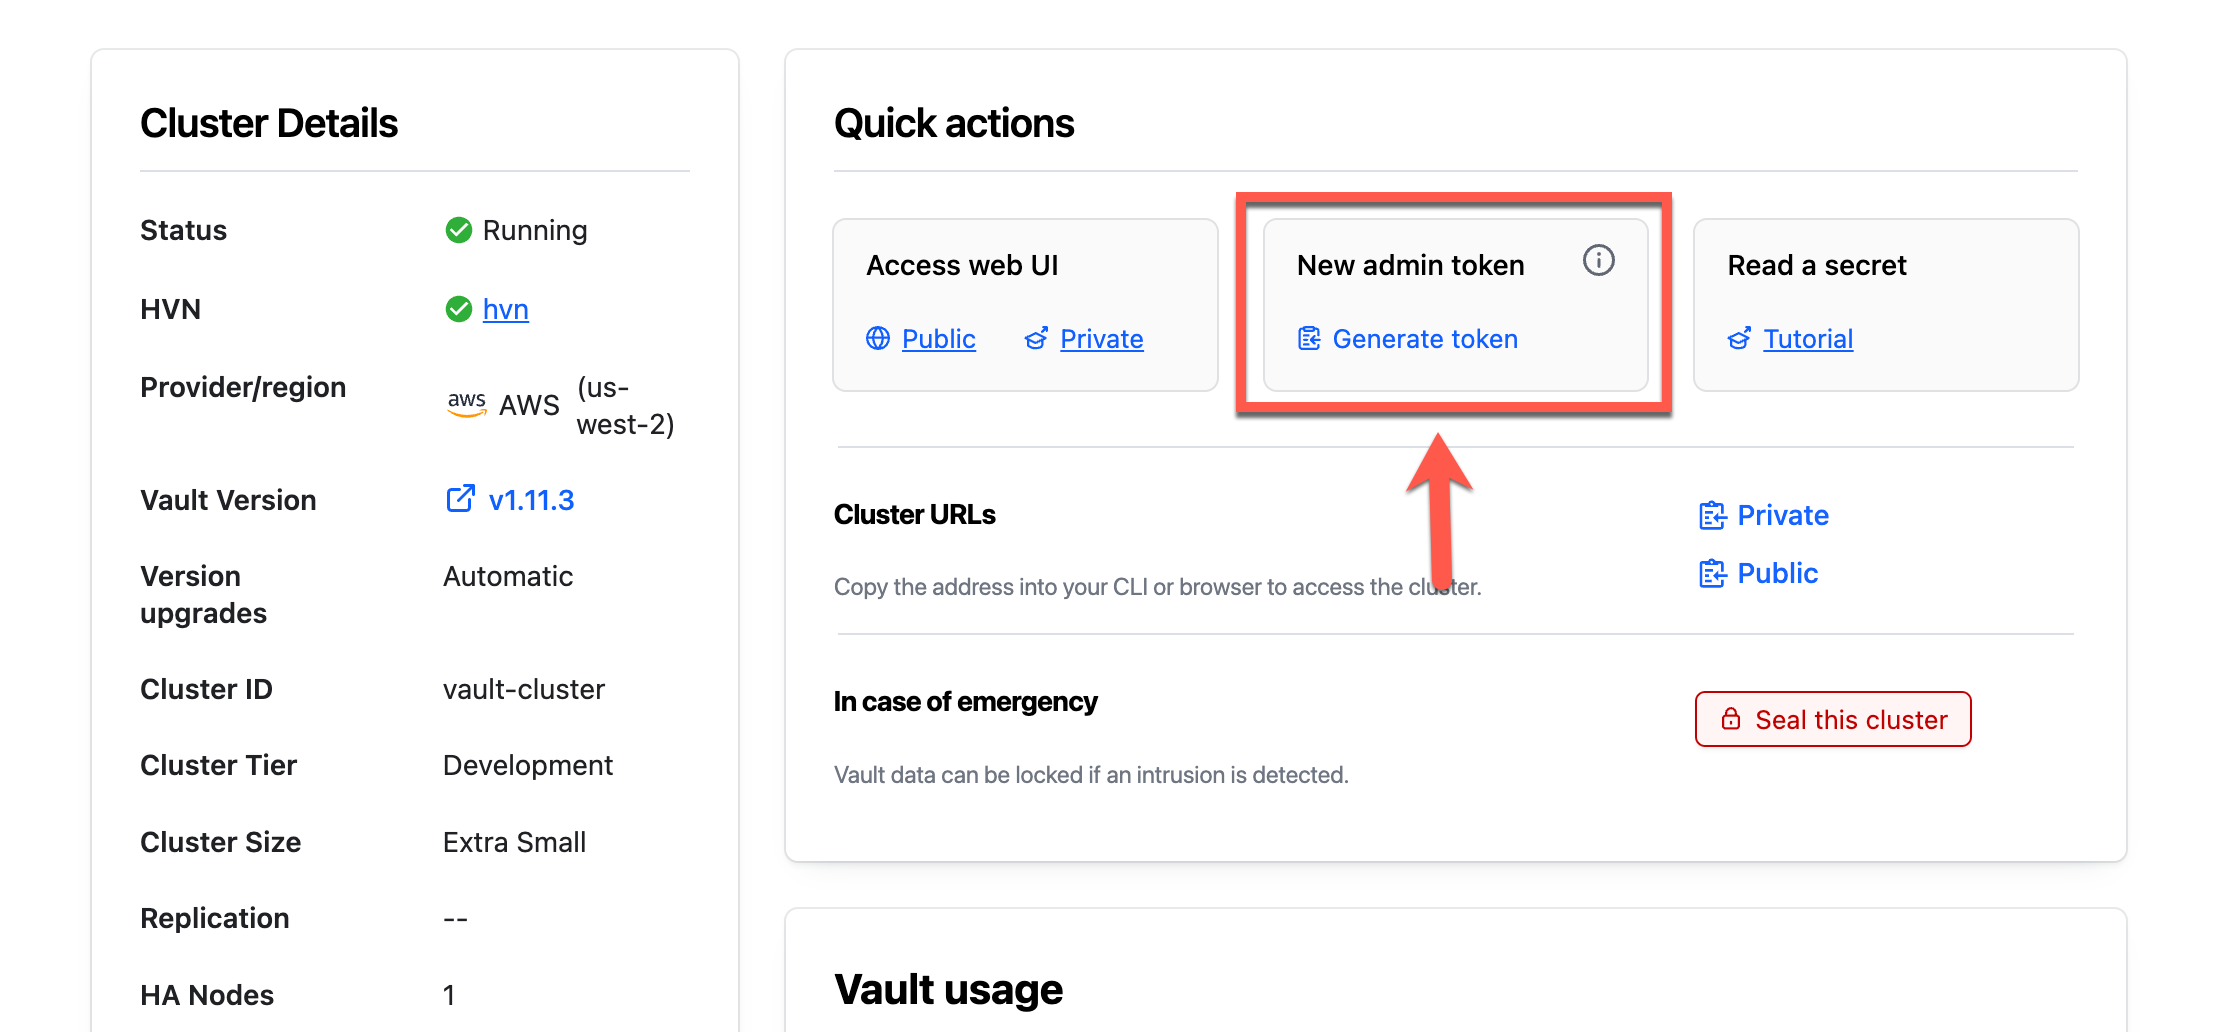
Within a few moments, a new token will be generated.
Copy the Admin Token.
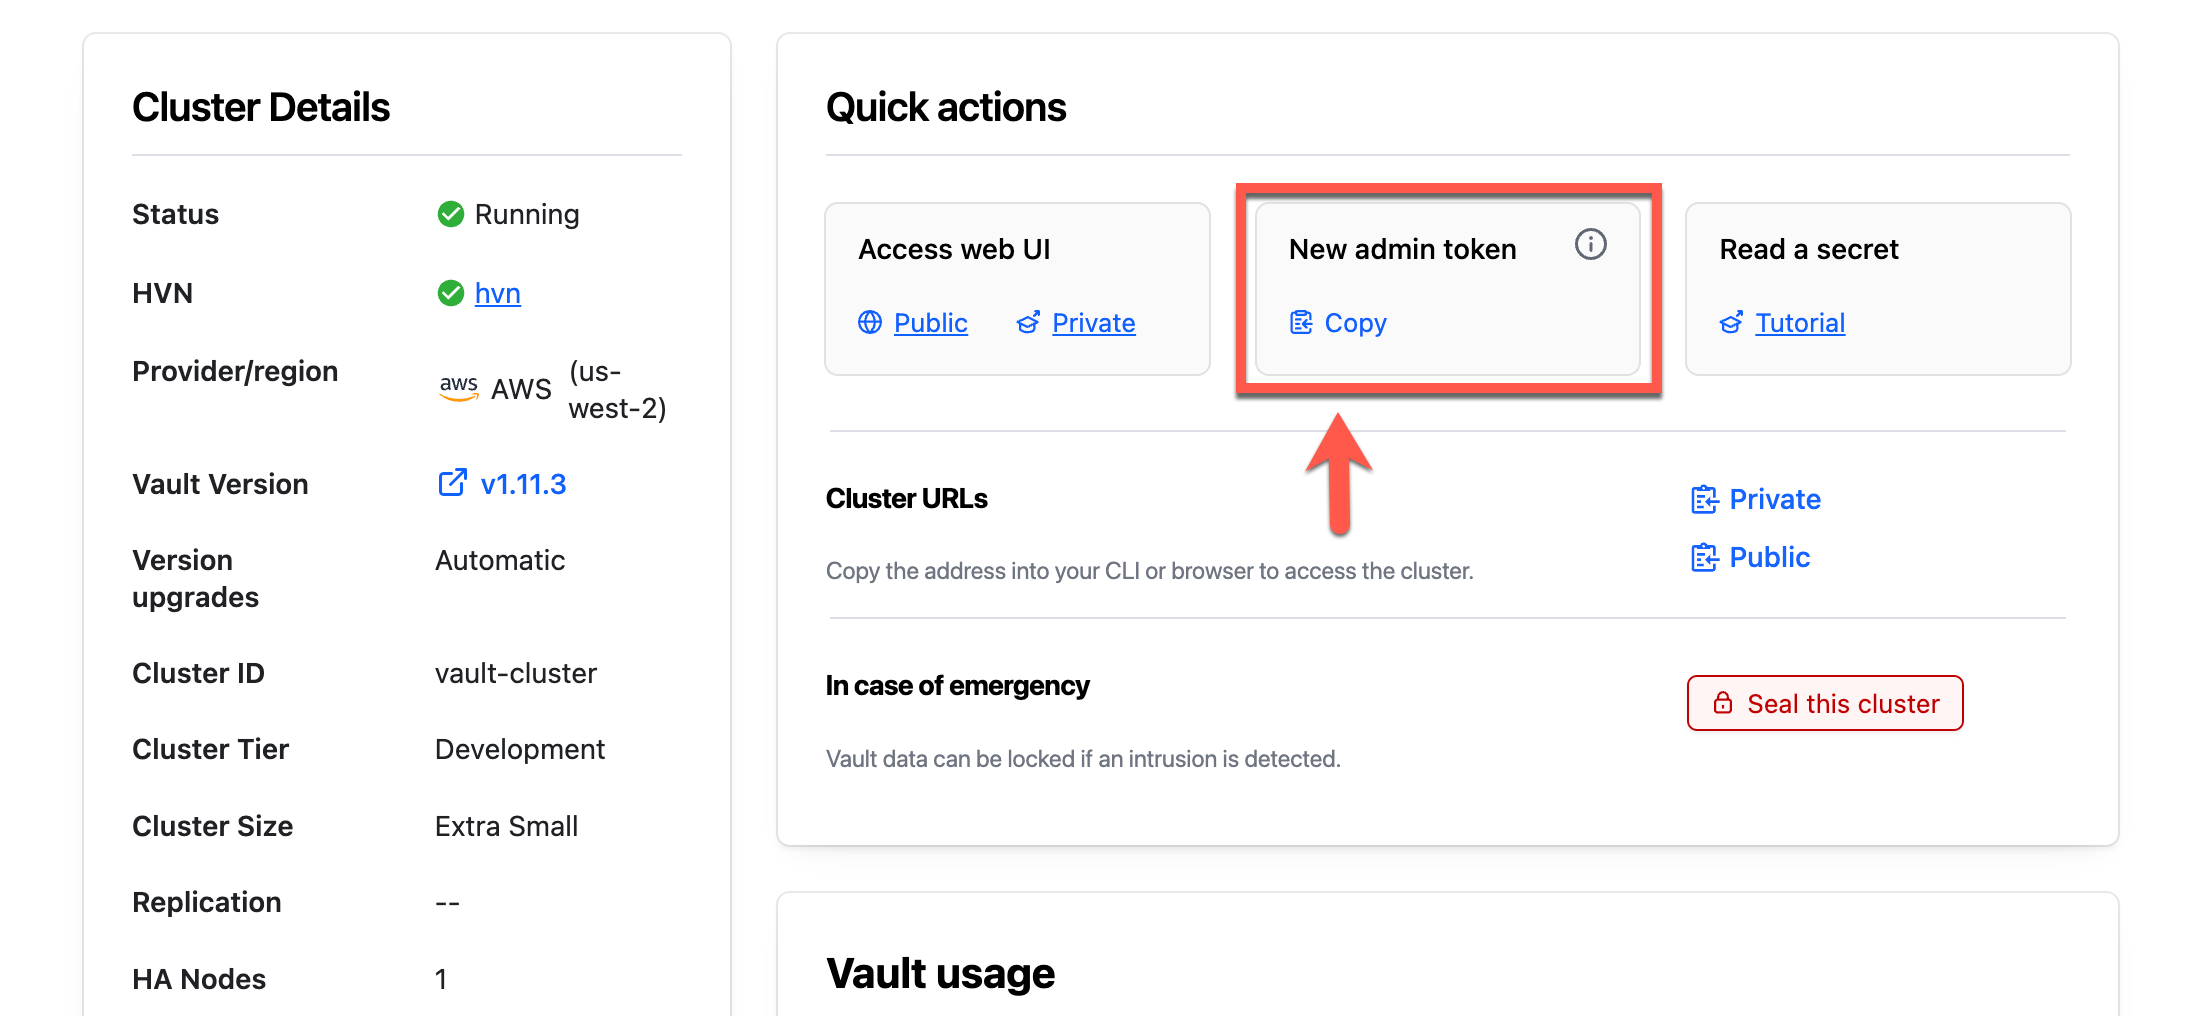
Return to the terminal and set the
VAULT_TOKENenvironment variable.$ export VAULT_TOKEN=<token>Set the
VAULT_NAMESPACEenvironment variable toadmin.$ export VAULT_NAMESPACE=adminThe
adminnamespace is the top-level namespace automatically created by HCP Vault. All CLI operations default to use the namespace defined in this environment variable.Type
vault statusto verify your connectivity to the Vault cluster.$ vault status Key Value --- ----- Recovery Seal Type shamir Initialized true Sealed false Total Recovery Shares 1 Threshold 1 Version 1.12.3+ent ...snipped...
The Vault Dedicated server is ready.
Configure transit secrets engine
(Persona: admin)
The transit secrets engine must be configured before it can perform its operations. This step is usually done by an admin or configuration management tool.
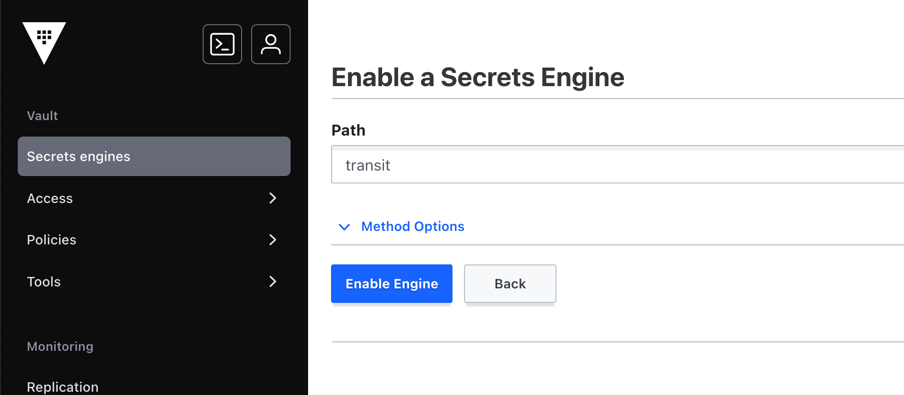
Enable the transit secrets engine by executing the following command.
$ vault secrets enable transit
Success! Enabled the transit secrets engine at: transit/
By default, the secrets engine will mount at the name of the engine. If you wish to enable it at a different path, use the
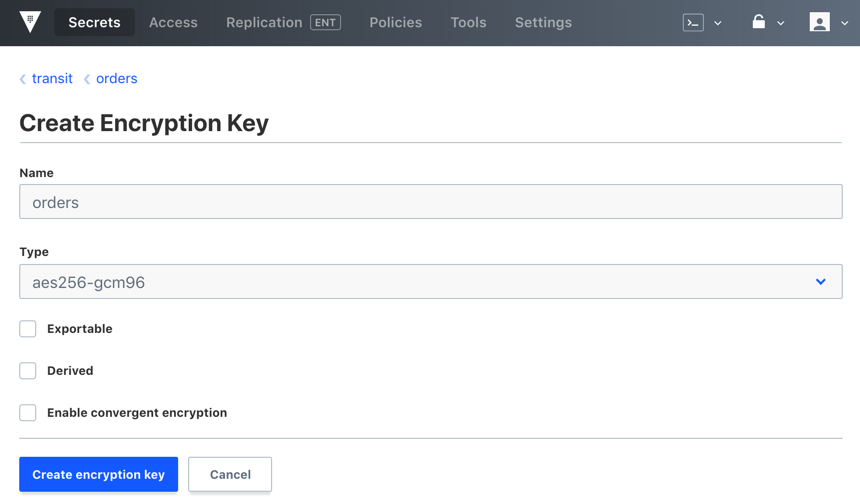
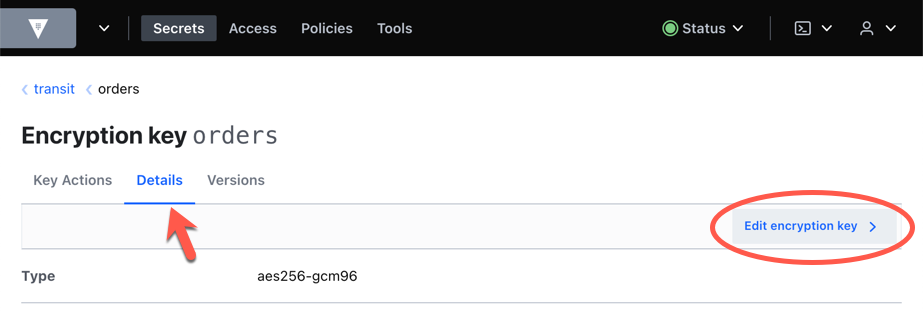
-pathargument.Create an encryption key ring named
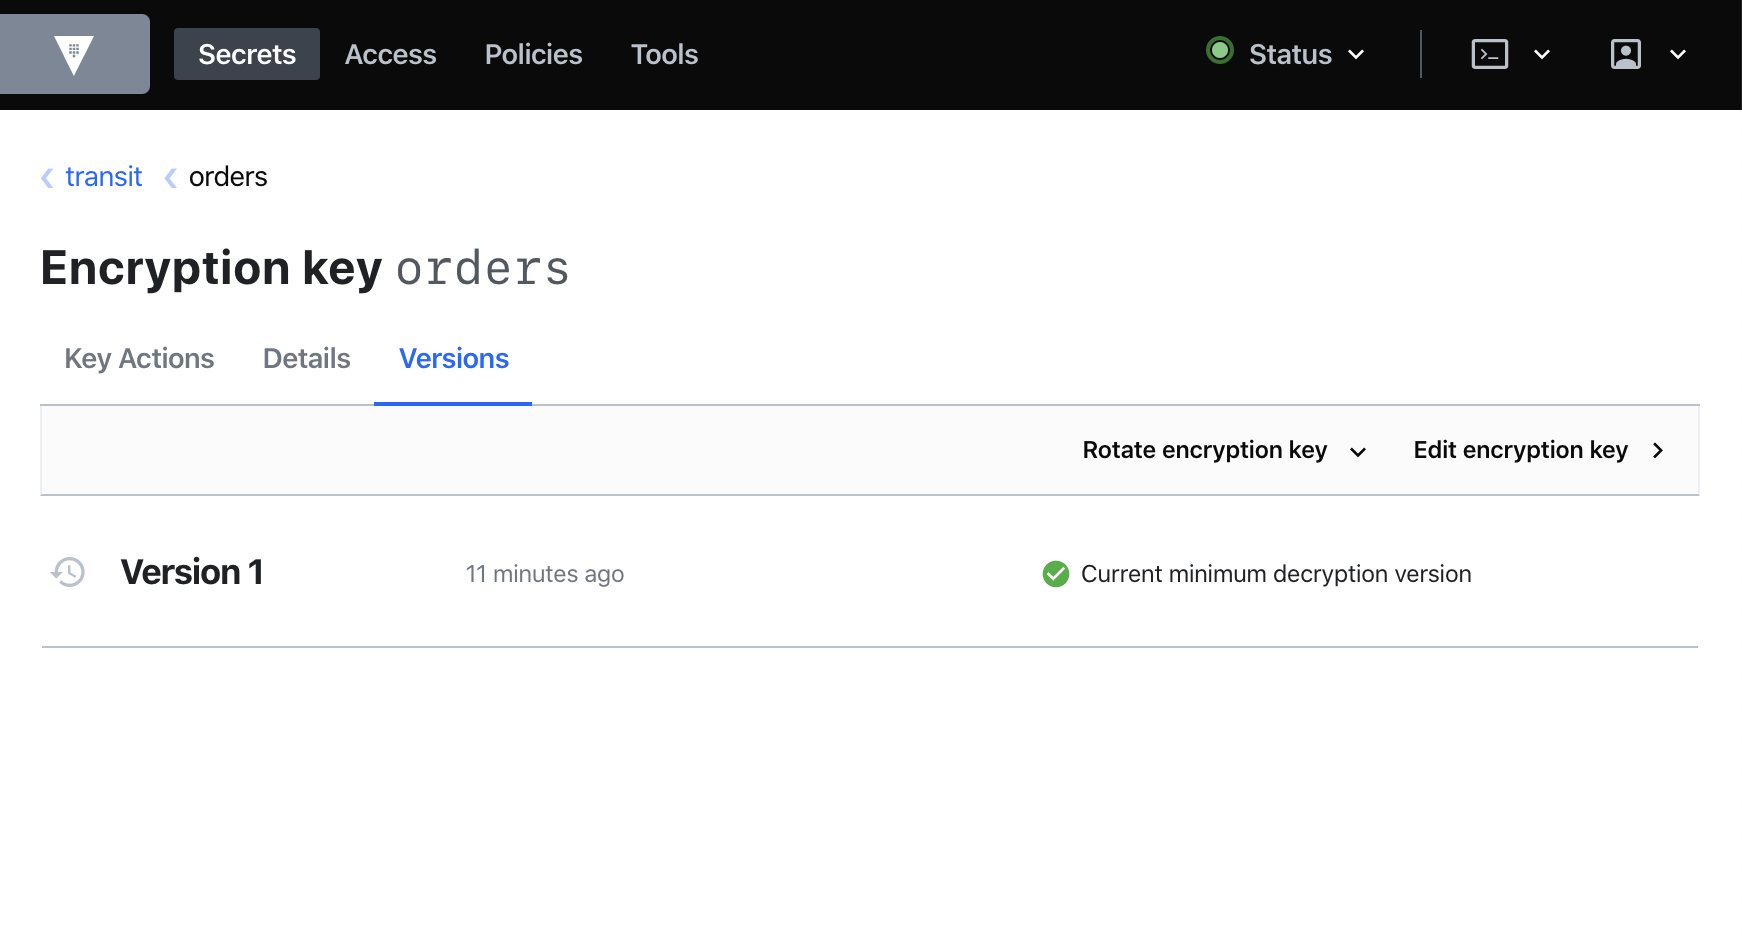
ordersby executing the following command.$ vault write -f transit/keys/orders Success! Data written to: transit/keys/orders
Create a token for Vault clients
(Persona: admin)
Vault clients must authenticate with Vault and acquire a valid token with appropriate policies allowing to request data encryption and decryption using the specific key.

When the transit secrets engine is enabled at transit, the policy must include
the following:
path "transit/encrypt/<key_name>" {
   capabilities = [ "update" ]
}

path "transit/decrypt/<key_name>" {
   capabilities = [ "update" ]
}
This tutorial uses the vault token create command to generate a client token
and skips the authentication step.
Create a policy named
app-orders.$ vault policy write app-orders -<<EOF path "transit/encrypt/orders" { capabilities = [ "update" ] } path "transit/decrypt/orders" { capabilities = [ "update" ] } EOFThe policy is created or updated; if it already exists.
Example output:
Success! Uploaded policy: app-ordersCreate a token with
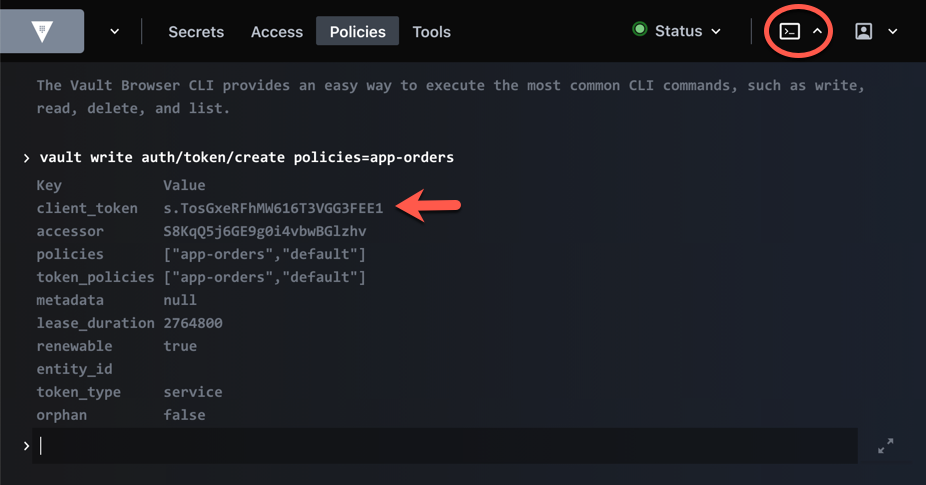
app-orderspolicy attached.$ vault token create -policy=app-ordersExample output:
Key                  Value
---                  -----
token                hvs.CAESIIGSlbFFoYgqdzTu2lwnoDteRshqcWdVSAUohC2w-gZ2GicKImh2cy54cjRiQ1lMaHptSm44eVAySmFNWk9FNk4ueU54TmkQlQQ
token_accessor       lzzyhDwNzO3wO9ai734Bf14g.yNxNi
token_duration       1h
token_renewable      true
token_policies       ["app-orders" "default"]
identity_policies    []
policies             ["app-orders" "default"]
The
tokenis returned with theapp-orderspolicy attached.Re-run the command and create a
APP_ORDER_TOKENenvironment variable to store the generated client token value.$ export APP_ORDER_TOKEN=$(vault token create \ -policy=app-orders \ -format=json | jq -r '.auth | .client_token')
Encrypt secrets
(Persona: apps)
Once the transit secrets engine has been configured, any Vault client holding a valid token with the proper permissions can send data to encrypt.
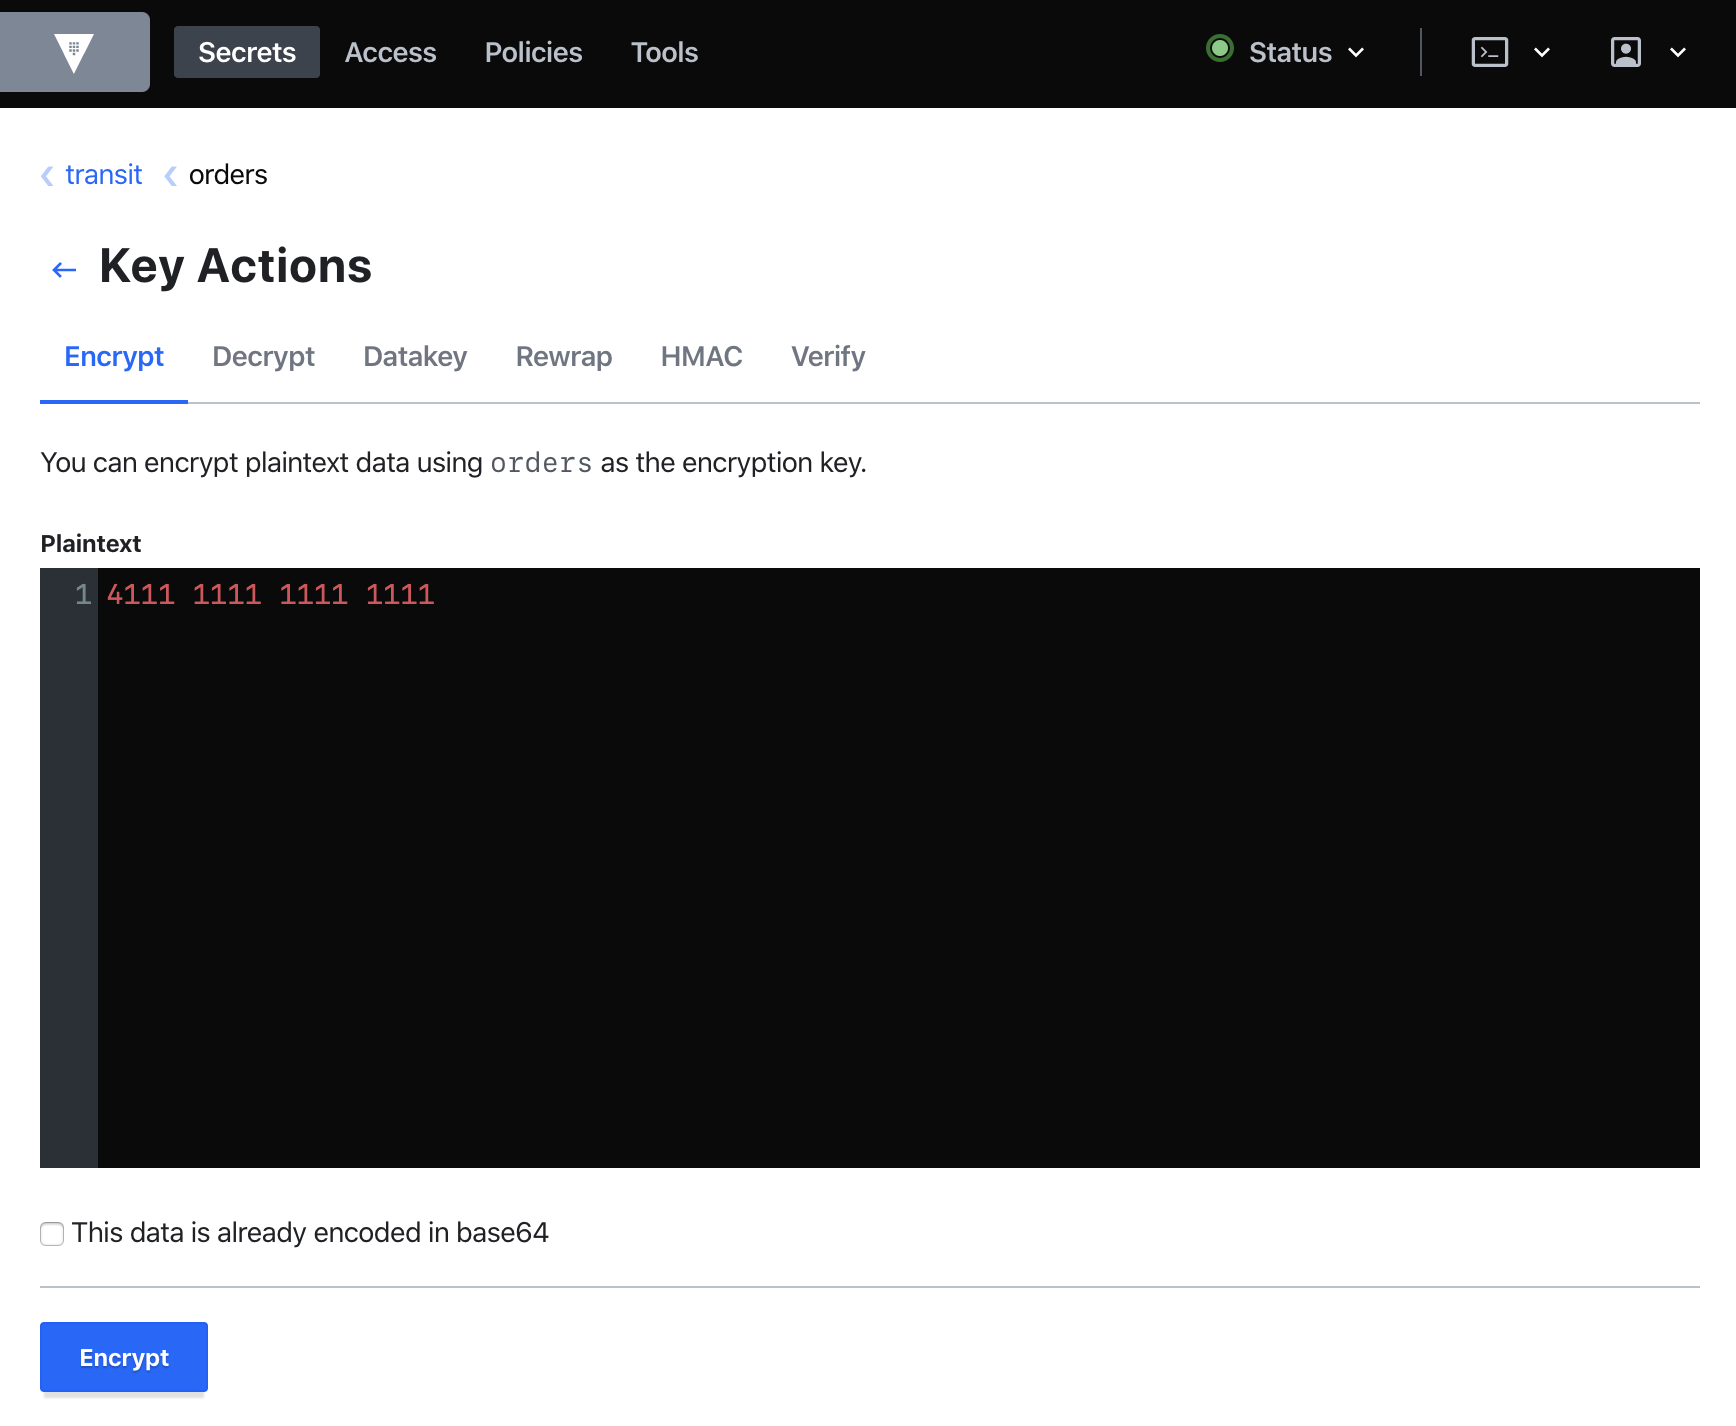
Encrypt plaintext (using the shell to do the
base64encoding) using theordersencryption key.$ VAULT_TOKEN=$APP_ORDER_TOKEN vault write transit/encrypt/orders \ plaintext=$(base64 <<< "4111 1111 1111 1111")Example output:
Key           Value
---           -----
ciphertext    vault:v1:cZNHVx+sxdMErXRSuDa1q/pz49fXTn1PScKfhf+PIZPvy8xKfkytpwKcbC0fF2U=
Re-run the command to store the encrypted value as an environment variable.
$ export CIPHERTEXT=$(VAULT_TOKEN=$APP_ORDER_TOKEN vault write transit/encrypt/orders \
    plaintext=$(base64 <<< "4111 1111 1111 1111")\
    -format=json | jq -r '.data | .ciphertext')
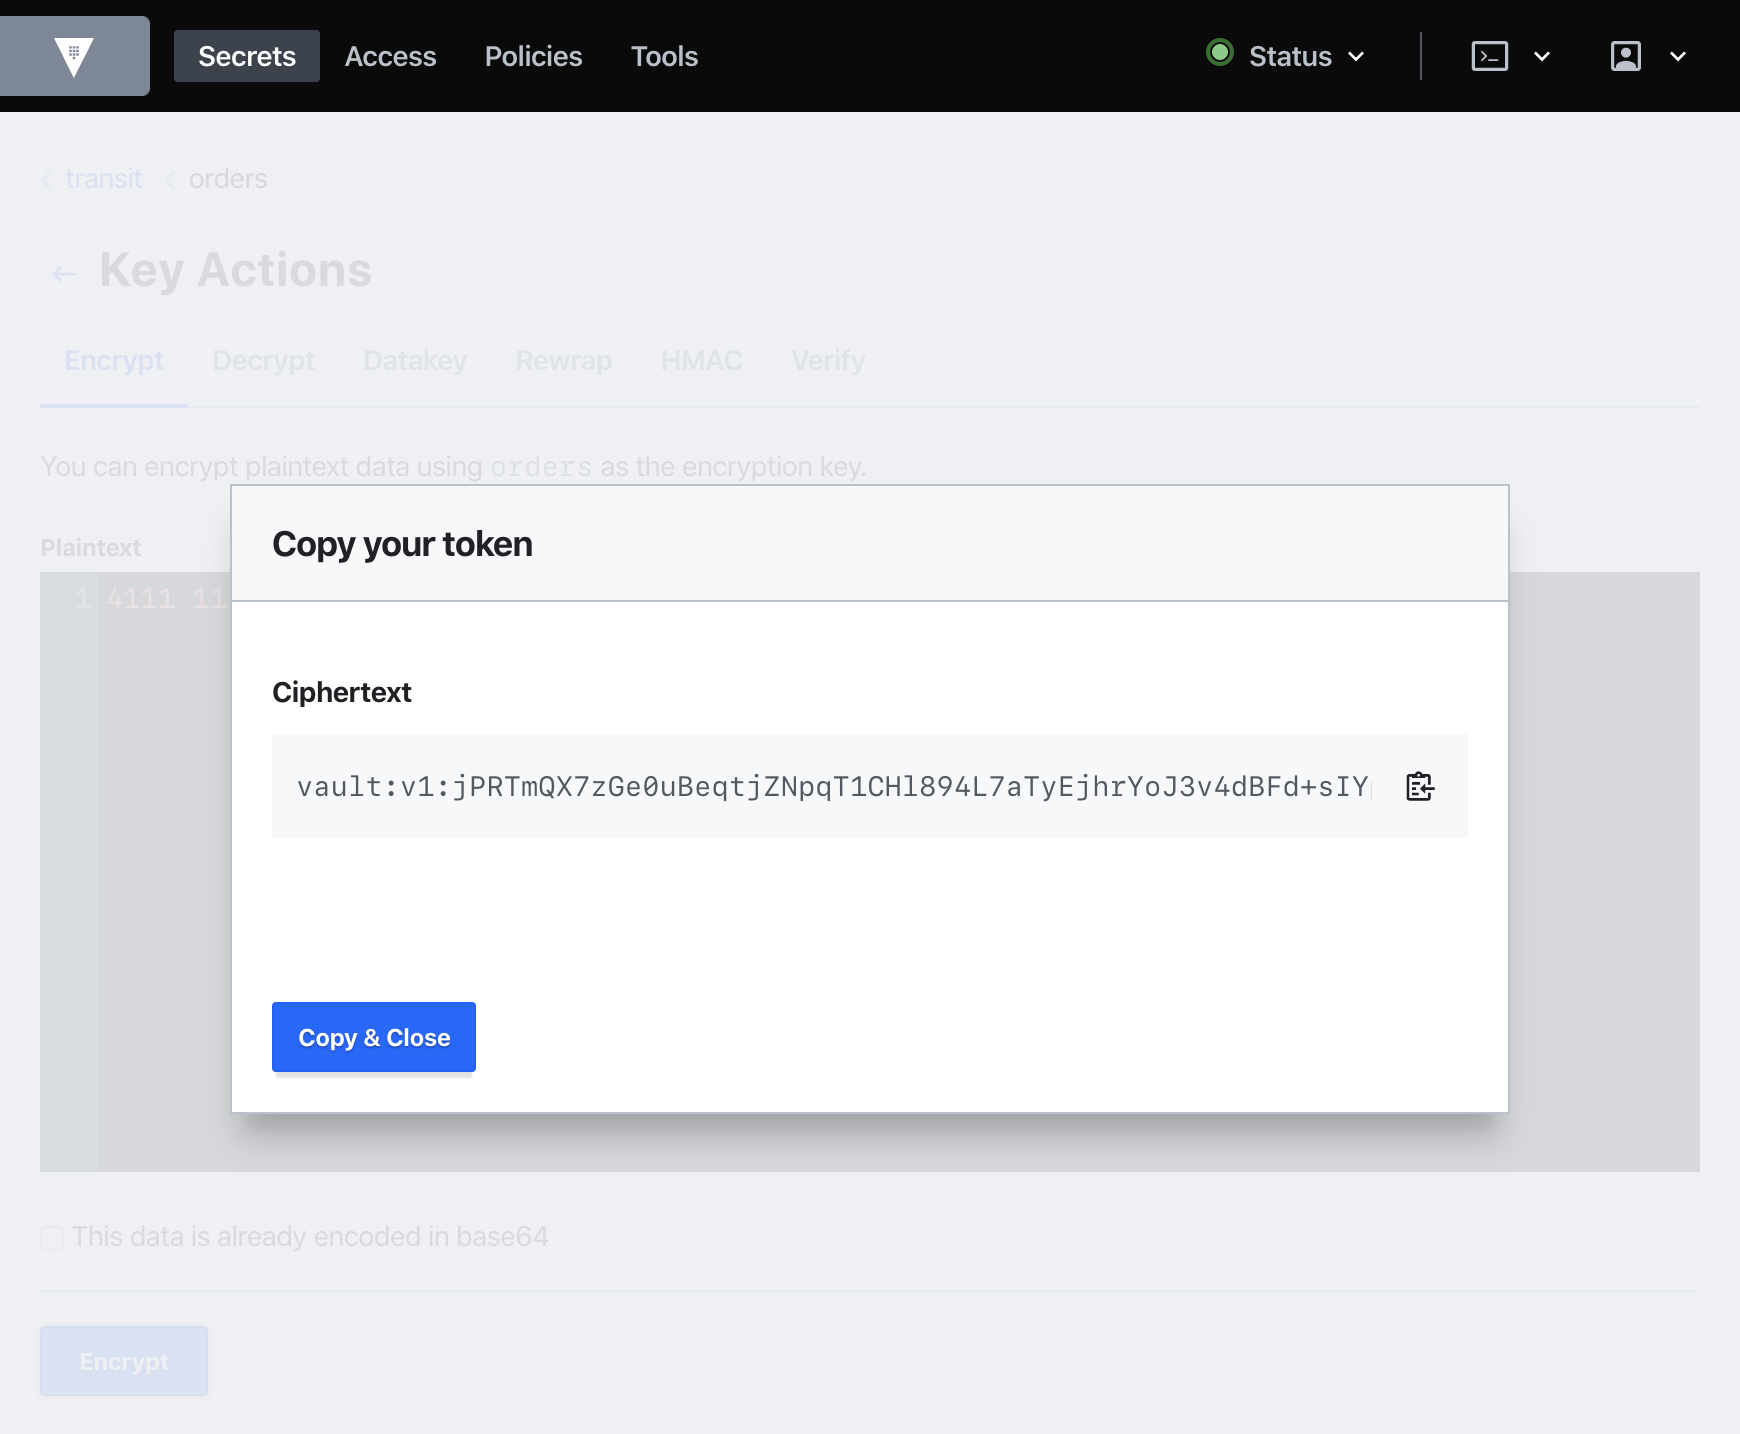
Notice that the ciphertext starts with vault:v1:. This prefix indicates that
this value is wrapped by vault and the version of the orders encryption key
used was v1. Therefore, when you decrypt this ciphertext, Vault knows to use
v1 of the key. Later, you are going to rotate the encryption key and learn how
to re-wrap the ciphertext with the latest version of the encryption key.
Decrypt ciphertext
(Persona: apps)
Any client holding a valid token with proper permissions can decrypt ciphertext
generated by Vault. To decrypt the ciphertext, invoke the transit/decrypt
endpoint.
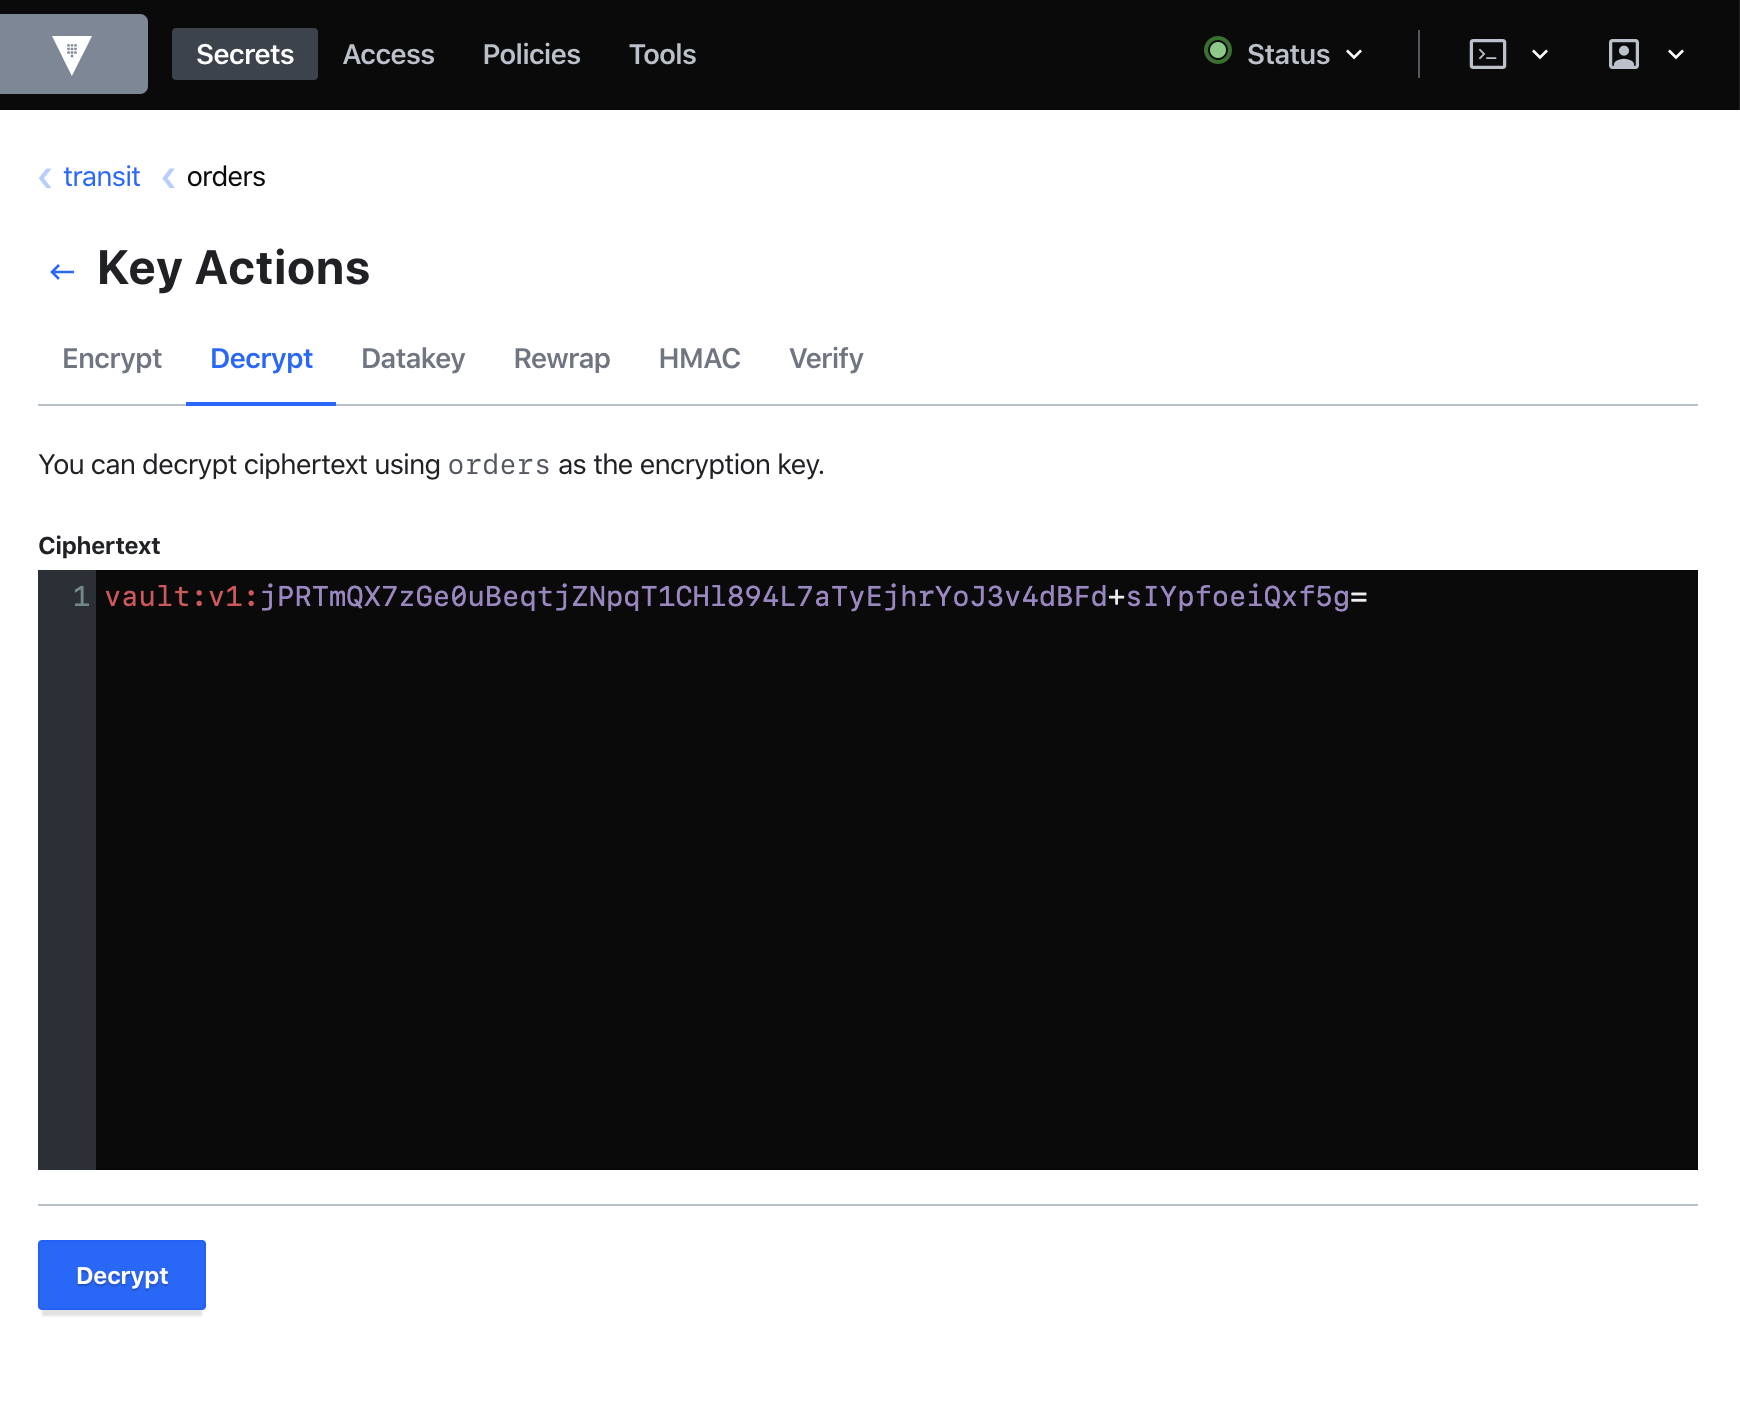
Decrypt the ciphertext emitted in the encrypt secrets step.
$ VAULT_TOKEN=$APP_ORDER_TOKEN vault write \
    transit/decrypt/orders ciphertext=$CIPHERTEXT
Example output:
Key          Value
---          -----
plaintext    NDExMSAxMTExIDExMTEgMTExMQo=
The resulting data is base64-encoded and must be decoded to reveal the plaintext.
$ base64 --decode <<< "NDExMSAxMTExIDExMTEgMTExMQo="
4111 1111 1111 1111
Rotate the encryption key
(Persona: admin)
One of the benefits of using the Vault transit secrets engine is its ability to easily rotate encryption keys. Keys can be rotated manually or through an automated process which invokes the key rotation API endpoint through Cron, a CI pipeline, a periodic Nomad batch job, Kubernetes Job, etc.
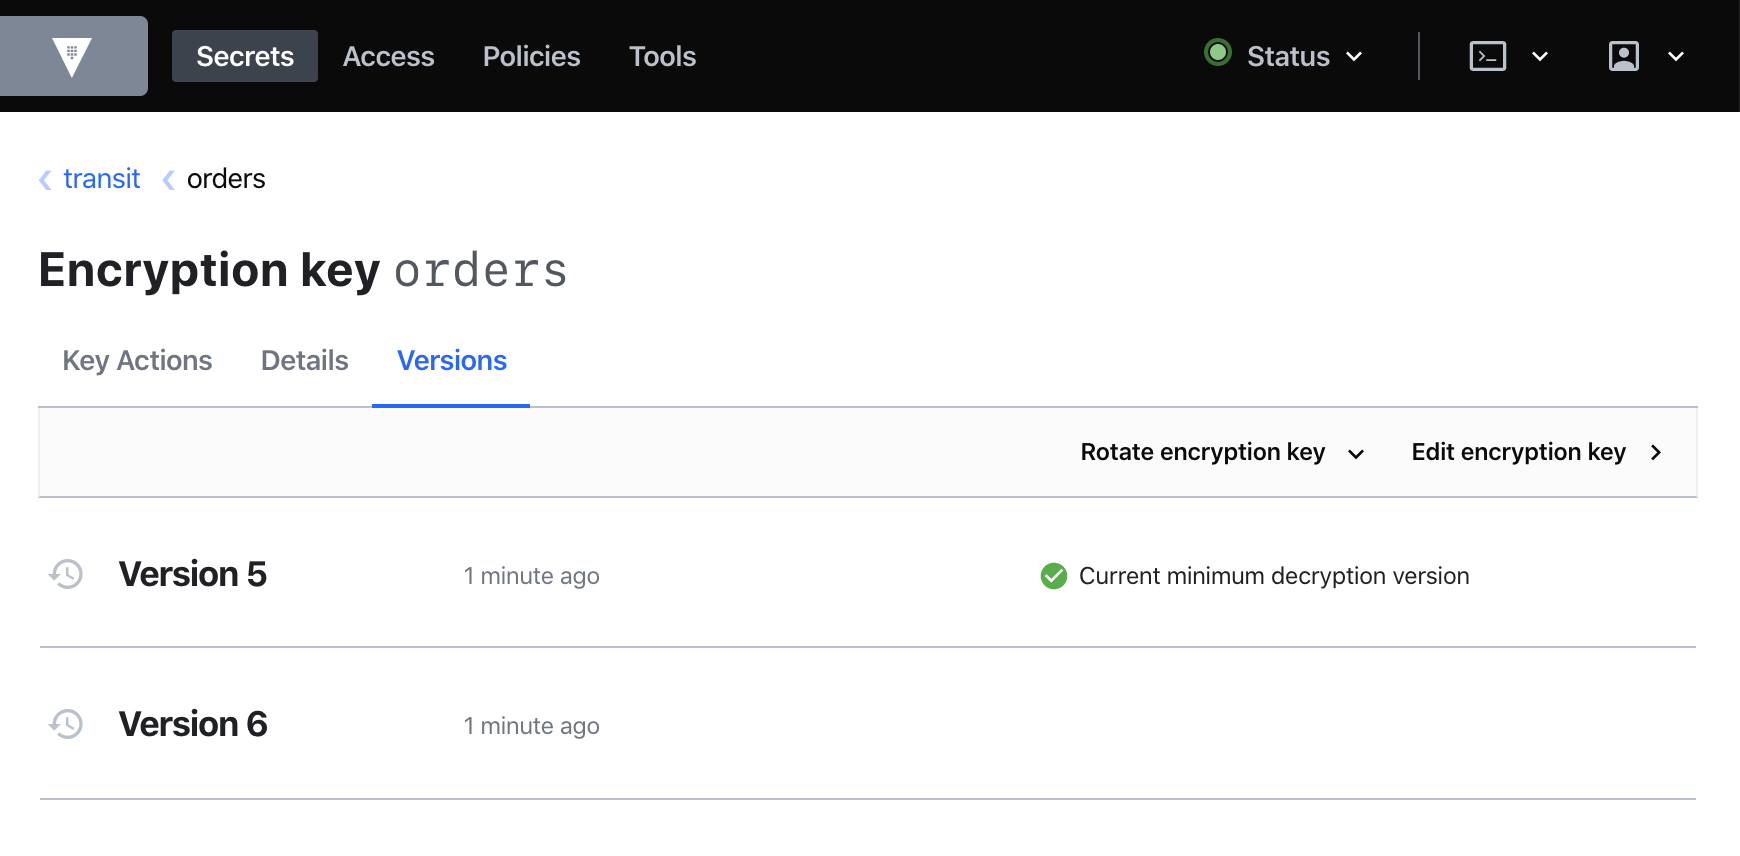
Vault maintains the versioned keyring and the admin can decide the minimum version allowed for decryption operations. When data is encrypted using Vault, the resulting ciphertext is prepended by the version of the key used to encrypt it.
To rotate the encryption key, invoke the
transit/keys/<key_ring_name>/rotateendpoint. In this tutorial, the key ring name isorders.$ vault write -f transit/keys/orders/rotate Success! Data written to: transit/keys/orders/rotateEncrypt the data with the new key.
$ vault write transit/encrypt/orders plaintext=$(base64 <<< "4111 1111 1111 1111") Key Value --- ----- ciphertext vault:v2:rmFFvJTbSu7+6a75SIUOfeBlhaF0Y7ImDk7PJHTLSI2AB5A48TjMp+bb68N1874V key_version 2Compare the ciphertext from the encrypt secrets step.
Version 1:
ciphertext vault:v1:cZNHVx+sxdMErXRSuDa1q/pz49fXTn1PScKfhf+PIZPvy8xKfkytpwKcbC0fF2U=Version 2:
ciphertext vault:v2:rmFFvJTbSu7+6a75SIUOfeBlhaF0Y7ImDk7PJHTLSI2AB5A48TjMp+bb68N1874VNotice that the first ciphertext starts with "
vault:v1:". After rotating the encryption key, the ciphertext starts with "vault:v2:". This indicates that the data is encrypted using the latest version of the key after the rotation.Rewrap your ciphertext from the encrypt secrets step with the latest version of the encryption key.
$ vault write transit/rewrap/orders \ ciphertext=$CIPHERTEXTExample output:
Key Value --- ----- ciphertext vault:v2:gHkxylYrff4TNbKIpQ/fDPmplwyqirxFtzBror+NigmlX1JKkX6gH3LzkXB/AACJ key_version 2Notice that the resulting ciphertext now starts with "
vault:v2:".This operation does not reveal the plaintext data. But Vault will decrypt the value using the appropriate key in the keyring and then encrypt the resulting plaintext with the newest key in the keyring.
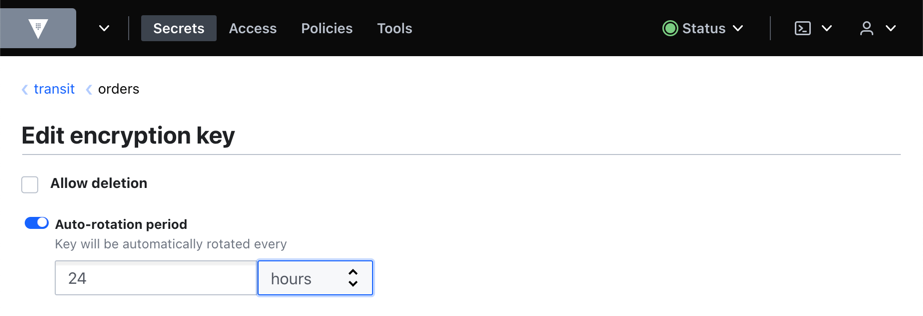
Automatic key rotation
Instead of rotating the key manually, you can configure Vault to automatically rotate the encryption key at a user-defined time interval.
Read the
orderskey information.$ vault read transit/keys/ordersExample output:
Key Value --- ----- allow_plaintext_backup false auto_rotate_period 0s deletion_allowed false derived false exportable false imported_key false keys map[1:1686228409 2:1686230400] latest_version 2 ...snip...The
auto_rotate_periodparameter configures the amount of time the key should live before being automatically rotated. A value of 0 (default) disables automatic rotation for the key.Configure automatic rotation for the
orderskey every 24 hours.$ vault write transit/keys/orders/config auto_rotate_period=24h Success! Data written to: transit/keys/orders/configRead the
orderskey information again.$ vault read transit/keys/ordersExample output:
Key Value --- ----- allow_plaintext_backup false auto_rotate_period 24h deletion_allowed false derived false exportable false imported_key false keys map[1:1686228409 2:1686230400] latest_version 2 ...snip...Vault will automatically rotate the
orderskey every 24 hours.
Update key configuration
(Persona: admin)
Vault admins can update the encryption key configuration to specify the minimum version of ciphertext allowed to be decrypted, the minimum version of the key that can be used to encrypt the plaintext, or if the key is allowed to be deleted.
Allowing Vault admins to manage the data encryption key rules strengthens the safety of the encrypted data.
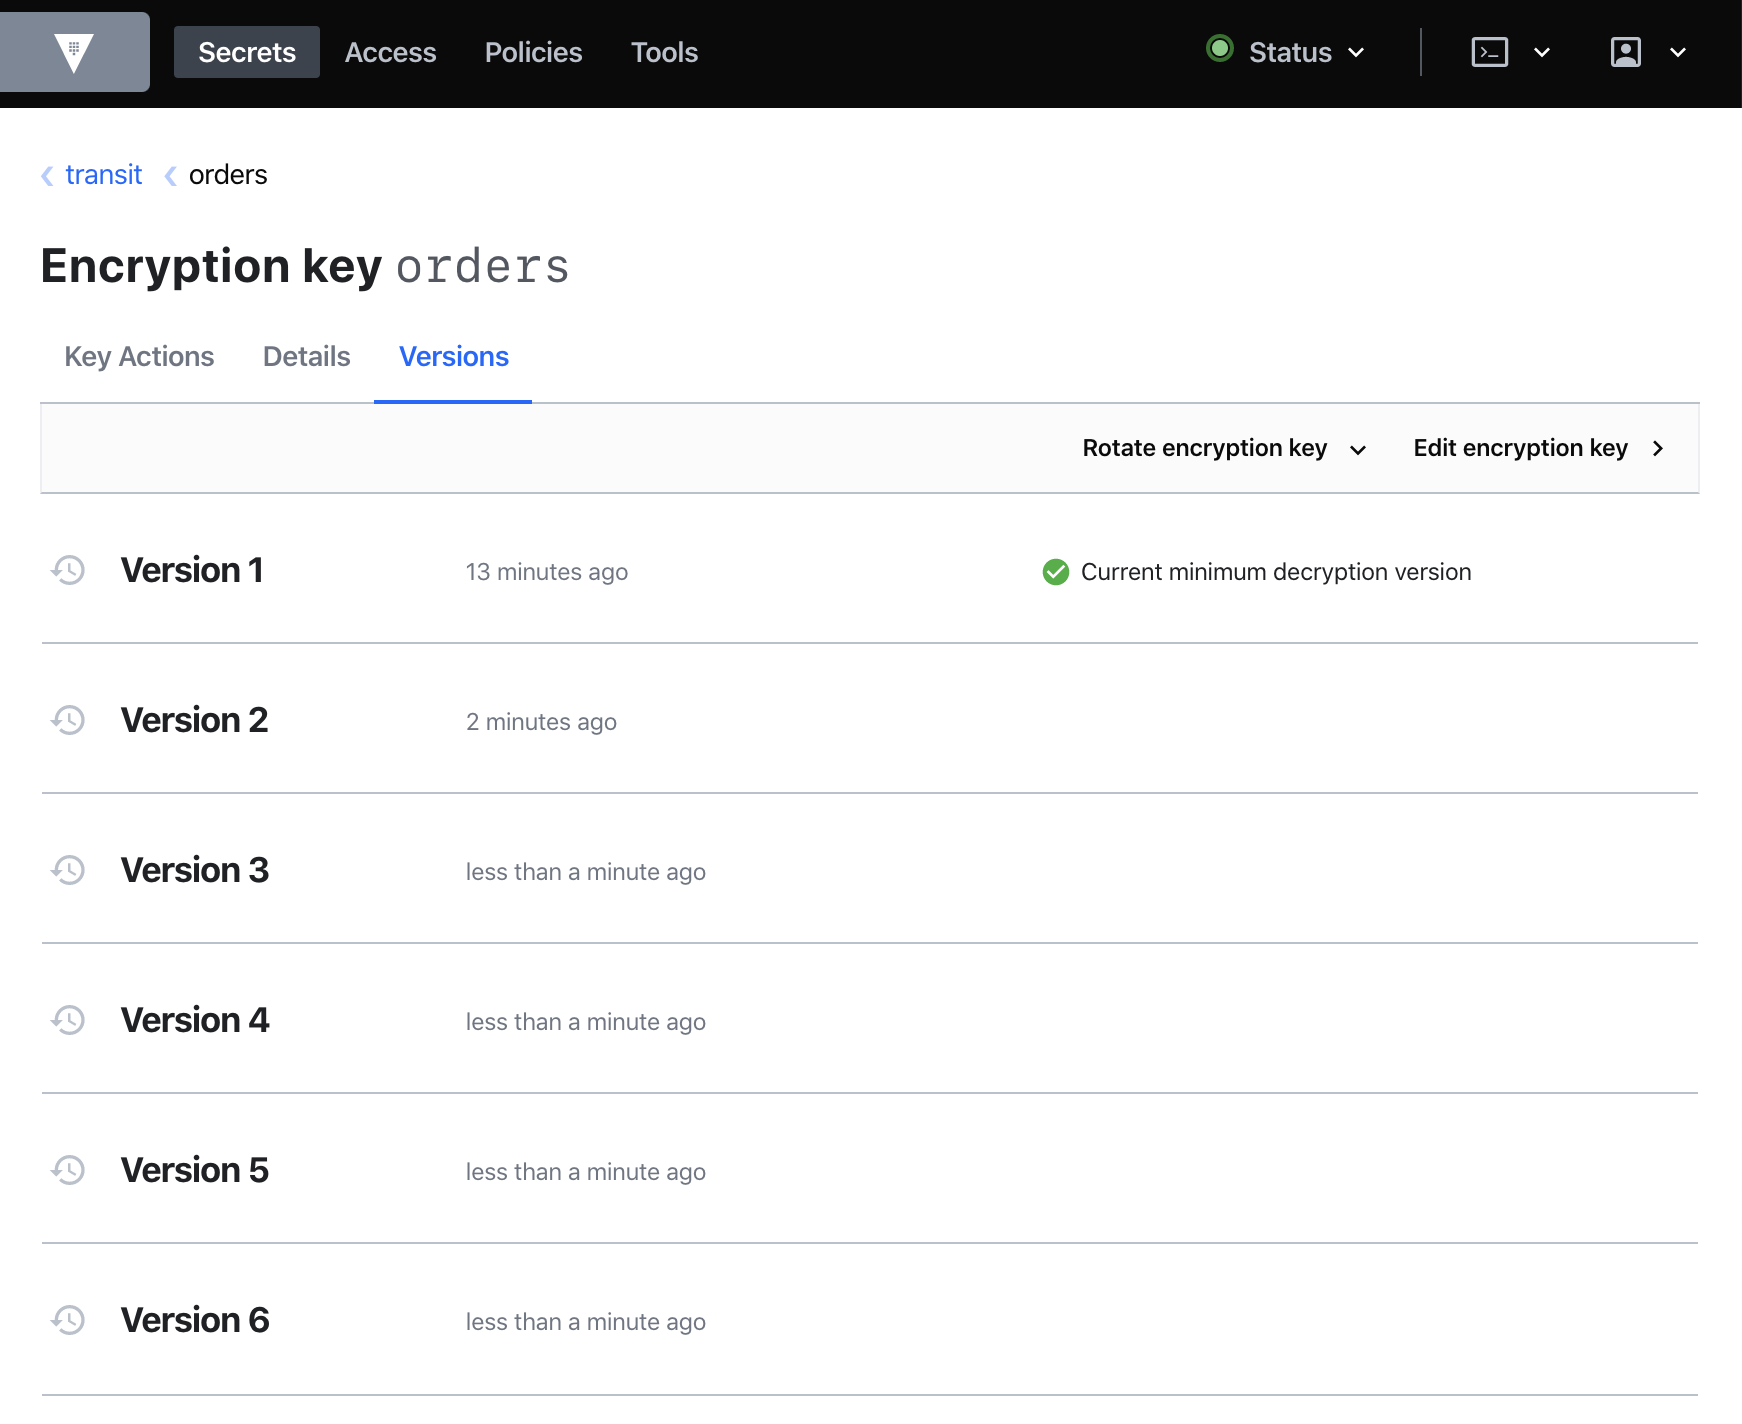
Execute the key rotation command three times to generate multiple versions of the key.
$ vault write -f transit/keys/orders/rotate Success! Data written to: transit/keys/orders/rotateRead the
orderskey information.$ vault read transit/keys/ordersExample output:
Key                       Value
---                       -----
allow_plaintext_backup    false
auto_rotate_period        24h
deletion_allowed          false
derived                   false
exportable                false
imported_key              false
keys                      map[1:1686228409 2:1686230400 3:1686231508 4:1686231519 5:1686231520]
latest_version            5
min_available_version     0
min_decryption_version    1
min_encryption_version    0
name                      orders
supports_decryption       true
supports_derivation       true
supports_encryption       true
supports_signing          false
type                      aes256-gcm96
In this example, the current version of the key is now
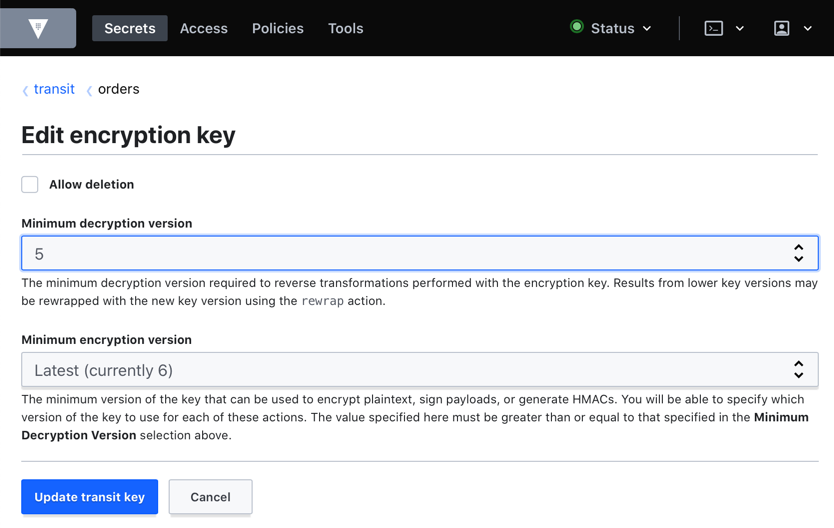
5because you previously rotated the key to version 2, then re-ran the rotate command 3 more times. However, there is no restriction about the minimum encryption key version (min_encryption_version), and any of the key versions can decrypt the data (min_decryption_version).Enforce the use of the encryption key at version
5or later to decrypt the data.$ vault write transit/keys/orders/config min_decryption_version=5 Success! Data written to: transit/keys/orders/configVerify the
orderskey configuration.$ vault read transit/keys/orders Key Value --- ----- allow_plaintext_backup false auto_rotate_period 24h deletion_allowed false derived false exportable false imported_key false keys map[5:1686231520] latest_version 5 min_available_version 0 min_decryption_version 5 min_encryption_version 0 name orders supports_decryption true supports_derivation true supports_encryption true supports_signing false type aes256-gcm96min_decryption_versionis now set to 5.
Additional discussion: generate data key
(Persona: admin)
When you encrypt your data, the encryption key used to encrypt the plaintext is
referred to as a data key. This data key needs to be protected so that your
encrypted data cannot be decrypted easily by an unauthorized party. In the encrypt
secrets step, you encrypted your data by specifying the key
ring name (orders) and the actual data key used to encrypt the data was never
presented to you.
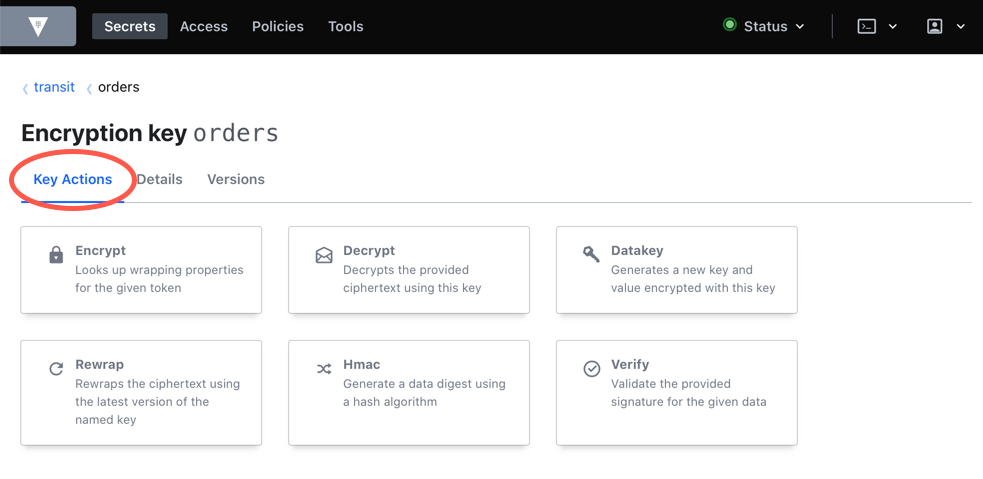
In this step, you are going to use the transit/datakey endpoint which returns
the plaintext of a named data key.
Why would I need the data key?
Consider a scenario where you have a 2GB base64 binary large object (blob) that needs to be encrypted. Sending 2GB of data over the network to Vault and receive the 2GB back introduces additional network overhead.
With the data key available locally, applications can encrypt and decrypt large datasets or objects without introducing network overhead by sending it to Vault.
The data key is its own full key; you can't decrypt it with the transit key that it is wrapped with. However, because the data key is wrapped by a transit key, and thus protected, you can store it with the data. This way, you can control which Vault clients can decrypt the data through policies.
$ vault write -f transit/datakey/plaintext/orders
Key            Value
---            -----
ciphertext     vault:v5:bEGOqiwiWG4IZqSVOy4BZBbGdCNinMYtUGeH5Zj0lcm2CP3hYmfK0NETnLYWu6WruSdXCCdBfDw6wJ9B
key_version    5
plaintext      yHBiiQ5DRq0NC87/YZb6KOx5JLxx+8tqZYit09ao+cg=
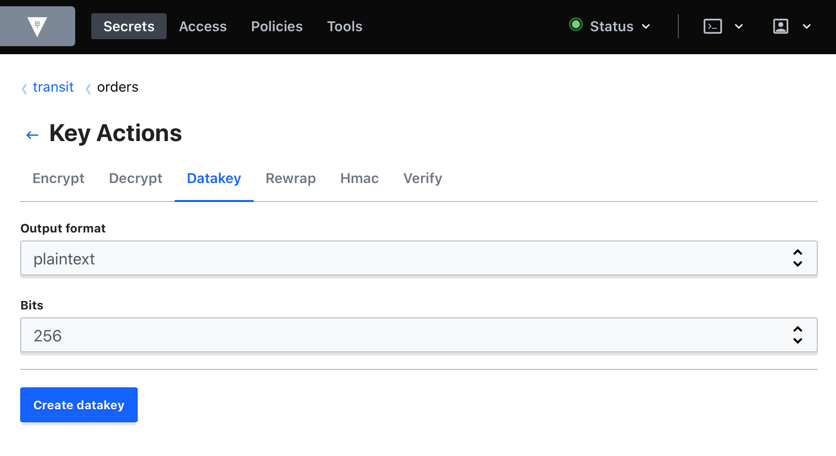
The response contains the plaintext of the data key as well as its ciphertext. Use the plaintext to encrypt your blob. Store the ciphertext of your data key wherever you want. You can even store it in the key/value secrets engine.
When you need to decrypt the blob, request Vault to decrypt the ciphertext of your data key (decrypt ciphertext) so that you can get the plaintext back to decrypt the blob locally. In other words, once your blob is encrypted, you don't have to persist the data key. You only need to keep the ciphertext version of the data key.
Additional discussion: bring your own key
(Persona: admin)
When your use case requires an external key, users of Vault version 1.11.0 or greater can use bring your own key (BYOK) functionality to import an existing encryption key that was generated outside Vault.
The target key for import can originate from an HSM or other external source, and must be prepared according to its origin before you can import it.
The example shown here will use a 256-bit AES key, referred to as the target key. To successfully import the target key, you must perform the following operations to prepare it.
Generate an ephemeral 256-bit AES key.
Wrap the target key using the ephemeral AES key with AES-KWP.
Wrap the AES key under the Vault wrapping key using RSAES-OAEP with MGF1 and either SHA-1, SHA-224, SHA-256, SHA-384, or SHA-512.
Delete the ephemeral AES key.
Append the wrapped target key to the wrapped AES key.
Base64 encode the result.
A specific code example for preparing and wrapping the key for import is beyond the scope of this tutorial. For more details about wrapping the key for import including instructions for wrapping key from an HSM, refer to the key wrapping guide.
Before you can wrap the key for import, you must read the wrapping key from Vault so that it can be used to prepare your key.
$ vault read -field=public_key transit/wrapping_key
-----BEGIN PUBLIC KEY-----
MIICIjANBgkqhkiG9w0BAQEFAAOCAg8AMIICCgKCAgEAuO1Gf6nIiD6fem4vOo96
syUFOY7aUt85QlqaJrXoxtYQ3mxiAI4MTm4Wxd3uCmFa4CHtVRaPD+VuJRvOwVlZ
qRK3R6HMsJglElVZjpFovBBjwvThUSoTqqBGK/2cTR15PxeluhwcHIUjo9gT1SKm
WSzSpfGXyNqwGLyZLGpip5FcB7p3CS9Yf77Bzxjnz66kUAqCCm0Q09lGkXyhuXWb
qNAPHPCOVaKlY4b4SpJu921stZGmIC1Ik3r78fLs6ZNthfNt7yvVQGcRKdzrjlRL
z9vv2XBllKsXJf88OWu2iMrU1ybmxPp0Is1pqaNCgGsNzkrWPDKmZIWuyCOHzleb
Tsp0AdjNU9K36AD5x+jztoEGYMumPDZwhzF9WzcyfGNroy2LonXUdza305BhBCKE
Cw+rwchXLxDk9mqz8mJ4cmTvVA+c30dF1a89YReb4NLXVKNbG7VcoO2tgmnioBOj
CUQhmpxLnvKZJ38QKpQzhqHnzOK72K5v3paOyqicPWQDBHhup6UL4+mB+0vfFESH
rhkA0OGqYWEDf9QQ41toafNyuHZtGmzuD1MDBbKTemvhGYL7Gvv6H2UadFBr8Mcz
BLi5V8j/QEjdt+jZ6ZGtIlFZSjLkaKTeqyq2pTLldyuRzm4vBDZ46+dS4whfrFMm
/yg0pLHOE8ItLIqwq4vojscCAwEAAQ==
-----END PUBLIC KEY-----
The output is the (4096-bit RSA) wrapping key.
Use the wrapping key value at step 3 in the previously detailed preparation steps. Once you have prepared and base64 encoded the ciphertext, export the value to the environment variable IMPORT_CIPHERTEXT.
Example:
$ export IMPORT_CIPHERTEXT=Q3Pf4qcMzWrq1BS4OKUfAIpZ4b3IXta68Rc4AuodE+S9JiCr2+OqemaU3OFPleeDTfY8jF1VykqE3DLwzrlD0qlvqg+AiVjOLnBRCf6hFtDM3DrncXZalSlKEyAxWQAt1ZtgccXK6Sje+j4+OchAM+FRNojhMgxTbYYY2zbJZpVH7Qqr9Sd6ypsD0k+RsGUncW3tvjUlea1u0Yvaj4buRlrEKs5W4bLzo8VSsfwporVyC764Xrk9D0sR3PFp0BcIzVEfklhYugUIXHtwdOVLRbtdKGzSeUSY6epS5br6BkLQLsoMEUToSZKo6RhgzS+6uoa6OjO0WsR2KoEjfzuW2VAZSZTDlbCCe+87TDgPBQO/tUm+BdXPh0JOSjJ/DuIbIH6iwkVhKwS/EJrEna88FbwGg8rLVmiVGicrHWTNyoGSnfTyzLza8zkTINlX23k++SMcFnhakFjSJq/jJp8jTjqZyqXzZIL4Bz9GFfhCL2cGBhIAAwvYrUEqEJeaYPtXkoyC8O/86qEvHnEpW1SpC/juWKMAxjQ2cYY2JPMIuote3Ihz+JEFItQSwi0dpoECRKTNdnoPVw3rbHcoffd5xO7vvUB9nObNA/nZ+s+iTcxZmRlbBda4fNRLzzKyrqMxWkb7HBQ7a0L8S0Nmmqah0993Qrbym8E7vz0QgS9TUqZDFtA6meUKy0I+f9+z+907TsS5U9XHhlJRPL6nvv7PDX+X6doPrjYS
Import the key into a key named biometric-reader. Imported keys do not support rotation by default, so include the allow_rotation parameter and set its value to true so that you can also try rotating the imported key.
$ vault write transit/keys/biometric-reader/import \
    ciphertext=$IMPORT_CIPHERTEXT allow_rotation=true
Output:
Success! Data written to: transit/keys/biometric-reader/import
Try using the newly imported key to encrypt some data.
$ vault write transit/encrypt/biometric-reader plaintext=$(base64 <<< "secret biometric data")
Key            Value
---            -----
ciphertext     vault:v1:G0G2+vFOE5RLLmXtVAmk2Xdl9y8Wti/iYe1mwBieHzCIpI03M5MyWX6JbE9JPiJyGF0=
key_version    1
The imported key is working, and the plaintext value was encrypted and returned as the value of the ciphertext field.
Let's take a look a the key information.
$ vault read transit/keys/biometric-reader
Key                            Value
---                            -----
allow_plaintext_backup         false
auto_rotate_period             0s
deletion_allowed               false
derived                        false
exportable                     false
imported_key                   true
imported_key_allow_rotation    true
keys                           map[1:1665164440]
latest_version                 1
min_available_version          0
min_decryption_version         1
min_encryption_version         0
name                           biometric-reader
supports_decryption            true
supports_derivation            true
supports_encryption            true
supports_signing               false
type                           aes256-gcm96
The key's latest_version is currently 1.
Rotate the key.
$ vault write -force transit/keys/biometric-reader/rotate
Success! Data written to: transit/keys/biometric-reader/rotate
Check the key information once more.
$ vault read transit/keys/biometric-reader
Key                       Value
---                       -----
allow_plaintext_backup    false
auto_rotate_period        0s
deletion_allowed          false
derived                   false
exportable                false
imported_key              false
keys                      map[1:1665164440 2:1665165083]
latest_version            2
min_available_version     0
min_decryption_version    1
min_encryption_version    0
name                      biometric-reader
supports_decryption       true
supports_derivation       true
supports_encryption       true
supports_signing          false
type                      aes256-gcm96
The key's latest_version is currently 2, and you can no longer import external versions of the key as it is now internally maintained by Vault.
Clean up
Unset the
VAULT_TOKENenvironment variable.$ unset VAULT_TOKENUnset the
VAULT_ADDRenvironment variable.$ unset VAULT_ADDRUnset the
VAULT_NAMESPACEenvironment variable.$ unset VAULT_NAMESPACEUnset the
APP_ORDER_TOKENenvironment variable.$ unset APP_ORDER_TOKENUnset the
IMPORT_CIPHERTEXTenvironment variable.$ unset IMPORT_CIPHERTEXTYou can stop the Vault dev server by pressing Ctrl+C where the server is running. Or, execute the following command.
$ pgrep -f vault | xargs kill