Automate Terraform with GitHub Actions
GitHub Actions add continuous integration to GitHub repositories to automate your software builds, tests, and deployments. Automating Terraform with CI/CD enforces configuration best practices, promotes collaboration, and automates the Terraform workflow.
HashiCorp provides GitHub Actions that integrate with the HCP Terraform API. These actions let you create your own custom CI/CD workflows to meet the needs of your organization.
In this tutorial, you will use HashiCorp's HCP Terraform GitHub Actions to create a complete Actions workflow to deploy a publicly accessible web server within an HCP Terraform workspace.

The workflow will:
- Generate a plan for every commit to a pull request branch, which you can review in HCP Terraform.
- Apply the configuration when you update the
mainbranch.
After configuring the GitHub Action, you will create and merge a pull request to test the workflow.
HCP Terraform's built-in support for GitHub webhooks can accomplish this generic workflow. However, by using HashiCorp's HCP Terraform GitHub Actions, you can create a custom workflow with additional steps before or after your Terraform operations.
Prerequisites
This tutorial assumes that you are familiar with the Terraform and HCP Terraform workflows. If you are new to Terraform, complete the Get Started tutorials first. If you are new to HCP Terraform, complete the HCP Terraform Get Started tutorials first.
For this tutorial, you will need:
Create an HCP Terraform team token
Navigate to your organization's settings page and click Teams. Click Create a team and specify GitHub Actions in the Team name field. Leave all permissions set to their default values.
Next, navigate to the API tokens page in your organization's settings, click Team Tokens, and then click Create a team token.
Choose your GitHub Actions team, leave the Expiration set to the default value of 30 days, then click Create.
Save this token in a safe place. You will add it to GitHub later as a secret, so the Actions workflow can authenticate to HCP Terraform.
Create the HCP Terraform workspace
The GitHub Action you create will connect to HCP Terraform to plan and apply your configuration. Before you set up the Actions workflow, you must create a workspace and add your AWS credentials as workspace variables.
First, create a new HCP Terraform workspace named learn-terraform-github-actions.
Go to the Create a new Workspace page and select API-driven workflow.
Name your workspace learn-terraform-github-actions and click Create workspace.
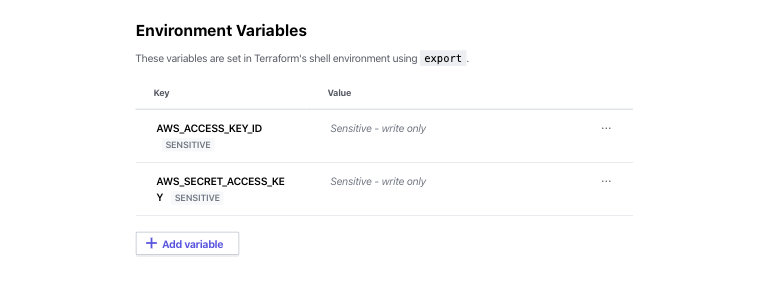
Now, find the AWS credentials you want to use for the workspace, or create a new key pair in the IAM console. On your workspace's overview page click Variables in the left navigation bar. Then, add the following as Environment Variables for your learn-terraform-github-actions workspace.
| Type | Variable name | Description | Sensitive |
|---|---|---|---|
| Environment variable | AWS_ACCESS_KEY_ID | The access key ID from your AWS key pair | No |
| Environment variable | AWS_SECRET_ACCESS_KEY | The secret access key from your AWS key pair | Yes |
HCP Terraform will use these credentials to authenticate to AWS.
Next, give your GitHub Actions team permission to run plan and apply runs in this workspace. Navigate to the workspace's Settings page, click Team Access, then click Add team and permissions.
On the next page, choose GitHub Actions from the Team dropdown, choose the Write permission group, then click Update permissions.
Set up a GitHub repository
In your browser, navigate to the Learn Terraform GitHub Actions template repository.
Select Use this template, then select Create a new repository.
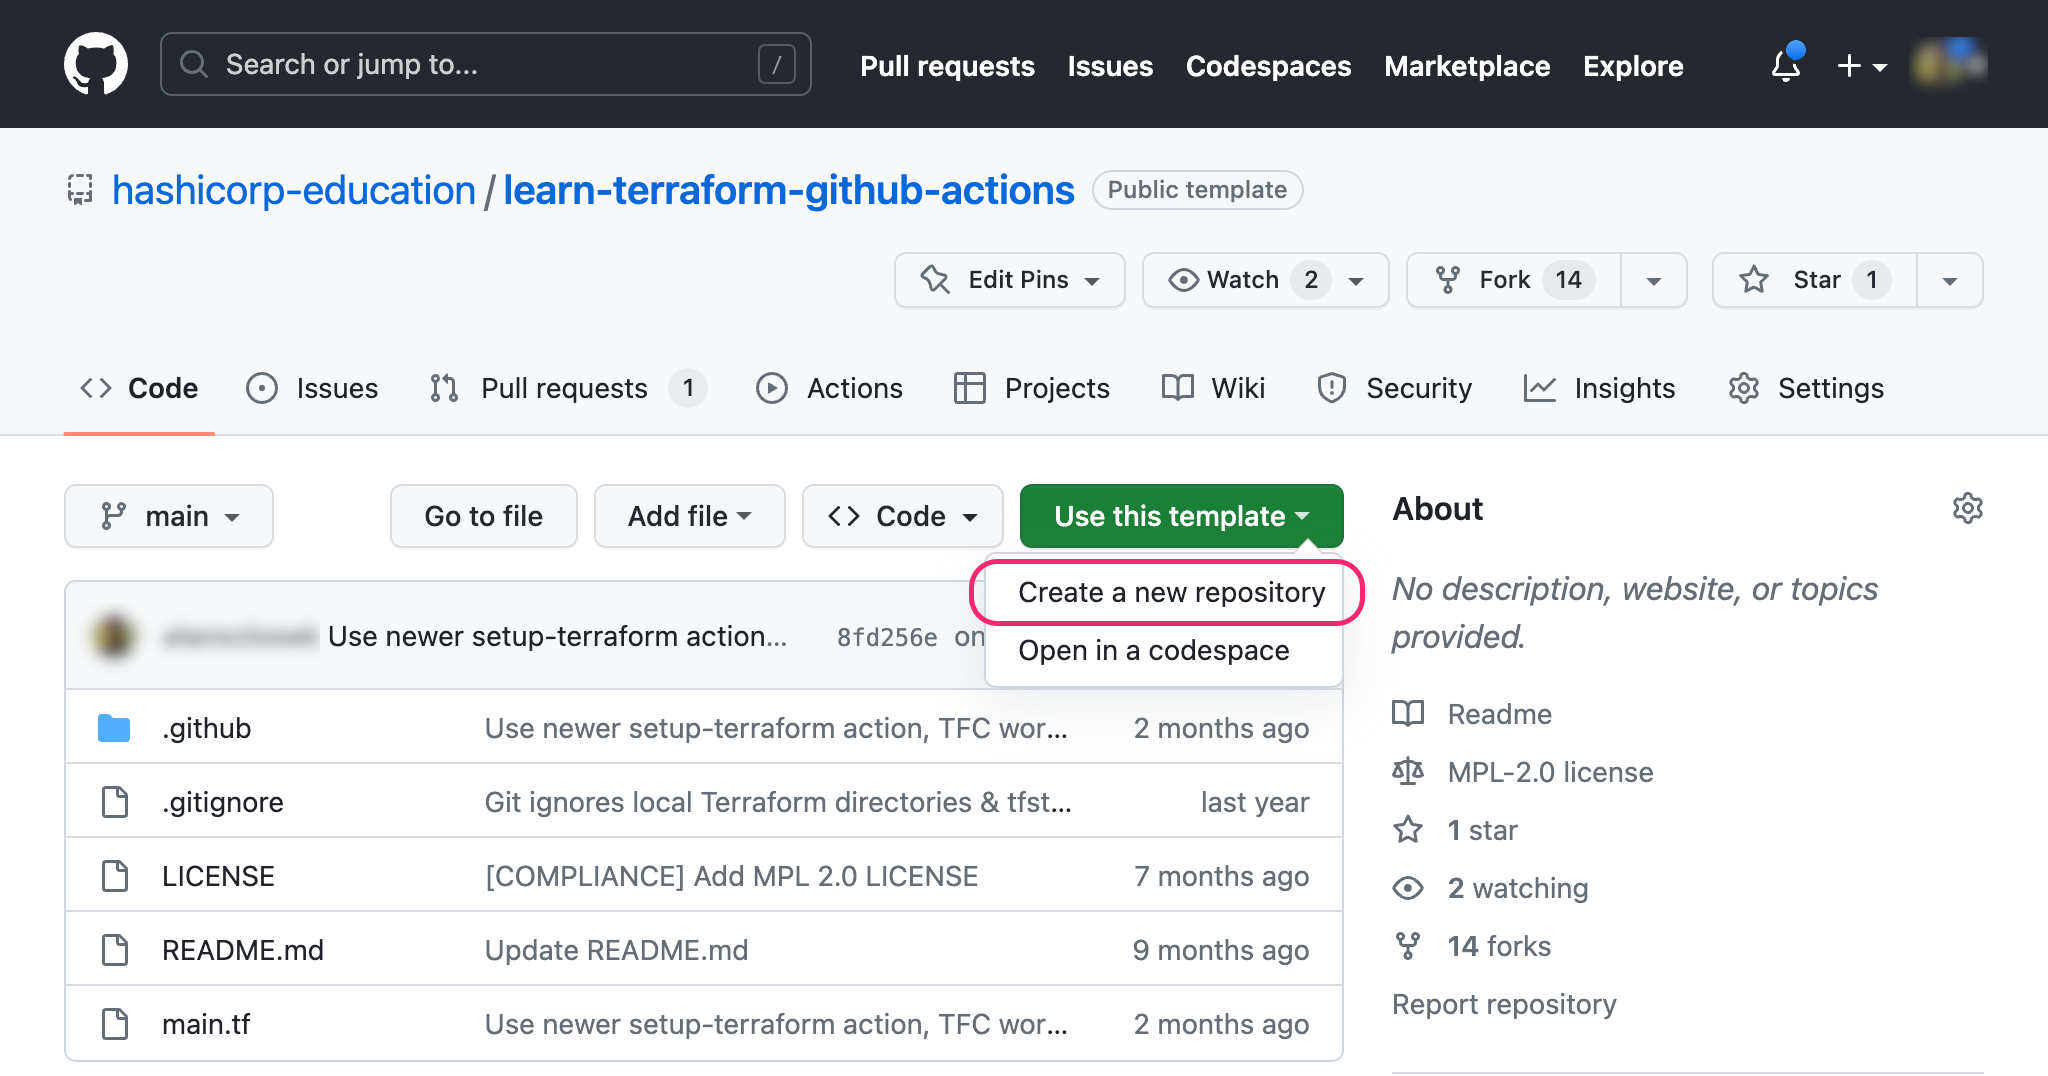
In the Owner dropdown, select your personal GitHub account.
Next, enter learn-terraform-github-actions as the Repository name.
Finally, select Public and click Create repository from template.
In your new repository, navigate to the Settings page. Open the Secrets and variables menu, then select Actions.
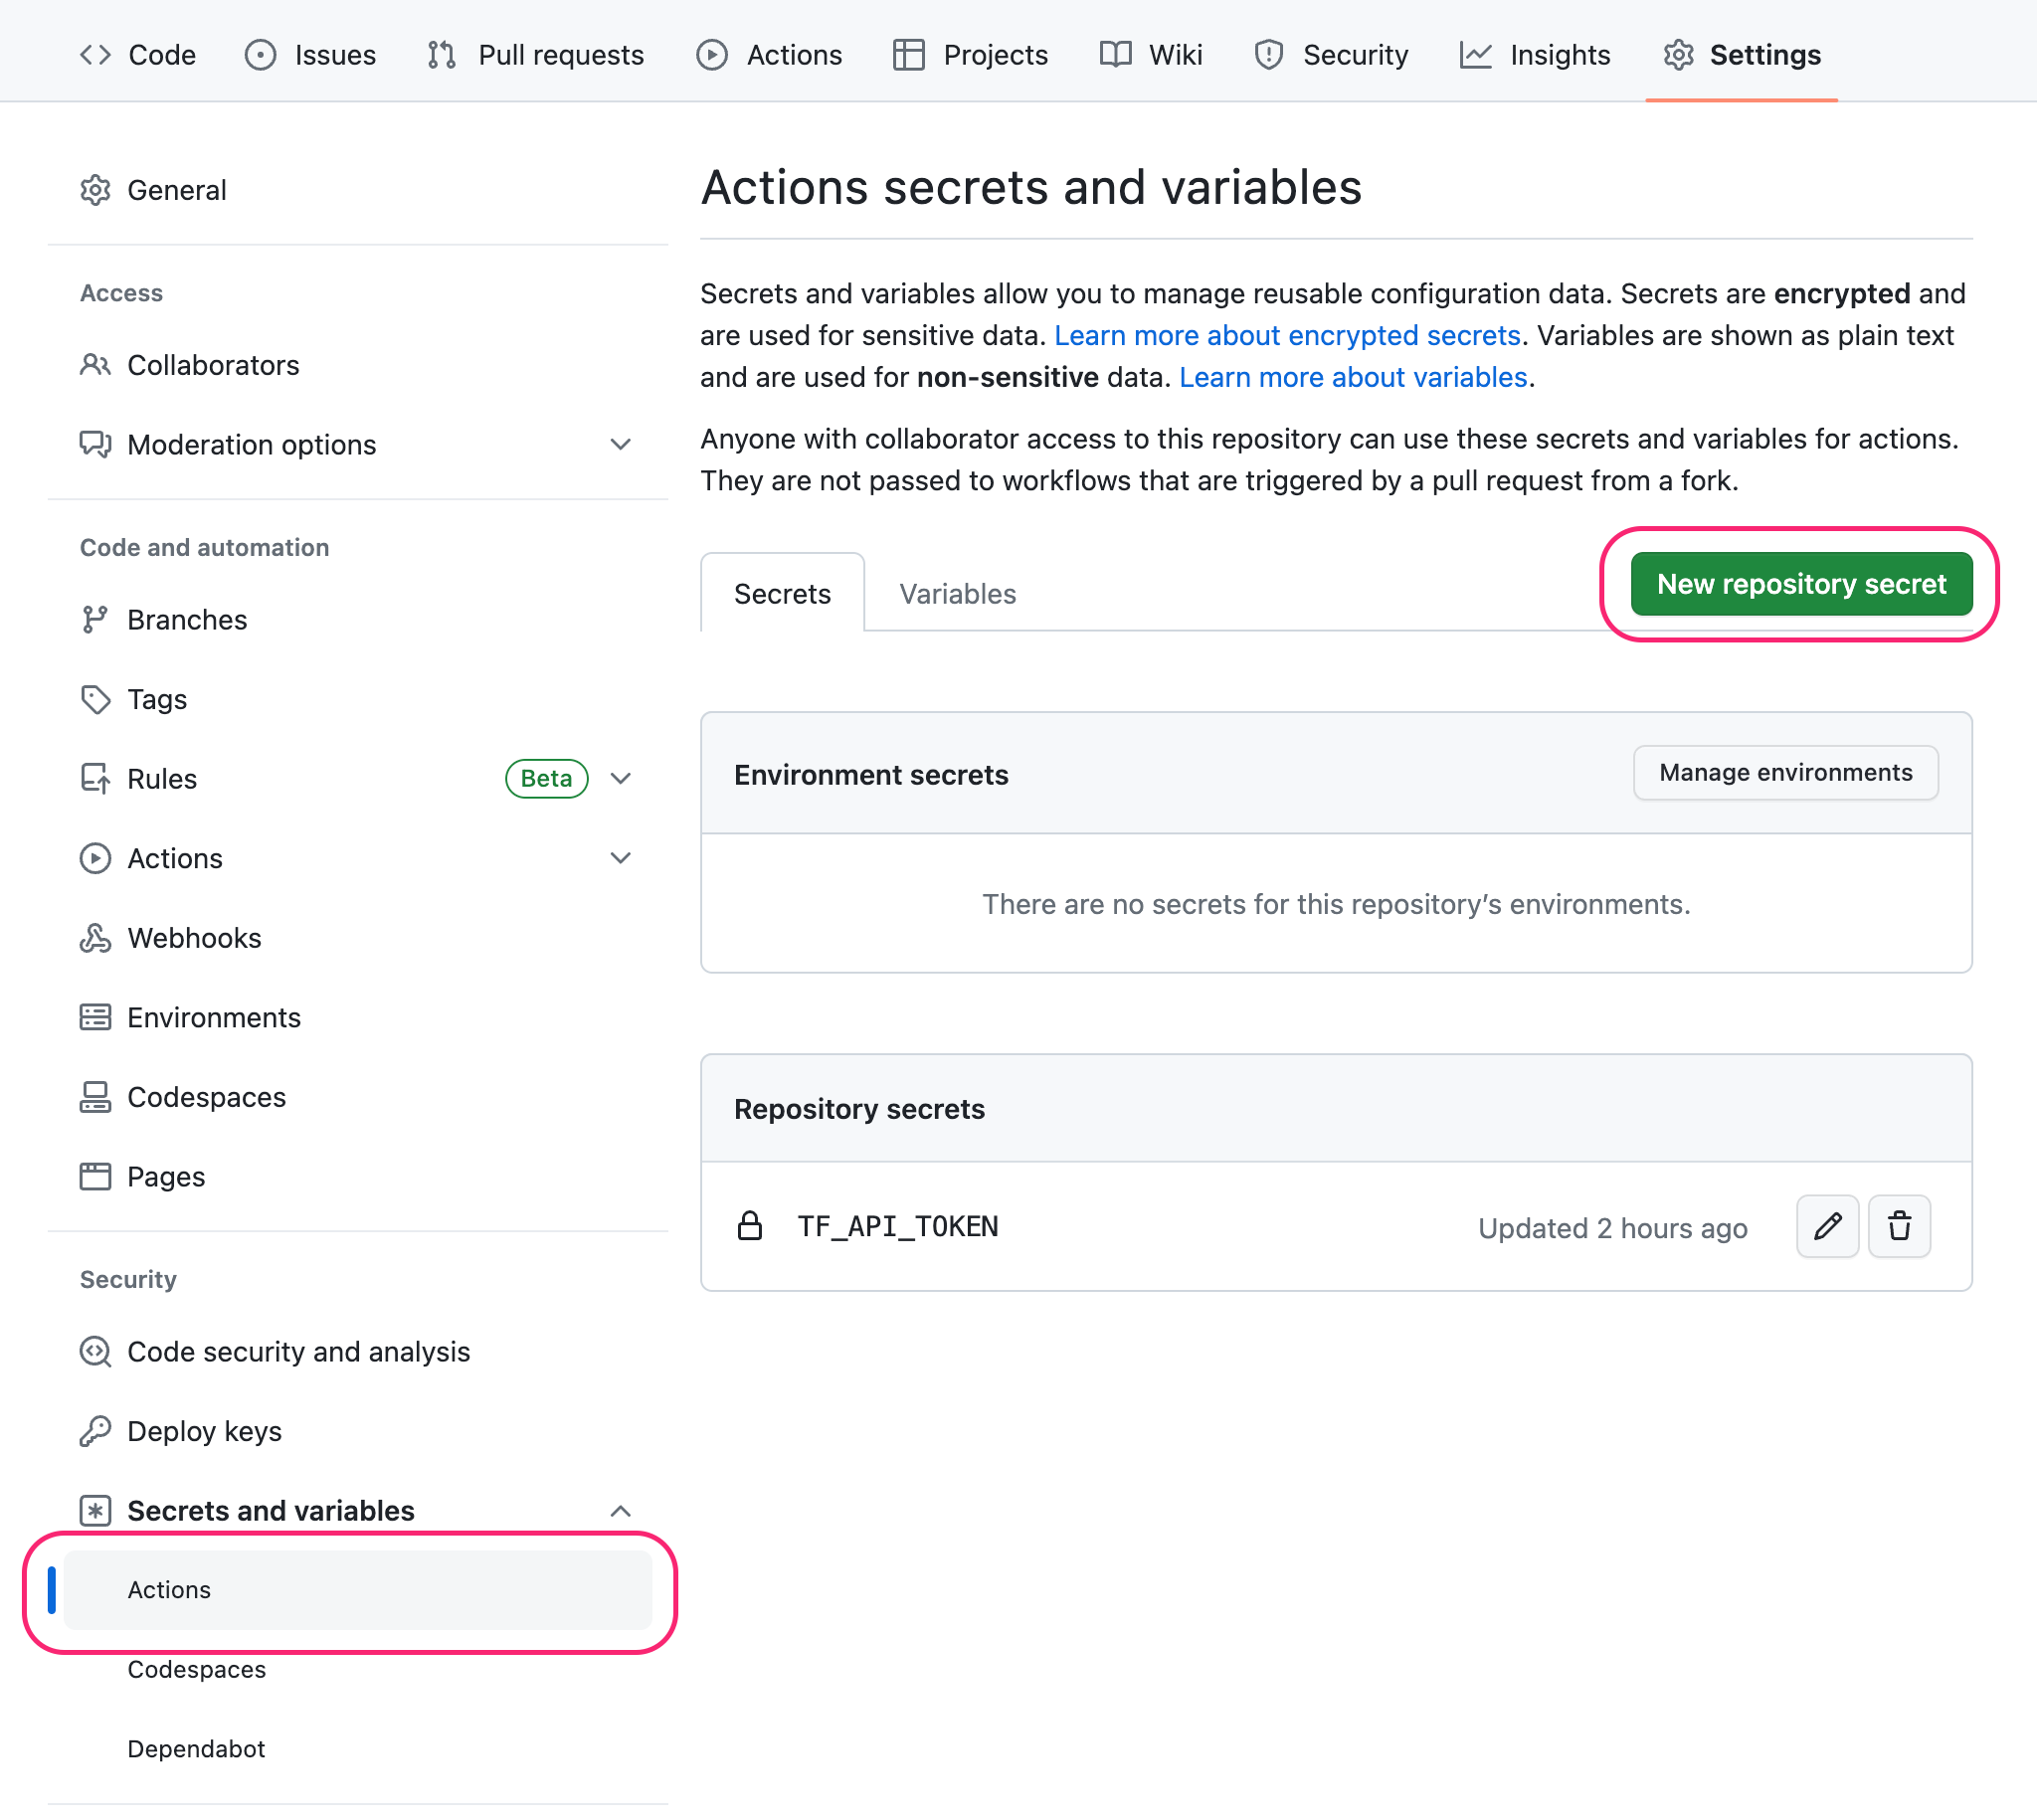
Now, select New repository secret. Create a secret named TF_API_TOKEN, setting the HCP Terraform API token you created in the previous step as the value.
Then, clone your forked repository to your local machine. Remember to replace YOUR-USER-NAME with your GitHub username if you are using the command below.
$ git clone git@github.com:YOUR-USER-NAME/learn-terraform-github-actions
Review Actions workflows
There are several files in your local repository.
main.tfcontains Terraform configuration to deploy a publicly accessible EC2 instance..github/workflows/terraform-plan.ymldefines the Actions workflow that runs Terraform plan..github/workflows/terraform-apply.ymldefines the Actions workflow that runs Terraform apply.
Review Terraform plan workflow
In your editor, open .github/workflows/terraform-plan.yml.
The first line defines the name of the Actions workflow.
.github/workflows/terraform-plan.yml
name: 'Terraform Plan'
## ...
Next, the configuration states that this workflow should only run on pull requests. It also defines environment variables used by the workflow.
.github/workflows/terraform-plan.yml
## ...
on:
  pull_request:

env:
  TF_CLOUD_ORGANIZATION: "YOUR-ORGANIZATION-HERE"
  TF_API_TOKEN: "${{ secrets.TF_API_TOKEN }}"
  TF_WORKSPACE: "learn-terraform-github-actions"
  CONFIG_DIRECTORY: "./"
## ...
Replace YOUR-ORGANIZATION-HERE with the name of your HCP Terraform organization and save the file.
Then, the configuration defines a terraform job, and grants the workflow permission to read the repository contents and write to pull requests.
.github/workflows/terraform-plan.yml
## ...
jobs:
  terraform:
    if: github.repository != 'hashicorp-education/learn-terraform-github-actions'
    name: "Terraform Plan"
    runs-on: ubuntu-latest
    permissions:
      contents: read
      pull-requests: write
    steps:
## ...
The workflow defines several steps.
Checkout checks out the repository. Uses defines the GitHub action or Docker image to run that specific step. The checkout step uses GitHub's
actions/checkout@v3action..github/workflows/terraform-plan.yml
## ...
- name: Checkout
  uses: actions/checkout@v3
## ...
Upload Configuration uploads the Terraform configuration to HCP Terraform and marks it as speculative so it cannot modify infrastructure.
.github/workflows/terraform-plan.yml
## ...
- name: Upload Configuration
  uses: hashicorp/tfc-workflows-github/actions/upload-configuration@v1.0.0
  id: plan-upload
  with:
    workspace: ${{ env.TF_WORKSPACE }}
    directory: ${{ env.CONFIG_DIRECTORY }}
    speculative: true
## ...
Create Plan Run creates a speculative plan run in HCP Terraform using the configuration uploaded in the previous step.
.github/workflows/terraform-plan.yml
## ...
- name: Create Plan Run
  uses: hashicorp/tfc-workflows-github/actions/create-run@v1.0.0
  id: plan-run
  with:
    workspace: ${{ env.TF_WORKSPACE }}
    configuration_version: ${{ steps.plan-upload.outputs.configuration_version_id }}
    plan_only: true
## ...
Get Plan Output extracts the plan output from the speculative run.
.github/workflows/terraform-plan.yml
## ...
- name: Get Plan Output
  uses: hashicorp/tfc-workflows-github/actions/plan-output@v1.0.0
  id: plan-output
  with:
    plan: ${{ fromJSON(steps.plan-run.outputs.payload).data.relationships.plan.data.id }}
## ...
Update PR adds a comment to the pull request with a link to the run in HCP Terraform. It also removes any previous comments added by this workflow.
.github/workflows/terraform-plan.yml
## ...
- name: Update PR
  uses: actions/github-script@v6
  id: plan-comment
  with:
    github-token: ${{ secrets.GITHUB_TOKEN }}
    script: |
      // 1. Retrieve existing bot comments for the PR
      const { data: comments } = await github.rest.issues.listComments({
        owner: context.repo.owner,
        repo: context.repo.repo,
        issue_number: context.issue.number,
      });
      const botComment = comments.find(comment => {
        return comment.user.type === 'Bot' && comment.body.includes('HCP Terraform Plan Output')
      });
      const output = `#### HCP Terraform Plan Output
          \`\`\`
          Plan: ${{ steps.plan-output.outputs.add }} to add, ${{ steps.plan-output.outputs.change }} to change, ${{ steps.plan-output.outputs.destroy }} to destroy.
          \`\`\`
          [HCP Terraform Plan](${{ steps.plan-run.outputs.run_link }})
          `;
      // 3. Delete previous comment so PR timeline makes sense
      if (botComment) {
        github.rest.issues.deleteComment({
          owner: context.repo.owner,
          repo: context.repo.repo,
          comment_id: botComment.id,
        });
      }
      github.rest.issues.createComment({
        issue_number: context.issue.number,
        owner: context.repo.owner,
        repo: context.repo.repo,
        body: output
      });
Review Terraform apply workflow
In your editor, open .github/workflows/terraform-apply.yml.
The first line defines the name of the Actions workflow.
.github/workflows/terraform-apply.yml
name: 'Terraform Apply'
## ...
Next, the configuration states that this workflow should only run on pushes to the main branch, which includes Pull Request merges to main. It also defines environment variables used by the workflow.
.github/workflows/terraform-apply.yml
## ...
on:
  push:
    branches:
      - main

env:
  TF_CLOUD_ORGANIZATION: "YOUR-ORGANIZATION-HERE"
  TF_API_TOKEN: "${{ secrets.TF_API_TOKEN }}"
  TF_WORKSPACE: "learn-terraform-github-actions"
  CONFIG_DIRECTORY: "./"
## ...
Replace YOUR-ORGANIZATION-HERE with the name of your HCP Terraform organization and save the file.
Then, the configuration defines a terraform job, and grants the workflow permission to read the repository contents.
.github/workflows/terraform-apply.yml
## ...
jobs:
  terraform:
    if: github.repository != 'hashicorp-education/learn-terraform-github-actions'
    name: "Terraform Apply"
    runs-on: ubuntu-latest
    permissions:
      contents: read
    steps:
## ...
The workflow defines several steps.
Checkout checks out the current configuration. Uses defines the action/Docker image to run that specific step. The checkout step uses GitHub's
actions/checkout@v3action..github/workflows/terraform-apply.yml
## ...
- name: Checkout
  uses: actions/checkout@v3
## ...
Upload Configuration uploads the Terraform configuration to HCP Terraform.
.github/workflows/terraform-apply.yml
## ...
- name: Upload Configuration
  uses: hashicorp/tfc-workflows-github/actions/upload-configuration@v1.0.0
  id: apply-upload
  with:
    workspace: ${{ env.TF_WORKSPACE }}
    directory: ${{ env.CONFIG_DIRECTORY }}
## ...
Create Apply Run creates a Terraform apply run using the configuration uploaded in the previous step.
.github/workflows/terraform-apply.yml
## ...
- name: Create Apply Run
  uses: hashicorp/tfc-workflows-github/actions/create-run@v1.0.0
  id: apply-run
  with:
    workspace: ${{ env.TF_WORKSPACE }}
    configuration_version: ${{ steps.apply-upload.outputs.configuration_version_id }}
## ...
Apply confirms and applies the run.
.github/workflows/terraform-apply.yml
## ...
- name: Apply
  uses: hashicorp/tfc-workflows-github/actions/apply-run@v1.0.0
  if: fromJSON(steps.apply-run.outputs.payload).data.attributes.actions.IsConfirmable
  id: apply
  with:
    run: ${{ steps.apply-run.outputs.run_id }}
    comment: "Apply Run from GitHub Actions CI ${{ github.sha }}"
Create pull request
Create a new branch in your forked repository named update-tfc-org.
$ git checkout -b 'update-tfc-org'
Now commit the org name changes you made to the workflow files.
$ git add .github/workflows
Commit these changes with a message.
$ git commit -m 'Use our HCP Terraform organization'
Push these changes.
$ git push origin update-tfc-org
Next, open a pull request from the update-tfc-org branch. From the base drop-down, choose the main branch.
Review and merge pull request
Navigate to your pull request. Your PR will trigger the Terraform Plan Actions workflow. When the workflow completes, it will add a comment with a link to the speculative plan.
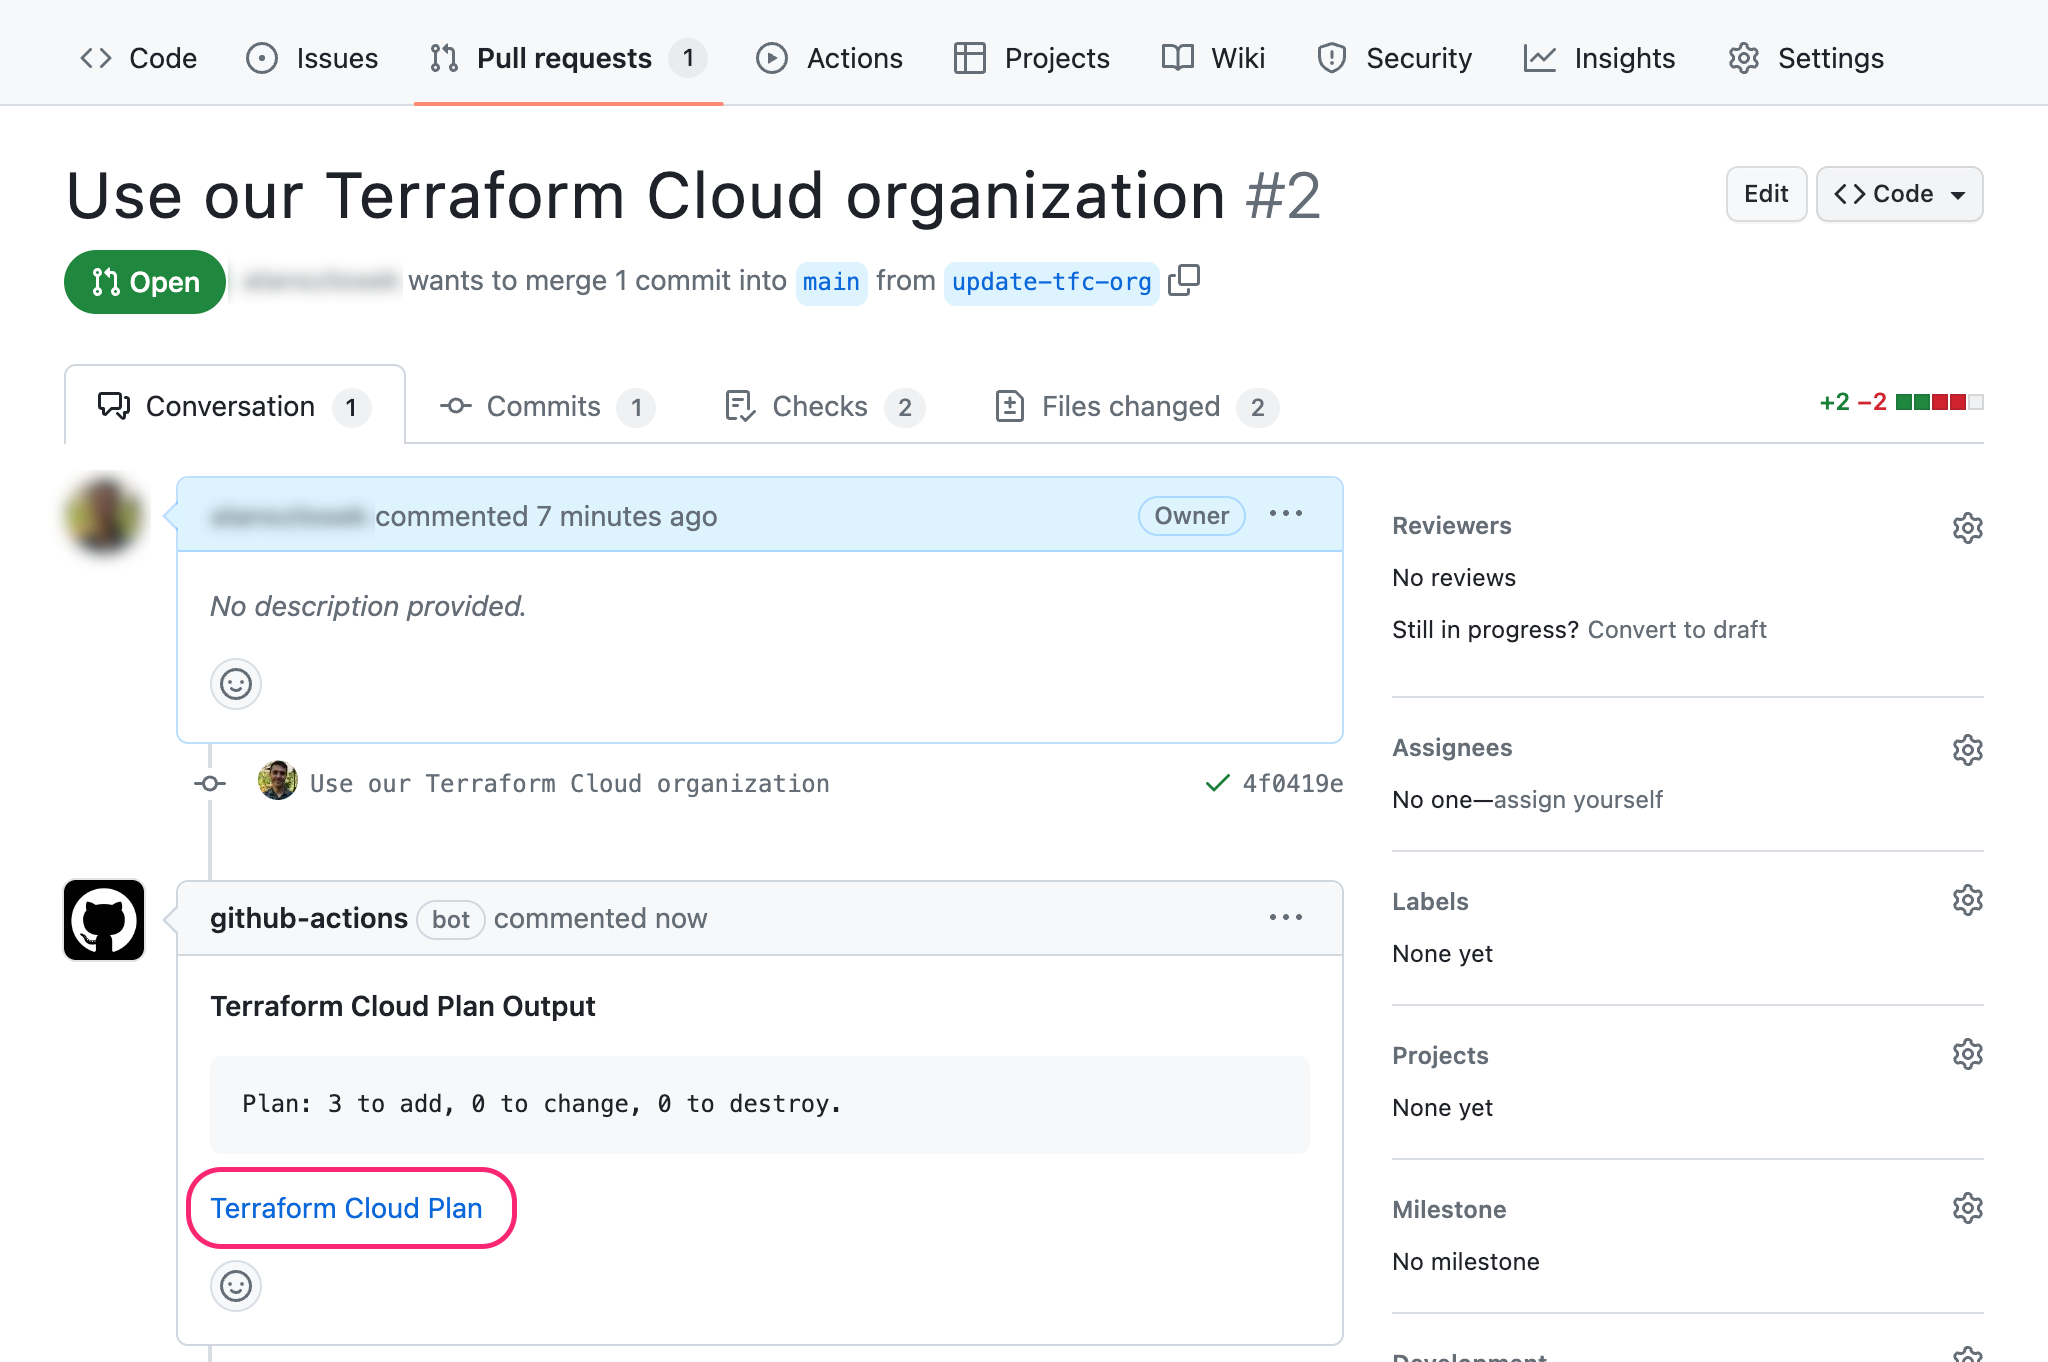
Click the HCP Terraform Plan link to view the plan in HCP Terraform.
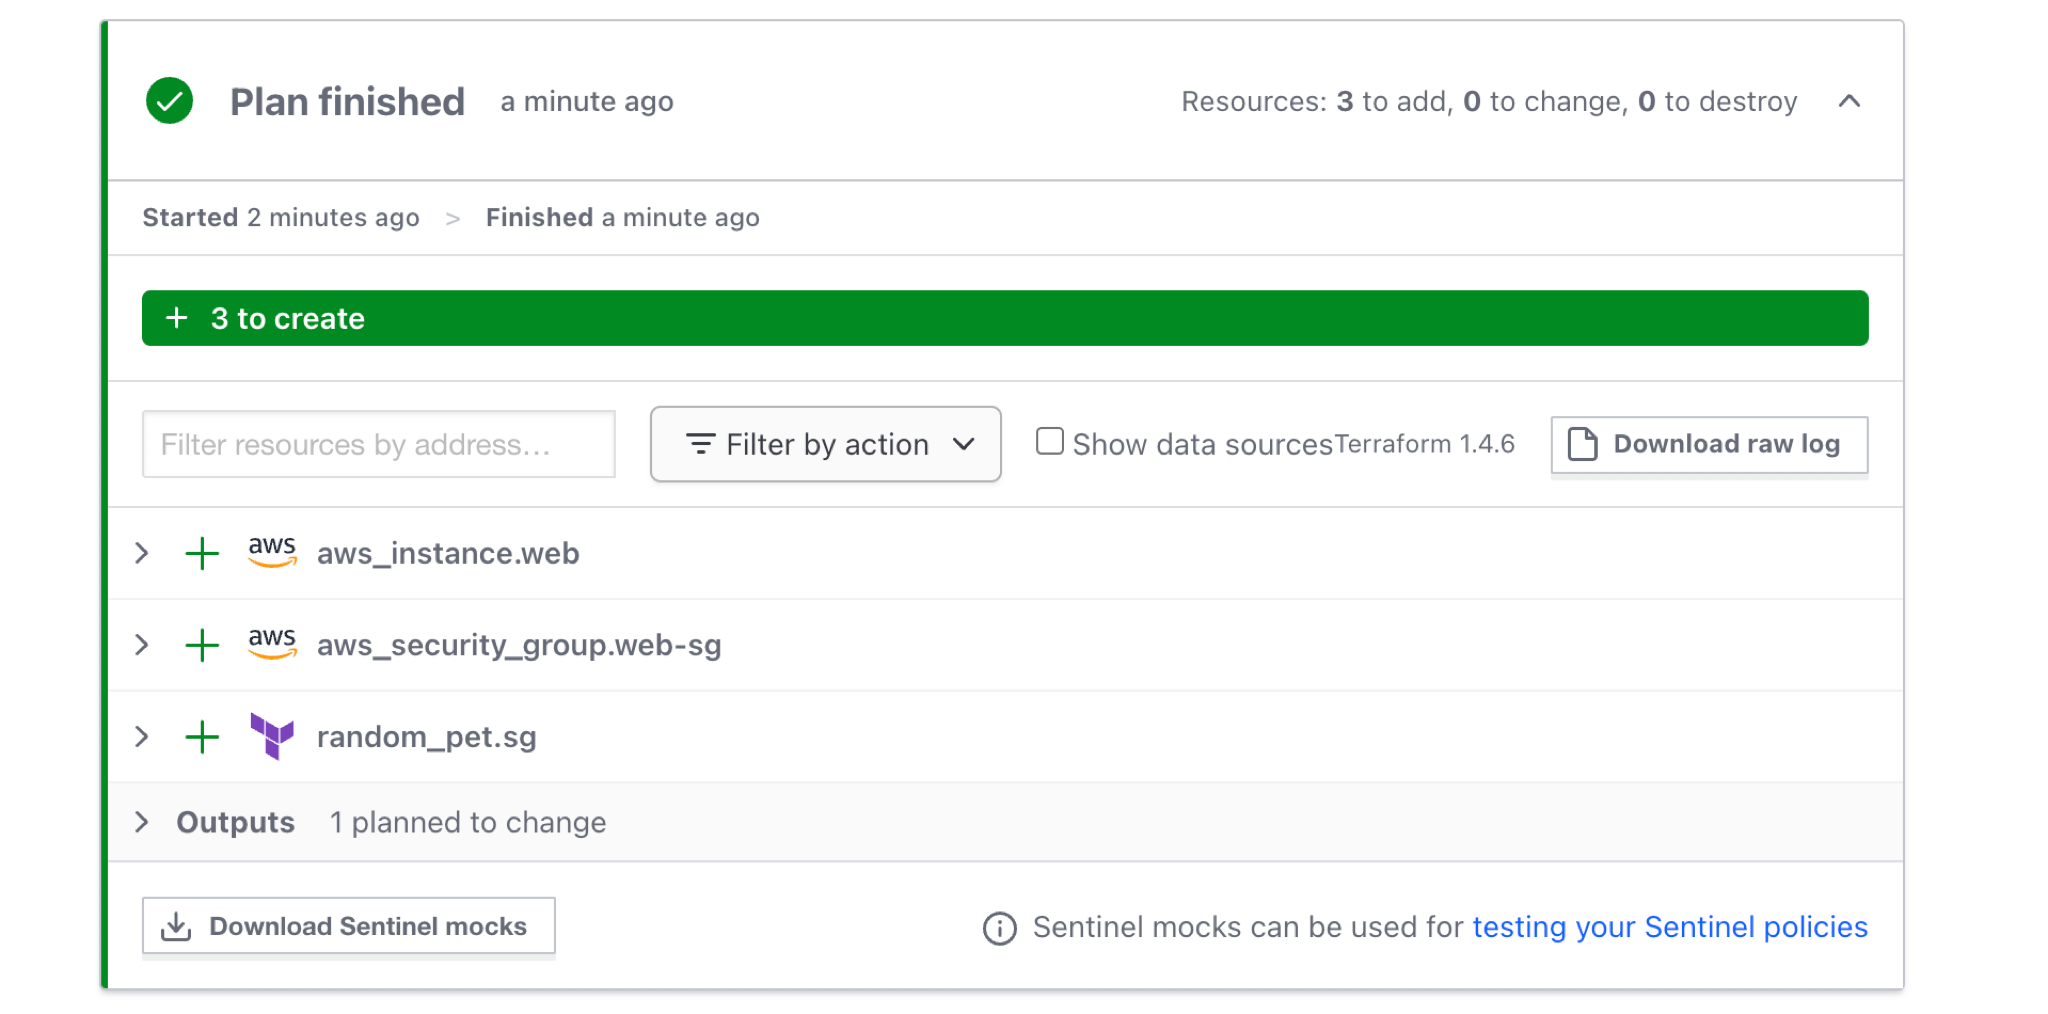
Terraform plans to create three resources, matching the comment in the pull request.
Merge the pull request.
Verify EC2 instance provisioned
In GitHub, go to Actions, then select the pull request you just merged.
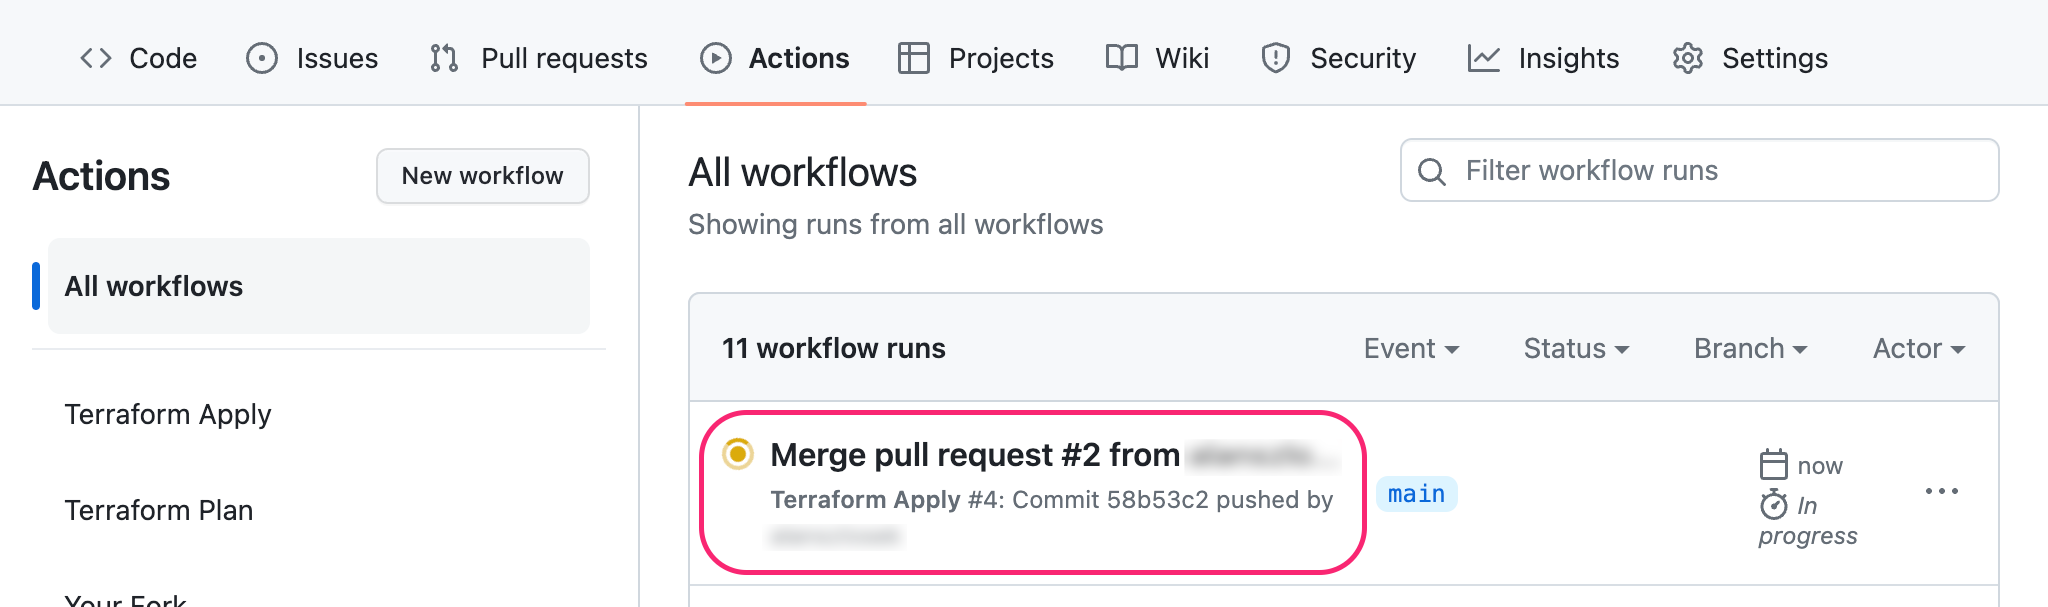
Then, click on the Terraform Apply workflow.
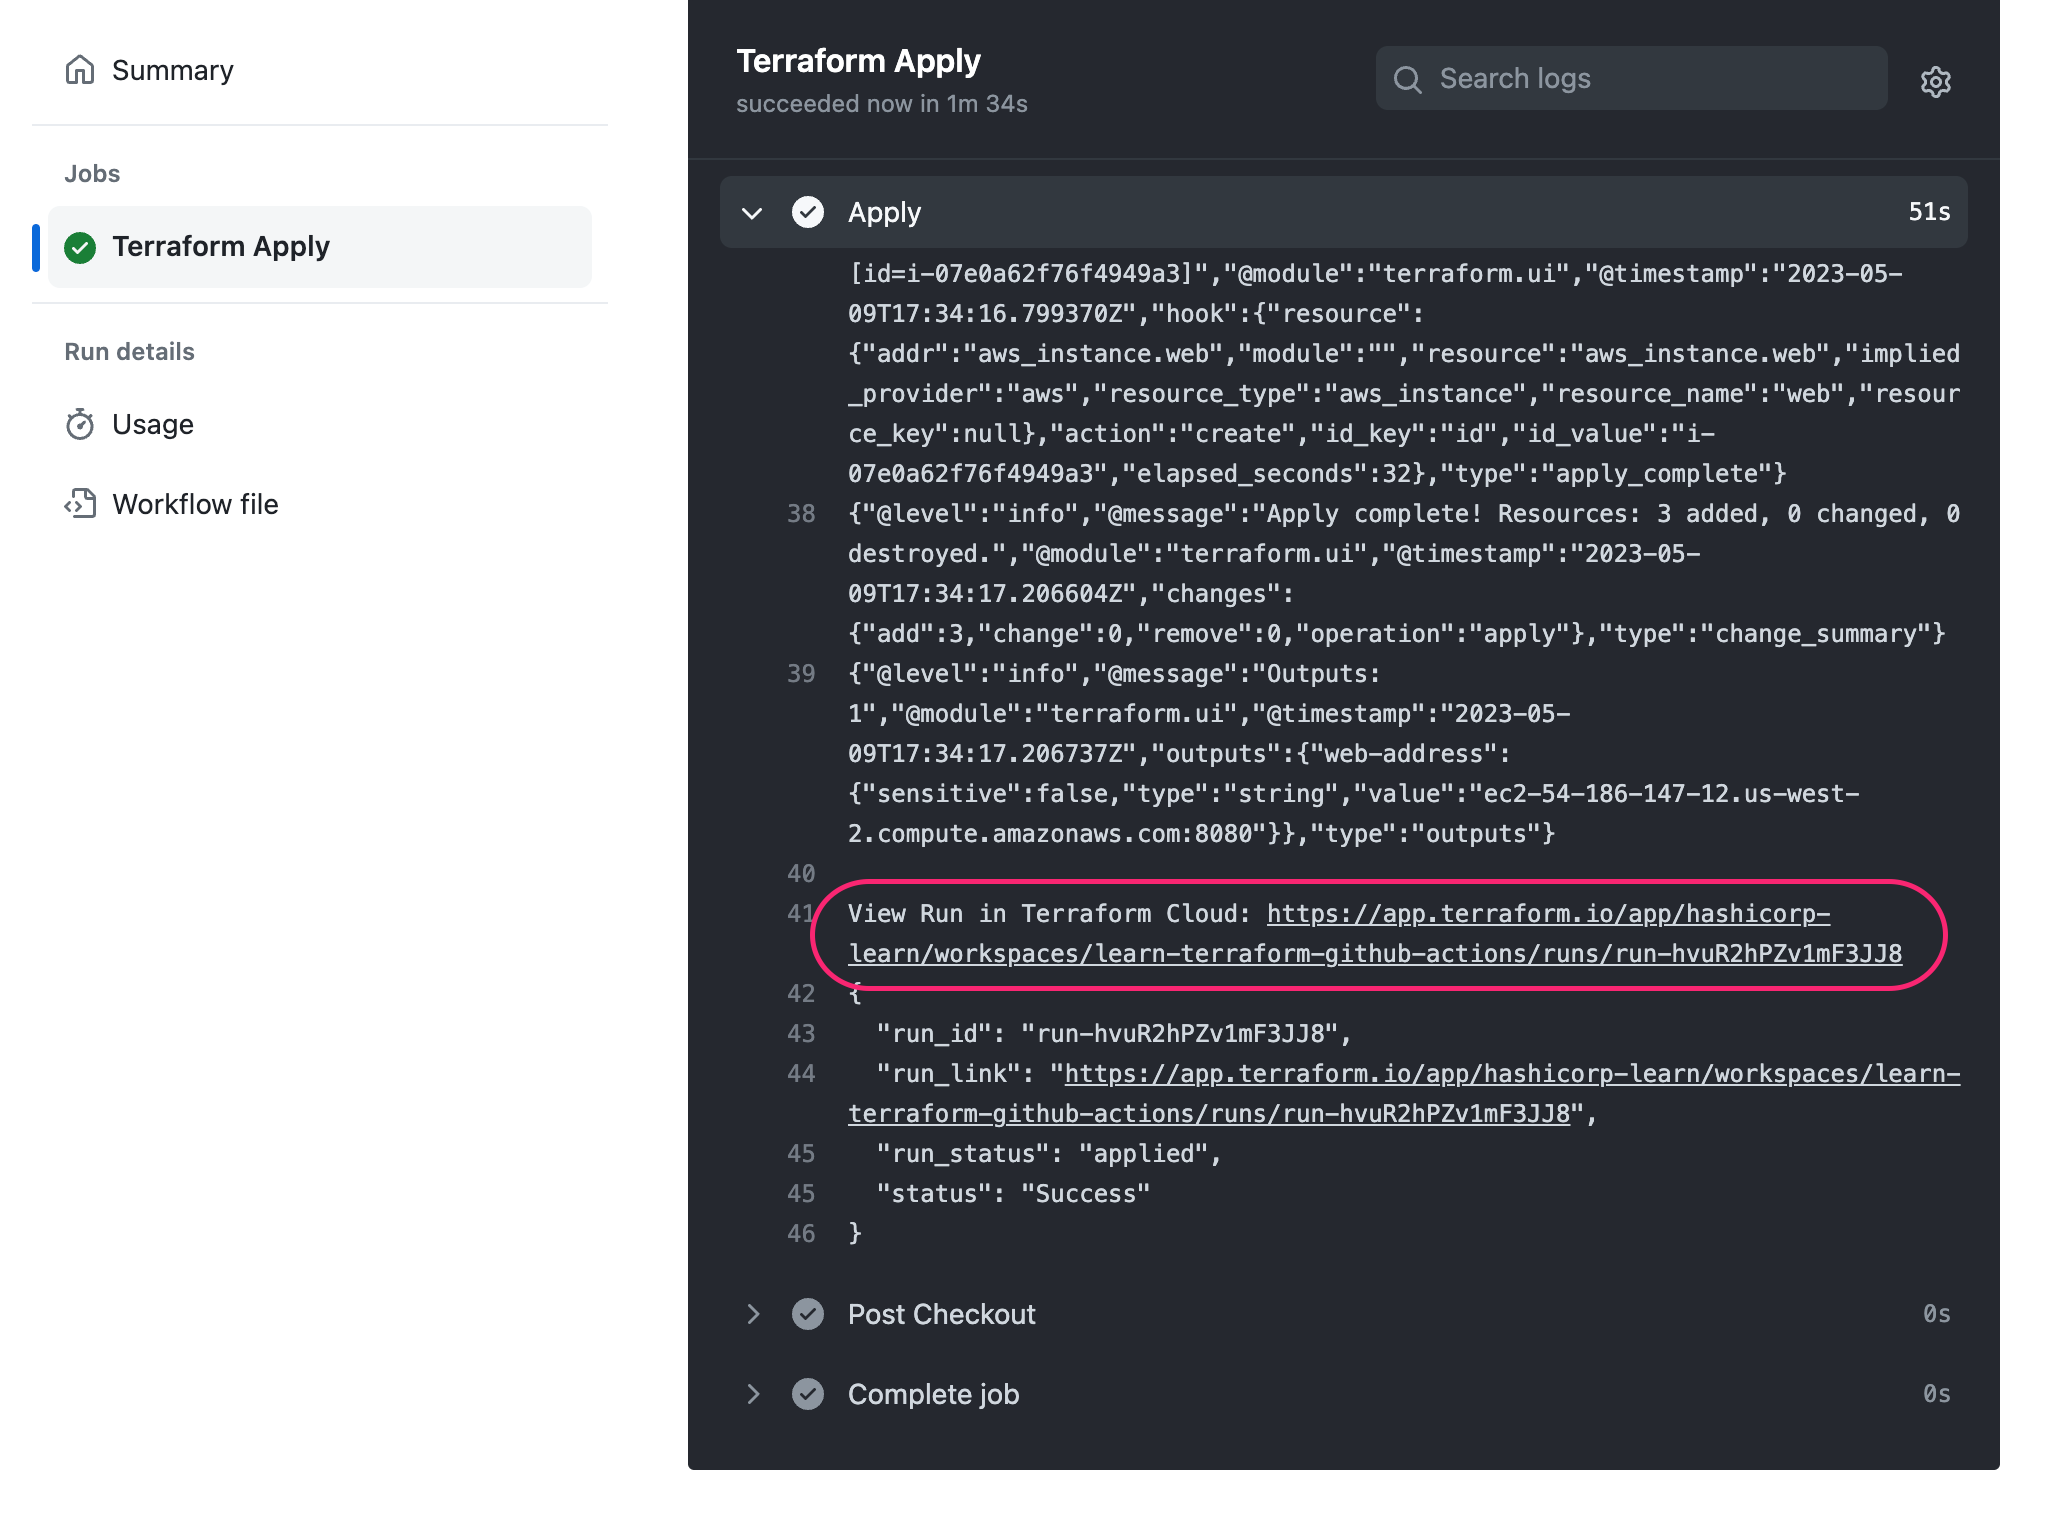
Wait for the workflow to complete.
Then, expand the Apply step, scroll to the bottom, and click the link next to View Run in HCP Terraform.
In HCP Terraform, expand the Apply finished section. HCP Terraform shows the resources it created and the EC2 instance's web address.
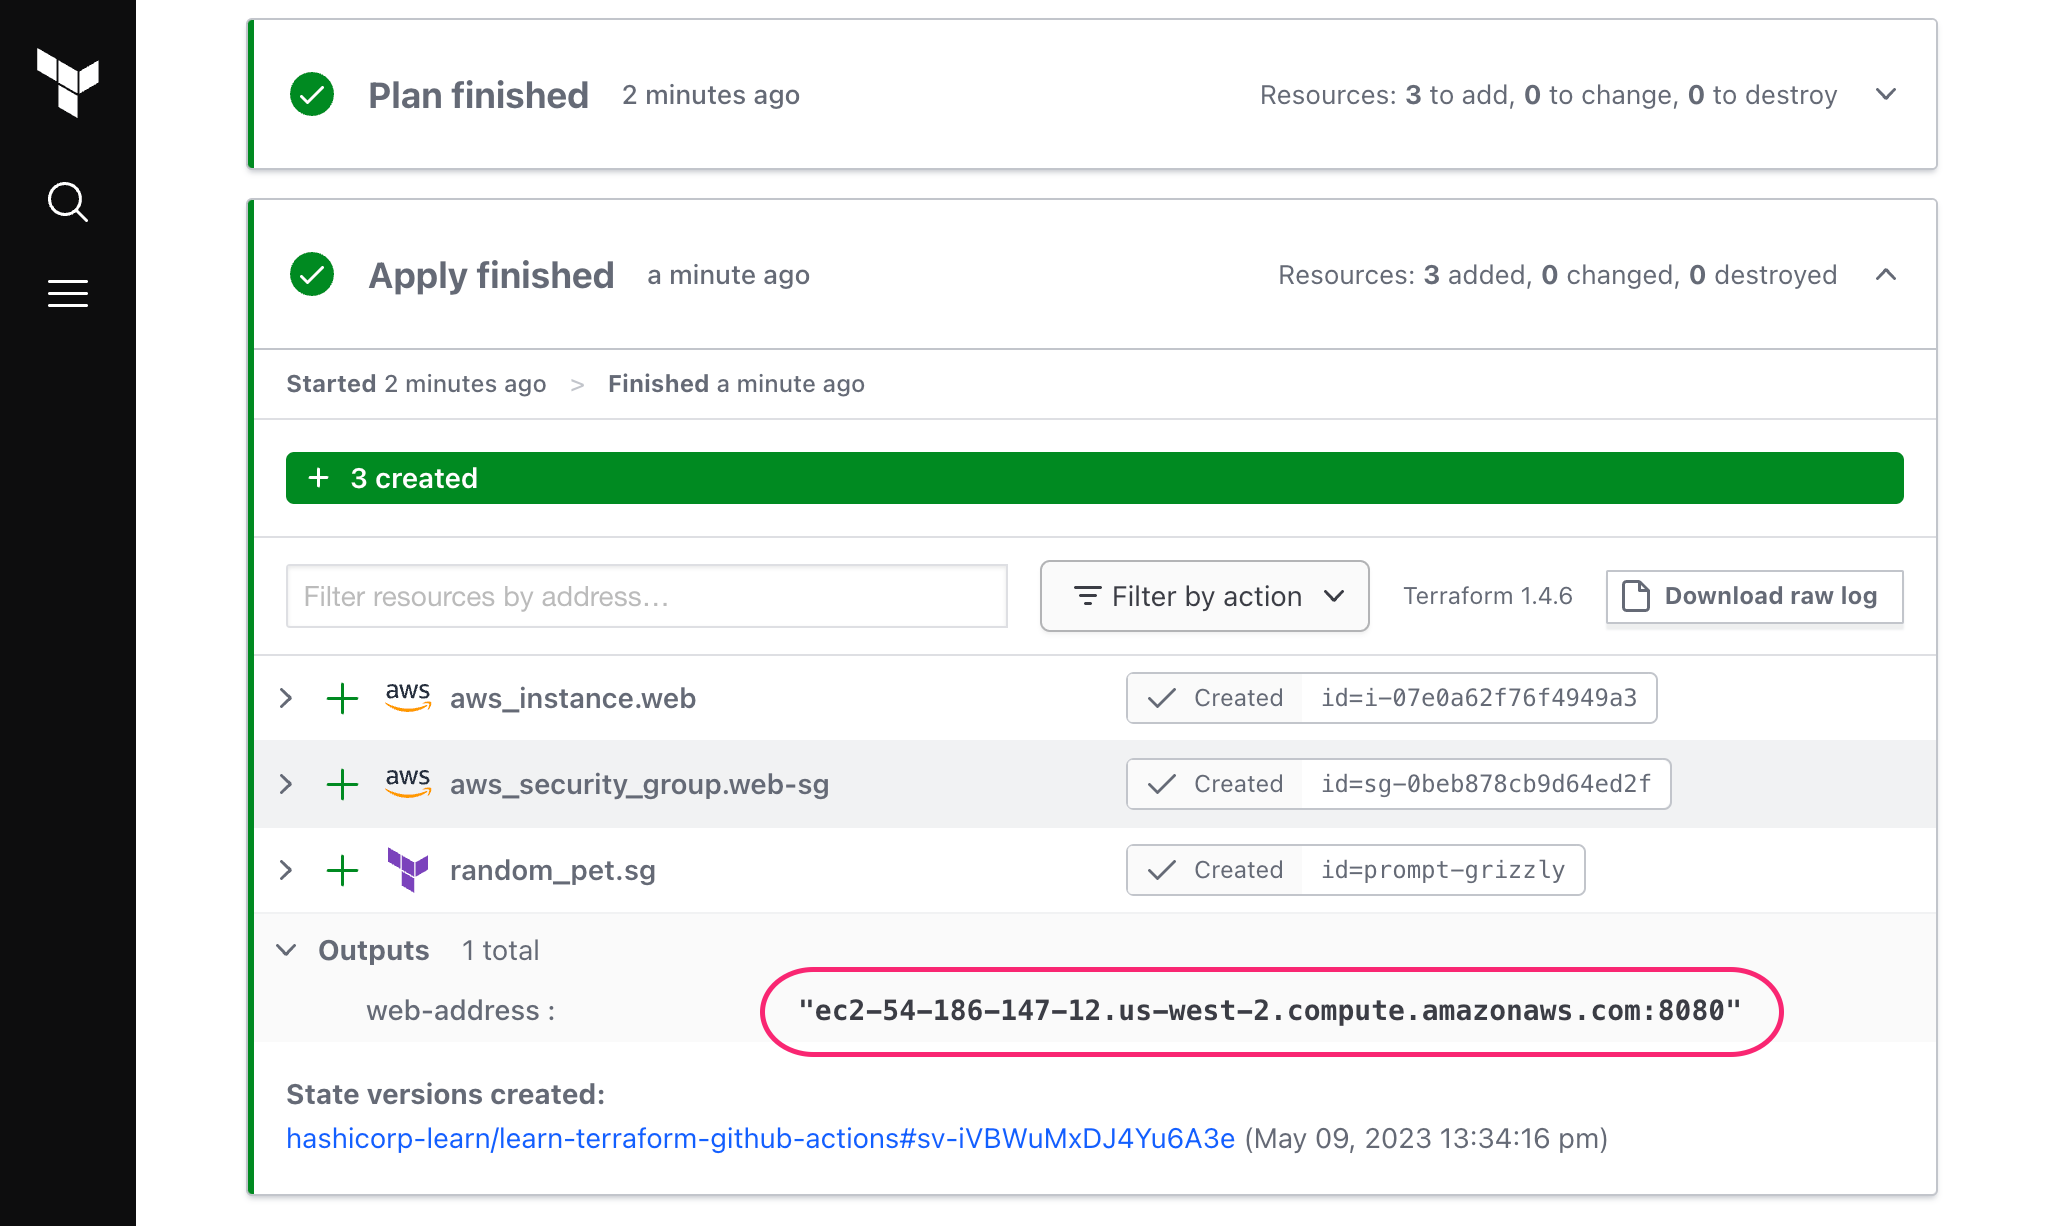
Copy the web-address output.
Finally, verify that the EC2 instance is publicly available. Use the curl command below with the web-address output value.
$ curl <web-address output>
Hello World
You have successfully set up a complete GitHub Actions workflow to deploy a publicly accessible web server within an HCP Terraform workspace.
Destroy resources
Remember to destroy the resources and HCP Terraform workspace you created for this tutorial.
Go to the learn-terraform-github-actions workspace, queue a destroy plan, and apply it. Then, delete the workspace from HCP Terraform.
Next steps
In this tutorial, you deployed a publicly available web server by automating your HCP Terraform workflow with GitHub Actions. The resources below will help you customize the Actions workflow to fit your real-world use cases.
- HCP Terraform Workflows for GitHub
- Continuous Integration for Terraform Modules with GitHub Actions
- Terraform and CircleCI tutorial guides you through building an automated Terraform workflow using AWS S3 as a backend.
- Running Terraform in Automation