Build a golden image pipeline with HCP Packer
A golden image is an image on top of which developers can build applications, letting them focus on the application itself instead of system dependencies and patches. A typical golden image includes common system, logging, and monitoring tools, recent security patches, and application dependencies.
Traditionally, operations and security teams had to cross-reference spreadsheets, personally inform downstream developers, and manually update build files when they released new golden images. Sophisticated organizations automated this process by building and maintaining effort-intensive continuous integration (CI) pipelines. The HCP Packer registry improves this process by tracking artifact metadata and storage location, and providing the correct image to developers automatically through Packer and Terraform integrations. It also allows you to revoke artifacts to remove them from circulation if they become stale or have security vulnerabilities.

After you build your artifact with Packer and push its metadata to HCP Packer, you can reference the artifact in your Terraform configuration to deploy it. HCP Packer has an HCP Terraform run task integration, which validates that the machine images in your Terraform configuration are not revoked.
In this tutorial, you will use HCP Packer to define a golden image pipeline and build a golden parent image and child application images. You will configure a webhook to respond to HCP Packer events, and integrate HCP Terraform with a run task to verify that the images you deploy are up to date. You will then deploy the application image to AWS using Terraform.
To accomplish this, you will first configure a webhook to allow you to respond to HCP Packer events. Next you will deploy an EC2 instance running Loki for log aggregation and Grafana for visualization. Then you will create a run task in HCP Terraform that will allow HCP Packer to validate your images before use. Next, you will build a golden image with configuration that references the Loki and Grafana instance's details, and build an application image that uses the golden image as a base. Then, you will schedule a revocation and learn how artifact revocation prevents downstream artifact consumers from referencing outdated artifacts. Finally, you will use Terraform to deploy an EC2 instance running the application image, and view the application logs in Grafana.
Prerequisites
This tutorial assumes that you are familiar with the standard Packer and HCP Packer workflows. If you are new to Packer, complete the Get Started tutorials first. If you are new to HCP Packer, complete the Get Started HCP Packer tutorials first.
This tutorial also assumes that you are familiar with the Terraform and HCP Terraform workflows. If you are new to Terraform, complete the Get Started tutorials first. If you are new to HCP Terraform, complete the HCP Terraform Get Started tutorials first.
To follow along with this tutorial, you will need:
- Packer 1.10.1+ installed locally.
- Terraform 1.2 or later installed locally.
- An HCP Terraform account with workspace admin permissions.
- An HCP account.
- An HCP Packer registry with Standard tier.
- Create a registry: click Packer > Create a free registry. You only need to do this once.
- An AWS account with credentials set as local environment variables.
Clone the example repository
In your terminal, clone the tutorial repository. It contains configuration for building and publishing images with Packer and deploying them to AWS with Terraform.
$ git clone https://github.com/hashicorp-education/learn-packer-hcp-golden-image
Navigate to the cloned repository.
$ cd learn-packer-hcp-golden-image
Architecture overview
The diagram below shows the infrastructure and services you will deploy in this tutorial. You will provision one instance that runs Loki and Grafana and two instances for HashiCups — an example application for ordering HashiCorp-branded coffee. You will deploy the HashiCups instances across two AWS regions, us-east-2 and us-west-2. The HashiCups instances contain baseline tools, including Docker and promtail, which they will inherit from the golden image that HashiCups is based on.
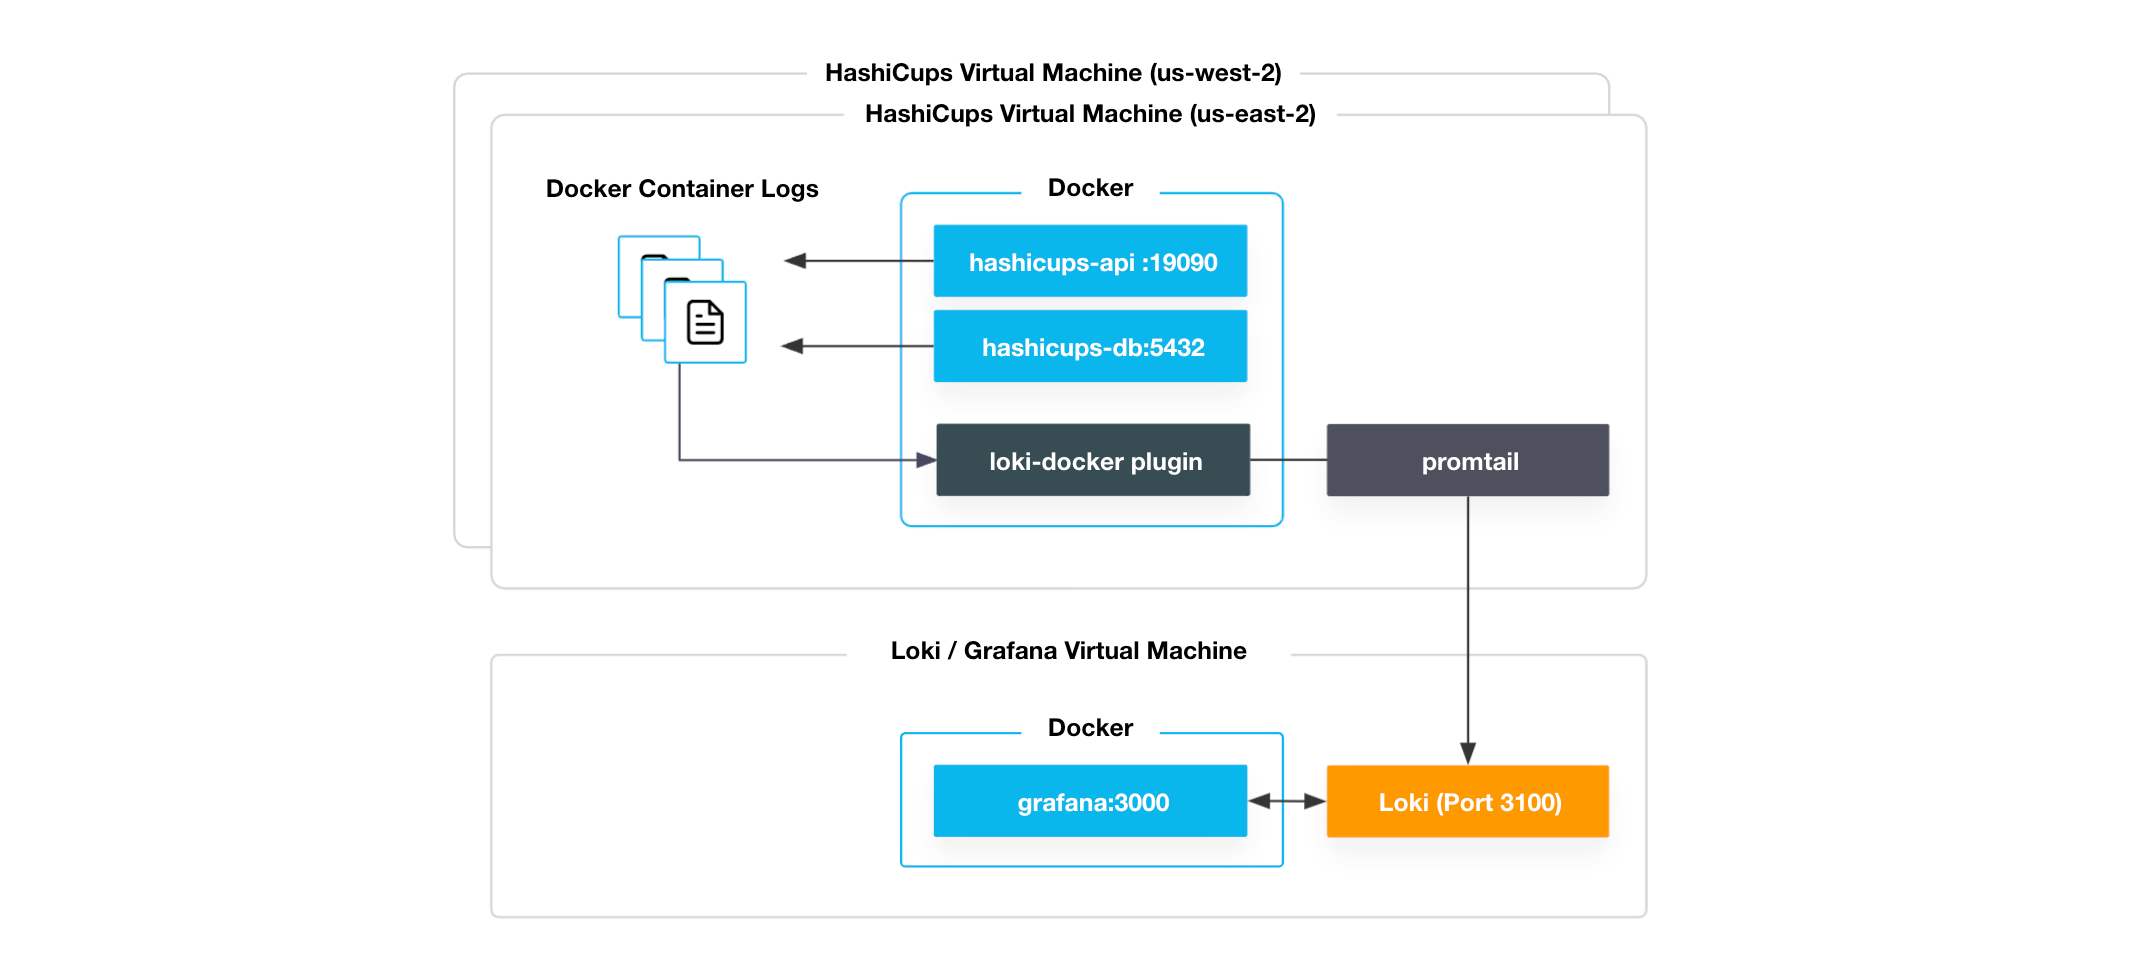
HashiCups is an application consisting of an API and a database. The components run as separate Docker containers and are provisioned with Docker Compose. Docker stores the logs generated by both the API and database.
Promtail is an agent that sends logs from a local log store to an instance of Loki. In this scenario, Promtail forwards the HashiCups Docker container logs to the Loki instance using a Loki Docker plugin.
Loki is a log aggregation tool that provides log data for querying and runs on port
3100. Grafana visualizes the Loki logs and provides its own web user interface on port3000.
Review configuration
The example repository contains several directories:
- The
loki-imagedirectory contains a Packer template file, a Loki configuration file, and scripts that configure and enable Loki and Grafana. - The
golden-imagedirectory contains a Packer template file, Docker and Promtail configuration files, and scripts that configure and enable Docker and Promtail. - The
hashicups-imagedirectory contains a Packer template file, a Docker Compose file, and the HashiCups start script. - The
notif-webhookdirectory contains Terraform configuration files to deploy an AWS Lambda function and S3 bucket to capture HCP Packer events. - The
infrastructuredirectory contains Terraform configuration files to deploy AWS EC2 instances that run the images for this scenario, and a script to query the HashiCups API.

First, you will provision a webhook that will use AWS Lambda to log HCP Packer events into an S3 bucket. Next, you will build the Loki image and deploy it to an EC2 instance. Then, you will build the golden image, which uses promtail to forward log events to the Loki instance. Next, you will integrate HCP Packer and HCP Terraform with a run task to validate that the instance AMIs referred to in your Terraform configurations have not been revoked. Finally, you will build and provision the HashiCups artifact, which uses the golden image as a parent artifact.
Review HCP Packer webhook configuration
Open notif-webhook/main.tf and review the configuration for the webhook, API
Gateway, Lambda function, and S3 bucket.
After configuring the HCP and AWS providers, this configuration defines the HCP webhook.
notif-webhook/main.tf
resource "hcp_notifications_webhook" "version_events_webhook" {
  depends_on = [time_sleep.wait_10_seconds]

  name        = "packer-events-webhook"
  description = "Notify for all of the events for all Packer artifact versions existing in the project."

  config = {
    url = "${aws_apigatewayv2_stage.version_events_webhook.invoke_url}/packer-events-webhook"
  }

  subscriptions = [
    {
      events = [
        {
          actions = ["*"]
          source  = "hashicorp.packer.version"
        }
      ]
    }
  ]
}

resource "time_sleep" "wait_10_seconds" {
  depends_on = [aws_apigatewayv2_route.version_events_webhook]

  create_duration = "10s"
}
This webhook configuration sends all HCP Packer version events to the
configured URL. Refer to the HCP Packer
documentation
for a full list of events and the event payload. This configuration also uses
the time_sleep resource to wait to configure the webhook until 10 seconds
after the API Gateway has been provisioned. It can take a few
seconds for the API Gateway to be ready to accept requests, and provisioning the webhook will fail if HCP Packer cannot send a test event to the configured URL.
Next, the configuration defines the Lambda function that handles incoming events from the webhook.
notif-webhook/main.tf
data "archive_file" "version_events_webhook" {
  type        = "zip"
  source_file = "function/lambda.py"
  output_path = "lambda.zip"
}

resource "aws_lambda_function" "version_events_webhook" {
  function_name = "packer-events-webhook"

  filename         = data.archive_file.version_events_webhook.output_path
  source_code_hash = data.archive_file.version_events_webhook.output_base64sha256
  role             = aws_iam_role.version_events_webhook.arn

  handler = "lambda.handler"
  runtime = "python3.9"

  environment {
    variables = {
      "S3_BUCKET_ARN" : aws_s3_bucket.version_events_webhook_output.arn,
      "S3_BUCKET_NAME" : aws_s3_bucket.version_events_webhook_output.bucket
    }
  }
}
The Lambda function logs events to an S3 bucket, which is defined later in the configuration.
Next, the configuration defines the API Gateway and related resources, including policies to allow the API Gateway to call your Lambda function and log events into AWS Cloudwatch.
notif-webhook/main.tf
resource "aws_apigatewayv2_api" "version_events_webhook" {
  name          = "packer-events-webhook"
  protocol_type = "HTTP"
}

resource "aws_apigatewayv2_route" "version_events_webhook" {
  api_id    = aws_apigatewayv2_api.version_events_webhook.id
  route_key = "POST /packer-events-webhook"
  target    = "integrations/${aws_apigatewayv2_integration.version_events_webhook.id}"
}

resource "aws_apigatewayv2_stage" "version_events_webhook" {
  api_id      = aws_apigatewayv2_api.version_events_webhook.id
  name        = "packer-events-webhook"
  auto_deploy = true

  access_log_settings {
    destination_arn = aws_cloudwatch_log_group.version_events_webhook.arn

    format = jsonencode({
      requestId               = "$context.requestId"
      sourceIp                = "$context.identity.sourceIp"
      requestTime             = "$context.requestTime"
      protocol                = "$context.protocol"
      httpMethod              = "$context.httpMethod"
      resourcePath            = "$context.resourcePath"
      routeKey                = "$context.routeKey"
      status                  = "$context.status"
      responseLength          = "$context.responseLength"
      integrationErrorMessage = "$context.integrationErrorMessage"
      }
    )
  }
}

resource "aws_cloudwatch_log_group" "version_events_webhook" {
  name              = "/aws/api_gw/${aws_apigatewayv2_api.version_events_webhook.name}"
  retention_in_days = 30
}

resource "aws_apigatewayv2_integration" "version_events_webhook" {
  api_id             = aws_apigatewayv2_api.version_events_webhook.id
  integration_type   = "AWS_PROXY"
  integration_method = "POST"

  integration_uri = aws_lambda_function.version_events_webhook.invoke_arn
}

resource "aws_lambda_permission" "version_events_webhook" {
  statement_id  = "AllowExecutionFromAPIGateway"
  action        = "lambda:InvokeFunction"
  function_name = aws_lambda_function.version_events_webhook.function_name
  principal     = "apigateway.amazonaws.com"
  source_arn    = "${aws_apigatewayv2_api.version_events_webhook.execution_arn}/*/*"
}

resource "aws_iam_role" "version_events_webhook" {
  name = "packer-events-webhook"

  assume_role_policy = <<EOF
{
  "Version": "2012-10-17",
  "Statement": [
    {
      "Effect": "Allow",
      "Sid": "",
      "Principal": {
        "Service": "lambda.amazonaws.com"
      },
      "Action": "sts:AssumeRole"
    }
  ]
}
EOF
}

resource "aws_iam_role_policy_attachment" "version_events_webhook" {
  role       = aws_iam_role.version_events_webhook.name
  policy_arn = "arn:aws:iam::aws:policy/service-role/AWSLambdaBasicExecutionRole"
}

resource "aws_iam_policy" "version_events_webhook_logs" {
  policy = <<EOF
{
  "Version": "2012-10-17",
  "Statement": [
    {
      "Effect": "Allow",
      "Action": [
        "logs:CreateLogGroup",
        "logs:CreateLogStream",
        "logs:PutLogEvents"
      ],
      "Resource": "arn:aws:logs:*:*:*"
    }
  ]
}
EOF
}

resource "aws_iam_policy_attachment" "version_events_webhook_logs" {
  name = "packer-events-webhook-logs"

  roles      = [aws_iam_role.version_events_webhook.name]
  policy_arn = aws_iam_policy.version_events_webhook_logs.arn
}
Finally, the configuration defines an S3 bucket and a policy that allows the Lambda function to access it.
notif-webhook/main.tf
resource "aws_iam_policy" "version_events_webhook_output" {
  policy = <<EOF
{
  "Version": "2012-10-17",
  "Statement": [
    {
      "Effect": "Allow",
      "Action": [
        "s3:*"
      ],
      "Resource": [
        "${aws_s3_bucket.version_events_webhook_output.arn}",
        "${aws_s3_bucket.version_events_webhook_output.arn}/*"
      ]
    }
  ]
}
EOF
}

resource "aws_iam_policy_attachment" "version_events_webhook_output" {
  name = "packer-events-webhook-output"

  roles      = [aws_iam_role.version_events_webhook.name]
  policy_arn = aws_iam_policy.version_events_webhook_output.arn
}

resource "aws_s3_bucket" "version_events_webhook_output" {
  bucket_prefix = "packer-events-"

  force_destroy = true
}
Review the code in notif-webhook/function/lambda.py.
notif-webhook/function/lambda.py
import boto3
from datetime import datetime
import json
import os

s3 = boto3.client('s3')

def handler(event, context):
    response = s3.put_object(
        Body=json.dumps(event.get('body', {})),
        Bucket=os.environ["S3_BUCKET_NAME"],
        Key=f"{datetime.now().strftime('%Y-%m-%d-%H-%M-%S-%f')}.json"
    )

    return {
        'statusCode' : 200,
        'body': json.dumps(response)
    }
Depending on your workflow needs, you can integrate your webhooks with notification systems or other workflow tools in addition to logging the events as demonstrated in this tutorial. For example, you may wish to send an email to your users when you publish or revoke a new iteration of an image, integrate with message tools such as Slack, or a service delivery platform such as Service Now to provide notification or approval workflows.
Review Loki artifact configuration
Open loki-image/start-loki-grafana.sh and note that both Loki and Grafana run on the same instance. Loki runs as a system process and Grafana as a Docker container.
loki-image/start-loki-grafana.sh
#!/bin/bash
# Start Loki in background
cd /home/ubuntu
nohup ./loki-linux-amd64 -config.file=loki-local-config.yaml &

# Start Grafana
docker run -d -p 3000:3000 grafana/grafana
Next, open loki-image/loki.pkr.hcl. Packer uses this file to build an Amazon Machine Image (AMI) that runs Loki and Grafana. This tutorial refers to this artifact as the "Loki artifact" even though it contains both Loki and Grafana.
The amazon-ami.ubuntu-focal data block retrieves an Ubuntu 20.04 AMI from the us-east-2 region to use as a base. The amazon-ebs.base source block then references the ID of that AMI from the amazon-ami.ubuntu-focal data block for the source_ami.
loki-image/loki.pkr.hcl
data "amazon-ami" "ubuntu-focal" {
  region = "us-east-2"
  filters = {
    name                = "ubuntu/images/hvm-ssd/ubuntu-focal-20.04-amd64-server-*"
    root-device-type    = "ebs"
    virtualization-type = "hvm"
  }
  most_recent = true
  owners      = ["099720109477"]
}

source "amazon-ebs" "base" {
  ami_name      = "${var.ami_prefix}-${local.timestamp}"
  instance_type = "t2.micro"
  region        = "us-east-2"
  source_ami    = data.amazon-ami.ubuntu-focal.id
  ssh_username  = "ubuntu"
  tags = {
    Name        = "learn-hcp-packer-loki"
    environment = "production"
  }
  snapshot_tags = {
    environment = "production"
  }
}
The build block uses the AMI retrieved by the amazon-ebs.base source block, and adds an SSH public key, the Loki configuration file, and the startup script to the artifact.
loki-image/loki.pkr.hcl
build {
  name = "learn-packer-loki-server"
  sources = [
    "source.amazon-ebs.base"
  ]

  # Add SSH public key
  provisioner "file" {
    source      = "../learn-packer.pub"
    destination = "/tmp/learn-packer.pub"
  }

  # Add Loki configuration file
  provisioner "file" {
    source      = "loki-local-config.yaml"
    destination = "loki-local-config.yaml"
  }

  # Add startup script that will run loki and grafana on instance boot
  provisioner "file" {
    source      = "start-loki-grafana.sh"
    destination = "/tmp/start-loki-grafana.sh"
  }
## ...
}
Then, Packer executes the loki-setup.sh script to set up sudo, install dependencies, the SSH key, and Loki.
loki-image/loki.pkr.hcl
build {
## ...
  # Execute setup script
  provisioner "shell" {
    script = "loki-setup.sh"
    # Run script after cloud-init finishes, otherwise you run into race conditions
    execute_command = "/usr/bin/cloud-init status --wait && sudo -E -S sh '{{ .Path }}'"
  }

  # Move temp files to actual destination
  # Must use this method because their destinations are protected
  provisioner "shell" {
    inline = [
      "sudo cp /tmp/start-loki-grafana.sh /var/lib/cloud/scripts/per-boot/start-loki-grafana.sh",
      "rm /tmp/start-loki-grafana.sh",
    ]
  }
  # …
}
Finally, Packer sends the artifact metadata to the HCP Packer registry so downstream Terraform deployments can use it.
loki/loki.pkr.hcl
build {
## ...
  hcp_packer_registry {
    bucket_name = "learn-packer-hcp-loki-image"
    description = <<EOT
This is an image for loki built on top of ubuntu 20.04.
    EOT

    bucket_labels = {
      "hashicorp-learn"       = "learn-packer-hcp-loki-image",
      "ubuntu-version"        = "20.04"
    }
  }
}
Review golden image configuration
A golden image typically includes baseline tools, services, and configurations. The golden image for this tutorial contains Docker and Docker Compose for running applications, promtail for log export, grafana/loki-docker-driver:latest for collecting Docker logs, and auditd for securing Docker.
Open golden-image/golden.pkr.hcl. This configuration defines two amazon-ebs source blocks which each reference a corresponding amazon-ami data block. There is one block for each AWS region where you will publish your AMI. AMIs are region specific, so you must build a separate AMI for each region.
golden-image/golden.pkr.hcl
data "amazon-ami" "ubuntu-focal-east" {
  region = "us-east-2"
  filters = {
    name                = "ubuntu/images/hvm-ssd/ubuntu-focal-20.04-amd64-server-*"
    root-device-type    = "ebs"
    virtualization-type = "hvm"
  }
  most_recent = true
  owners      = ["099720109477"]
}

source "amazon-ebs" "base_east" {
  ami_name      = "${var.ami_prefix}-${local.timestamp}"
  instance_type = "t2.micro"
  region        = "us-east-2"
  source_ami    = data.amazon-ami.ubuntu-focal-east.id
  ssh_username  = "ubuntu"
  tags = {
    Name        = "learn-hcp-packer-base-east"
    environment = "production"
  }
  snapshot_tags = {
    environment = "production"
  }
}

data "amazon-ami" "ubuntu-focal-west" {
  region = "us-west-2"
  filters = {
    name                = "ubuntu/images/hvm-ssd/ubuntu-focal-20.04-amd64-server-*"
    root-device-type    = "ebs"
    virtualization-type = "hvm"
  }
  most_recent = true
  owners      = ["099720109477"]
}

source "amazon-ebs" "base_west" {
  ami_name      = "${var.ami_prefix}-${local.timestamp}"
  instance_type = "t2.micro"
  region        = "us-west-2"
  source_ami    = data.amazon-ami.ubuntu-focal-west.id
  ssh_username  = "ubuntu"
  tags = {
    Name        = "learn-hcp-packer-base-west"
    environment = "production"
  }
  snapshot_tags = {
    environment = "production"
  }
}
The build block uses the amazon-ebs.base_east and amazon-ebs.base_west sources. It adds an SSH public key, runs the setup.sh script to install dependencies, adds the audit rules for Docker, the Docker daemon config file, the promtail config file, and the run-promtail.sh script file.
The two values in the sources attribute let Packer build these two artifacts in parallel, reducing the build time. Refer to the AWS Get Started Tutorial for more details about parallel builds.
golden-image/golden.pkr.hcl
build {
  name = "learn-packer-golden"
  sources = [
    "source.amazon-ebs.base_east",
    "source.amazon-ebs.base_west"
  ]

  # Add SSH public key
  provisioner "file" {
    source      = "../learn-packer.pub"
    destination = "/tmp/learn-packer.pub"
  }

  # Execute setup script
  provisioner "shell" {
    script = "setup.sh"
    # Run script after cloud-init finishes, otherwise you run into race conditions
    execute_command = "/usr/bin/cloud-init status --wait && sudo -E -S sh '{{ .Path }}'"
  }

  # Add audit rules to temp location
  provisioner "file" {
    source      = "audit.rules"
    destination = "/tmp/audit.rules"
  }

  # Update Docker daemon with Loki logs
  provisioner "file" {
    source      = "docker-daemon.json"
    destination = "/tmp/daemon.json"
  }

  # Add promtail configuration file
  provisioner "file" {
    source      = "promtail.yaml"
    destination = "/tmp/promtail.yaml"
  }

  # Add startup script that will run promtail on instance boot
  provisioner "file" {
    source      = "run-promtail.sh"
    destination = "/tmp/run-promtail.sh"
  }
## ...
}
After it builds the artifacts, Packer moves the configuration files to the correct directories and runs the setup-promtail.sh script to configure promtail and its Docker plugin.
golden-image/golden.pkr.hcl
build {
## ...
  # Move temp files to actual destination
  # Must use this method because their destinations are protected
  provisioner "shell" {
    inline = [
      "sudo cp /tmp/audit.rules /etc/audit/rules.d/audit.rules",
      "sudo mkdir /opt/promtail/",
      "sudo cp /tmp/promtail.yaml /opt/promtail/promtail.yaml",
      "sudo cp /tmp/run-promtail.sh /var/lib/cloud/scripts/per-boot/run-promtail.sh",
      "sudo cp /tmp/daemon.json /etc/docker/daemon.json",
    ]
  }

  # Execute setup script
  provisioner "shell" {
    script = "setup-promtail.sh"
  }
## ...
}
Finally, Packer sends the artifact metadata to the HCP Packer registry so that downstream Packer builds and Terraform deployments can reference it.
golden-image/golden.pkr.hcl
build {
## ...
  hcp_packer_registry {
    bucket_name = "learn-packer-hcp-golden-base-image"
    description = <<EOT
This is a golden image built on top of ubuntu 20.04.
    EOT

    bucket_labels = {
      "hashicorp-learn" = "learn-packer-hcp-golden-image",
      "ubuntu-version"  = "20.04"
    }
  }
}
Review HashiCups artifact configuration
Open hashicups-image/hashicups.pkr.hcl.
The hcp-packer-version data source retrieves information about the version from the HCP Packer bucket_name and channel_name. The value of bucket_name matches the one defined in the hcp_packer_registry block of the golden image Packer template (golden/golden.pkr.hcl).
The hcp-packer-artifact data source uses the version details to retrieve the artifact for the specified platform and region. This data source is necessary because a version can include artifacts from different cloud providers and regions.
The two hcp-packer-artifact data sources use the same version_fingerprint but reference different artifacts based on the region value.
hashicups-image/hashicups.pkr.hcl
data "hcp-packer-version" "golden" {
  bucket_name  = "learn-packer-hcp-golden-base-image"
  channel_name = "production"
}

data "hcp-packer-artifact" "golden_base_east" {
  bucket_name         = data.hcp-packer-version.golden.bucket_name
  version_fingerprint = data.hcp-packer-version.golden.fingerprint
  platform            = "aws"
  region              = "us-east-2"
}

data "hcp-packer-artifact" "golden_base_west" {
  bucket_name         = data.hcp-packer-version.golden.bucket_name
  version_fingerprint = data.hcp-packer-version.golden.fingerprint
  platform            = "aws"
  region              = "us-west-2"
}
The source_ami references the hcp-packer-artifact data source, using the AMI ID stored in the HCP Packer registry.
hashicups-image/hashicups.pkr.hcl
source "amazon-ebs" "hashicups_east" {
  ami_name      = "${var.ami_prefix}-${local.timestamp}"
  instance_type = "t2.micro"
  region        = "us-east-2"
  source_ami    = data.hcp-packer-artifact.golden_base_east.external_identifier
  ssh_username  = "ubuntu"
  tags = {
    Name        = "learn-hcp-packer-hashicups-east"
    environment = "production"
  }
  snapshot_tags = {
    environment = "production"
  }
}

source "amazon-ebs" "hashicups_west" {
  ami_name      = "${var.ami_prefix}-${local.timestamp}"
  instance_type = "t2.micro"
  region        = "us-west-2"
  source_ami    = data.hcp-packer-artifact.golden_base_west.external_identifier
  ssh_username  = "ubuntu"
  tags = {
    Name        = "learn-hcp-packer-hashicups-west"
    environment = "production"
  }
  snapshot_tags = {
    environment = "production"
  }
}
The build block uses the golden images defined in the amazon-ebs.hashicups_east and amazon-ebs.hashicups_west sources and adds an SSH public key, the conf.json file for application configuration, the Docker Compose file to create the HashiCups containers, and the HashiCups start script. Packer then moves the start script to the correct directory.
Like the golden images, Packer builds these artifacts in parallel.
hashicups-image/hashicups.pkr.hcl
build {
  name = "learn-packer-hashicups"
 sources = [
    "source.amazon-ebs.hashicups_east",
    "source.amazon-ebs.hashicups_west"
  ]


  # Add SSH public key
  provisioner "file" {
    source      = "../learn-packer.pub"
    destination = "/tmp/learn-packer.pub"
  }

  # Add HashiCups configuration file
  provisioner "file" {
    source      = "conf.json"
    destination = "conf.json"
  }

  # Add Docker Compose file
  provisioner "file" {
    source      = "docker-compose.yml"
    destination = "docker-compose.yml"
  }

  # Add startup script that will run hashicups on instance boot
  provisioner "file" {
    source      = "start-hashicups.sh"
    destination = "/tmp/start-hashicups.sh"
  }

  # Move temp files to actual destination
  # Must use this method because their destinations are protected
  provisioner "shell" {
    inline = [
      "sudo cp /tmp/start-hashicups.sh /var/lib/cloud/scripts/per-boot/start-hashicups.sh",
    ]
  }
## ...
}
Finally, Packer sends the artifact metadata to the HCP Packer registry so downstream Terraform deployments can reference it.
hashicups-image/hashicups.pkr.hcl
build {
## ...
  hcp_packer_registry {
    bucket_name = "learn-packer-hcp-hashicups-image"
    description = <<EOT
This is an image for HashiCups built on top of a golden parent image.
    EOT

    bucket_labels = {
      "hashicorp-learn"       = "learn-packer-hcp-hashicups-image",
    }
  }
}
Review infrastructure configuration
Open infrastructure/main.tf. This Terraform configuration defines the EC2 instances that run the Loki and HashiCups artifacts.
Terraform retrieves the artifact source information from the HCP Packer registry in a similar way as Packer. The hcp_packer_version data source gets the latest version from the bucket and channel provided.
The hcp_packer_artifact data sources then use the version fingerprint to retrieve and store the AMI IDs of the artifacts in the regions specified. Notice that the ami value of the aws_instance resource references the hcp_packer_artifact data source's AMI ID.
infrastructure/main.tf
data "hcp_packer_version" "loki" {
  bucket_name  = var.hcp_bucket_loki
  channel_name = var.hcp_channel
}

data "hcp_packer_artifact" "loki" {
  bucket_name  = data.hcp_packer_version.loki.bucket_name
  channel_name = var.hcp_channel
  platform     = "aws"
  region       = var.region_east
}

resource "aws_instance" "loki" {
  ami           = data.hcp_packer_artifact.loki.external_identifier
  instance_type = "t2.micro"
  # ...
}
The remaining Terraform configuration files define input variables, output values, and network infrastructure that the Loki and HashiCups instances depend on, including a VPC, internet gateway, subnet, route table, and security groups. This Terraform configuration deploys these resources to both the us-east-2 and us-west-2 regions.
Prepare your environment
The configuration scripts included in the AMIs rely on a user named terraform.
Create a local SSH key to pair with the user so that you can securely connect to
your instances.
Generate a new SSH key named learn-packer. The argument provided with the -f
flag creates the key in the current directory and creates two files called
learn-packer and learn-packer.pub.
$ ssh-keygen -P "" -t rsa -f ./learn-packer
Set your HCP Terraform organization
Set the TF_CLOUD_ORGANIZATION environment variable to your HCP Terraform
organization name.
$ export TF_CLOUD_ORGANIZATION=
Log in to HCP Terraform
In this tutorial, you will use the Terraform CLI to create the HCP Terraform workspace and trigger remote plan and apply runs.
Log in to your HCP Terraform account in your terminal.
$ terraform login
Terraform will request an API token for app.terraform.io using your browser.

If login is successful, Terraform will store the token in plain text in
the following file for use by subsequent commands:
    /Users/<USER>/.terraform.d/credentials.tfrc.json

Do you want to proceed?
  Only 'yes' will be accepted to confirm.

  Enter a value:
Confirm with a yes and follow the workflow in the browser window that automatically opens. Paste the generated API key into your Terminal when prompted. Review the Authenticate the CLI with HCP Terraform tutorial for more details about logging in.
Create HCP project and service principal
Create an HCP project and service principal for you to use with this tutorial.
A service principal allows Packer and Terraform to interact with HCP Packer to push and reference artifact metadata.
Log in to HashiCorp Cloud Platform, choose your organization, and navigate to Projects.
Click the + Create project button, name your project
learn-packer-golden-image, leave the description blank, and click Create
project.
Next, navigate to the Access control (IAM) page from the left navigation.
Click on the Service principals link from the left navigation, then Create service principal on the top right of the page.
Name the service principal learn-hcp-packer, assign the "Contributor" role,
then click Create service principal.
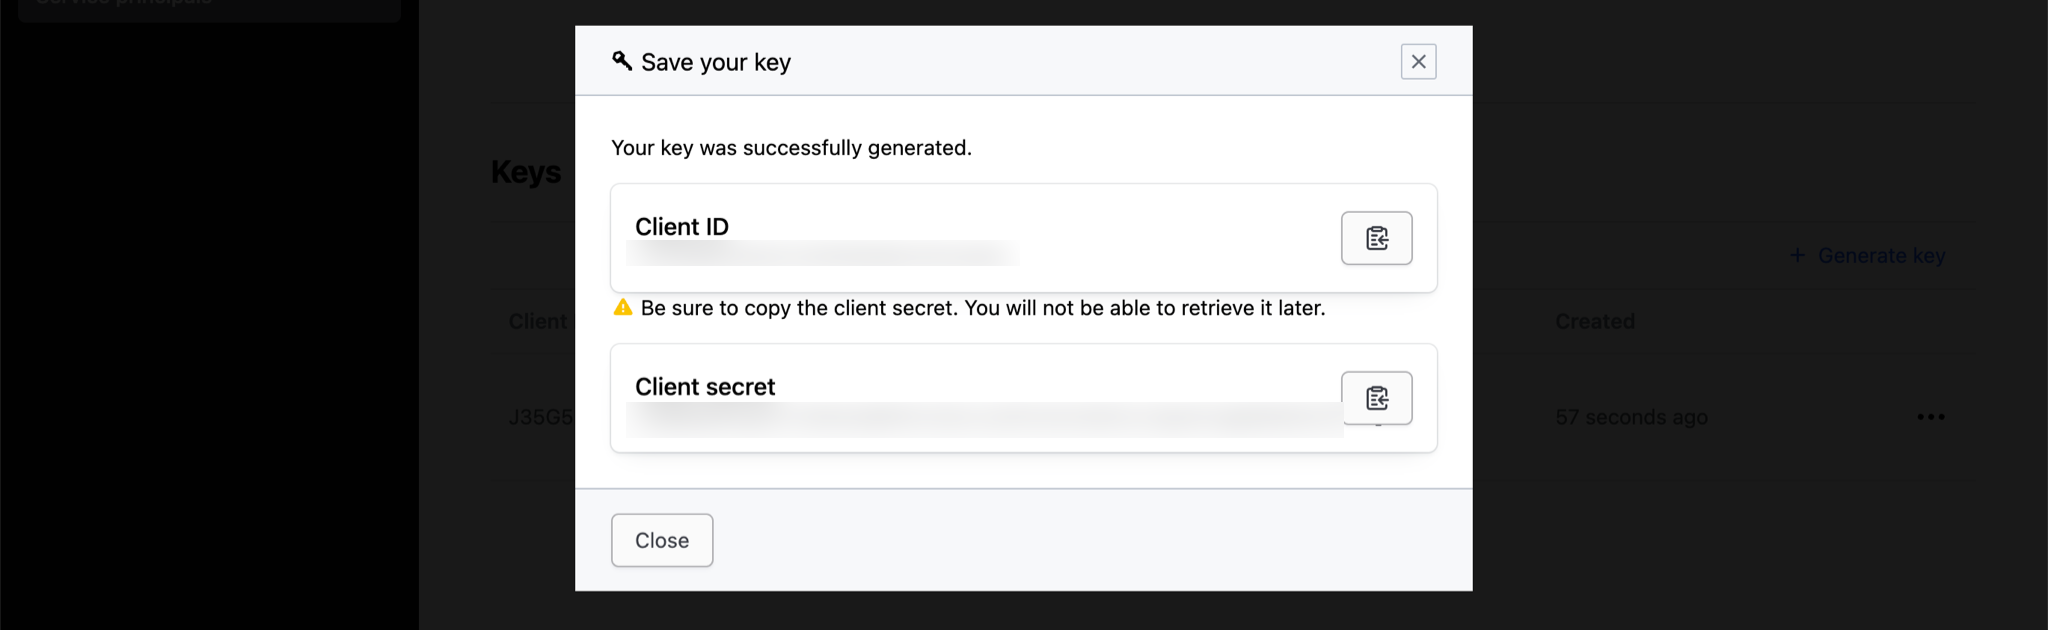
From your service principal page, navigate to Keys, then click the + Generate key button.
Record the Client ID and Client secret — HCP only displays these values upon creation. In addition to setting environment variables in your terminal, you will configure HCP Terraform variables for them later in this tutorial.
In your terminal, set an environment variable for your client ID.
$ export HCP_CLIENT_ID=
Then, set an environment variable for your client secret.
$ export HCP_CLIENT_SECRET=
Once you have recorded and exported your HCP client id and client secret, click the Close button.
Next, navigate to your learn-packer-golden-image Project settings page to
retrieve your project's ID.
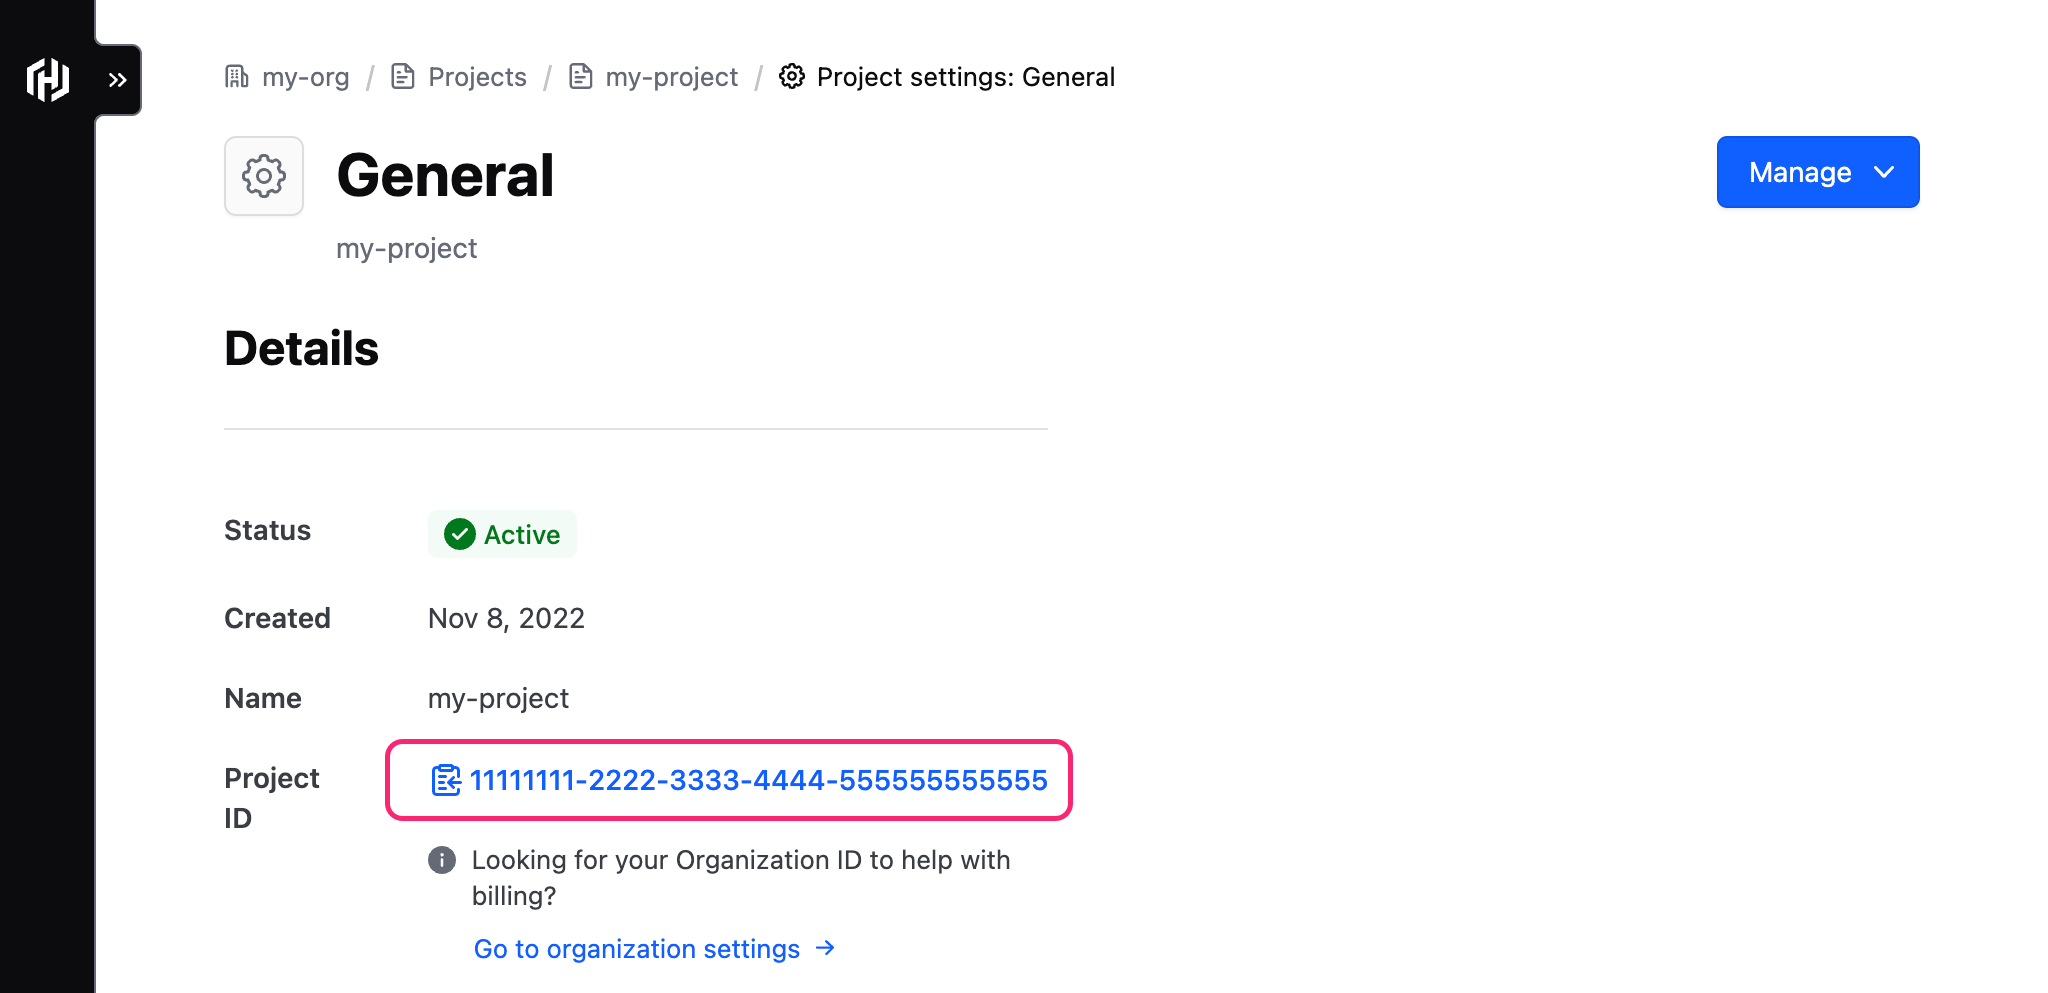
Use this value to set an environment variable for your project's ID.
$ export HCP_PROJECT_ID=
Configure HCP Terraform project and variable set
Create an HCP Terraform project and variable set to configure the credentials for your HCP Terraform workspaces.
Login to HCP Terraform and select the organization you are using for this tutorial, or create a new organization.
Create a project by navigating to Projectss and clicking + New Project.
Name your project learn-packer-golden-image. Leave the description blank, and
click Create.
Next, navigate to your organization's variable sets page by selecting < Projects from the left navigation, followed by Settings, then Variable sets.
On the Variable sets page, click the Create variable set button.
Name your variable set learn-packer-golden-image and leave the description blank.
Select Apply to specific projects and workspaces and select your 'learn-packer-golden-image' project in the Apply to projects dropdown.
Scroll to the bottom of the page and use the + Add variable button to add the following environment variables.
| Category | Key | Value | Sensitive |
|---|---|---|---|
| Environment variable | HCP_PROJECT_ID | Your HCP project ID | No |
| Environment variable | HCP_CLIENT_ID | Your HCP client ID | No |
| Environment variable | HCP_CLIENT_SECRET | Your HCP client secret | Yes |
| Environment variable | AWS_ACCESS_KEY_ID | Your AWS access key ID | No |
| Environment variable | AWS_SECRET_ACCESS_KEY | Your AWS secret access key | Yes |
Depending on your AWS account configuration, you may need to include other variables to configure your AWS provider. Refer to the AWS provider documentation for more information.
Once you have added all of the required variables, click Create variable set.
Configure webhook
Navigate to the webhook configuration directory.
$ cd notif-webhook
Initialize your Terraform configuration.
$ terraform init

Initializing HCP Terraform...

Initializing provider plugins...
- Reusing previous version of hashicorp/aws from the dependency lock file
- Reusing previous version of hashicorp/hcp from the dependency lock file
- Reusing previous version of hashicorp/time from the dependency lock file
- Reusing previous version of hashicorp/archive from the dependency lock file
- Using previously-installed hashicorp/aws v5.49.0
- Using previously-installed hashicorp/hcp v0.88.0
- Using previously-installed hashicorp/time v0.11.1
- Using previously-installed hashicorp/archive v2.4.2

HCP Terraform has been successfully initialized!

You may now begin working with HCP Terraform. Try running "terraform plan" to
see any changes that are required for your infrastructure.

If you ever set or change modules or Terraform settings, run "terraform init"
again to reinitialize your working directory.
Apply the configuration to create your webhook and related resources.
$ terraform apply
Running apply in HCP Terraform. Output will stream here. Pressing Ctrl-C
will cancel the remote apply if it's still pending. If the apply started it
will stop streaming the logs, but will not stop the apply running remotely.

Preparing the remote apply...

To view this run in a browser, visit:
https://app.terraform.io/app/hashidays-golden-image-lab/learn-hcp-packer-golden-image-webhook/runs/run-9PPoSRH5RYKfB85x

Waiting for the plan to start...

Terraform v1.8.3
on linux_amd64
Initializing plugins and modules...
data.archive_file.version_events_webhook: Refreshing...
data.archive_file.version_events_webhook: Refresh complete after 0s [id=888af02a98f47487fee51528b3c7485960fc4821]

Terraform used the selected providers to generate the following execution plan. Resource actions are indicated with the following symbols:
  + create

Terraform will perform the following actions:

  # aws_apigatewayv2_api.version_events_webhook will be created
  + resource "aws_apigatewayv2_api" "version_events_webhook" {
## ...
Plan: 16 to add, 0 to change, 0 to destroy.

Changes to Outputs:
  + base_url      = (known after apply)
  + function_name = "packer-events-webhook"
  + gateway       = (known after apply)

Do you want to perform these actions in workspace "learn-hcp-packer-golden-image-webhook"?
  Terraform will perform the actions described above.
  Only 'yes' will be accepted to approve.

  Enter a value:
Respond to the confirmation prompt with a yes.
  Enter a value: yes

aws_iam_policy.version_events_webhook_logs: Creating...
aws_apigatewayv2_api.version_events_webhook: Creating...
aws_iam_role.version_events_webhook: Creating...
aws_s3_bucket.version_events_webhook_output: Creating...

## ...

time_sleep.wait_10_seconds: Creation complete after 10s [id=2024-05-28T22:11:02Z]
hcp_notifications_webhook.version_events_webhook: Creating...
hcp_notifications_webhook.version_events_webhook: Creation complete after 3s [name=packer-events-webhook]

Apply complete! Resources: 16 added, 0 changed, 0 destroyed.

Outputs:
base_url = "https://fz7s49ao0a.execute-api.us-east-2.amazonaws.com/packer-events-webhook"
function_name = "packer-events-webhook"
gateway = "https://fz7s49ao0a.execute-api.us-east-2.amazonaws.com"
Refer to the S3 section of your AWS Console to review the bucket and the test event. The Lambda function will continue to log HCP Packer events into this bucket.
Build and deploy the Loki artifact
Use Packer to build the Loki artifact. Once you create the artifact and deploy it to an EC2 instance, you will add the instance IP address to the golden image Packer template.
Navigate to the loki-image directory.
$ cd ../loki-image
Initialize the template file for the Loki artifact.
$ packer init .
Build the Loki artifact.
$ packer build .
Tracking build on HCP Packer with fingerprint "01H3MZNN6T60W39TB7S4E816FX"
learn-packer-loki-server.amazon-ebs.base: output will be in this color.

==> learn-packer-loki-server.amazon-ebs.base: Prevalidating any provided VPC information
==> learn-packer-loki-server.amazon-ebs.base: Prevalidating AMI Name: learn-packer-hcp-loki-server-20230623203829
    learn-packer-loki-server.amazon-ebs.base: Found Image ID: ami-0044e9baf05717051
## ...
Build 'learn-packer-loki-server.amazon-ebs.base' finished after 3 minutes 58 seconds.

==> Wait completed after 3 minutes 59 seconds

==> Builds finished. The artifacts of successful builds are:
--> learn-packer-loki-server.amazon-ebs.base: AMIs were created:
us-east-2: ami-0364ce7d42d2a6943

--> learn-packer-loki-server.amazon-ebs.base: Published metadata to HCP Packer registry packer/learn-packer-hcp-loki-image/versions/01HMXWKYXAFCVE4CPAB7AHDKB9
Notice that Packer assigned a randomly generated unique lexicographical identifier (ULID) to this build, which lets HCP packer identify it. Packer then built the Loki image, stored it in AWS, and published the build's metadata to the HCP Packer registry in the final build step.
Inspect Packer Build on HCP
Visit HCP and click on Packer in the left navigation menu.
This page displays a list of buckets and their latest associated versions. Click on the Loki bucket, which is named learn-packer-hcp-loki-image.

Here, you can find information published to the registry from the Loki Packer build including the description and labels defined in the hcp_packer_registry block of the loki/loki.pkr.hcl template. The latest artifact version is on the right.
Click on Versions in the left navigation.
This page displays each build version published to the bucket. Click on the version at the top of the list.
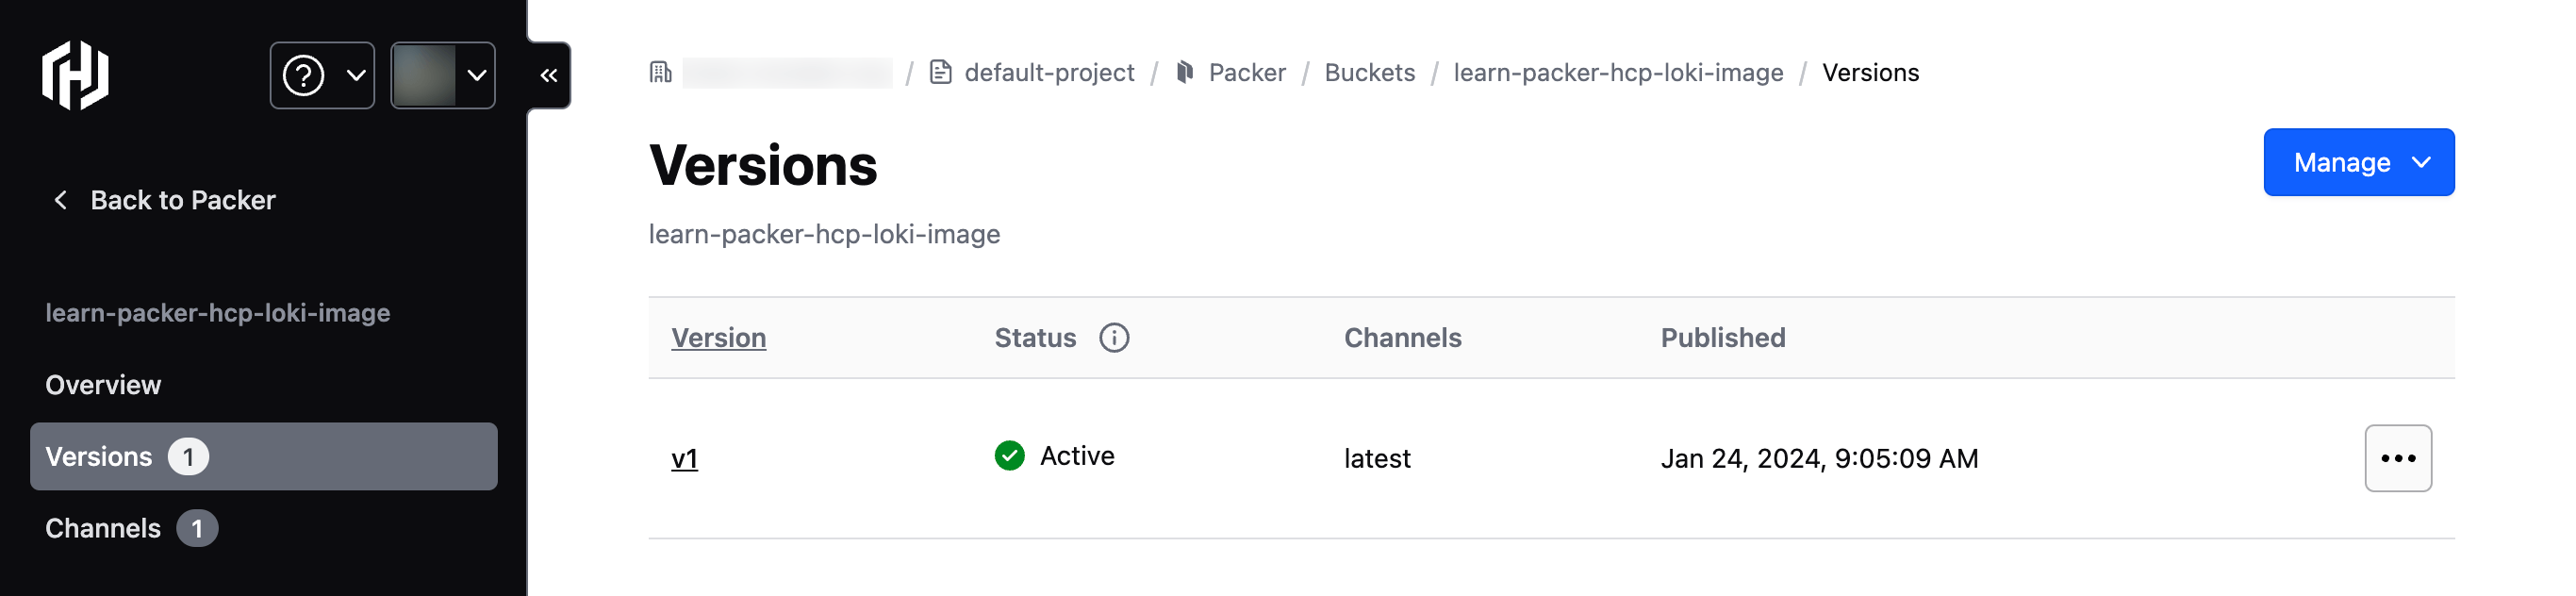
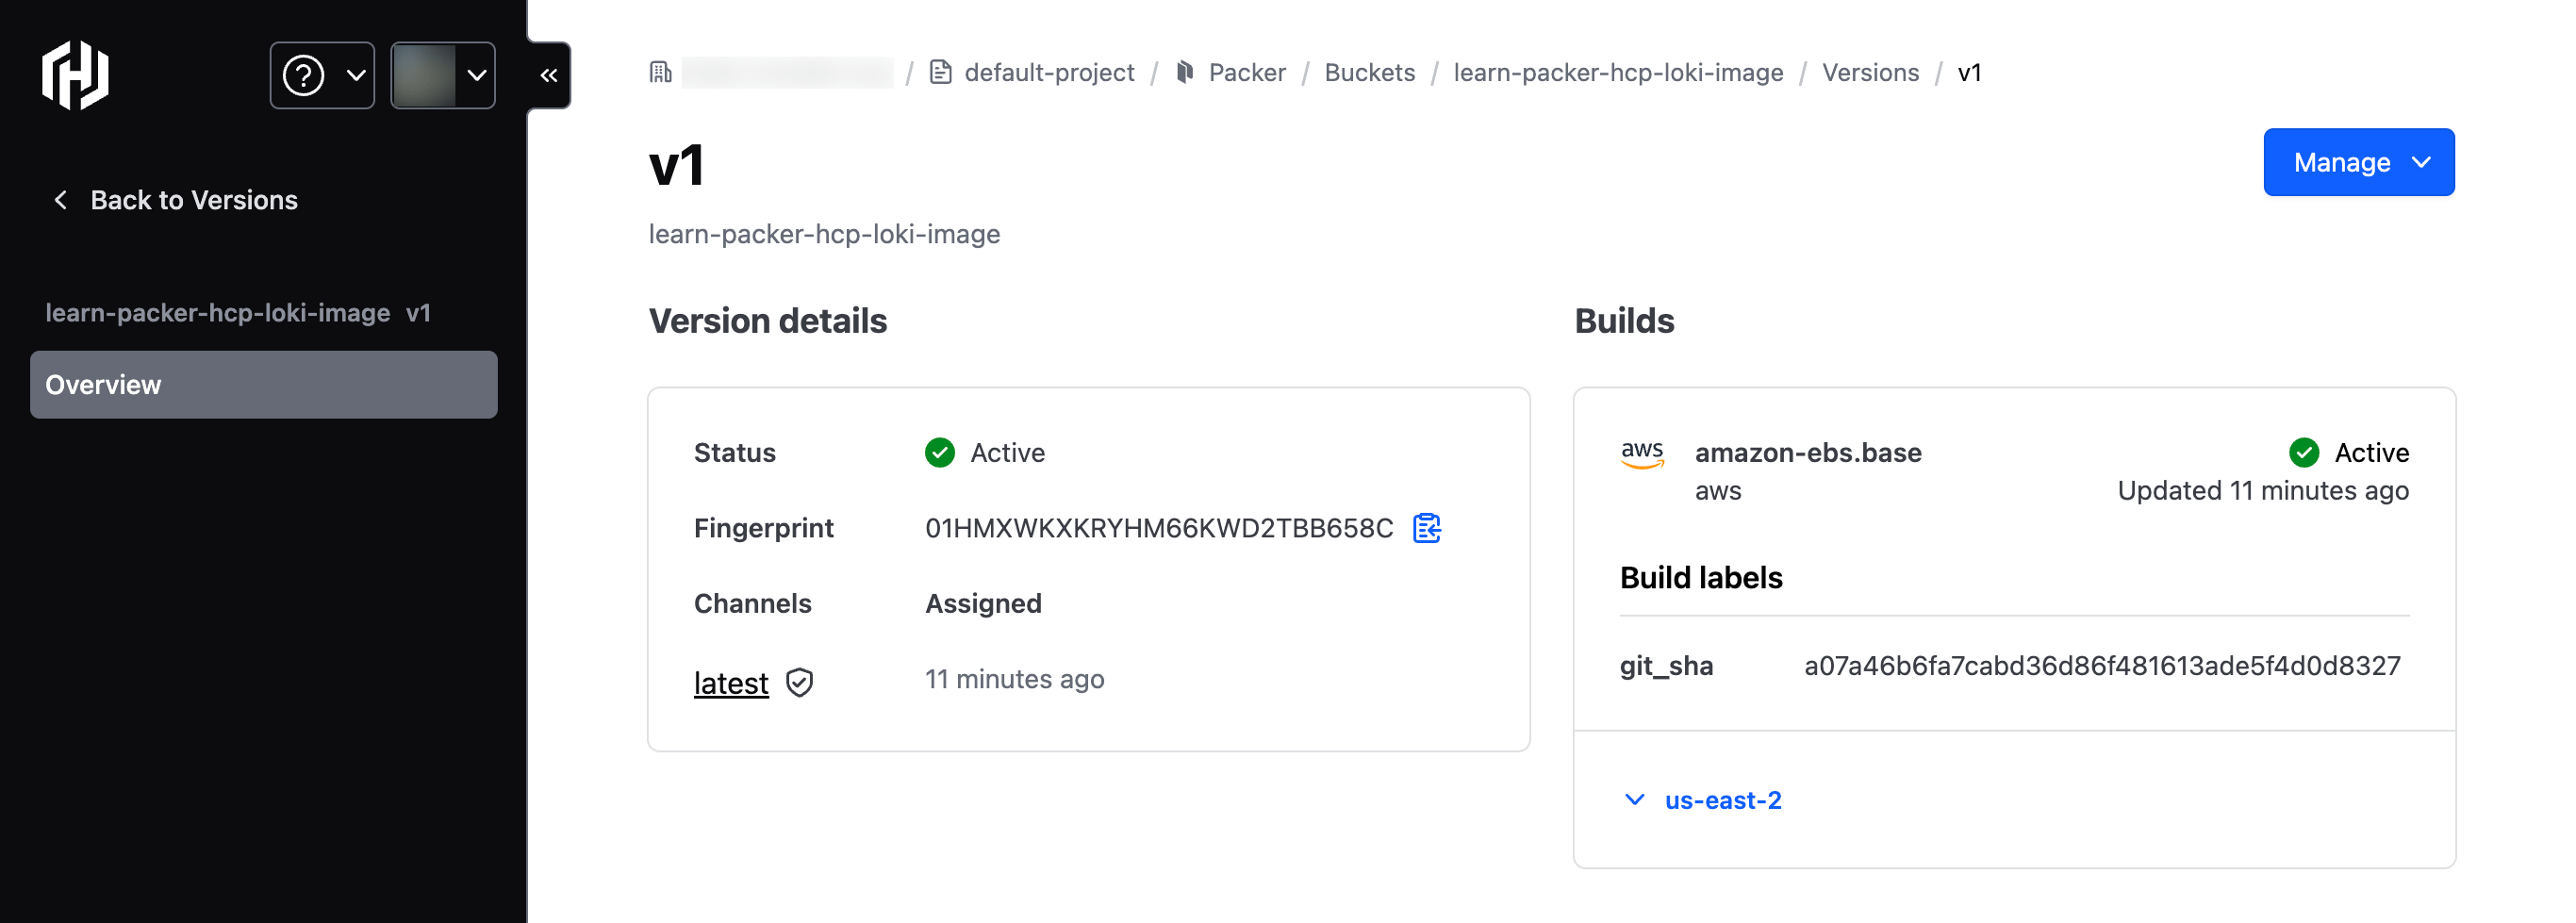
The Builds section lists details about the artifacts published in this version. The amazon-ebs.base artifact matches the artifact defined in the source block in the Loki Packer template. Click on the us-east-2 link to find information about the artifact published to the us-east-2 region, including the AMI ID.
Create channel for Loki artifact
HCP Packer registry channels let you reference a specific build version in Packer or Terraform. This reduces errors from hardcoding AMI IDs and allows both Packer and Terraform to automatically retrieve the most recent artifact.
Select < Back to Versions, then Channels from the left navigation.
Create a new channel for the Loki bucket by clicking on + New Channel.
Enter Production for the Channel name, select the v1 version from the
Choose an initial version to publish to this channel dropdown, then click the
Create channel button.
Initialize the Loki instance with Terraform
Now use Terraform to deploy the Loki artifact to an AWS instance. First, change into the infrastructure directory.
$ cd ../infrastructure
Initialize your Terraform configuration.
$ terraform init
Initializing HCP Terraform...

Initializing provider plugins...
- Reusing previous version of hashicorp/hcp from the dependency lock file
- Reusing previous version of hashicorp/aws from the dependency lock file
- Using previously-installed hashicorp/hcp v0.17.0
- Using previously-installed hashicorp/aws v3.63.0

HCP Terraform has been successfully initialized!

You may now begin working with HCP Terraform. Try running "terraform plan" to
see any changes that are required for your infrastructure.

If you ever set or change modules or Terraform Settings, run "terraform init"
again to reinitialize your working directory.
You have initialized your Terraform configuration and created your learn-hcp-packer-golden-image workspace. You will now associate the run task you created earlier with this workspace to verify that artifacts referenced in runs have not been revoked.
Deploy the Loki instance with Terraform
Apply your configuration. Respond yes to the prompt to confirm the operation.
$ terraform apply
Terraform used the selected providers to generate the following execution
plan. Resource actions are indicated with the following symbols:
  + create

Terraform will perform the following actions:

  # aws_instance.loki will be created
  + resource "aws_instance" "loki" {
      + ami                                  = "ami-03d45fc3ac1622776"
      + arn                                  = (known after apply)
      + associate_public_ip_address          = true
      + availability_zone                    = (known after apply)
      + cpu_core_count                       = (known after apply)
…
Plan: 21 to add, 0 to change, 0 to destroy.

Changes to Outputs:
  + loki_ip = (known after apply)

Do you want to perform these actions?
  Terraform will perform the actions described above.
  Only 'yes' will be accepted to approve.

  Enter a value: yes

## ...

Apply complete! Resources: 21 added, 0 changed, 0 destroyed.

Outputs:

grafana_url = "http://3.149.230.93:3000"
loki_ip = "3.149.230.93"
loki_url = "http://3.149.230.93:3100"
Once Terraform builds the Loki instance, it prints the loki_ip output value,
the Loki instance's public IP address. You will reference this IP address in
your parent artifact configuration to direct log forwarding to the Loki
instance.
Build golden image
To forward the Docker container logs to the Loki instance, you need to update two files with the Loki instance's IP address.
First, verify that you are in the infrastructure directory.
In golden-image/docker-daemon.json, replace LOKI_IP with your Loki public IP address.
$ sed -i "" "s/LOKI_IP/$(terraform output -raw loki_ip)/g" ../golden-image/docker-daemon.json
In golden-image/promtail.yaml, replace LOKI_IP with your Loki public IP address.
$ sed -i "" "s/LOKI_IP/$(terraform output -raw loki_ip)/g" ../golden-image/promtail.yaml
Change to the golden-image directory.
$ cd ../golden-image
Initialize the Packer build.
$ packer init .
Build the golden image with Packer and the golden/golden.pkr.hcl template.
$ packer build .
learn-packer-golden.amazon-ebs.base_east: output will be in this color.
learn-packer-golden.amazon-ebs.base_west: output will be in this color.

==> learn-packer-golden.amazon-ebs.base_east: Publishing build details for amazon-ebs.base_east to the HCP Packer registry
==> learn-packer-golden.amazon-ebs.base_west: Publishing build details for amazon-ebs.base_west to the HCP Packer registry
==> learn-packer-golden.amazon-ebs.base_east: Prevalidating any provided VPC information
==> learn-packer-golden.amazon-ebs.base_east: Prevalidating AMI Name: learn-packer-hcp-golden-image-20210923193639
    learn-packer-golden.amazon-ebs.base_east: Found Image ID: ami-0a5a9780e8617afe7
## …
==> learn-packer-golden.amazon-ebs.base_west: Running post-processor:
Build 'learn-packer-golden.amazon-ebs.base_west' finished after 7 minutes 25 seconds.

==> Wait completed after 7 minutes 25 seconds

==> Builds finished. The artifacts of successful builds are:
--> learn-packer-golden.amazon-ebs.base_east: AMIs were created:
us-east-2: ami-0586ee045d6d8119d

--> learn-packer-golden.amazon-ebs.base_east: Published metadata to HCP Packer registry packer/learn-packer-hcp-golden-base-image/versions/01HMXZFHE7Y08R8HGMDHAMW9V1
--> learn-packer-golden.amazon-ebs.base_west: AMIs were created:
us-west-2: ami-039d836647c0e2116

--> learn-packer-golden.amazon-ebs.base_west: Published metadata to HCP Packer registry packer/learn-packer-hcp-golden-base-image/versions/01HMXZFHE7Y08R8HGMDHAMW9V1
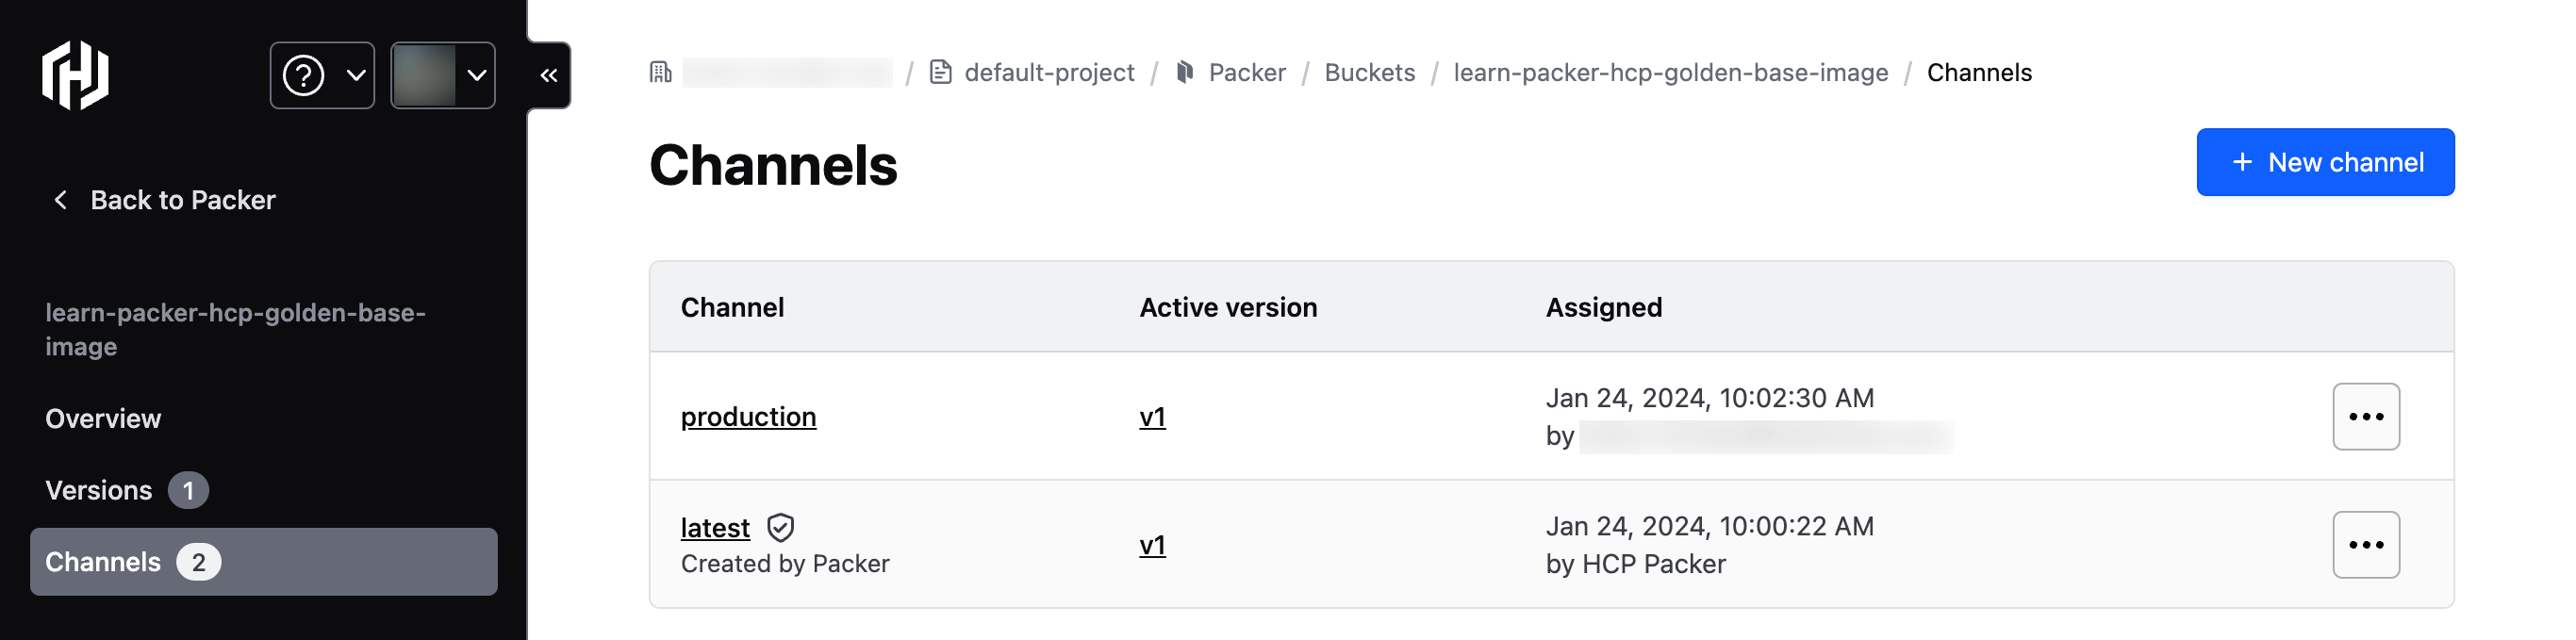
Create channel for golden image
In HCP Packer, navigate to the learn-packer-hcp-golden-base-image bucket page, create a new channel named Production, and select version v1.
Build and deploy HashiCups artifact
Since the golden image is already configured to send container logs to Loki, and the HashiCups artifact is built on top of the golden one, you do not need to modify the HashiCups artifact configuration.
Use Packer to build the HashiCups artifact. Change to the hashicups-image directory.
$ cd ../hashicups-image
Initialize the Packer build.
$ packer init .
Run the Packer build.
$ packer build .
learn-packer-hashicups.amazon-ebs.hashicups_east: output will be in this color.
learn-packer-hashicups.amazon-ebs.hashicups_west: output will be in this color.

==> learn-packer-hashicups.amazon-ebs.hashicups_west: Publishing build details for amazon-ebs.hashicups_west to the HCP Packer registry
==> learn-packer-hashicups.amazon-ebs.hashicups_east: Publishing build details for amazon-ebs.hashicups_east to the HCP Packer registry
==> learn-packer-hashicups.amazon-ebs.hashicups_east: Prevalidating any provided VPC information
==> learn-packer-hashicups.amazon-ebs.hashicups_east: Prevalidating AMI Name: learn-packer-hcp-hashicups-20210923192120
==> learn-packer-hashicups.amazon-ebs.hashicups_west: Prevalidating any provided VPC information
==> learn-packer-hashicups.amazon-ebs.hashicups_west: Prevalidating AMI Name: learn-packer-hcp-hashicups-20210923192120
    learn-packer-hashicups.amazon-ebs.hashicups_east: Found Image ID: ami-07ede610b9d9d4067
## …
==> learn-packer-hashicups.amazon-ebs.hashicups_west: Running post-processor:
Build 'learn-packer-hashicups.amazon-ebs.hashicups_west' finished after 3 minutes 57 seconds.

==> Wait completed after 3 minutes 57 seconds

==> Builds finished. The artifacts of successful builds are:
--> learn-packer-hashicups.amazon-ebs.hashicups_east: AMIs were created:
us-east-2: ami-0c10840bdeee6e680

--> learn-packer-hashicups.amazon-ebs.hashicups_east: Published metadata to HCP Packer registry packer/learn-packer-hcp-hashicups-image/versions/01HMY01S4AQ7KT41VE6WR3N5FB
--> learn-packer-hashicups.amazon-ebs.hashicups_west: AMIs were created:
us-west-2: ami-0c617adf614a50308

--> learn-packer-hashicups.amazon-ebs.hashicups_west: Published metadata to HCP Packer registry packer/learn-packer-hcp-hashicups-image/versions/01HMY01S4AQ7KT41VE6WR3N5FB
Set up run task in HCP Terraform
Configure a run task in HCP Terraform to validate your HCP Packer images when you use them in your Terraform configuration.
Configure HCP Packer integration
On the HCP Packer Buckets page, click Integrate with HCP Terraform.
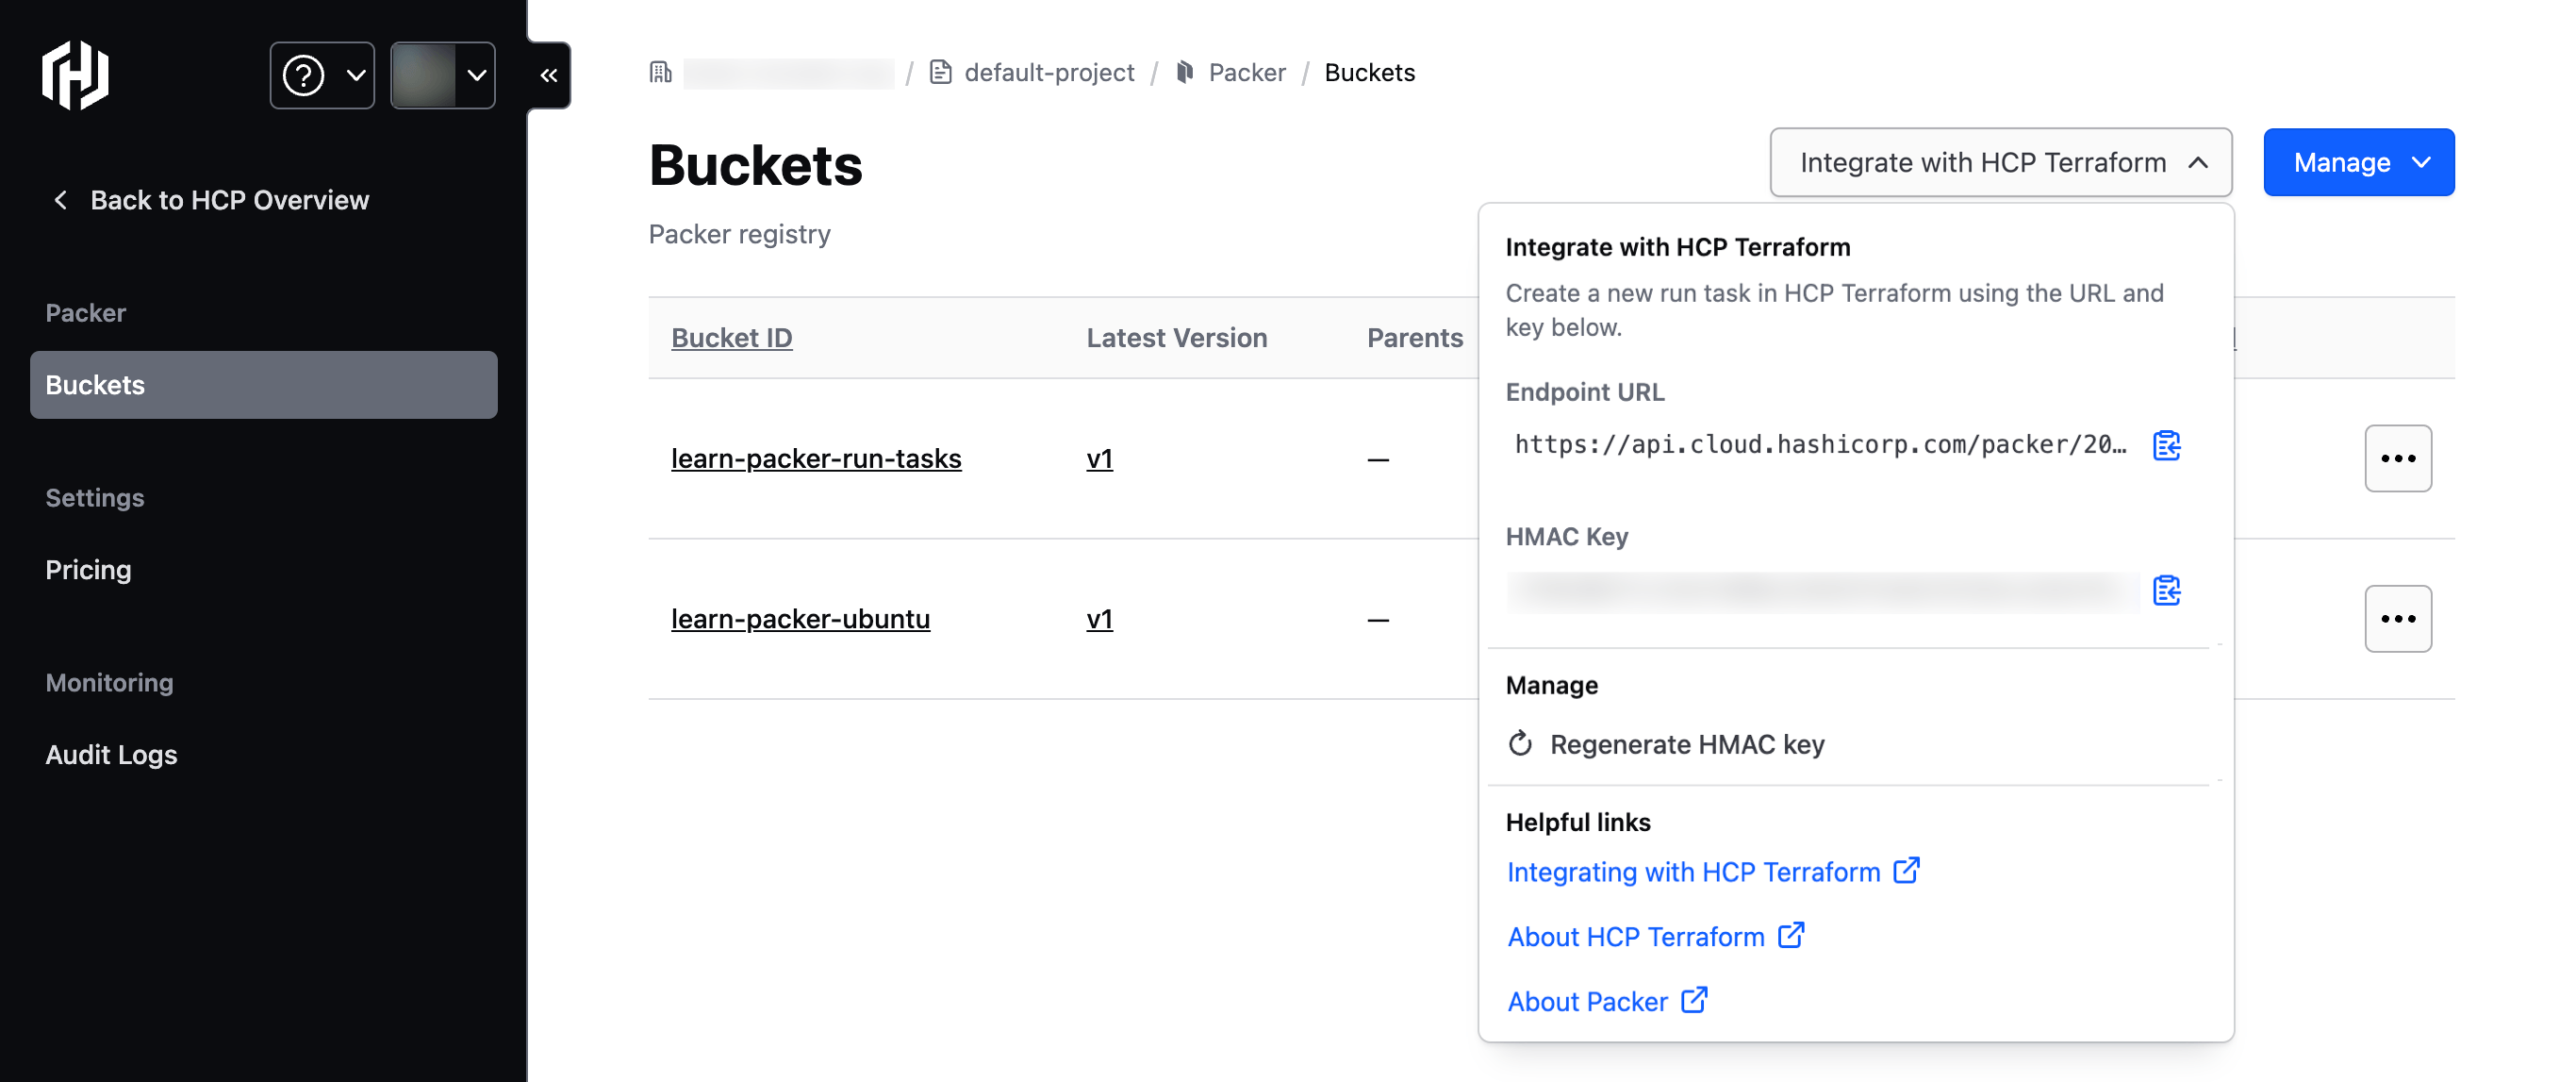
This displays information you will use to configure your HCP Terraform run task.
The Endpoint URL is a unique HCP Packer URL, specific to your HCP organization and HCP Packer registry. The HCP Terraform run task will send a payload to this URL for artifact validation.
The HMAC Key is a secret key that lets HCP Packer verify the run task request.
Leave this tab open to reference the displayed values for the next step.
Create HCP Terraform run task
In HCP Terraform, go to your organization's Settings page, then click Run tasks on the left sidebar.
Click Create run task.
On the Create a Run Task page:
Set Name to
HCP-Packer.Set Endpoint URL to the endpoint URL you retrieved in the previous step.
Set HMAC key to the HMAC key you retrieved in the previous step.
Click Create.
Enable run tasks in workspace
Open your learn-hcp-packer-golden-image workspace Settings page, then click Run Tasks.
Under Available Run Tasks, click on HCP-Packer.
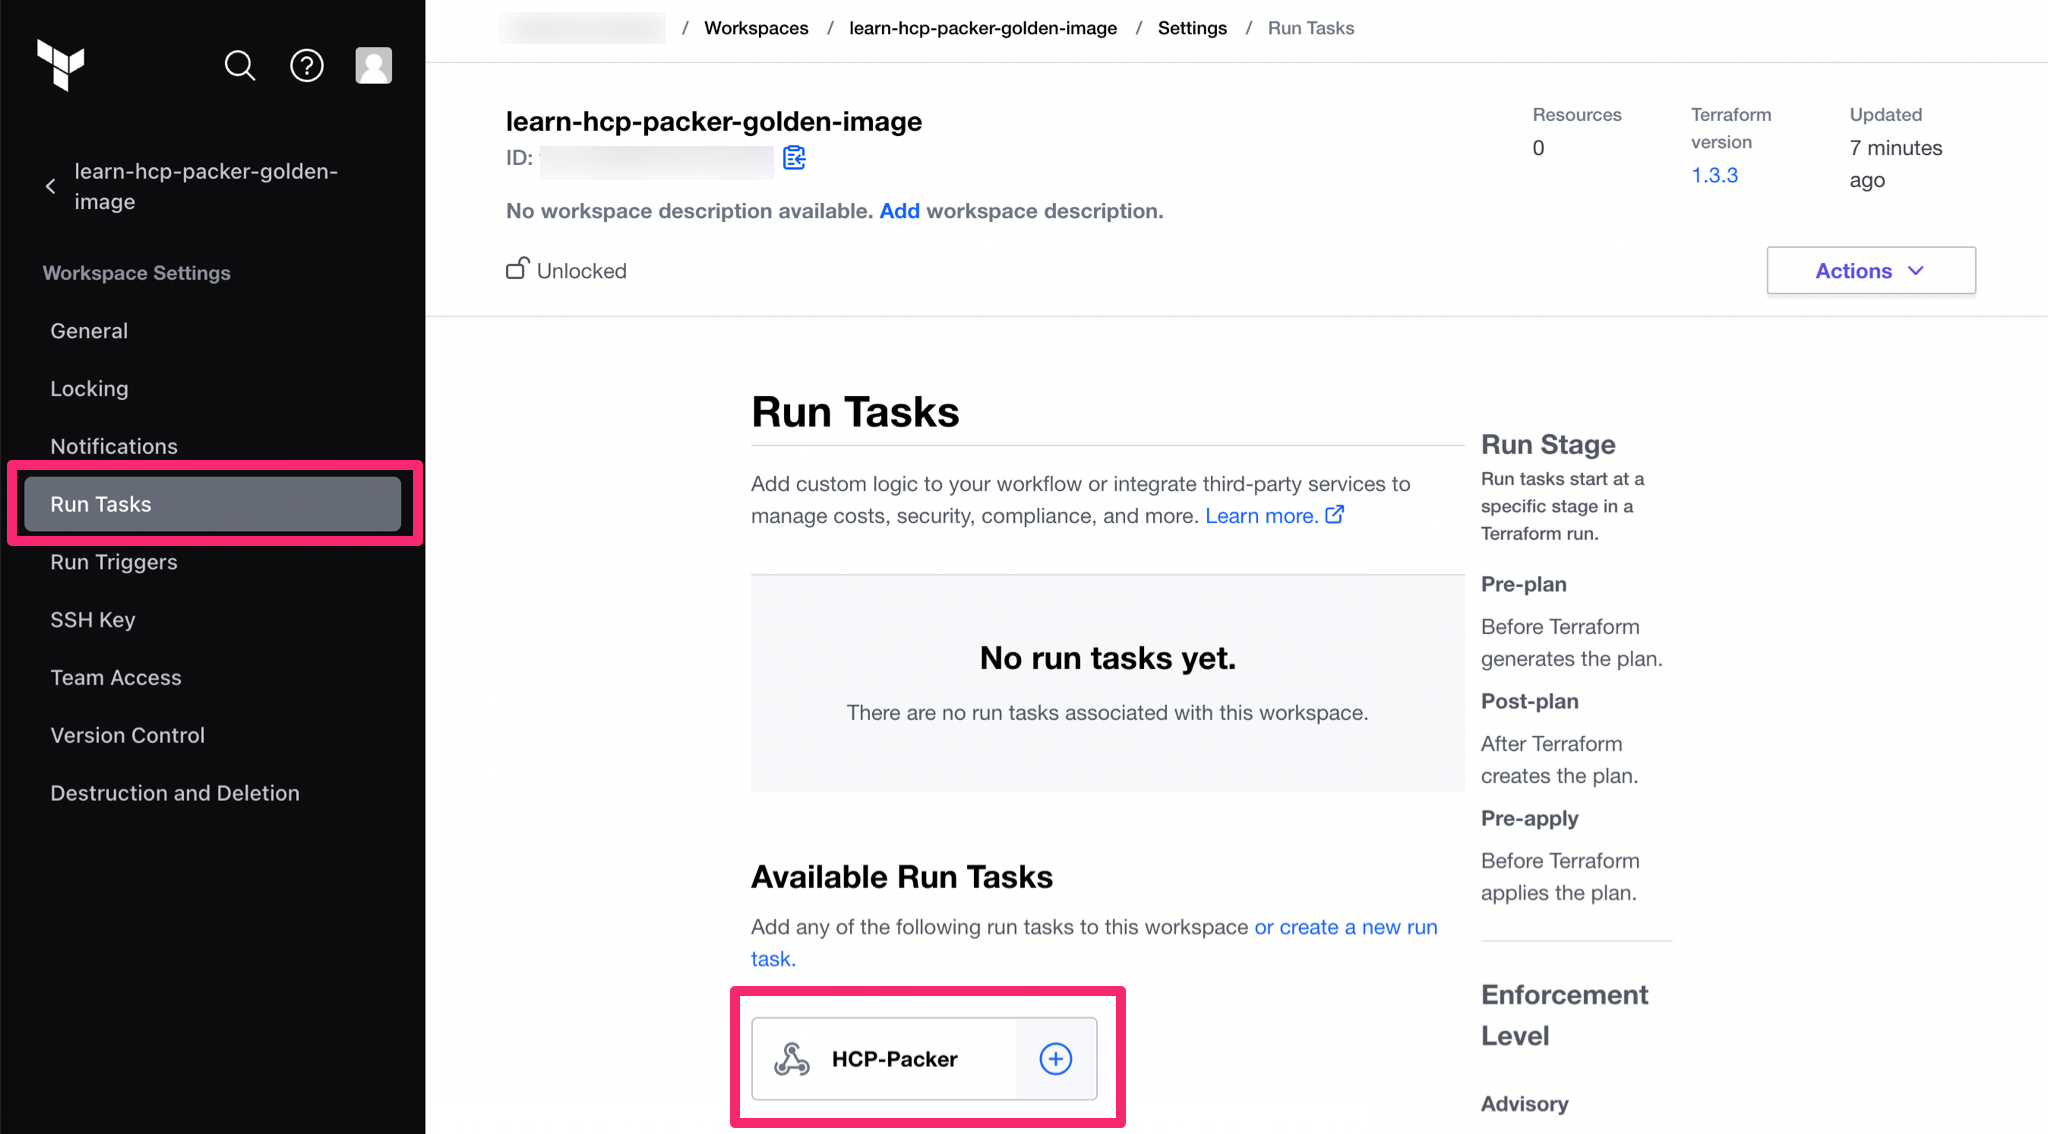
Select the Mandatory enforcement level, then click Create.
The Run Task page now displays the run task for HCP Packer. This run task scans your Terraform configuration for resources that use hard-coded machine AMI IDs and checks if the artifact is tracked by HCP Packer. If the artifact is associated with an artifact version, the run task warns users if it is a revoked version. It also prompts users to use the HCP Packer data sources instead of hard-coded AMI IDs to better track and manage artifacts.
Create channel for HashiCups artifact and schedule revocation
In HCP Packer, navigate to the learn-packer-hcp-hashicups-image bucket page.
The Ancestry table shows that this artifact is up to date with it's parent, the learn-packer-hcp-golden-base-image artifact.

Now, create a new channel named Production, and select the latest version.

Test HCP artifact validation
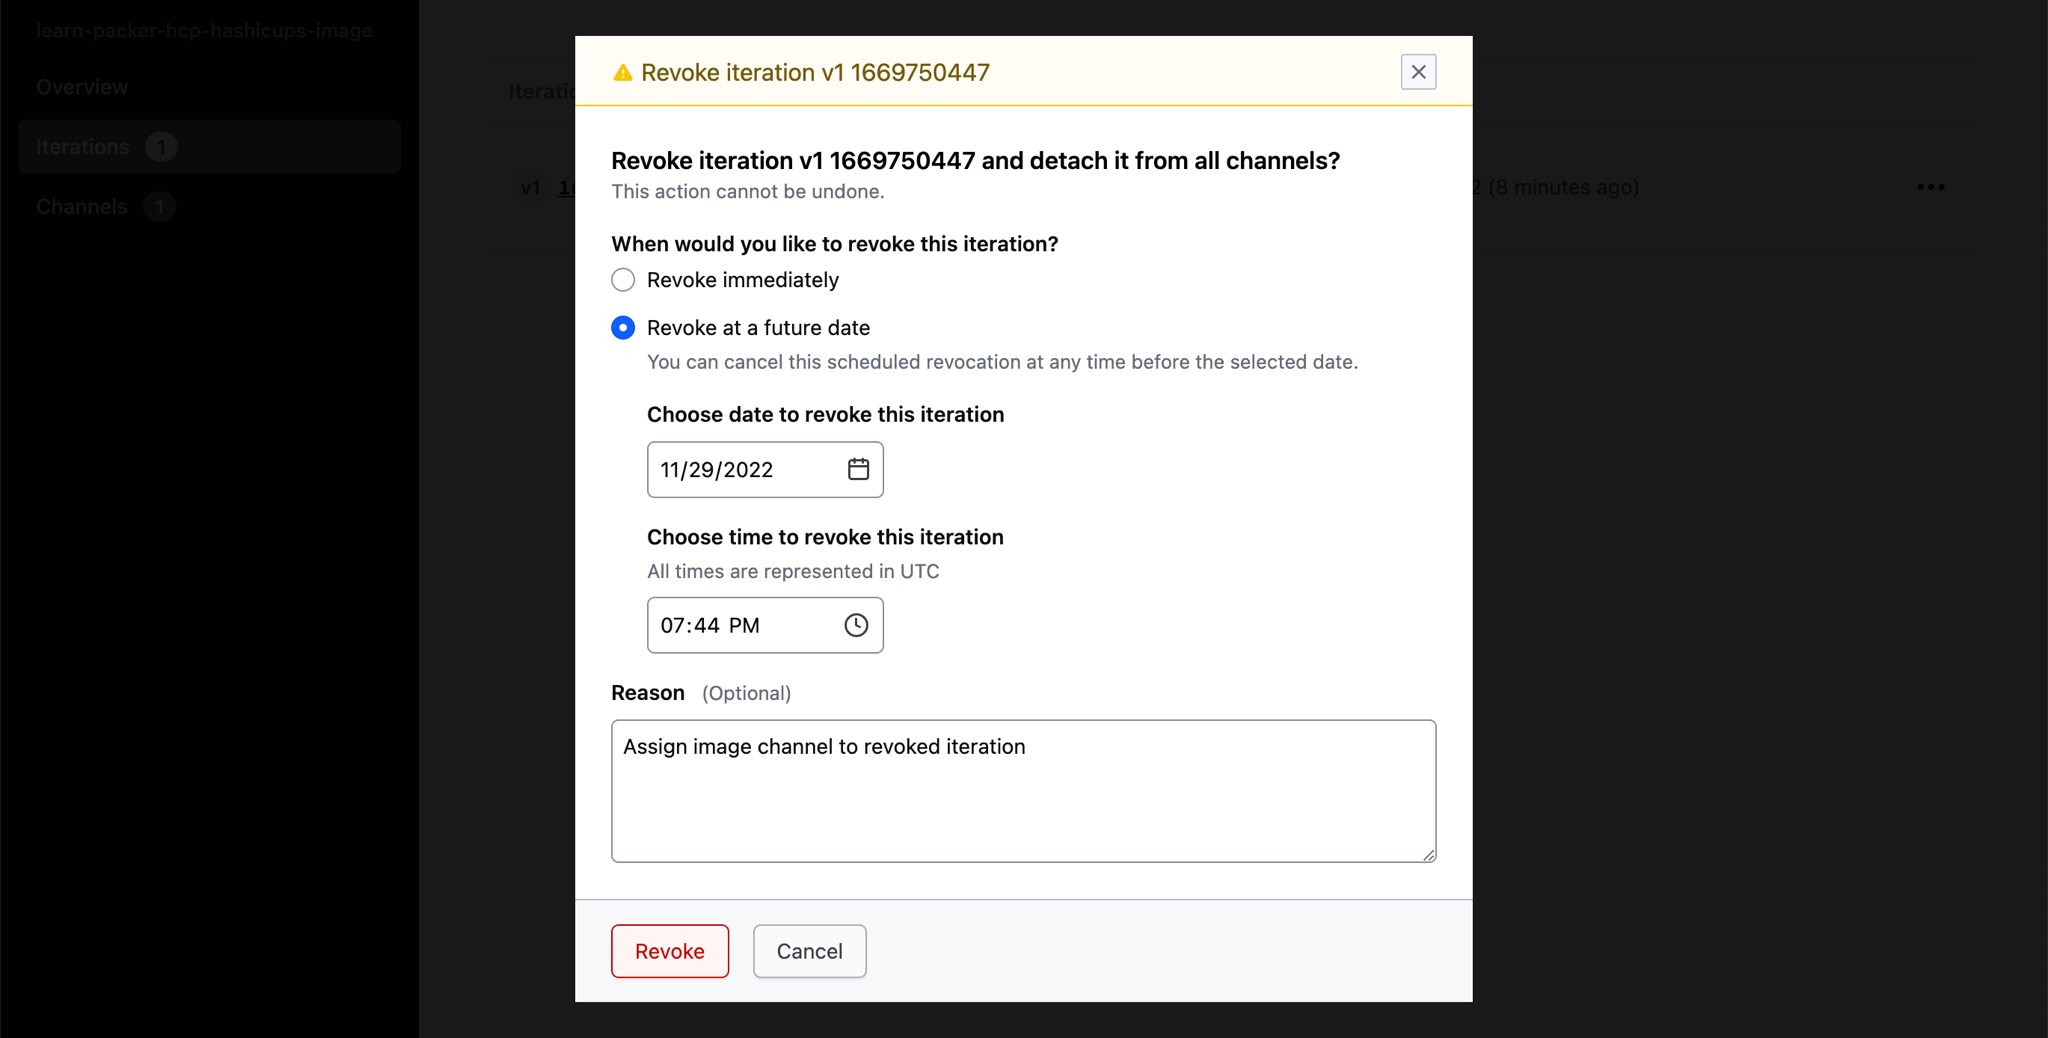
If an artifact becomes outdated or a security risk, you can revoke it to prevent consumers from accessing its metadata and using it to build artifacts. Schedule a revocation for the current version.
In order to schedule a revocation, you must first enable the Essentials tier for your HCP Packer registry.
Navigate to your HCP Packer Buckets page, then click Manage > Edit registry and select Essentials. If you have free-trial credits HCP will apply them to enable the Standard tier.
- Go to the Versions page
- Click ... next to the v1 version
- Click Revoke version
- Select Revoke at a future date
- Enter the time for 1 minute from your current time. The time is in UTC (current time in UTC). For example, if it is currently
10:00, enter10:01 - Enter
Assign artifact channel to revoked versionfor the revocation reason - Select No, do not rollback channel from the Rollback channels dropdown
- Click Revoke to revoke the version
You are setting a short revocation window so that your artifact channel uses a revoked artifact to test validation workflows. This is for the educational purposes of the tutorial.
Next, attempt to deploy the revoked HashiCups artifact with Terraform.
Change to the infrastructure directory.
$ cd ../infrastructure
Add the following configuration to the end of infrastructure/main.tf. This configuration defines EC2 instances in the us-east-2 and us-west-2 regions.
infrastructure/main.tf
data "hcp_packer_version" "hashicups" {
  bucket_name  = var.hcp_bucket_hashicups
  channel_name = var.hcp_channel
}

data "hcp_packer_artifact" "hashicups_west" {
  bucket_name  = data.hcp_packer_version.hashicups.bucket_name
  channel_name = var.hcp_channel
  platform     = "aws"
  region       = var.region_west
}

resource "aws_instance" "hashicups_west" {
  provider      = aws.west
  ami           = data.hcp_packer_artifact.hashicups_west.external_identifier
  instance_type = "t2.micro"
  subnet_id     = aws_subnet.subnet_public_west.id
  vpc_security_group_ids = [
    aws_security_group.ssh_west.id,
    aws_security_group.allow_egress_west.id,
    aws_security_group.promtail_west.id,
    aws_security_group.hashicups_west.id,
  ]
  associate_public_ip_address = true

  tags = {
    Name = "Learn-Packer-HashiCups"
  }

  depends_on = [
    aws_instance.loki
  ]
}

data "hcp_packer_artifact" "hashicups_east" {
  bucket_name  = data.hcp_packer_version.hashicups.bucket_name
  channel_name = var.hcp_channel
  platform     = "aws"
  region       = var.region_east
}

resource "aws_instance" "hashicups_east" {
  ami           = data.hcp_packer_artifact.hashicups_east.external_identifier
  instance_type = "t2.micro"
  subnet_id     = aws_subnet.subnet_public_east.id
  vpc_security_group_ids = [
    aws_security_group.ssh_east.id,
    aws_security_group.allow_egress_east.id,
    aws_security_group.promtail_east.id,
    aws_security_group.hashicups_east.id,
  ]
  associate_public_ip_address = true

  tags = {
    Name = "Learn-Packer-HashiCups"
  }

  depends_on = [
    aws_instance.loki
  ]
}
Save your changes.
The ami values reference values from the HCP Packer data sources instead of hard-coded AMI IDs.
Add the following configuration to the bottom of infrastructure/outputs.tf to display the IP addresses of the provisioned HashiCups instances.
infrastructure/outputs.tf
output "hashicups_west_url" {
  value       = "http://${aws_instance.hashicups_west.public_ip}:19090"
  description = "Public IP address for the HashiCups instance in us-west-2."
}

output "hashicups_west_ip" {
  value       = aws_instance.hashicups_west.public_ip
  description = "Public IP address for the HashiCups instance in us-west-2."
}

output "hashicups_west_ami" {
  value       = aws_instance.hashicups_west.ami
  description = "AMI of the HashiCups instance in us-west-2."
}

output "hashicups_east_ip" {
  value       = aws_instance.hashicups_east.public_ip
  description = "Public IP address for the HashiCups instance in us-east-2."
}

output "hashicups_east_url" {
  value       = "http://${aws_instance.hashicups_east.public_ip}:19090"
  description = "Public URL address for the HashiCups instance in us-east-2."
}
Save your changes.
In your terminal, apply your configuration. After Terraform creates the plan, the run will return an error because the run task failed.
In HCP Terraform, open the latest run to review the details. Click the Tasks failed box.
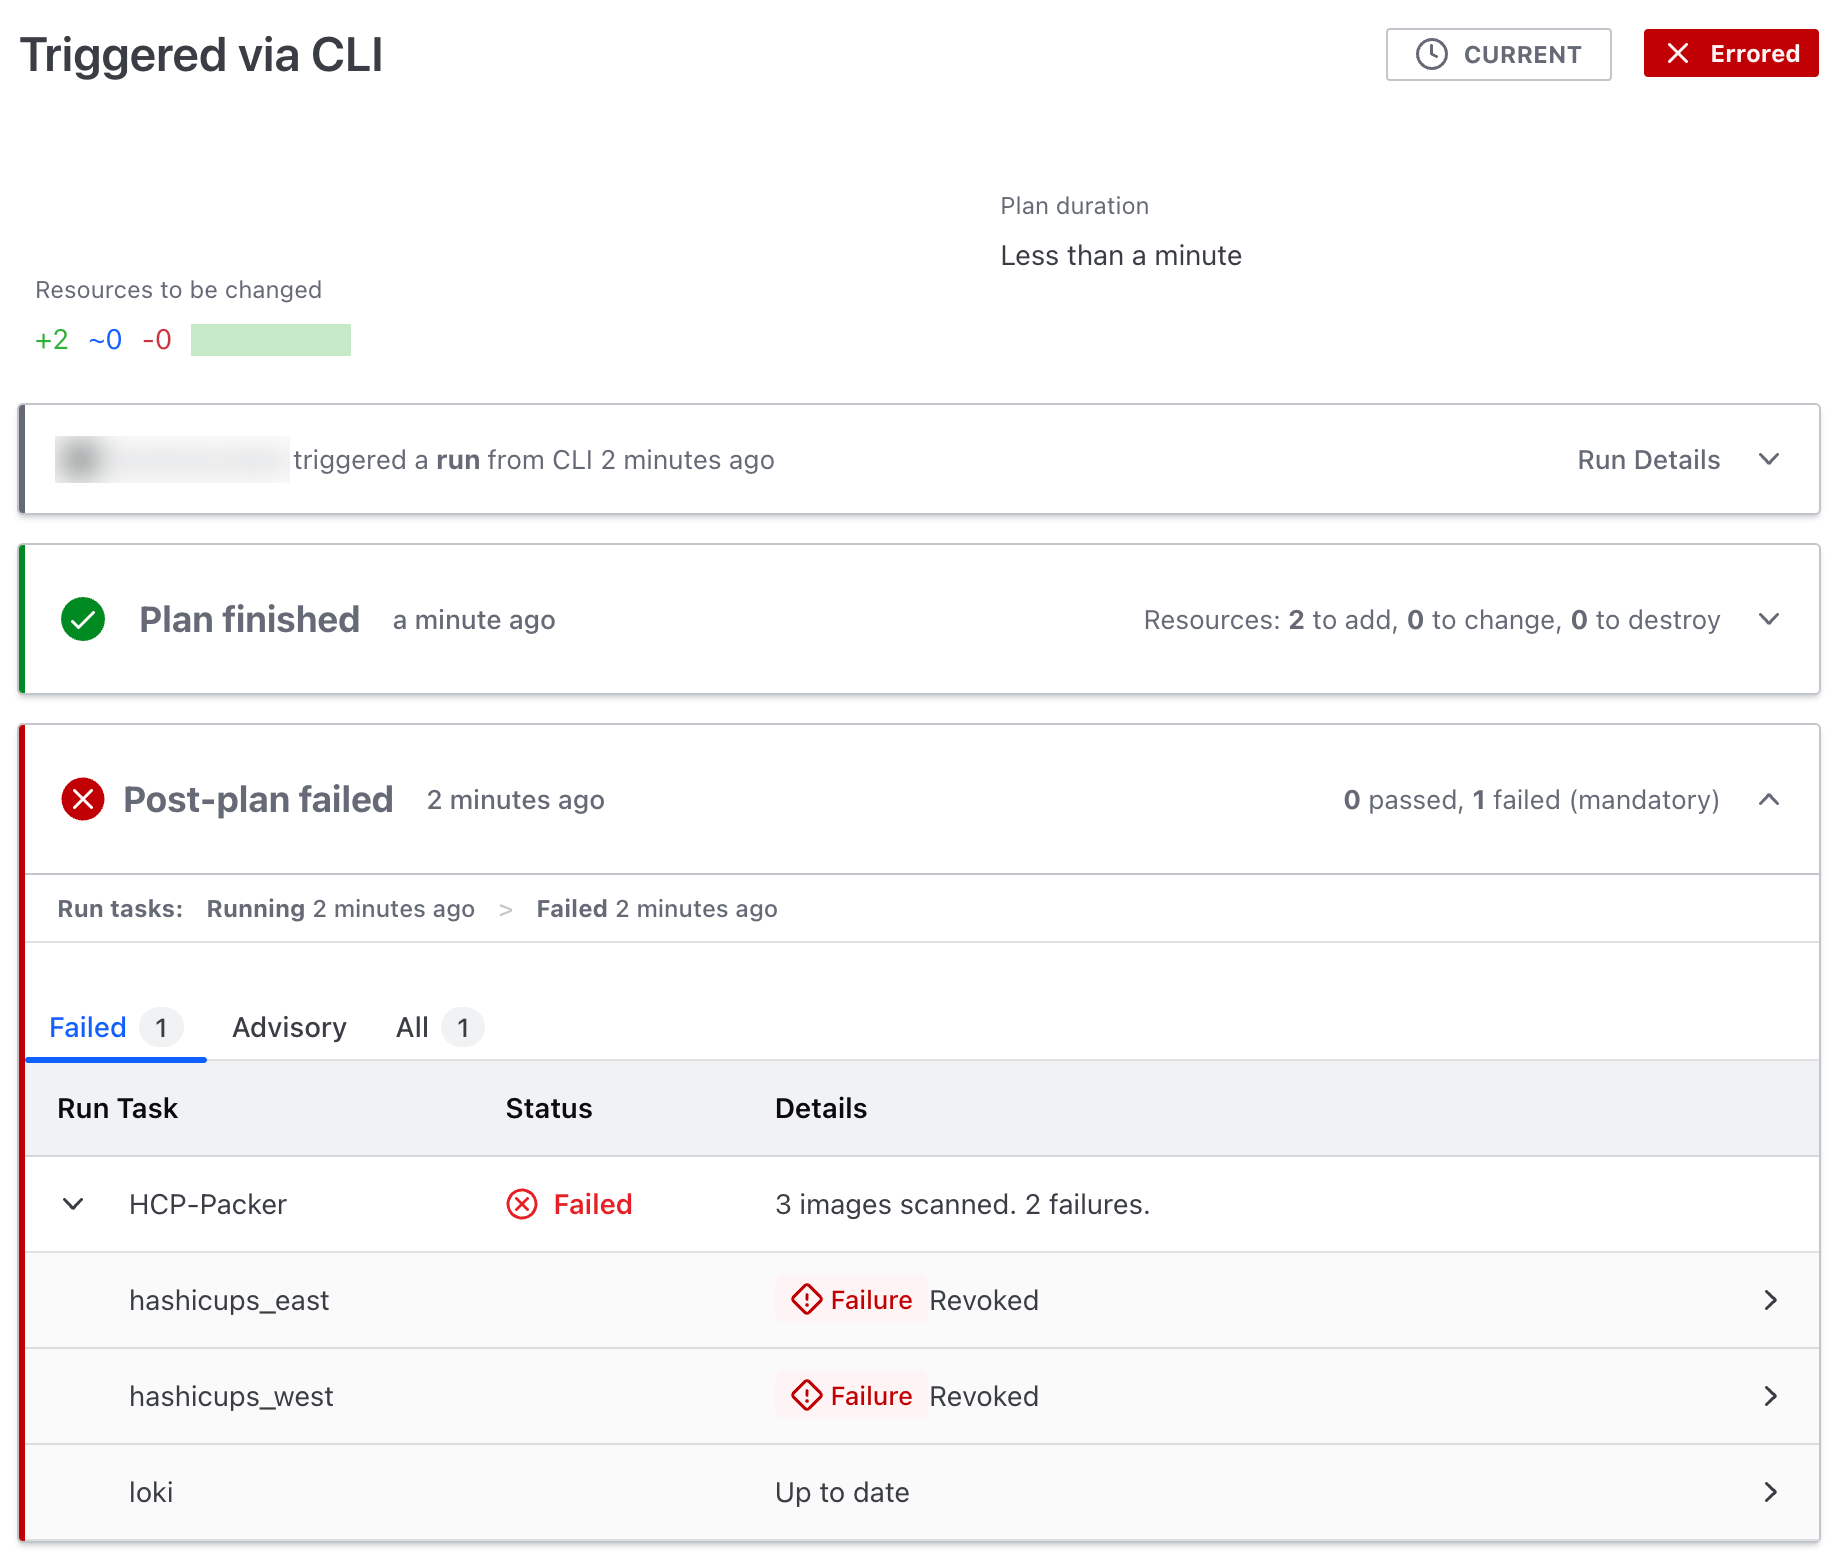
The run task detected that the aws_instance resource references the hcp_packer_artifact data source. Since the data source retrieved a revoked version, the run task failed.
If the run task had found a newer version, it would have suggested that you use it. As an artifact maintainer always make sure to replace revoked artifacts in channels.
Restore artifact version
Click on the Details link in the run task output to visit the HCP Packer dashboard. Click the learn-packer-hcp-hashicups-image bucket and select the revoked version. Click Manage, then Restore version to restore the revoked version.

Confirm the action by clicking on Restore version.
Deploy HashiCups
Apply your configuration.
$  terraform apply
Running apply in HCP Terraform. Output will stream here. Pressing Ctrl-C
will cancel the remote apply if it's still pending. If the apply started it
will stop streaming the logs, but will not stop the apply running remotely.

Preparing the remote apply...

To view this run in a browser, visit:
https://app.terraform.io/app/hashicorp-training/learn-hcp-packer-golden-image/runs/run-REDACTED

##

Plan: 2 to add, 0 to change, 0 to destroy.

Changes to Outputs:
  + hashicups_east_ip = (known after apply)
  + hashicups_west_ip = (known after apply)

Run Tasks (post-plan):

##..

All tasks completed! 1 passed, 0 failed           (4s elapsed)

│ HCP-Packer ⸺   Passed
│ 3 images scanned.
│
│
│ Overall Result: Passed

------------------------------------------------------------------------


Do you want to perform these actions in workspace "learn-hcp-packer-golden-image"?
  Terraform will perform the actions described above.
  Only 'yes' will be accepted to approve.

  Enter a value: yes

##..

Apply complete! Resources: 2 added, 0 changed, 0 destroyed.

Outputs:

hashicups_east_ip = "3.15.6.10"
hashicups_west_ip = "34.210.58.171"
loki_ip = "3.12.36.235"
Once Terraform finishes provisioning the HashiCups instances, use cURL to query the HashiCups API using the hashicups_east_ip address, port 19090, and the /coffees path.
$ curl $(terraform output -raw hashicups_east_ip):19090/coffees
[{"id":1,"name":"Packer Spiced Latte","teaser":"Packed with goodness to spice up your images","description":"","price":350,"image":"/packer.png","ingredients":[{"ingredient_id":1},{"ingredient_id":2},{"ingredient_id":4}]},{"id":2,"name":"Vaulatte","teaser":"Nothing gives you a safe and secure feeling like a Vaulatte","description":"","price":200,"image":"/vault.png","ingredients":[{"ingredient_id":1},{"ingredient_id":2}]},{"id":3,"name":"Nomadicano","teaser":"Drink one today and you will want to schedule another","description":"","price":150,"image":"/nomad.png","ingredients":[{"ingredient_id":1},{"ingredient_id":3}]},{"id":4,"name":"Terraspresso","teaser":"Nothing kickstarts your day like a provision of Terraspresso","description":"","price":150,"image":"terraform.png","ingredients":[{"ingredient_id":1}]},{"id":5,"name":"Vagrante espresso","teaser":"Stdin is not a tty","description":"","price":200,"image":"vagrant.png","ingredients":[{"ingredient_id":1}]},{"id":6,"name":"Connectaccino","teaser":"Discover the wonders of our meshy service","description":"","price":250,"image":"consul.png","ingredients":[{"ingredient_id":1},{"ingredient_id":5}]}]
The endpoint will return a list of coffees you could order using the HashiCups app. This shows that the application is running on the instances Terraform deployed.
Verify HashiCups logs in Grafana
Add Loki as a data source to retrieve logs in Grafana. Since Grafana is running on the Loki instance, you can access it at the same IP, on port 3000.
Use the loki_ip output value to determine the Grafana endpoint.
$ echo "http://$(terraform output -raw loki_ip):3000"
http://18.117.188.90:3000
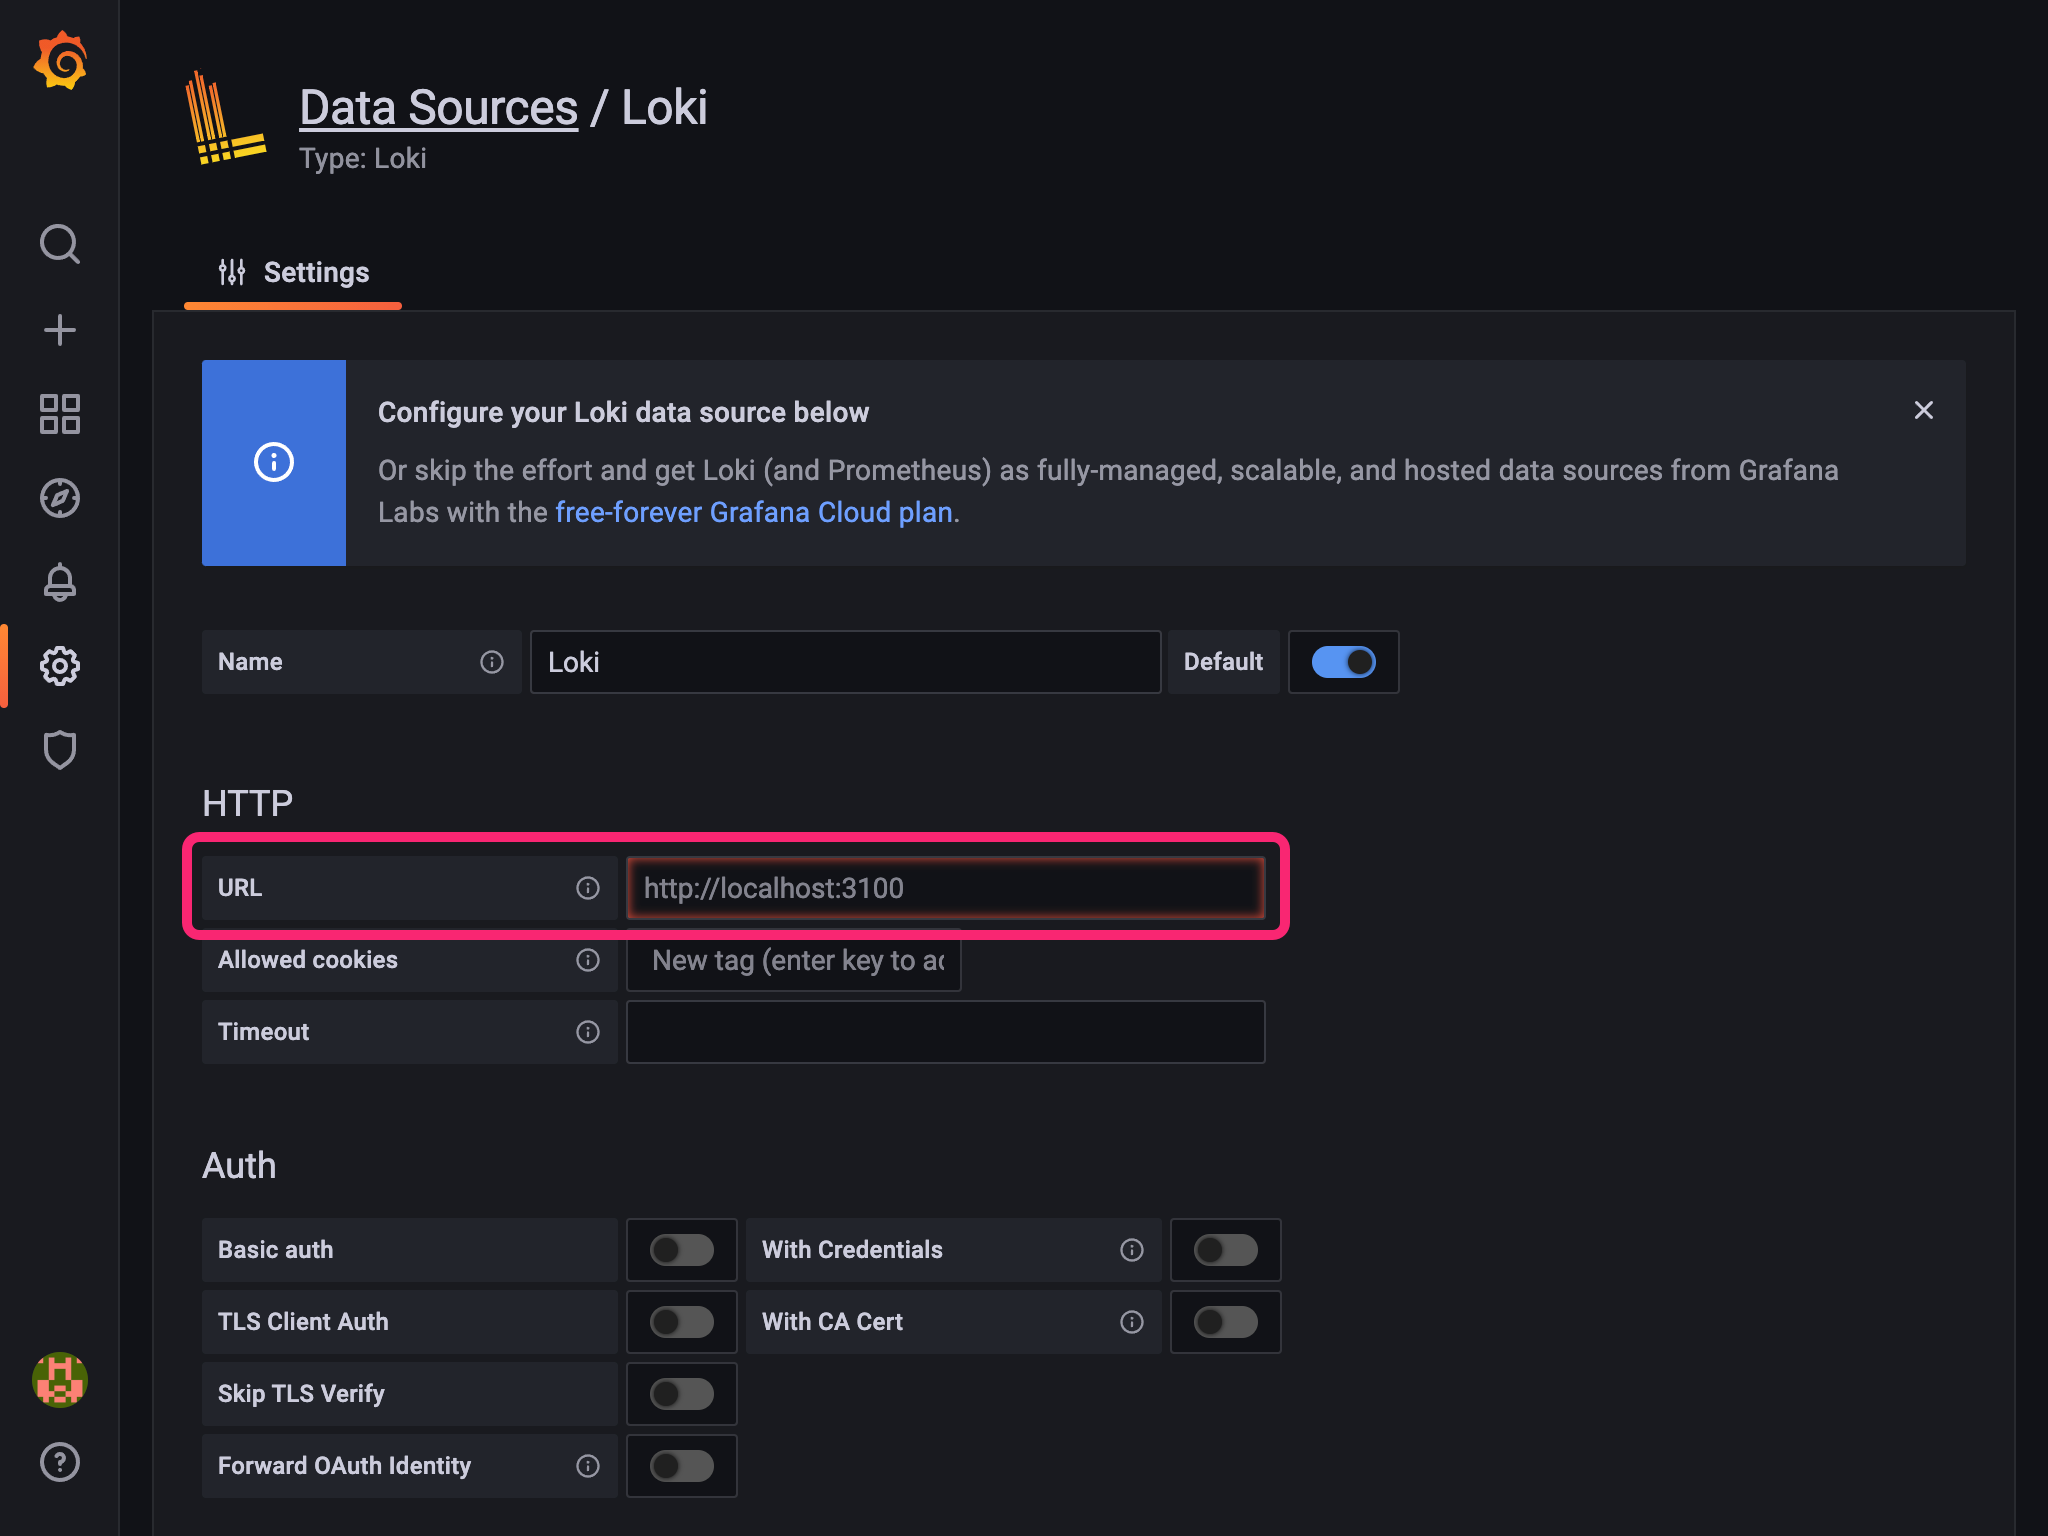
In your browser, navigate to the Grafana endpoint. Login with the default credentials of admin:admin and ignore the prompt to update the password by clicking on the Skip link at the bottom of the form. Then, click on the settings icon in the left navigation menu, then Data sources. Click on the Add data source button and then on the Loki option.
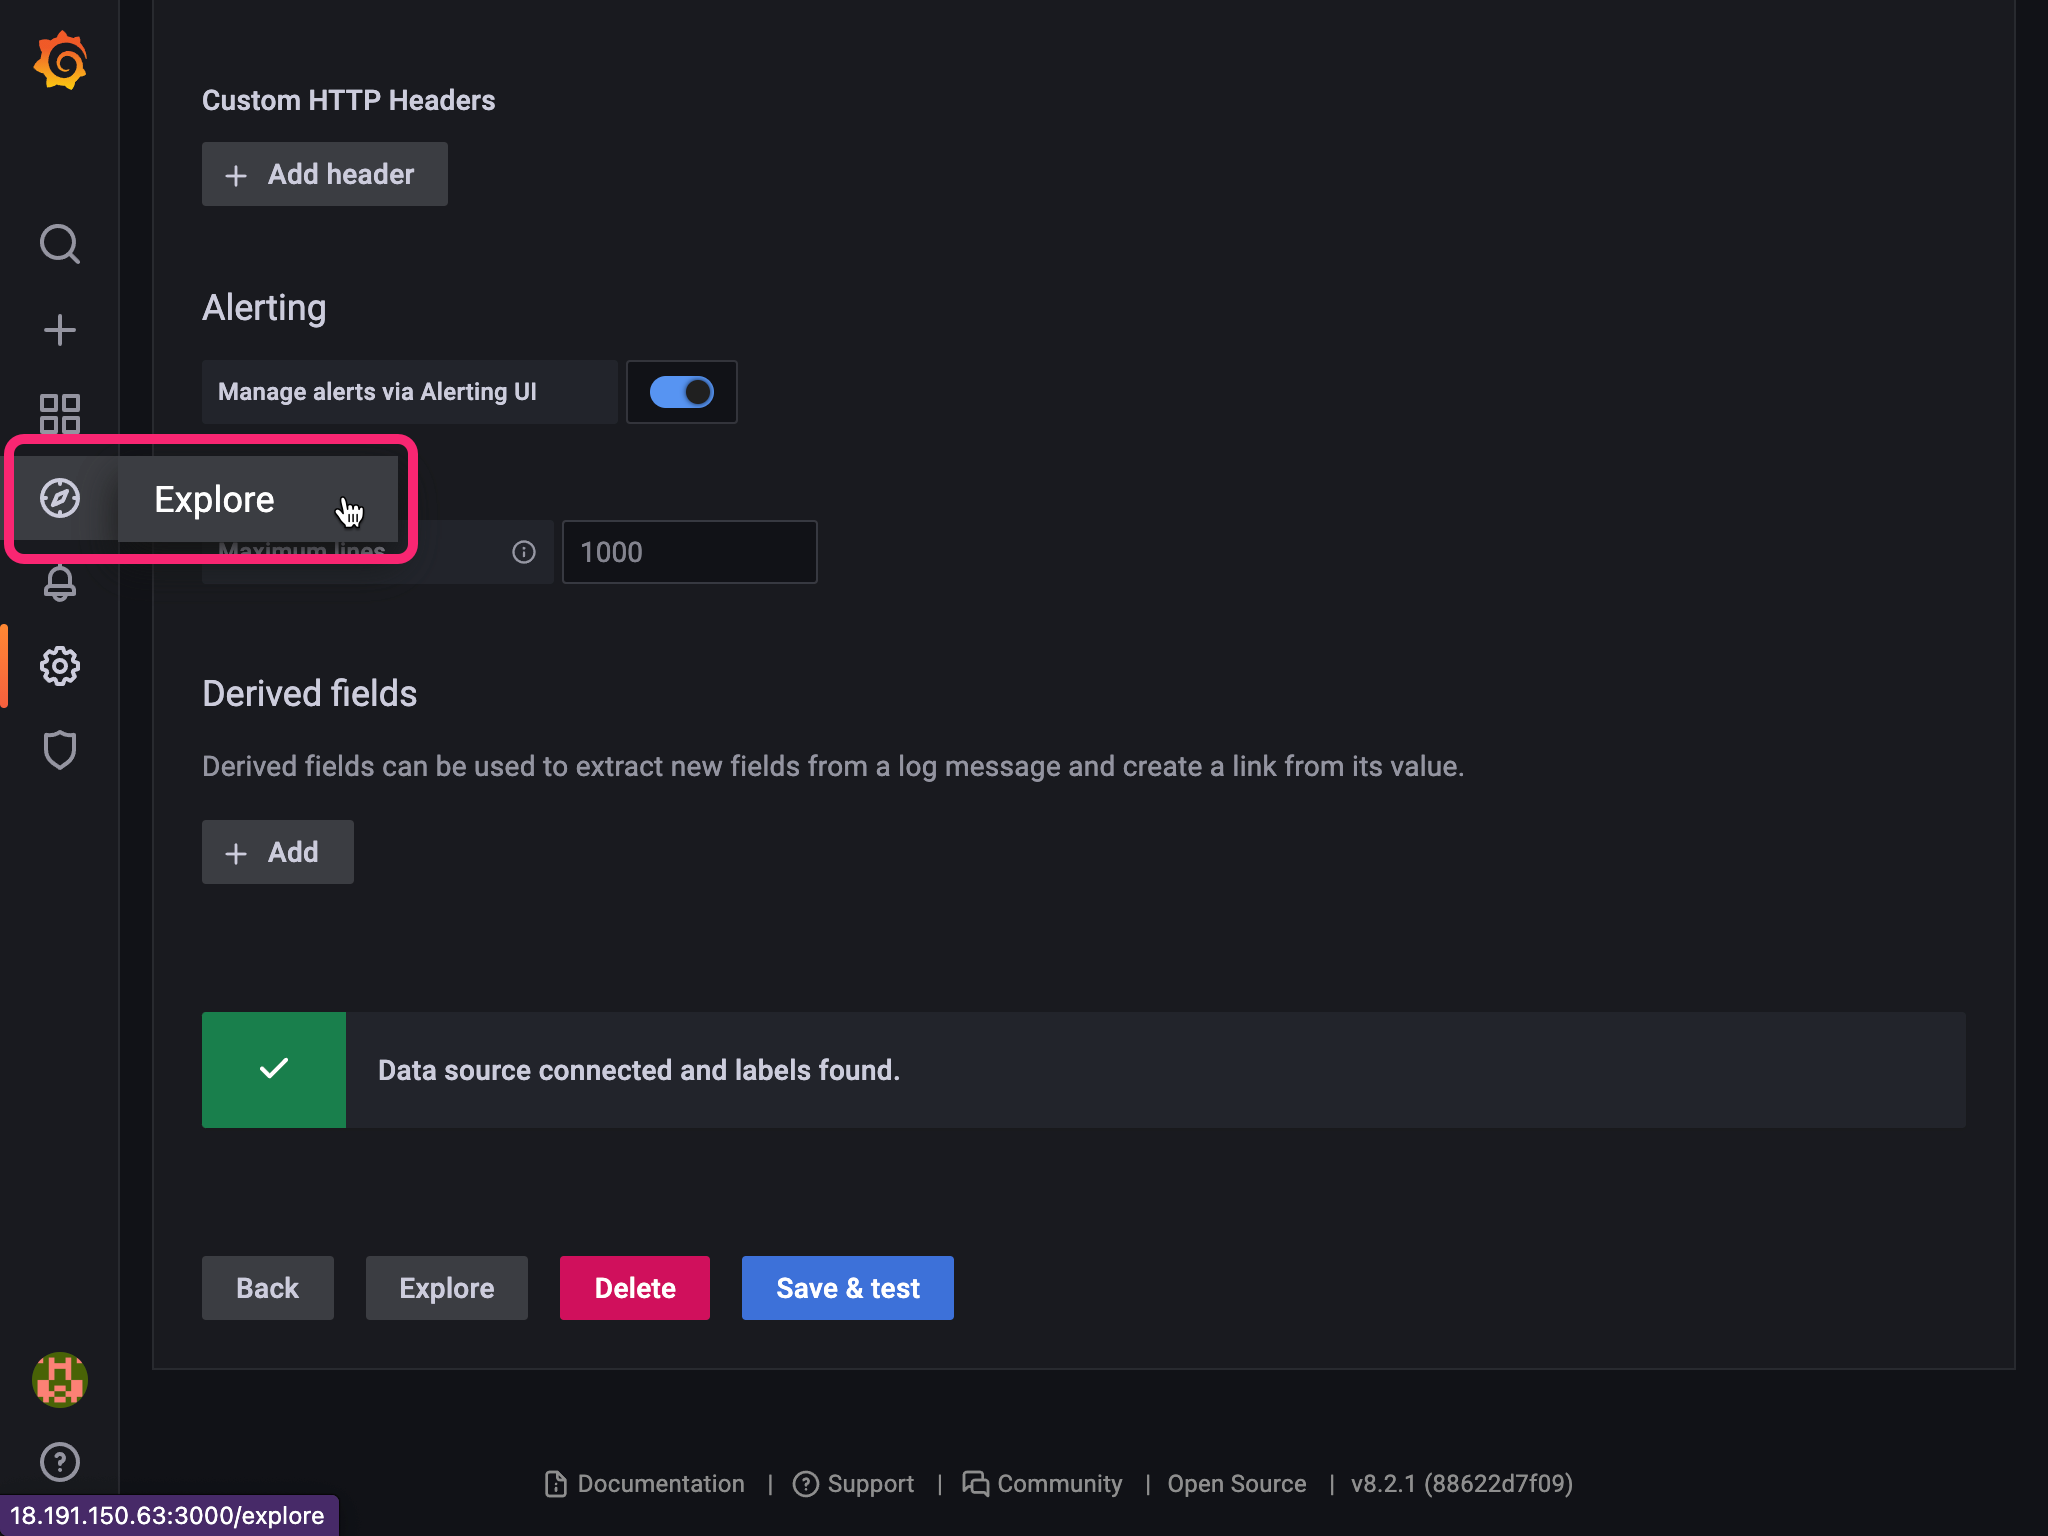
In the URL form field, enter the loki_ip address from the Terraform output and port 3100. Scroll down and click the Save & test button. Grafana will display a confirmation message stating that the data source is connected.
To view the HashiCups logs, click on the compass icon in the left navigation and then click Explore.
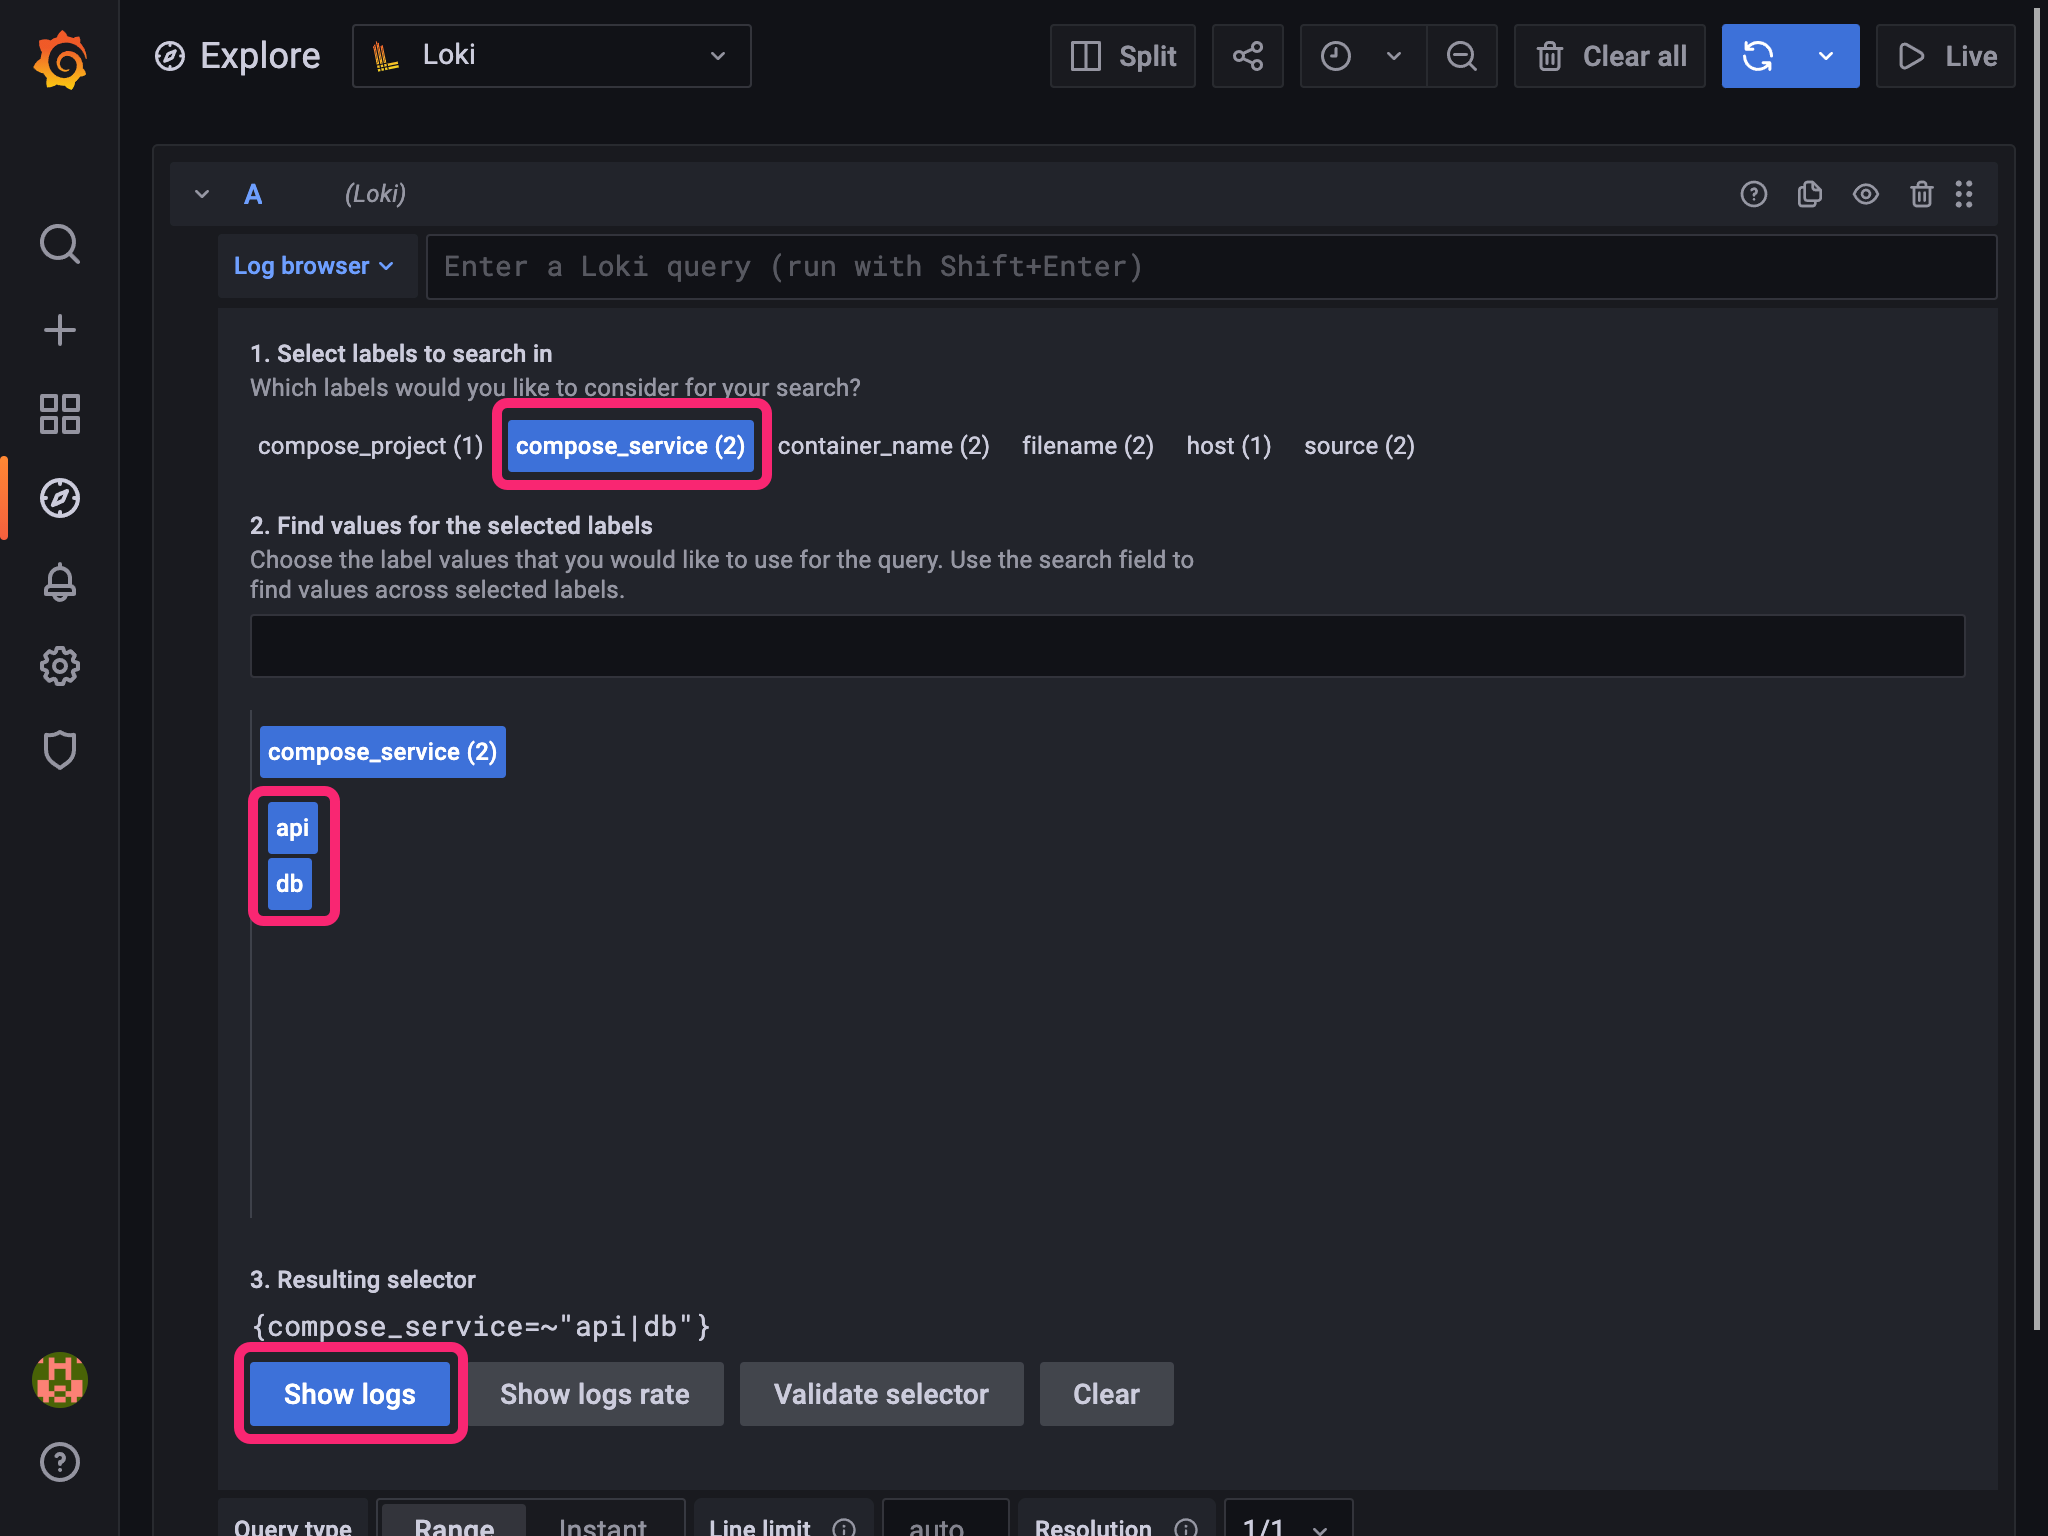
From the dropdown menu at the top left of the page, choose Loki and then click on the blue Log browser button below it.

Loki uses several labels for the log data it receives and you can choose which logs you want to see by selecting a label and values from the provided list. Select the compose_service label and then both api and db to see logs from the HashiCups API and database services. Notice that the resulting selector query updates as you make selections. Click the Show logs button to save the query.
Click the Live button on the upper right corner to have the output stream automatically.
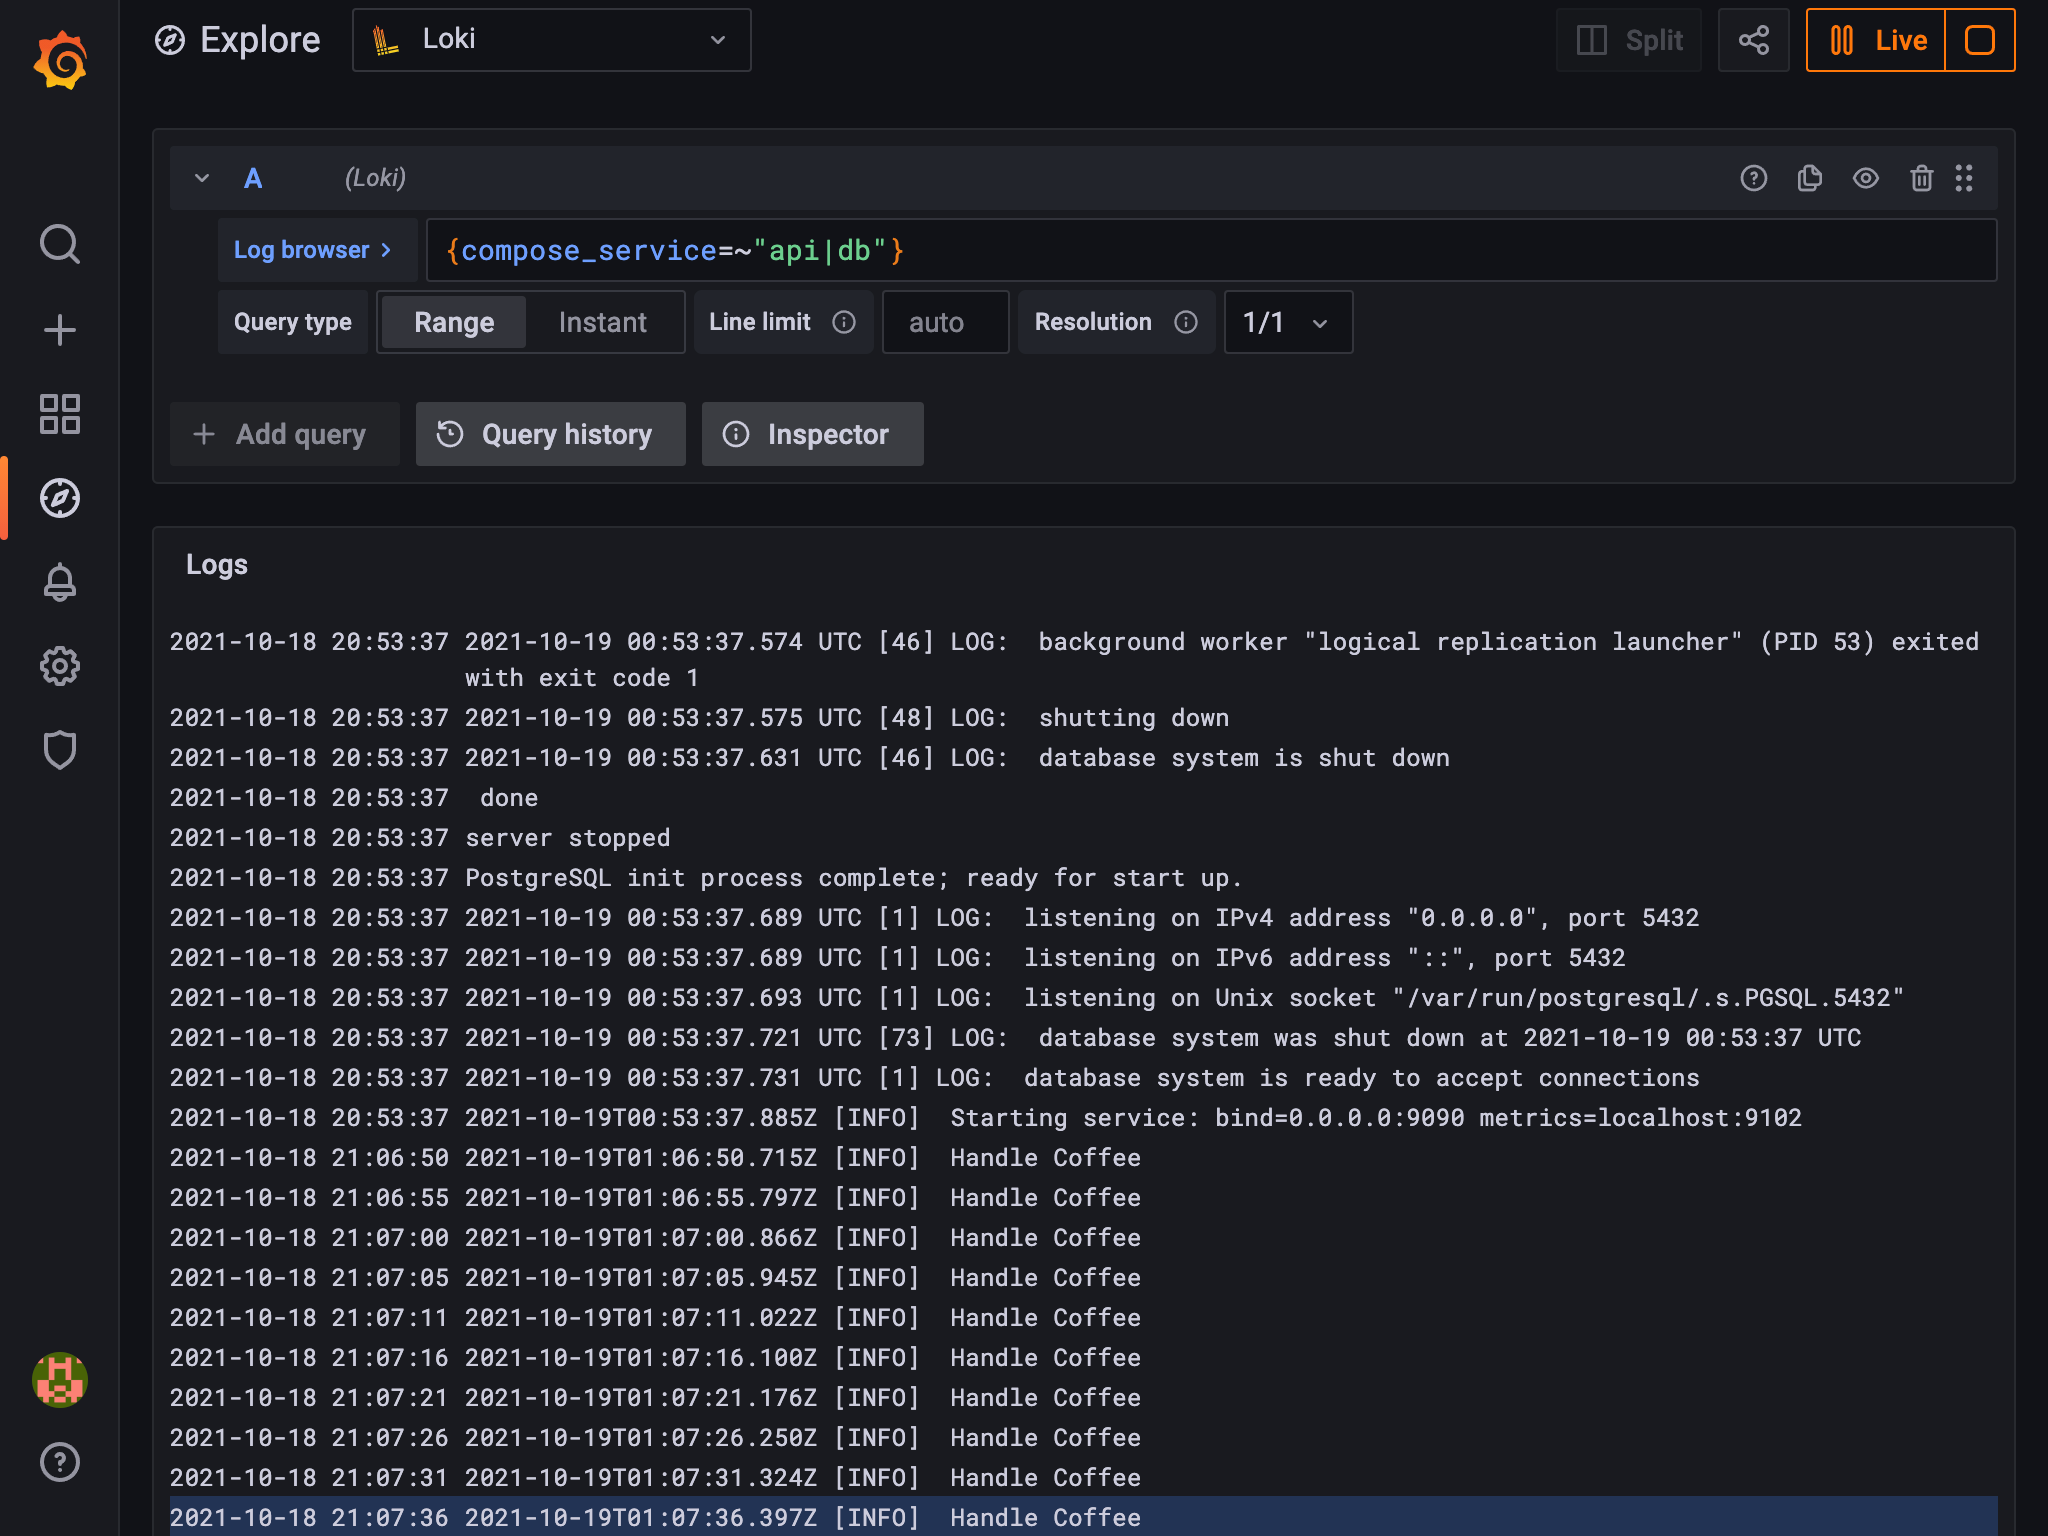
Run the terraform/hashicups-query.sh script to generate requests to HashiCups and watch as the output updates. The latest messages appear at the bottom of the output area.
$ ./hashicups-query.sh
HashiCups address (EAST): 3.139.105.135
HashiCups address (WEST): 54.69.128.234
Making requests to hashicups services every 5 seconds.
Press ctrl+c to quit.


HashiCups (EAST) response:
[{"id":1,"name":"Packer Spiced Latte","teaser":"Packed with goodness to spice up your images","description":"","price":350,"image":"/packer.png","ingredients":[{"ingredient_id":1},{"ingredient_id":2},{"ingredient_id":4}]},{"id":2,"name":"Vaulatte","teaser":"Nothing gives you a safe and secure feeling like a Vaulatte","description":"","price":200,"image":"/vault.png","ingredients":[{"ingredient_id":1},{"ingredient_id":2}]},{"id":3,"name":"Nomadicano","teaser":"Drink one today and you will want to schedule another","description":"","price":150,"image":"/nomad.png","ingredients":[{"ingredient_id":1},{"ingredient_id":3}]},{"id":4,"name":"Terraspresso","teaser":"Nothing kickstarts your day like a provision of Terraspresso","description":"","price":150,"image":"terraform.png","ingredients":[{"ingredient_id":1}]},{"id":5,"name":"Vagrante espresso","teaser":"Stdin is not a tty","description":"","price":200,"image":"vagrant.png","ingredients":[{"ingredient_id":1}]},{"id":6,"name":"Connectaccino","teaser":"Discover the wonders of our meshy service","description":"","price":250,"image":"consul.png","ingredients":[{"ingredient_id":1},{"ingredient_id":5}]}]

HashiCups (WEST) response:
[{"id":1,"name":"Packer Spiced Latte","teaser":"Packed with goodness to spice up your images","description":"","price":350,"image":"/packer.png","ingredients":[{"ingredient_id":1},{"ingredient_id":2},{"ingredient_id":4}]},{"id":2,"name":"Vaulatte","teaser":"Nothing gives you a safe and secure feeling like a Vaulatte","description":"","price":200,"image":"/vault.png","ingredients":[{"ingredient_id":1},{"ingredient_id":2}]},{"id":3,"name":"Nomadicano","teaser":"Drink one today and you will want to schedule another","description":"","price":150,"image":"/nomad.png","ingredients":[{"ingredient_id":1},{"ingredient_id":3}]},{"id":4,"name":"Terraspresso","teaser":"Nothing kickstarts your day like a provision of Terraspresso","description":"","price":150,"image":"terraform.png","ingredients":[{"ingredient_id":1}]},{"id":5,"name":"Vagrante espresso","teaser":"Stdin is not a tty","description":"","price":200,"image":"vagrant.png","ingredients":[{"ingredient_id":1}]},{"id":6,"name":"Connectaccino","teaser":"Discover the wonders of our meshy service","description":"","price":250,"image":"consul.png","ingredients":[{"ingredient_id":1},{"ingredient_id":5}]}]
If you want to update the golden image, rebuild it with Packer and update the bucket channel in HCP to the latest version. When you rebuild the HashiCups artifact, Packer will automatically retrieve the latest golden image as the base.
Similarly, if you wanted to update the HashiCups artifact, rebuild it with Packer and update the HashiCups bucket channel to the latest version. Then, when you re-run your Terraform configuration, Terraform will automatically deploy an instance with the latest HashiCups artifact.
Clean up resources
Now that you completed the tutorial, destroy the resources you created with Terraform. Enter yes to confirm the destruction process.
$ terraform destroy
Terraform used the selected providers to generate the following execution plan. Resource actions are indicated with the following symbols:
  - destroy

Terraform will perform the following actions:

  # aws_instance.hashicups_east will be destroyed
  - resource "aws_instance" "hashicups_east" {
      - ami                                  = "ami-0cf6c50483ef5aa26" -> null
      - arn                                  = "arn:aws:ec2:us-east-2:561656980159:instance/i-0c12e0ed831c32d93" -> null
      - associate_public_ip_address          = true -> null
…
aws_instance.loki: Destruction complete after 2m33s
aws_subnet.subnet_public: Destroying... [id=subnet-0ba2204618dee10bc]
aws_security_group.loki_grafana: Destroying... [id=sg-0864554590b0d7b5d]
aws_security_group.ssh: Destroying... [id=sg-07eb1f573f4701b69]
aws_security_group.allow_egress: Destroying... [id=sg-095ac5c93dacc82bb]
aws_security_group.allow_egress: Destruction complete after 5s
aws_subnet.subnet_public: Destruction complete after 5s
aws_security_group.ssh: Destruction complete after 5s
aws_security_group.loki_grafana: Destruction complete after 5s
aws_vpc.vpc: Destroying... [id=vpc-0073a7f86c6f28cae]
aws_vpc.vpc: Destruction complete after 1s

Destroy complete! Resources: 23 destroyed.
Navigate to the notif-webhook directory.
$ cd ../notif-webhook
Destroy your webhook and related resources. Enter yes to confirm the
destruction process.
$ terraform destroy
Your AWS account still has AMIs and their S3-stored snapshots, which you may be charged for depending on your other usage. Destroy the AMIs and snapshots stored in your S3 buckets in both the us-east-2 and us-west-2 regions.
In your us-east-2 AWS account, deregister the AMIs by selecting the AMIs, then click on the Actions button and the Deregister option. Delete the snapshots by selecting the snapshots, then click on the Actions button and the Delete option.
In your us-west-2 AWS account, deregister the AMIs by selecting the AMIs, then click on the Actions button and the Deregister option. Delete the snapshots by selecting the snapshots, then click on the Actions button and the Delete option.
Next steps
In this tutorial, you used Packer and the HCP Packer registry to create a golden image pipeline, allowing you to create a reusable parent artifact on top of which to build other AMIs. You validated the artifacts using an HCP Terraform run task.
You learned how to use HCP Packer registry buckets and channels to control which parent artifacts downstream applications build upon and how to integrate them into both Packer and Terraform configurations. This workflow lets your organization build machine artifacts for its services while reducing the overhead of managing system requirements and manually tracking AMI IDs.
For more information on topics covered in this tutorial, check out the following resources.
- Read more about the HCP Packer announcement
- Browse the Packer and HCP Packer documentation
- Browse the HCP Packer API documentation
- Visit the HCP Discuss forum to leave feedback or engage in discussion