Control access into the service mesh with Consul API gateway
Consul API Gateway is a dedicated ingress solution for intelligently routing traffic to applications on your Consul service mesh. This provides a consistent method for handling inbound requests to the service mesh from external clients.
Consul API Gateway takes all API calls from clients, then routes them to the appropriate service with request routing, composition, and protocol translation. Once Consul API Gateway becomes available for your services, you can use it for ingress, load balancing, modifying HTTP headers, and splitting traffic between multiple services based on weighted ratios.
In this tutorial, you will:
- Deploy an Elastic Kubernetes Service (EKS) cluster with Terraform
- Deploy Consul to EKS cluster
- Deploy example applications (HashiCups and echo)
- Deploy Consul API Gateway
- Apply API gateway routes to enable ingress to HashiCups
- Apply API gateway routes to load balance echo services
Prerequisites
The tutorial assumes that you are familiar with Consul and its core functionality. If you are new to Consul, refer to the Consul Getting Started tutorials collection.
For this tutorial, you will need:
- An AWS account configured for use with Terraform
- kubectl >= 1.28
- aws-cli >= 2.13.19
- terraform >= 1.5.7
- consul-k8s v1.2.1
- helm >= 3.12.3
Clone GitHub repository
Clone the GitHub repository containing the configuration files and resources.
$ git clone https://github.com/hashicorp-education/learn-consul-api-gateway
Change into the directory with the newly cloned repository.
$ cd learn-consul-api-gateway/self-managed/
This repository contains Terraform configuration to spin up the initial infrastructure and all files to deploy Consul, the sample application, and the API Gateway resources.
Here, you will find the following Terraform configuration:
eks-cluster.tfdefines Amazon EKS cluster deployment resourcesoutputs.tfdefines outputs you will use to authenticate and connect to your Kubernetes clusterproviders.tfdefines AWS and HCP provider definitions for Terraformvariables.tfdefines variables you can use to customize the tutorialvpc.tfdefines the AWS VPC resources
Additionally, you will find the following directories:
api-gwcontains the Kubernetes custom resource definitions (CRDs) required to deploy and configure the API gateway resourcesconsulcontains the Helm chart that configures your Consul instancek8s-servicescontains the Kubernetes definitions that deploys HashiCups and Echo sample applications
Deploy infrastructure, Consul, and sample applications
Initialize your Terraform configuration to download the necessary providers and modules.
$ terraform init
Initializing the backend...

Initializing provider plugins...
## ...

Terraform has been successfully initialized!
## ...
Then, create the infrastructure. Confirm the run by entering yes. This will take about 15 minutes to deploy your infrastructure. Feel free to explore the next sections of this tutorial while waiting for the resources to deploy.
$ terraform apply

## ...
Do you want to perform these actions?
 Terraform will perform the actions described above.
 Only 'yes' will be accepted to approve.

 Enter a value: yes

## ...

Apply complete! Resources: 58 added, 0 changed, 0 destroyed.
Configure your terminal to communicate with EKS
Now that you have deployed the Kubernetes cluster, configure kubectl to interact with it.
$ aws eks --region $(terraform output -raw region) update-kubeconfig --name $(terraform output -raw kubernetes_cluster_id)
Install Consul
You will now deploy Consul on your Kubernetes cluster with consul-k8s. By default, Consul deploys into its own dedicated namespace (consul). The Consul installation will use the Consul Helm chart file in the consul directory.
Notice this file defines API gateway in the connectInject stanza. Since this tutorial uses an EKS cluster, the API Gateway will create an AWS load balancer to handle network ingress. Refer to the Helm chart for more information.
consul/values.yaml
global:
  enabled: true
  name: consul
  datacenter: dc1

connectInject:
  transparentProxy:
    defaultEnabled: true
  enabled: true
  default: true
  apiGateway:
    managedGatewayClass:
      serviceType: LoadBalancer
  cni:
    enabled: true
Deploy Consul and confirm the installation with a y.
$ consul-k8s install -config-file=consul/values.yaml

==> Checking if Consul can be installed
 ✓ No existing Consul installations found.
 ✓ No existing Consul persistent volume claims found
 ✓ No existing Consul secrets found.

==> Consul Installation Summary
    Name: consul
    Namespace: consul

    Helm value overrides
    --------------------
    connectInject:
      apiGateway:
        managedGatewayClass:
          serviceType: LoadBalancer

##...
 ✓ Consul installed in namespace "consul".
Verify that you have installed Consul by inspecting the Kubernetes pods in the consul namespace.
$ kubectl --namespace=consul get pods
NAME                                           READY   STATUS    RESTARTS   AGE
consul-cni-dk4rl                               1/1     Running   0          3m48s
consul-cni-h2rlv                               1/1     Running   0          3m48s
consul-cni-s9x7n                               1/1     Running   0          3m48s
consul-connect-injector-5c4b78785c-lcjx8       1/1     Running   0          3m48s
consul-server-0                                1/1     Running   0          3m48s
consul-server-1                                1/1     Running   0          3m48s
consul-server-2                                1/1     Running   0          3m48s
consul-webhook-cert-manager-5d54fcb6f7-kbqkr   1/1     Running   0          3m48s
Deploy sample applications
Now that your Consul service mesh is operational in your cluster, deploy the two sample applications so you can explore API Gateway for ingress and load balancing.
Deploy the HashiCups and echo services.
$ kubectl apply --filename k8s-services/
Check the pods to make sure they are all up and running.
$ kubectl get pods
NAME                              READY   STATUS    RESTARTS   AGE
echo-1-6469764ff6-drqnh           2/2     Running   0          39s
echo-2-d7b7b9599-4w9mr            2/2     Running   0          38s
frontend-7d9774d4c5-ctxmb         2/2     Running   0          38s
frontend-v2-c67dc467c-kt7vp       2/2     Running   0          38s
payments-b4f5c6c58-t8cr7          2/2     Running   0          36s
product-api-74c5f98f64-9nltt      2/2     Running   0          35s
product-api-db-6c49b5dcb4-rrzss   2/2     Running   0          36s
public-api-5dc47dd74-5d6kx        3/3     Running   0          35s
Deploy API Gateway
A complete API Gateway deployment consists of an API Gateway configuration and a routing configuration. In this section, you will review the API Gateway configuration files, then deploy it.
API Gateway consists of multiple components that enable external traffic into your Consul service mesh. The configuration file specifies how Consul API Gateway will handle API calls from clients and how it will route them to the respective services with request routing, composition, and protocol translation.
Inspect the ./api-gw/consul-api-gateway.yaml file contents in your current directory.
./api-gw/consul-api-gateway.yaml
apiVersion: gateway.networking.k8s.io/v1beta1
kind: Gateway
metadata:
  name: api-gateway
  namespace: consul
spec:
  gatewayClassName: consul
  listeners:
    # options: HTTP or HTTPS
  - protocol: HTTP
     # options: 80 or 443 or custom
    port: 80
    name: http
    allowedRoutes:
      namespaces:
        # options: All or Same or Specific
        from: All
##...
This configuration file defines a Gateway object. This object is the main infrastructure resource that links all other related configuration information together. The spec itself defines listener and address details. Refer to the Gateway documentation for more information.
This configuration file also defines other objects needed for the deployment of the Consul API Gateway, such as ReferenceGrant, ClusterRoleBinding and ClusterRole. The reference grant lets API Gateway route traffic to services in different namespaces, and the RBAC ClusterRole objects let the API gateway interact with Consul datacenter resources.
$ kubectl apply --filename api-gw/consul-api-gateway.yaml
gateway.gateway.networking.k8s.io/api-gateway created
referencegrant.gateway.networking.k8s.io/consul-reference-grant created
clusterrolebinding.rbac.authorization.k8s.io/consul-auth-binding created
clusterrolebinding.rbac.authorization.k8s.io/consul-api-gateway-tokenreview-binding created
clusterrole.rbac.authorization.k8s.io/consul-api-gateway-auth created
clusterrolebinding.rbac.authorization.k8s.io/consul-api-gateway-auth-binding created
Verify you have deployed API Gateway. You should find an output similar to the following.
$ kubectl get services --namespace=consul api-gateway
NAME          TYPE           CLUSTER-IP     EXTERNAL-IP                                                               PORT(S)        AGE
api-gateway   LoadBalancer   172.20.167.0   a942e82c578ea4713bcd552f3c193913-2027307265.us-west-2.elb.amazonaws.com   80:30177/TCP   43s
Export the API gateway external IP address. You will reference this URL in the next sections to confirm you have configured the routes for ingress and load balancing.
$ export APIGW_URL=$(kubectl get services --namespace=consul api-gateway -o jsonpath='{.status.loadBalancer.ingress[0].hostname}') && echo $APIGW_URL
a336ea2854e1c4f3294470eed4975c42-388180783.us-west-2.elb.amazonaws.com
Apply API gateway routes for ingress
Routes tell your Consul API Controller how to handle traffic into your service mesh.
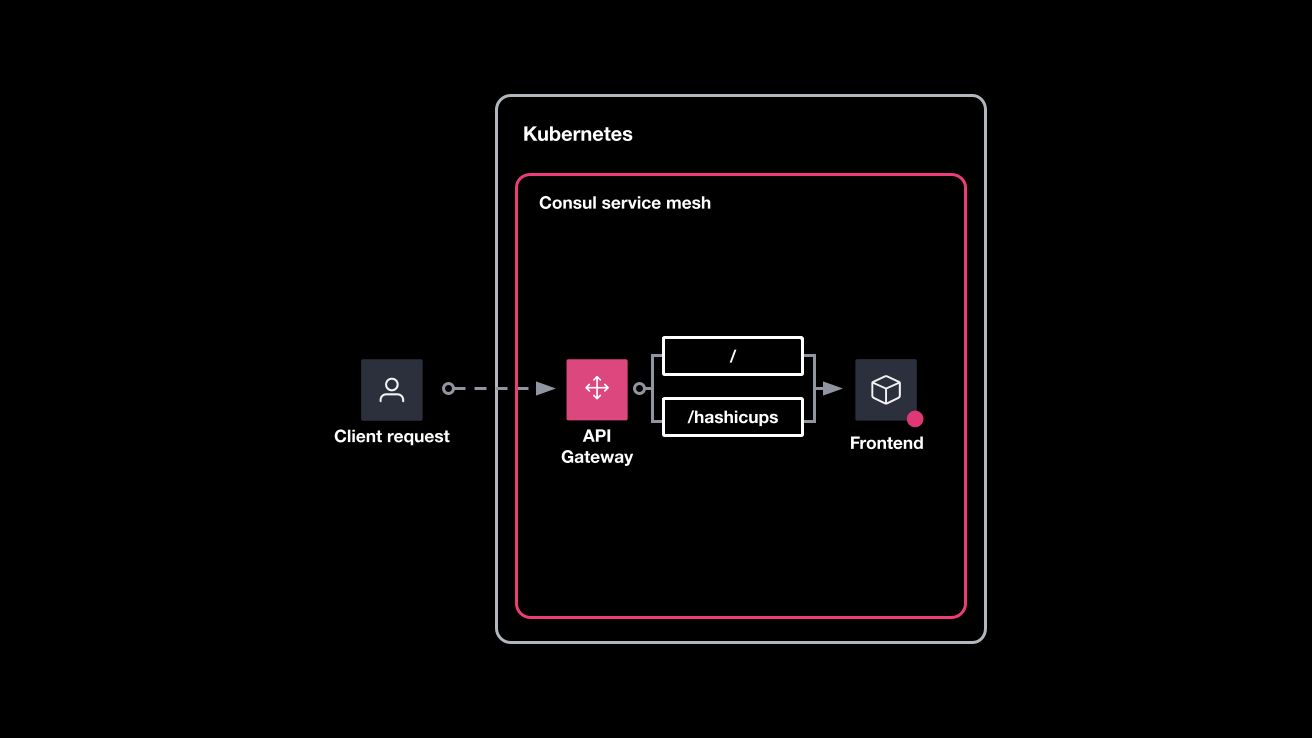
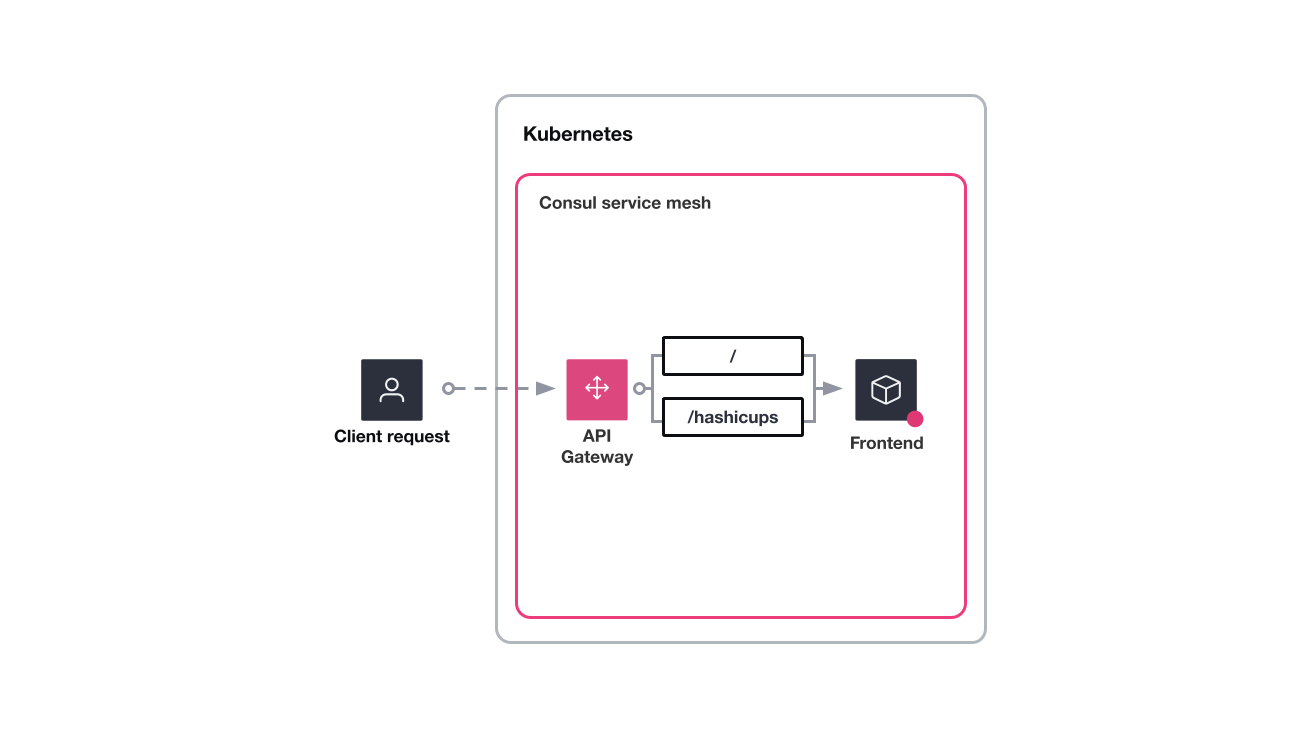
The following diagram shows your existing Kubernetes cluster, the Consul API Gateway, and the HashiCups web frontend application. In this section, you will review the HTTPRoute definitions for HashiCups and deploy it to enable ingress traffic to the frontend application.
The ./api-gw/ingress-hashicups-frontend.yaml file defines an intention and two routes.
The
api-gateway-hashicupsintention lets traffic flow from the API gateway to HashiCup'sfrontendservice../api-gw/ingress-hashicups-frontend.yaml
apiVersion: consul.hashicorp.com/v1alpha1
kind: ServiceIntentions
metadata:
  name: api-gateway-hashicups
spec:
  destination:
    name: frontend
  sources:
    - name: api-gateway
      action: allow
The
route-rootHTTPRoute directs traffic from/to thefrontendservice where the HashiCups demo application web frontend runs. TheparentRefsbinds the route to the API gateway. The rules and matches define the conditions used to match the HTTP request to the service. Refer to theRoutedocumentation for more information../api-gw/ingress-hashicups-frontend.yaml
apiVersion: gateway.networking.k8s.io/v1beta1
kind: HTTPRoute
metadata:
  name: route-root
  namespace: default
spec:
  parentRefs:
  - name: api-gateway
    namespace: consul
  rules:
  - matches:
    - path:
        type: PathPrefix
        value: /
    backendRefs:
    - kind: Service
      name: frontend
      port: 3000
The
route-hashicupsHTTPRoute performs an URL rewrite and redirects traffic from/hashicupsto the root address of the API Gateway (where the HashiCups web frontend is served fromroute-root)../api-gw/ingress-hashicups-frontend.yaml
apiVersion: gateway.networking.k8s.io/v1beta1
kind: HTTPRoute
metadata:
  name: route-hashicups
  namespace: default
spec:
  parentRefs:
  - name: api-gateway
    namespace: consul
  rules:
  - matches:
    - path:
        type: Exact
        value: /hashicups
    backendRefs:
    - kind: Service
      name: frontend
      namespace: default
      port: 3000
    filters:
      - type: URLRewrite
        urlRewrite:
          path:
            replacePrefixMatch: /
            type: ReplacePrefixMatch
Apply the intention and API Gateway routes.
$ kubectl apply --filename api-gw/ingress-hashicups-frontend.yaml
serviceintentions.consul.hashicorp.com/api-gateway-hashicups created
httproute.gateway.networking.k8s.io/route-root created
httproute.gateway.networking.k8s.io/route-hashicups created
Retrieve the API Gateway URL to confirm you have enabled ingress to HashiCups on both the root and hashicups path. Open the URLs in your browser to view the HashiCups UI. The frontend service will load, however no item is present because the HashiCups API has not been exposed yet.
$ echo "http://$APIGW_URL" && echo "http://$APIGW_URL/hashicups"
http://a336ea2854e1c4f3294470eed4975c42-388180783.us-west-2.elb.amazonaws.com
http://a336ea2854e1c4f3294470eed4975c42-388180783.us-west-2.elb.amazonaws.com/hashicups

Apply API gateway routes for HashiCups API ingress
Now, you will expose the HashiCups API so that the frontend can query the available coffees from the API.
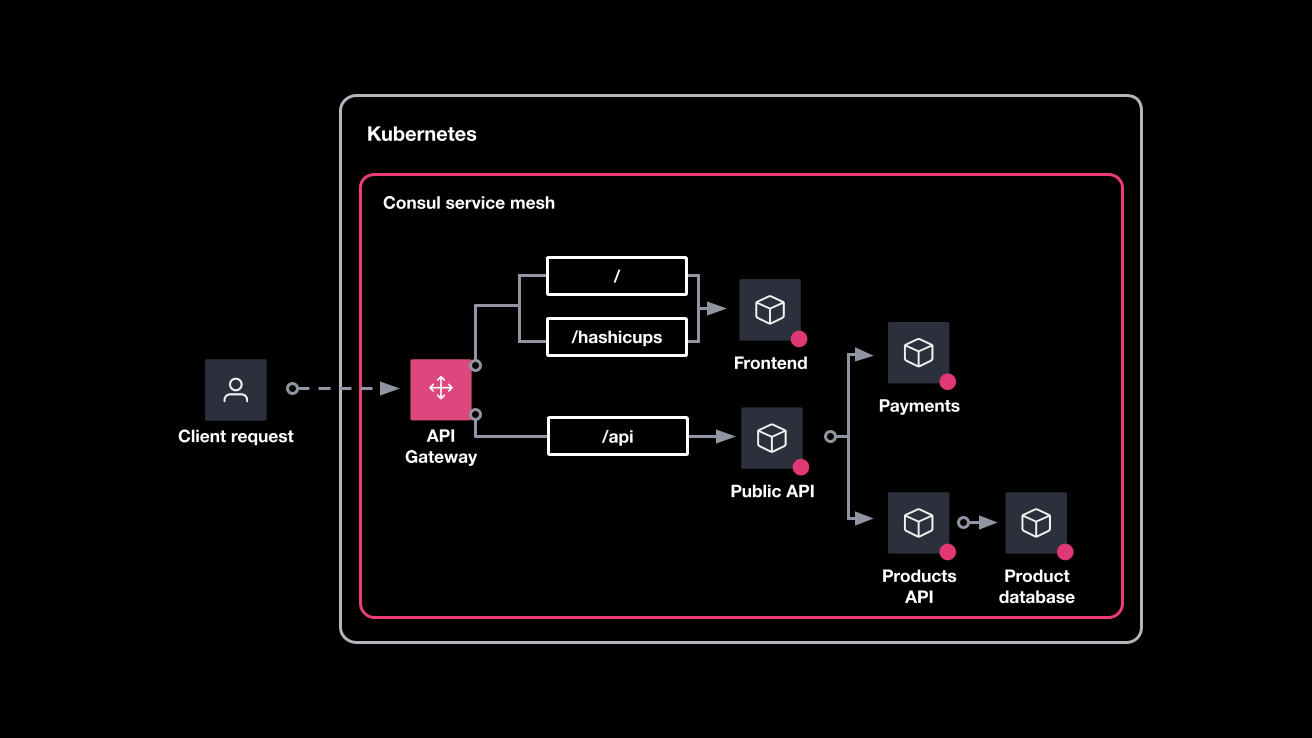
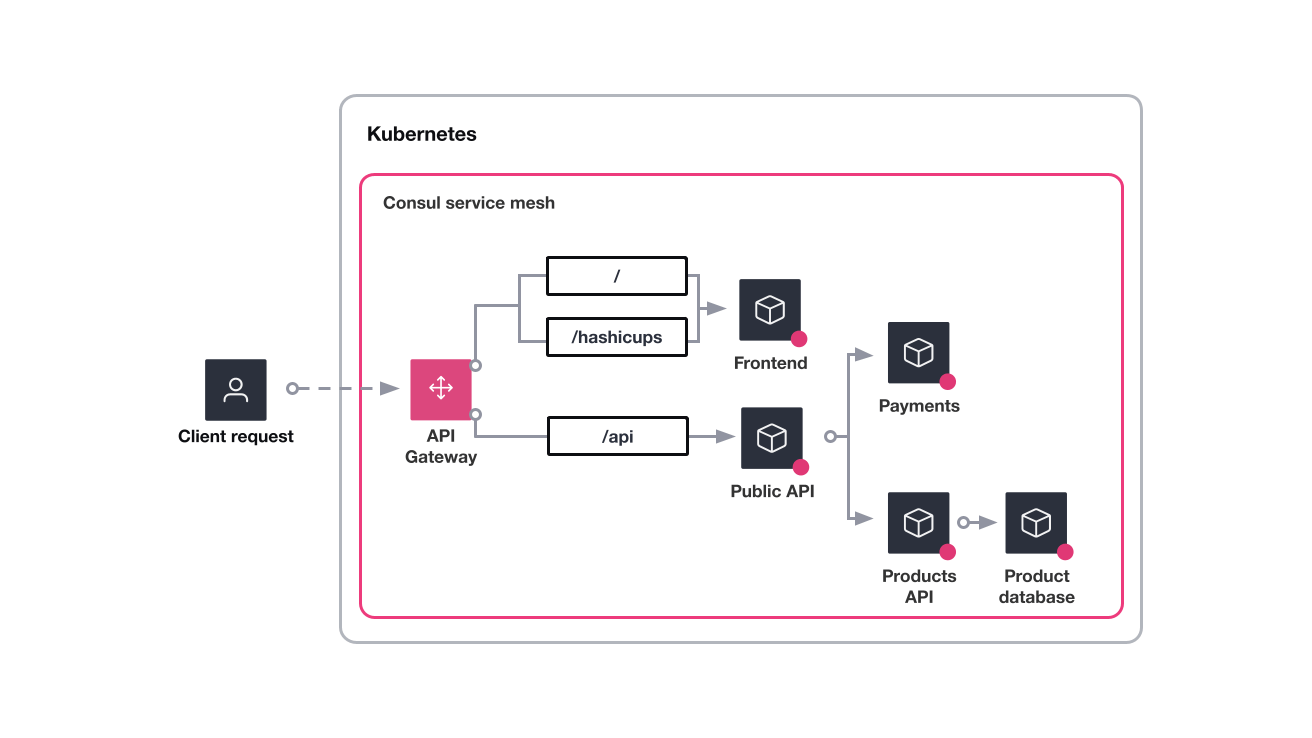
The following diagram shows your existing Kubernetes cluster, the Consul API Gateway, the HashiCups frontend service, and the HashiCups public API service. In this section, you will review the HTTPRoute definitions for the HashiCups public API and deploy it to enable ingress traffic to the HashiCups API application.
The ./api-gw/ingress-hashicups-api.yaml file defines an intention and one routes.
The
api-gateway-publicapiintention lets traffic flow from the API gateway to HashiCup'spublic-apiservice../api-gw/ingress-hashicups-api.yaml
apiVersion: consul.hashicorp.com/v1alpha1
kind: ServiceIntentions
metadata:
  name: api-gateway-publicapi
spec:
  destination:
    name: public-api
  sources:
    - name: api-gateway
      action: allow
The
route-apiHTTPRoute directs traffic from/apito thepublic-apiservice where the HashiCups public API service serves information related to the coffees in the HashiCups inventory. TheparentRefsbinds the route to the API gateway. The rules and matches define the conditions used to match the HTTP request to the service. Refer to theRoutedocumentation for more information../api-gw/ingress-hashicups-api.yaml
apiVersion: gateway.networking.k8s.io/v1beta1
kind: HTTPRoute
metadata:
  name: route-api
  namespace: default
spec:
  parentRefs:
  - name: api-gateway
    namespace: consul
  rules:
  - matches:
    - path:
        type: Exact
        value: /api
    backendRefs:
    - kind: Service
      name: public-api
      namespace: default
      port: 8080
Apply the intention and API Gateway route.
$ kubectl apply --filename api-gw/ingress-hashicups-api.yaml
serviceintentions.consul.hashicorp.com/api-gateway-publicapi created
httproute.gateway.networking.k8s.io/route-api created
Retrieve the API Gateway URL to confirm you have enabled access to the public-api service for the HashiCups items to be visible in the store. Open the URLs in your browser to view the HashiCups UI.
$ echo "http://$APIGW_URL"
http://a336ea2854e1c4f3294470eed4975c42-388180783.us-west-2.elb.amazonaws.com

Apply API gateway routes for load balancing
You can also use API Gateway to load balance services within your Consul service mesh.
The following diagram shows your existing Kubernetes cluster, the Consul API Gateway, and the echo sample services. In this section, you will review the HTTPRoute definitions for the echo service and deploy it to split traffic evenly between echo-1 and echo-2.
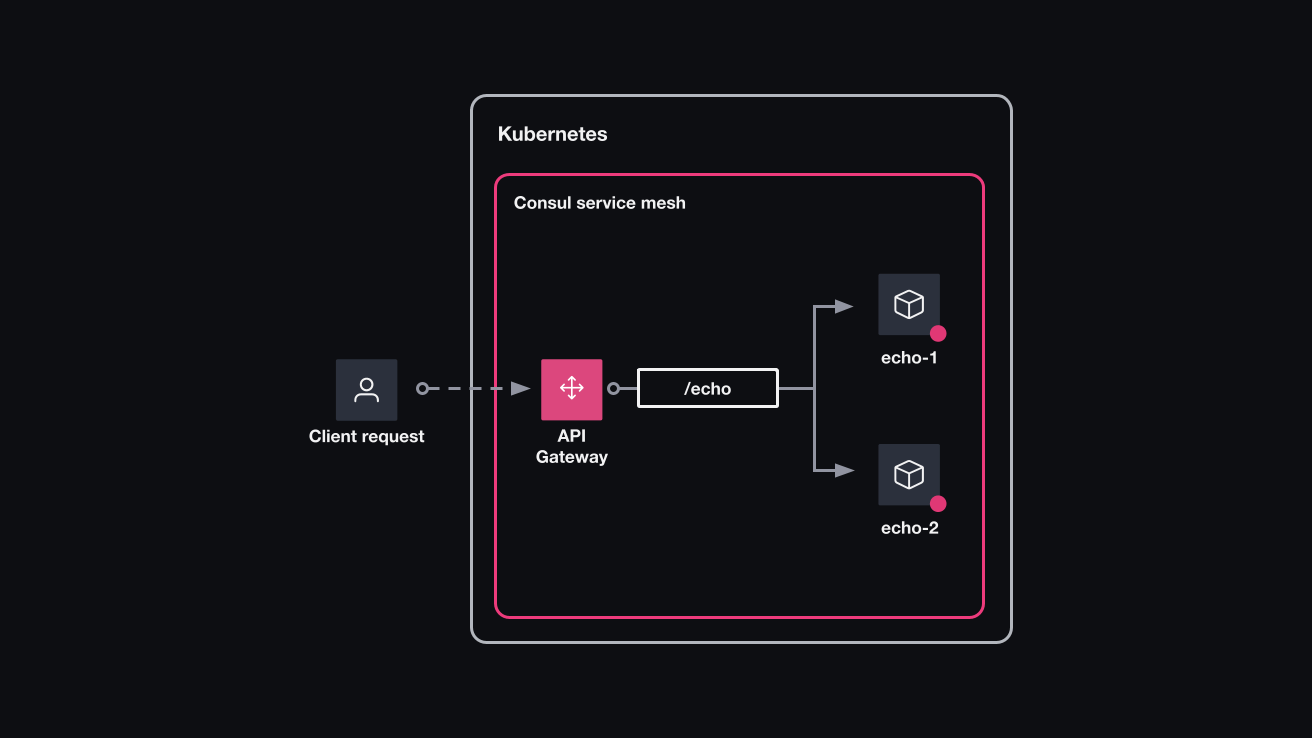
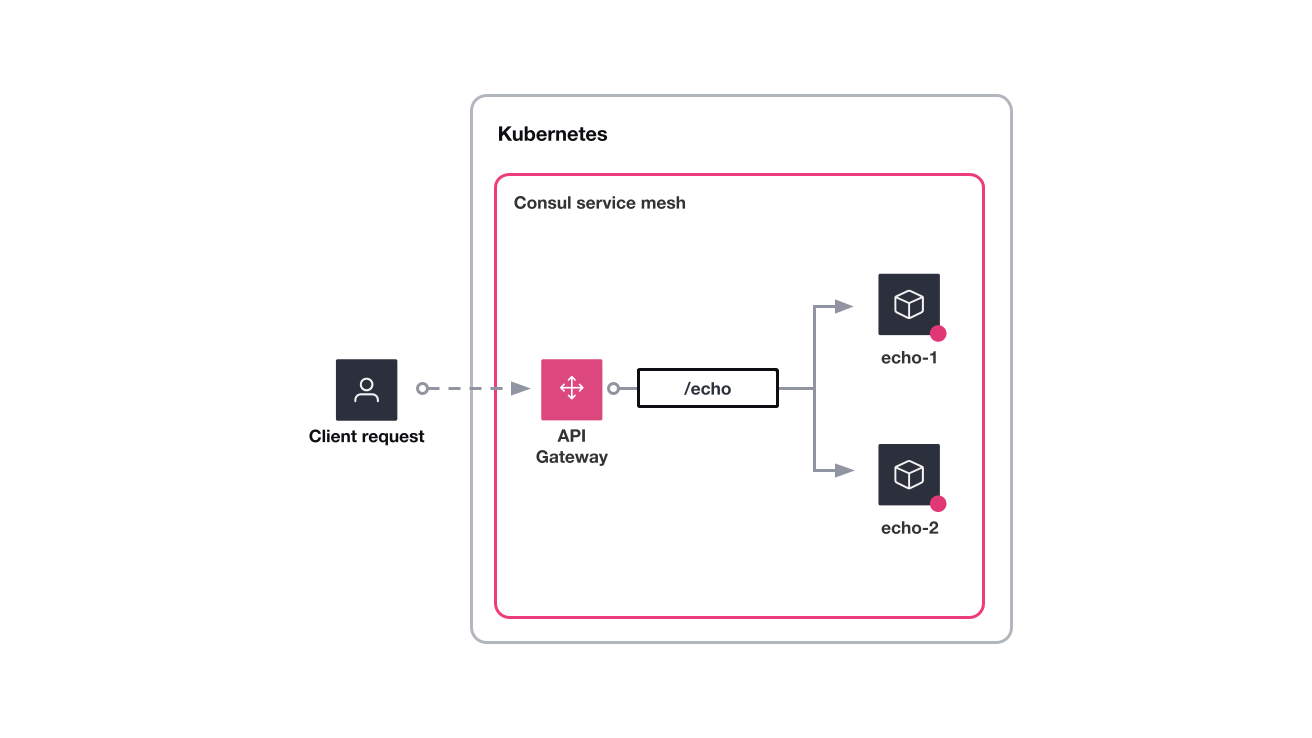
The ./api-gw/ingress-echo-loadbalance.yaml file defines two intentions and a route.
The
api-gateway-echo-1intention lets traffic flow from the API gateway to the first echo service (echo-1)../api-gw/ingress-echo-loadbalance.yaml
apiVersion: consul.hashicorp.com/v1alpha1
kind: ServiceIntentions
metadata:
  name: api-gateway-echo-1
spec:
  destination:
    name: echo-1
  sources:
    - name: api-gateway
      action: allow
The
api-gateway-echo-2intention lets traffic flow from the API gateway to the second echo service (echo-2). You need to define both intentions since API gateway needs access to send traffic to both echo services../api-gw/ingress-echo-loadbalance.yaml
apiVersion: consul.hashicorp.com/v1alpha1
kind: ServiceIntentions
metadata:
  name: api-gateway-echo-2
spec:
  destination:
    name: echo-2
  sources:
    - name: api-gateway
      action: allow
The
route-echoHTTPRoute splits traffic between the two echo services. The route defines a weight of50for both services which evenly distribute traffic to the services../api-gw/ingress-echo-loadbalance.yaml
apiVersion: gateway.networking.k8s.io/v1beta1
kind: HTTPRoute
metadata:
  name: route-echo
  namespace: default
spec:
  parentRefs:
  - name: api-gateway
    namespace: consul
  rules:
  - matches:
    - path:
        type: PathPrefix
        value: /echo
    backendRefs:
    - kind: Service
      name: echo-1
      port: 8080
      weight: 50
    - kind: Service
      name: echo-2
      port: 8090
      weight: 50
Apply the intentions and API Gateway route.
$ kubectl apply --filename api-gw/ingress-echo-loadbalance.yaml
serviceintentions.consul.hashicorp.com/api-gateway-echo-1 created
serviceintentions.consul.hashicorp.com/api-gateway-echo-2 created
httproute.gateway.networking.k8s.io/route-echo created
Visit the API gateway's /echo path several times. Notice how API Gateway alternates requests between the two different services.
$ for i in `seq 1 10`; do echo -n "$i. " && curl -s "$APIGW_URL/echo" | grep 'Request served by'; done
1. Request served by echo-2-785dfb87b-glqb5
2. Request served by echo-1-55c568fc75-7tsxk
3. Request served by echo-1-55c568fc75-7tsxk
4. Request served by echo-1-55c568fc75-7tsxk
5. Request served by echo-2-785dfb87b-glqb5
6. Request served by echo-2-785dfb87b-glqb5
7. Request served by echo-2-785dfb87b-glqb5
8. Request served by echo-2-785dfb87b-glqb5
9. Request served by echo-1-55c568fc75-7tsxk
10. Request served by echo-1-55c568fc75-7tsxk
Clean up environment
Destroy the Terraform resources to clean up your environment. Enter yes to confirm the destroy operation.
$ terraform destroy
Due to race conditions with the various cloud resources created in this tutorial, you may need to run the destroy operation twice to ensure all resources have been properly removed.
Next steps
In this tutorial, you used API Gateway as an ingress solution for routing traffic to the applications running on your HashiCorp Consul service mesh. In the process, you learn the benefits of using API Gateway for secure traffic ingress to multiple services and load balancing. Using API Gateway as your dedicated ingress solution eliminates the need to install and manage additional applications for handling traffic ingress.
Feel free to explore these tutorials and collections to learn more about Consul service mesh, microservices, and Kubernetes security.