Configure Vault cluster with Integrated Storage
Challenge
Vault supports a range of storage solutions to which it can persist its encrypted data (for example: Consul, MySQL, or DynamoDB).
These storage solutions require:
- Their own administration; increasing complexity and total administration.
- Configuration to allow Vault as a client.
- Vault configuration to connect to the provider as a client.
Solution
Use Vault's Integrated Storage to persist the encrypted data. The integrated storage has the following benefits:
- Integrated into Vault (reducing total administration).
- All configuration within Vault.
- Supports failover and multi-cluster replication.
- Eliminates extra network requests.
- Lowers complexity when diagnosing issues (leading to faster time to recovery).

Prerequisites
This tutorial requires Vault, sudo access, and extra configuration to create the cluster.
- Install Vault v1.4.0 or later.
Setup
The cluster.sh script configures and starts four Vault servers. Here is a
diagram describing the architecture:
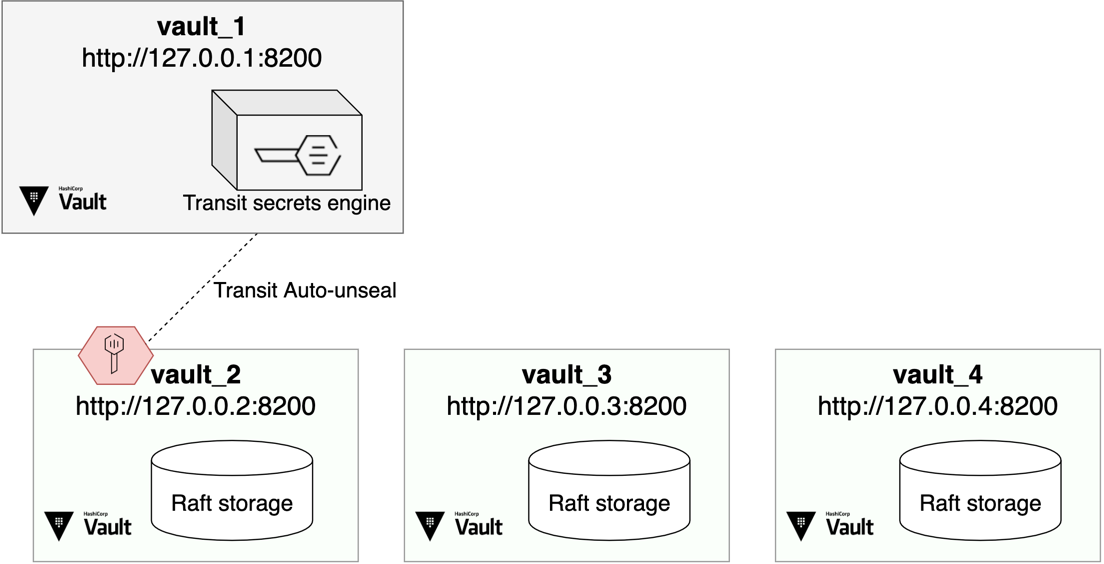
- The script initializes and unseals vault_1 (
http://127.0.0.1:8200). The root token creates a transit key that enables the other Vaults auto-unseal. This Vault server does not join the cluster. - The script initializes and unseals vault_2 (
http://127.0.0.2:8200). This Vault starts as the cluster leader. The script enables an example K/V-V2 secret engine. - The scripts starts vault_3 (
http://127.0.0.3:8200), but you need to join it to the cluster. - The script starts vault_4 (
http://127.0.0.4:8200), but you need to join it to the cluster.
Open a terminal, and create a directory named
$HOME/vault-tutorial, and set it as the working directory.$ mkdir $HOME/vault-tutorial && cd $HOME/vault-tutorialRetrieve the configuration by cloning the
hashicorp-education/learn-vault-raftrepository from GitHub.$ git clone https://github.com/hashicorp-education/learn-vault-raftChange the working directory to
learn-vault-raft/raft-storage/local.$ cd learn-vault-raft/raft-storage/localSet the
cluster.shfile to executable:$ chmod +x cluster.shSet up the local loopback addresses for each Vault:
$ ./cluster.sh create network [vault_2] Enabling local loopback on 127.0.0.2 (requires sudo) Password: [vault_3] Enabling local loopback on 127.0.0.3 (requires sudo) [vault_4] Enabling local loopback on 127.0.0.4 (requires sudo)Create the configuration for each Vault node.
$ ./cluster.sh create config

[vault_1] Creating configuration
  - creating <path_to_local>/config-vault_1.hcl
[vault_2] Creating configuration
  - creating <path_to_local>/config-vault_2.hcl
  - creating <path_to_local>/raft-vault_2
[vault_3] Creating configuration
  - creating <path_to_local>/config-vault_3.hcl
  - creating <path_to_local>/raft-vault_3
[vault_4] Creating configuration
  - creating <path_to_local>/config-vault_4.hcl
  - creating <path_to_local>/raft-vault_4
Setup vault_1:
$ ./cluster.sh setup vault_1

[vault_1] starting Vault server @ http://127.0.0.1:8200

[vault_1] initializing and capturing the unseal key and root token

[vault_1] Unseal key: NheD5HT4IaCjLB2gv7a5t9dfw7tEjoHMZ67DS+5nQ3A=
[vault_1] Root token: hvs.YFkvurx85VPSfsEwS6mSnfWj

[vault_1] unsealing and logging in
Key             Value
---             -----
Seal Type       shamir
Initialized     true
Sealed          false
Total Shares    1
Threshold       1
Version         1.14.0
Build Date      2023-06-19T11:40:23Z
Storage Type    inmem
Cluster Name    vault-cluster-74bee892
Cluster ID      d74ca2cf-a081-2918-b8a2-8a2ccd6c5b22
HA Enabled      false
Success! You are now authenticated. The token information displayed below
is already stored in the token helper. You do NOT need to run "vault login"
again. Future Vault requests will automatically use this token.

Key                  Value
---                  -----
token                hvs.YFkvurx85VPSfsEwS6mSnfWj
token_accessor       Ed0JMHdQGPyoDIrR7WbCGhrn
token_duration       ∞
token_renewable      false
token_policies       ["root"]
identity_policies    []
policies             ["root"]

[vault_1] enabling the transit secrets engine and creating a key to auto-unseal vault cluster
Success! Enabled the transit secrets engine at: transit/
Key                       Value
---                       -----
allow_plaintext_backup    false
auto_rotate_period        0s
deletion_allowed          false
derived                   false
exportable                false
imported_key              false
keys                      map[1:1688151586]
latest_version            1
min_available_version     0
min_decryption_version    1
min_encryption_version    0
name                      unseal_key
supports_decryption       true
supports_derivation       true
supports_encryption       true
supports_signing          false
type                      aes256-gcm96
vault_1 (
http://127.0.0.1:8200) is initialized and unsealed. The transit secrets engine is enabled and a key is created. This will be used to auto-unseal vault_2. The initial root token is stored in theroot_token-vault_1file.Setup vault_2.
$ ./cluster.sh setup vault_2

[vault_2] starting Vault server @ http://127.0.0.2:8200

Using [vault_1] root token (hvs.YFkvurx85VPSfsEwS6mSnfWj) to retrieve transit key for auto-unseal

[vault_2] initializing and capturing the recovery key and root token

[vault_2] Recovery key: VV9QAfeD0DpSIEAyJhuBw9sH5ZSICW/dYeuf/XjVmV4=
[vault_2] Root token: hvs.D9IGFnaaq0EQdGEIDMyMincn

[vault_2] waiting to finish post-unseal setup (15 seconds)

[vault_2] logging in and enabling the KV secrets engine
Success! You are now authenticated. The token information displayed below
is already stored in the token helper. You do NOT need to run "vault login"
again. Future Vault requests will automatically use this token.

Key                  Value
---                  -----
token                hvs.D9IGFnaaq0EQdGEIDMyMincn
token_accessor       WB7pM07o9oydE1DKepOSS2rK
token_duration       ∞
token_renewable      false
token_policies       ["root"]
identity_policies    []
policies             ["root"]
Success! Enabled the kv-v2 secrets engine at: kv/

[vault_2] storing secret 'kv/apikey' to demonstrate snapshot and recovery methods
= Secret Path =
kv/data/apikey

======= Metadata =======
Key                Value
---                -----
created_time       2023-06-30T19:00:29.354452Z
custom_metadata    <nil>
deletion_time      n/a
destroyed          false
version            1
= Secret Path =
kv/data/apikey

======= Metadata =======
Key                Value
---                -----
created_time       2023-06-30T19:00:29.354452Z
custom_metadata    <nil>
deletion_time      n/a
destroyed          false
version            1

===== Data =====
Key       Value
---       -----
webapp    ABB39KKPTWOR832JGNLS02
vault_2 (
http://127.0.0.2:8200) is initialized and unsealed. K/V-V2 secrets engine is enabled with some test data atkv/apikey. The initial root token is stored in therecovery_key-vault_2file.Setup vault_3.
$ ./cluster.sh setup vault_3

[vault_3] starting Vault server @ http://127.0.0.3:8200

Using [vault_1] root token (hvs.S72Tuc0TOI17zoJolxhxZzba) to retrieve transit key for auto-unseal
Create an HA cluster
Currently vault_2 is initialized, unsealed, and has HA enabled. It is the only node in a cluster. The remaining nodes, vault_3 and vault_4, have not joined its cluster.
Examine the leader
Let's discover more about the configuration of vault_2 and how it describes the current state of the cluster.
Open the vault_2 server configuration file (
config-vault_2.hcl) in a text editor.config-vault_2.hcl
storage "raft" {
   path    = "<path_to_local>/raft-vault_2/"
   node_id = "vault_2"
}

listener "tcp" {
   address = "127.0.0.2:8200"
   cluster_address = "127.0.0.2:8201"
   tls_disable = true
}

seal "transit" {
   address            = "http://127.0.0.1:8200"
   # token is read from VAULT_TOKEN env
   # token              = ""
   disable_renewal    = "false"

   // Key configuration
   key_name           = "unseal_key"
   mount_path         = "transit/"
}

disable_mlock = true
cluster_addr = "http://127.0.0.2:8201"
To use the Integrated Storage, the
storagestanza is set toraft. Thepathspecifies the path where Vault data will be stored ($HOME/vault-tutorial/learn-vault-raft/raft-storage/local/raft-vault_2/).Set the
VAULT_ADDRto point to vault_2.$ export VAULT_ADDR="http://127.0.0.2:8200"Examine the current raft peer set.
$ vault operator raft list-peers
Node       Address           State     Voter
----       -------           -----     -----
vault_2    127.0.0.2:8201    leader    true
The cluster reports that vault_2 is the only node and is currently the leader.
Examine vault_2 root token.
$ cat root_token-vault_2
hvs.tgWTO0NoZ1YxR89B4NULANQA
The cluster.sh script captured the root token of vault_2 during its
setup and stored it in this file. This root token has privileged access to all
nodes within the cluster.
Although the listener stanza disables TLS for this tutorial, Vault should always be used with TLS in production to provide secure communication between clients and the Vault server. It requires a certificate file and key file on each Vault host.
Join nodes to the cluster
Add vault_3 to the cluster using the vault operator raft join command.
Open a new terminal and set the working directory to the
learn-vault-raft/raft-storage/localdirectory.$ cd $HOME/vault-tutorial/learn-vault-raft/raft-storage/localSet the VAULT_ADDR to vault_3 API address.
$ export VAULT_ADDR="http://127.0.0.3:8200"Join vault_3 to the vault_2 cluster.
$ vault operator raft join http://127.0.0.2:8200

Key       Value
---       -----
Joined    true
The
http://127.0.0.2:8200is the vault_2 server address which has been already initialized and auto-unsealed. This makes vault_2 the active node and its storage behaves as the leader in this cluster.Next, configure the
vaultCLI to use vault_2 root token for requests.$ export VAULT_TOKEN=$(cat root_token-vault_2)Examine the current raft peer set.
$ vault operator raft list-peers

Node       Address           State     Voter
----       -------           -----     -----
vault_2    127.0.0.2:8201    leader    true
vault_3    127.0.0.3:8201    follower  true
Now, vault_3 is listed as a follower node.
Examine vault_3 log file (
vault_3.log).$ cat vault_3.log ... [TRACE] storage.raft: setting up raft cluster [TRACE] storage.raft: applying raft config: inputs="map[node_id:vault_3 path:/Users/yoko/vault-tutorial/learn-vault-raft/raft-storage/local/raft-vault_3/]" ...snip... [INFO] storage.raft: entering follower state: follower="Node at 127.0.0.3:8201 [Follower]" leader-address= leader-id= [TRACE] storage.raft: finished setting up raft cluster [INFO] core: successfully joined the raft cluster: leader_addr=http://127.0.0.2:8200The log describes the cluster joining operations.
Finally, verify that you can read the secret at
kv/apikey.$ vault kv get kv/apikey = Secret Path = kv/data/apikey ======= Metadata ======= Key Value --- ----- created_time 2022-05-11T23:57:41.394854Z custom_metadata <nil> deletion_time n/a destroyed false version 1 ===== Data ===== Key Value --- ----- webapp ABB39KKPTWOR832JGNLS02
Retry join
You can use the vault operator raft join command to join
vault_4 to the cluster in the same way you joined vault_3 to the cluster. However, if the connection details of all the nodes
are known beforehand, you can configure the retry_join stanza in the server
configuration file to automatically join the cluster.
Modify the server configuration file,
config-vault_4.hclby adding theretry_joinblock inside thestoragestanza.retry_join { leader_api_addr = "http://127.0.0.2:8200" } retry_join { leader_api_addr = "http://127.0.0.3:8200" }The resulting
config-vault_4.hclfile should look like:config-vault_4.hcl
storage "raft" {
   path    = "<path_to_local>/raft-vault_4/"
   node_id = "vault_4"
   retry_join {
      leader_api_addr = "http://127.0.0.2:8200"
   }
   retry_join {
      leader_api_addr = "http://127.0.0.3:8200"
   }
}

listener "tcp" {
   address = "127.0.0.4:8200"
   cluster_address = "127.0.0.4:8201"
   tls_disable = true
}

seal "transit" {
   address            = "http://127.0.0.1:8200"
   # token is read from VAULT_TOKEN env
   # token              = ""
   disable_renewal    = "false"

   // Key configuration
   key_name           = "unseal_key"
   mount_path         = "transit/"
}

disable_mlock = true
cluster_addr = "http://127.0.0.4:8201"
Since the address of vault_2 and vault_3 are known, you can predefine the possible cluster leader addresses in the
retry_joinblock.Start vault_4.
$ ./cluster.sh start vault_4Open a new terminal and set the working directory to the
$HOME/vault-tutorial/learn-vault-raft/raft-storage/localdirectory.$ cd $HOME/vault-tutorial/learn-vault-raft/raft-storage/localSet the VAULT_ADDR to vault_4 API address.
$ export VAULT_ADDR="http://127.0.0.4:8200"List the peers and notice that vault_4 is listed as a follower node.
$ vault operator raft list-peers

Node       Address           State       Voter
----       -------           -----       -----
vault_2    127.0.0.2:8201    leader      true
vault_3    127.0.0.3:8201    follower    true
vault_4    127.0.0.4:8201    follower    true
Configure the
vaultCLI, in this terminal, to use vault_2 root token for requests.$ export VAULT_TOKEN=$(cat root_token-vault_2)Patch the secret at
kv/apikey.$ vault kv patch kv/apikey expiration="365 days" = Secret Path = kv/data/apikey ======= Metadata ======= Key Value --- ----- created_time 2022-05-12T04:07:32.488199Z custom_metadata <nil> deletion_time n/a destroyed false version 2Return to the terminal you used to configure vault_3 and read the secret again.
$ vault kv get kv/apikey

= Secret Path =
kv/data/apikey

======= Metadata =======
Key                Value
---                -----
created_time       2022-05-12T04:07:32.488199Z
custom_metadata    <nil>
deletion_time      n/a
destroyed          false
version            2

======= Data =======
Key           Value
---           -----
expiration    365 days
webapp        ABB39KKPTWOR832JGNLS02
Data snapshots for recovery
Integrated Storage provides an interface to take snapshots of its data. These snapshots can be used later to restore data if it ever becomes necessary.
Take a snapshot
Return to the terminal where VAULT_ADDR is set to vault_2 address
(http://127.0.0.2:8200), and then execute the following command to take a
snapshot of the data.
$ vault operator raft snapshot save demo.snapshot
Automated snapshots
Instead of taking a snapshot manually, you can schedule snapshots to be taken automatically at your desired interval. You can create multiple automatic snapshot configurations.
Create an automatic snapshot configuration named, daily which takes a snapshot
every 24 hours. The snapshots are stored locally in a directory named,
raft-backup and retain 5 snapshots before one can be deleted to make room
for the next snapshot. The local disk space available to store the snapshot is
1GB. This means that raft-backup retains up to 5 snapshots or 1GB of data
whichever the condition meets first.
$ vault write sys/storage/raft/snapshot-auto/config/daily interval="24h" retain=5 \
     path_prefix="raft-backup" storage_type="local" local_max_space=1073741824
In absence of a specific file_prefix value, the snapshot files will have a
prefix of vault-snapshot.
Read and verify the automatic snapshot configuration.
$ vault read sys/storage/raft/snapshot-auto/config/daily

Key                Value
---                -----
file_prefix        vault-snapshot
interval           86400
local_max_space    1073741824
path_prefix        raft-backup
retain             5
storage_type       local
Available snapshot storage types are: local, aws-s3, azure-blob, and
google-gcs. Depending on the target location, the configuration parameters
differ.
View the path help on the sys/storage/raft/snapshot-auto/config endpoint.
$ vault path-help sys/storage/raft/snapshot-auto/config/my-config

Request:        storage/raft/snapshot-auto/config/my-config
Matching Route: ^storage/raft/snapshot-auto/config/(?P<name>\w(([\w-.]+)?\w)?)$

Configure automatic snapshotting

## PARAMETERS

    aws_access_key_id (string)

        AWS access key ID

    aws_s3_bucket (string)

        AWS bucket

    aws_s3_disable_tls (bool)

        Disable TLS for the AWS endpoint, intended only for testing

    ## ...snip...
Simulate loss of data
First, verify that a secrets exists at kv/apikey.
$ vault kv get kv/apikey
Next, delete the secrets at kv/apikey.
$ vault kv metadata delete kv/apikey
Success! Data deleted (if it existed) at: kv/metadata/apikey
Finally, verify that the data has been deleted.
$ vault kv get kv/apikey
No value found at kv/data/apikey
Restore data from a snapshot
First, recover the data by restoring the data found in demo.snapshot.
$ vault operator raft snapshot restore demo.snapshot
Optional: You can tail the server log of the active node (vault_2).
$ grep -B3 'snapshot installed' vault_2.log

[TRACE] storage.raft.snapshot: snapshot write: writing keys: num_written=39
[INFO]  storage.raft: copied to local snapshot: bytes=19213
[INFO]  storage.raft.fsm: installing snapshot to FSM
[INFO]  storage.raft.fsm: snapshot installed
Verify that the data has been recovered.
$ vault kv get kv/apikey

= Secret Path =
kv/data/apikey

======= Metadata =======
Key                Value
---                -----
created_time       2022-05-12T04:07:32.488199Z
custom_metadata    <nil>
deletion_time      n/a
destroyed          false
version            2

======= Data =======
Key           Value
---           -----
expiration    365 days
webapp        ABB39KKPTWOR832JGNLS02
Resign from active duty
Currently, vault_2 is the active node. Experiment to see what happens if vault_2 steps down from its active node duty.
In the terminal where VAULT_ADDR is set to http://127.0.0.2:8200, execute the
step-down command.
$ vault operator step-down
Success! Stepped down: http://127.0.0.2:8200
In the terminal where VAULT_ADDR is set to http://127.0.0.3:8200, examine the raft peer set.
$ vault operator raft list-peers

Node       Address           State       Voter
----       -------           -----       -----
vault_2    127.0.0.2:8201    follower    true
vault_3    127.0.0.3:8201    leader      true
vault_4    127.0.0.4:8201    follower    true
Notice that vault_3 is now promoted to be the leader and vault_2 became a follower.
Remove a cluster member
It may become important to remove nodes from the cluster for maintenance, upgrades, or to preserve compute resources.
Remove vault_4 from the cluster.
$ vault operator raft remove-peer vault_4
Peer removed successfully!
Verify that vault_4 has been removed from the cluster by viewing the raft cluster peers.
$ vault operator raft list-peers

Node       Address           State       Voter
----       -------           -----       -----
vault_2    127.0.0.2:8201    follower    true
vault_3    127.0.0.3:8201    leader      true
Add vault_4 back to the cluster
If you wish to add vault_4 back to the HA cluster, return to the terminal
where VAULT_ADDR is set to vault_4 API address (http://127.0.0.4:8200),
and stop vault_4.
$ ./cluster.sh stop vault_4
Delete the data directory.
$ rm -r raft-vault_4
Now, create a raft-vault_4 directory again because the raft storage
destination must exist before you can start the server.
$ mkdir raft-vault_4
Start the vault_4 server.
$ ./cluster.sh start vault_4
You can again examine the peer set to confirm that vault_4 successfully joined the cluster as a follower.
$ vault operator raft list-peers

Node       Address           State       Voter
----       -------           -----       -----
vault_2    127.0.0.2:8201    follower    true
vault_3    127.0.0.3:8201    leader      true
vault_4    127.0.0.4:8201    follower    true
Recovery mode for troubleshooting
In the case of an outage caused by corrupt entries in the storage, an operator might need to start Vault in recovery mode. In this mode, Vault runs with minimal capabilities and exposes a subset of its API.
Start in recovery mode
Use the setup script to stop all remaining cluster members to simulate an outage.
Stop vault_2.
$ ./cluster.sh stop vault_2

Found 1 Vault service(s) matching that name
[vault_2] stopping
Stop vault_4 if you added it back to the cluster.
$ ./cluster.sh stop vault_4

Found 1 Vault service(s) matching that name
[vault_4] stopping
Stop vault_3.
$ ./cluster.sh stop vault_3

Found 1 Vault service(s) matching that name
[vault_3] stopping
Start vault_3 in recovery mode.
$ VAULT_TOKEN=$(cat root_token-vault_1) VAULT_ADDR=http://127.0.0.3:8200 \
            vault server -recovery -config=config-vault_3.hcl
Output example:
==> Vault server configuration:

               Seal Type: transit
         Transit Address: http://127.0.0.1:8200
      Transit Key Name: unseal_key
      Transit Mount Path: transit/
         Cluster Address: http://127.0.0.3:8201
            Go Version: go1.20.5
               Log Level:
         Recovery Mode: true
               Storage: raft
               Version: Vault v1.14.0, built 2023-06-19T11:40:23Z
            Version Sha: 13a649f860186dffe3f3a4459814d87191efc321

==> Vault server started! Log data will stream in below:

2023-06-30T12:50:34.915-0700 [INFO]  proxy environment: http_proxy="" https_proxy="" no_proxy=""
2023-06-30T12:50:34.976-0700 [INFO]  storage.raft.snapshot: reaping snapshot: path=/Users/yoko/vault-tutorial/learn-vault-raft/raft-storage/local/raft-vault_3/raft/snapshots/3-58-1688154202022
Create a recovery operational token
Open a new terminal and set the working directory to the
$HOME/vault-tutorial/learn-vault-raft/raft-storage/localdirectory.$ cd $HOME/vault-tutorial/learn-vault-raft/raft-storage/localSet the VAULT_ADDR to vault_3 API address.
$ export VAULT_ADDR="http://127.0.0.3:8200"Generate a temporary one-time password (OTP).
$ vault operator generate-root -generate-otp -recovery-token
dpj9OMJ2N4DoFu0bmq1EbPqASGij
Start the generation of the recovery token with the OTP.
Example:
$ vault operator generate-root -init \
    -otp=dpj9OMJ2N4DoFu0bmq1EbPqASGij -recovery-token
Output example:
Nonce         f0454dce-b46d-70d1-5ae0-9f7ac9dc1e9f
Started       true
Progress      0/1
Complete      false
OTP Length    28
View the recovery key that was generated during the setup of vault_3.
$ cat recovery_key-vault_2 JRiV5VGrzlB9JVXhfHSunSELfY+pQsqUTxGI8+Hjtpk=Create an encoded token.
$ vault operator generate-root -recovery-token

Operation nonce: b7411535-8c68-9905-97fc-d7b36dcb1a80
Unseal Key (will be hidden):
Enter the recovery key when prompted. The output looks similar to below.
Operation nonce: f0454dce-b46d-70d1-5ae0-9f7ac9dc1e9f
Unseal Key (will be hidden):
Nonce            f0454dce-b46d-70d1-5ae0-9f7ac9dc1e9f
Started          true
Progress         1/1
Complete         true
Encoded Token    DAYYFxcUKVN9XXYNDx9IDSEwXnFSMzt5AzUHCw
Finally, complete the creation of a recovery token with the
encoded tokenandotp.Example:
$ vault operator generate-root \
  -decode=DAYYFxcUKVN9XXYNDx9IDSEwXnFSMzt5AzUHCw \
  -otp=dpj9OMJ2N4DoFu0bmq1EbPqASGij \
  -recovery-token
Output example:
hvr.XYca3i2bIjxoLAo40cJ8PrnaIn recovery mode, Vault launches with a minimal API enabled. In this mode you are able to interact with the raw system storage. Use the recovery operational token to list the contents at
sys/raw/sys.Example:
$ VAULT_TOKEN=hvr.XYca3i2bIjxoLAo40cJ8Prna vault list sys/raw/sys

Keys
----
policy/
token/
Fix the issue using the recovery token.
Resume normal operations
First, stop the Vault server running in recovery mode by pressing Ctrl+C in the terminal where vault_3 is started in recovery mode.
Start Vault service for vault_3.
$ ./cluster.sh start vault_3Start vault_2.
$ ./cluster.sh start vault_2
Clean up
When you finish with the sceario, you can stop all services, remove all configuration, and remove all modifications to your local system with the same cluster.sh script you used during setup.
Clean up your local workstation.
$ ./cluster.sh clean
...
Found 4 Vault services

Each node in the Vault cluster required:
 - local loopback address
 - a configuration file
 - a directory to store the contents of the Raft storage.

Removing local loopback address: 127.0.0.2 (sudo required)
Removing local loopback address: 127.0.0.3 (sudo required)
Removing local loopback address: 127.0.0.4 (sudo required)
Removing configuration file <path_to_local>/config-vault_1.hcl
Removing configuration file <path_to_local>/config-vault_2.hcl
Removing configuration file <path_to_local>/config-vault_3.hcl
Removing configuration file <path_to_local>/config-vault_4.hcl
Removing raft storage file <path_to_local>/raft-vault_2
Removing raft storage file <path_to_local>/raft-vault_3
Removing raft storage file <path_to_local>/raft-vault_4
Removing key <path_to_local>/unseal_key-vault_1
Removing key <path_to_local>/recovery_key-vault_2
Removing key <path_to_local>/root_token-vault_1
Removing key <path_to_local>/root_token-vault_2
Removing log file <path_to_local>/vault_1.log
Removing log file <path_to_local>/vault_2.log
Removing log file <path_to_local>/vault_3.log
Removing log file <path_to_local>/vault_4.log
Removing demo.snapshot
Clean complete
Knowledge checks
A quiz to test your knowledge.
Why does this tutorial use Vault Integrated Storage instead of an external storage backend?
Integrated Storage keeps the storage layer inside Vault, which reduces operational complexity, removes extra client configuration, and supports HA features such as failover and replication.
What happens when you run
vault operator raft join http://127.0.0.2:8200from vault_3?🔘 vault_3 becomes the leader of a new cluster.
🔘 vault_3 joins the existing vault_2 cluster as a follower and auto-unseals through Transit.
🔘 vault_3 copies only the listener configuration from vault_2.
🔘 vault_3 removes vault_2 from the raft peer set.
❌ vault_3 becomes the leader of a new cluster.
✅ vault_3 joins the existing vault_2 cluster as a follower and auto-unseals through Transit.
❌ vault_3 copies only the listener configuration from vault_2.
❌ vault_3 removes vault_2 from the raft peer set.
How do snapshots help you recover from data loss in a Vault cluster that uses Integrated Storage?
Snapshots let you save the current raft data state and later restore it if data is deleted or corrupted. In this tutorial, restoring
demo.snapshotrecovers the data atkv/apikeyafter you delete it.