Deploy Vault on Amazon EKS Anywhere
This tutorial provides guidance on deploying Vault in Amazon Elastic Kubernetes Service (EKS) Anywhere. Amazon EKS Anywhere is a new deployment option for Amazon EKS that allows customers to create and operate Kubernetes clusters on customer-managed infrastructure, supported by AWS. There are several layers in this stack and this tutorial will help you set up your infrastructure end-to-end.
The bottom-most layer of the stack consists of Bare Metal with VMware's vSphere as the first layer of abstraction. Amazon EKS runs on top of that as the Kubernetes distribution with Vault running as the secrets manager for it.
Prerequisites
To perform the tasks described in this tutorial, you need to have:
AWS account with permissions for S3 and EKS services
One of the following:
- Amazon EKS Anywhere cluster already deployed
- Access to VMware vCenter cluster
- Equinix bare metal, Terraform and VMware account with access to vCenter Server Appliance (VCSA) binary
Vault Enterprise license (if using Enterprise version of Vault)
Administrative machine prerequisites:
- Docker 20.x.x
- Kubernetes command-line interface (CLI)
- Helm CLI installed
- Mac OS (10.15) or Ubuntu (20.04.2 LTS)
- 4 CPU cores
- 16GB memory
- 30GB free disk space
Download required files
Launch the vSphere downloads page. Under Enterprise, select VMware vCenter Server 7.0.3 (or the latest version). Select the GO TO DOWNLOAD link, and then click the DOWNLOAD NOW button.
Launch the vSan Management SDK for Python page. Click the DOWNLOAD button to download v7.0.3 (or the corresponding latest version to the previous step).
Upload the
VMware-VCSA-all-<version>.isointo Amazon S3 bucket to a folder path of your choice, usingvcsa-iso-image.List S3 objects to discover the
vcsa-iso-imagepath.$ aws s3 lsUpload the
VMware-VCSA-all-<version>.isointo Amazon S3 bucket.$ aws s3 cp /local/path/to/VMware-VCSA-all-7.0.3-<version>.iso s3://vcsa-storage-bucketUpload the Python scripts you downloaded earlier located at bindings > vsanmgmtObjects.py to the Amazon S3 folder.
$ aws s3 cp /<file_path>/vsan-sdk-python/bindings/vsanmgmtObjects.py s3://vcsa-storage-bucketUpload the Python scripts located at samplecode > vsanapiutils.py to the Amazon S3 bucket.
$ aws s3 cp /<file_path>/vsan-sdk-python/samplecode/vsanapiutils.py s3://vcsa-storage-bucketThe Amazon S3 bucket should look similar to the following
Object Store Root:
    |
    |__ Bucket_Name
        |
        |__ VMware-VCSA-all-7.0.3-18700403.iso
        |
        |__ vsanapiutils.py
        |
        |__ vsanmgmtObjects.py
Deploy vCenter
To setup vCenter cluster using Equinix Bare Metal services follow these steps, for a more detailed setup follow the instructions on their website.
Create a
eksafolder and change the working directory toeksa.$ mkdir eksa && cd eksaClone the Terraform repository.
$ git clone https://github.com/equinix/terraform-metal-vsphereSet the working directory to
terraform-metal-vsphere.$ cd terraform-metal-vsphereLaunch the Equinix console, and select Personal settings > Personal API keys > create. Make a note of the API key value.
From the Equinix console, click top-right on your name and select settings > org settings > General > Account Id. Make a note of the org ID.
From the Equinix console, select Personal settings > Project Id and copy the project ID.
Use your preferred text editor, create a file named,
terraform.tfvarsas follow. Change the facility value matches to your preference.terraform.tfvars
# Equinix vars
auth_token      = "<API_TOKEN_FROM_STEP_12.a>"
organization_id = "<ORG_TOKEN_FROM_STEP_12.b>"
project_id      = "<PROJECT_ID_FROM_STEP_12.c>"
create_project  = false
facility        = "da11"

# AWS vars
Object_store_tool        = "s3"
Object_store_bucket_name = "vcsa-storage-bucket"
s3_url                   = "https://s3.us_west_1.amazonaws.com"
vcenter_iso_name         = "VMware-VCSA-all-<version>.iso"
s3_access_key            = "<AWS_ACCESS_KEY>"
s3_secret_key            = "<AWS_SECRET_KEY>"
s3_version               = "S3v4"
Perform a
terraform initto pull down the necessary provider resources.$ terraform initRun
terraform applyand review the planned actions. Your terminal output indicates the plan that it found and what resources Terraform will create.$ terraform apply ...snip... Do you want to perform these actions? Terraform will perform the actions described above. Only 'yes' will be accepted to approve. Enter a value: yesWhen prompted, enter
yesto confirm and resume.
Setup VPN to connect to vCenter cluster via CLI (optional)
There is an L2TP IPsec VPN client for every platform. You need to reference your operating system's documentation on how to connect to an L2TP IPsec VPN. Make sure to enable all traffic to use the VPN on your L2TP client - do not enable split tunneling.
Deploy Amazon EKS Anywhere on vCenter
If you’re using a self deployed vCenter cluster, refer the Amazon EKS Anywhere create production cluster guide.
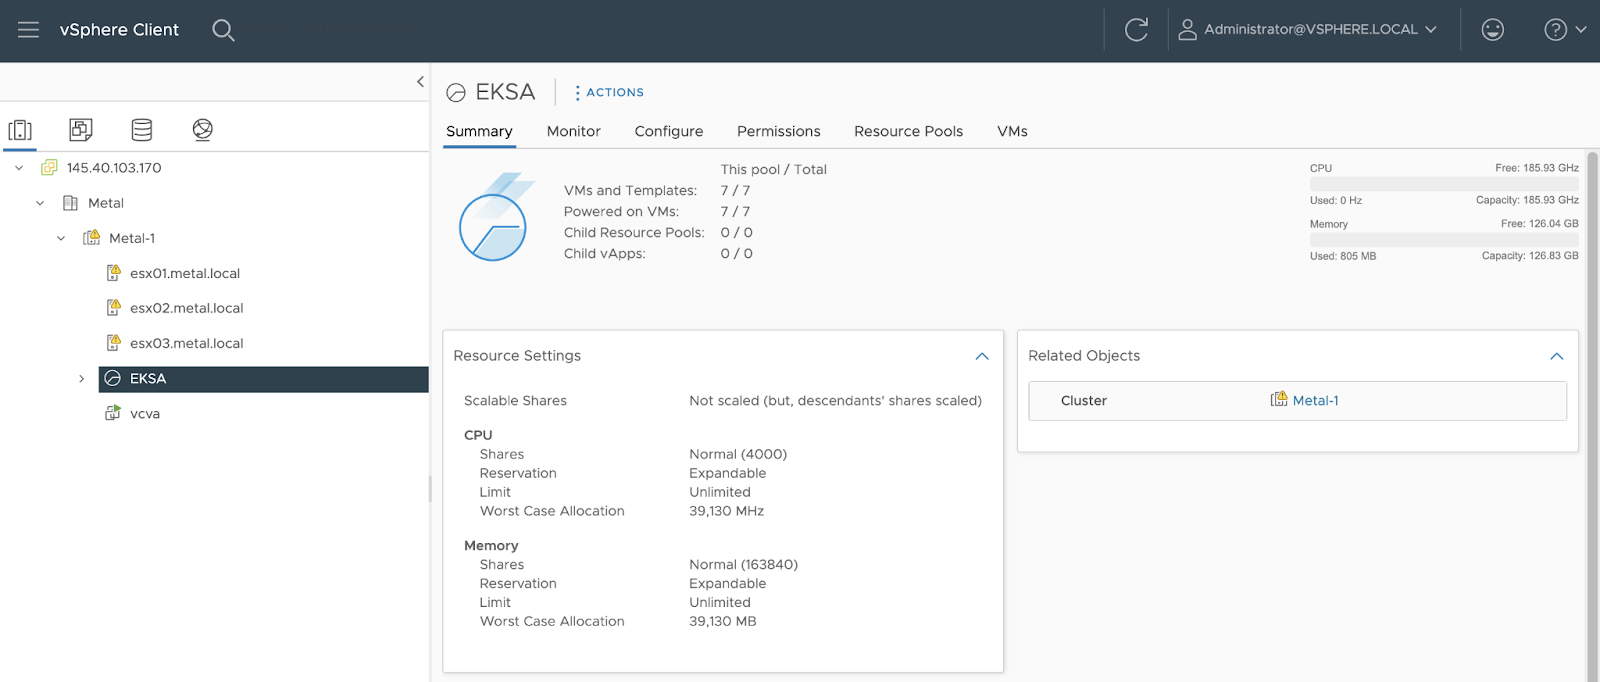
Login to vCenter and create resource pool under Metal (Datacenter) > Metal1 (Cluster) > EKSA (New resource Pool).
Install
eksctlandeksctl-anywherewith homebrew.$ brew install aws/tap/eks-anywhereVerify the installed version.
$ eksctl anywhere versionGenerate a YAML file to deploy Amazon EKS Anywhere.
$ CLUSTER_NAME=mgmt eksctl anywhere generate clusterconfig $CLUSTER_NAME \
   --provider vsphere > eksa-mgmt-cluster.yaml
Edit the control plane configuration in
eksa-mgmt-cluster.yaml.eksa-mgmt-cluster.yaml
…
…
controlPlaneConfiguration:
  count: 2
  endpoint:
    host: "172.16.0.150" # required unique IP outside DHCP block
  machineGroupRef:
…
…
The configuration defines the CIDR block, and reserves the first 100 IPs for DHCP, so a good one would be
172.16.0.150.Install
govcCLI from thevmware/govmomirepository.Set the
GOVC_INSECUREenvironment variable value to 1 to disable certificate verification.$ export GOVC_INSECURE=1Set the
GOVC_URLenvironment variable to the URL of ESXi or vCenter instance to connect to.$ export GOVC_URL=145.40.103.170Set the
GOVC_USERNAMEenvironment variable to the usename to use if not specified in GOVC_URL.$ export GOVC_USERNAME="Administrator@vsphere.local"Set the
GOVC_PASSWORDenvironment variable value to the password to use if not specified in GOVC_URL.$ export GOVC_PASSWORD="<VCENTER_PASSWORD>"Use
govcCLI to retrieve info about vCenter cluster.$ govc datacenter.info Name: Metal Path: /Metal Hosts: 3 Clusters: 1 Virtual Machines: 11 Networks: 2 Datastores: 4Use the private network for VMs in configuration: vCenter console > Network.
Generate thumbprint for vSphere to use when the connection is not insecure.
$ govc about.cert -thumbprint -k

145.40.103.170 61:B3:02:85:48:3F:A7:44:0E:3B:A0:AF:E8:38:11:62:79:16:E9:21
Edit the vSphere Data center configuration with the information gathered from the previous step.
eksa-mgmt-cluster.yaml
… … apiVersion: anywhere.eks.amazonaws.com/v1alpha1 kind: VSphereDatacenterConfig metadata: name: eks-mgmt spec: datacenter: "Metal" #required insecure: false #setting it to true might throw error network: "VM Private Net 1" #required server: "145.40.103.170" #required - vSphere server thumbprint: "61:B3:02:85:48:3F:A7:44:0E:3B:A0:AF:E8:38:11:62:79:16:E9:21" … …Edit the vSphere machine configuration to use the appropriate datastore and resource pool.
eksa-mgmt-cluster.yaml
…
…
kind: VSphereMachineConfig
metadata:
  name: mgmt-cp
spec:
  datastore: vsanDatastore #required
…
…
  resourcePool: /Metal/host/Metal-1/Resources/EKSA #required
…
…
kind: VSphereMachineConfig
metadata:
  name: mgmt
spec:
  datastore: vsanDatastore #required
…
…
  resourcePool: /Metal/host/Metal-1/Resources/EKSA #required
…
…
kind: VSphereMachineConfig
metadata:
  name: mgmt-etcd
spec:
  datastore: vsanDatastore #required
…
…
  resourcePool: /Metal/host/Metal-1/Resources/EKSA #required
…
…
Set the
EKSA_VSPHERE_USERNAMEenvironment variable.$ export EKSA_VSPHERE_USERNAME='Administrator@vsphere.local'Set the
EKSA_VSPHERE_PASSWORDenvironment variable.$ export EKSA_VSPHERE_PASSWORD='<VCENTER_PASSWORD>'Set the
EKSA_LICENSEenvironment variable. This is not required if you already have one.$ export EKSA_LICENSE='my-license-here'Deploy Amazon EKS Anywhere.
$ eksctl anywhere create cluster -f eksa-mgmt-cluster.yaml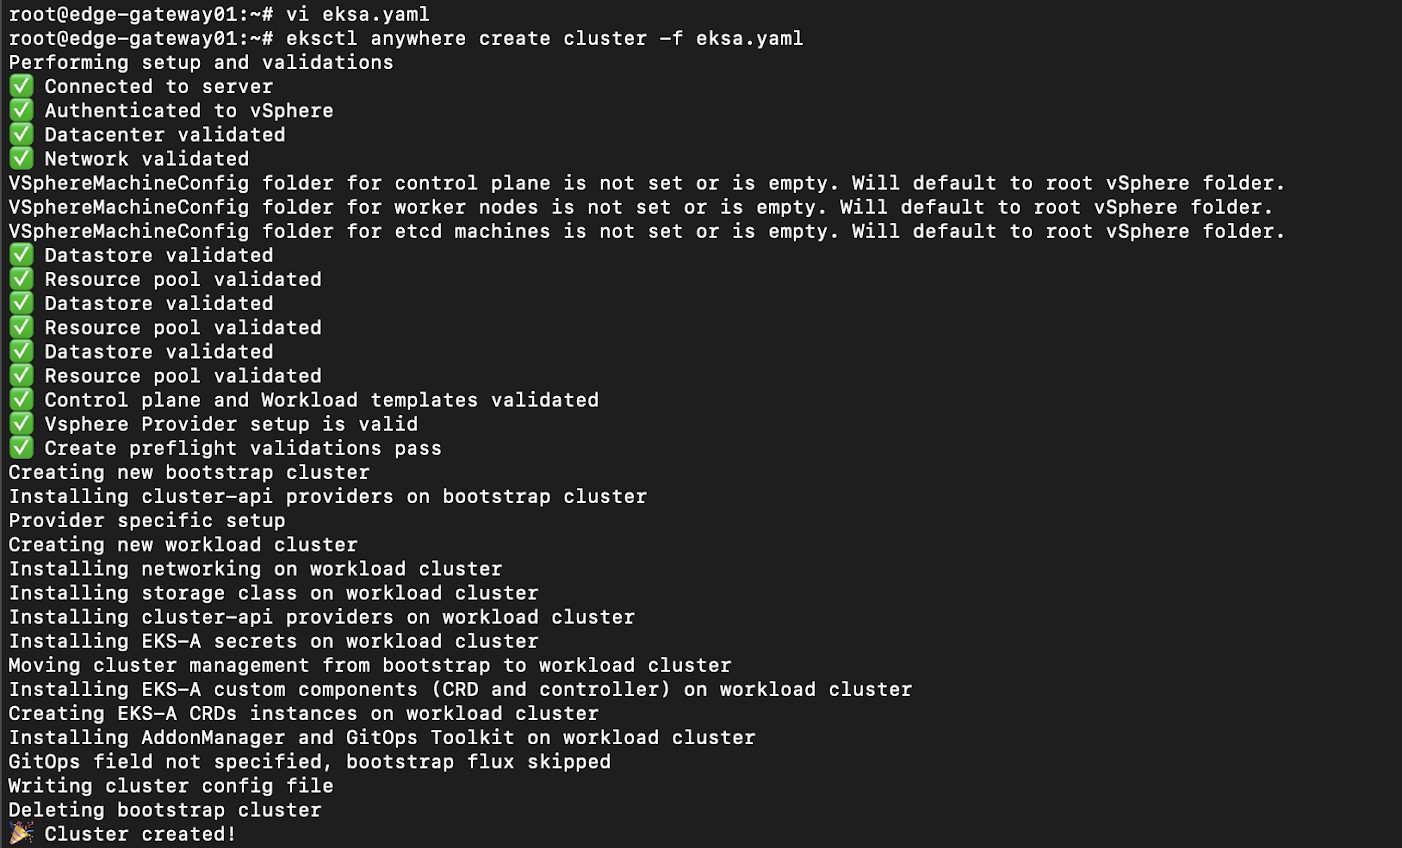
Store the
kubeconfigfile. You need to storekubeconfigin bastion or use VPN from the optional step.$ export KUBECONFIG=${PWD}/${CLUSTER_NAME}/${CLUSTER_NAME}-Amazon EKS Anywhere-cluster.kubeconfigDisplay the nodes of the cluster.
$ kubectl get nodes

NAME           STATUS   ROLES                  AGE   VERSION
172.16.0.134   Ready    <none>                 16d   v1.21.6
172.16.0.53    Ready    <none>                 16d   v1.21.6
172.16.0.63    Ready    control-plane,master   16d   v1.21.6
172.16.0.97    Ready    control-plane,master   16d   v1.21.6
Deploy Vault on Amazon EKS Anywhere
Vault installation on Amazon EKS Anywhere is same as any Kubernetes installation. For a step-by-step instructions, refer to the Vault on Kubernetes Deployment Guide.
Create a
vaultdirectory and change the working directory to thevaultdirectory.$ mkdir vault && cd vaultCreate a configuration file to configure Vault installation.
$ vi config.yaml
server:
  standalone:
    enabled: true
    config: |
      ui = true

      listener "tcp" {
        tls_disable = 1
        address = "[::]:8200"
        cluster_address = "[::]:8201"
      }
      storage "file" {
        path = "/vault/data"
      }
  service:
    enabled: true
ui:
  enabled: true
  serviceType: NodePort
Create a new namespace for the Vault installation.
$ kubectl create ns vaultTo access the Vault Helm chart, add the HashiCorp Helm repository.
$ helm repo add hashicorp https://helm.releases.hashicorp.comInstall the Vault Helm chart.
$ helm install vault hashicorp/vault --namespace vault -f config.yamlInitialize and unseal Vault.
$ kubectl exec --stdin=true --tty=true vault-0 -- vault operator init

Unseal Key 1: MBFSDepD9E6whREc6Dj+k3pMaKJ6cCnCUWcySJQymObb
Unseal Key 2: zQj4v22k9ixegS+94HJwmIaWLBL3nZHe1i+b/wHz25fr
Unseal Key 3: 7dbPPeeGGW3SmeBFFo04peCKkXFuuyKc8b2DuntA4VU5
Unseal Key 4: tLt+ME7Z7hYUATfWnuQdfCEgnKA2L173dptAwfmenCdf
Unseal Key 5: vYt9bxLr0+OzJ8m7c7cNMFj7nvdLljj0xWRbpLezFAI9

Initial Root Token: s.zJNwZlRrqISjyBHFMiEca6GF
The output displays the key shares and initial root key generated.
Unseal the Vault server using the unseal keys. The unseal threshold is 3.
$ kubectl exec --stdin=true --tty=true vault-0 -- vault operator unseal
Unseal Key (will be hidden):
When prompted, enter the Unseal Key 1 value.
$ kubectl exec --stdin=true --tty=true vault-0 -- vault operator unseal
Unseal Key (will be hidden):
When prompted, enter the Unseal Key 2 value.
$ kubectl exec --stdin=true --tty=true vault-0 -- vault operator unseal
Unseal Key (will be hidden):
When prompted, enter the Unseal Key 3 value.
Validate that Vault is up and running.
$ kubectl get pods --selector='app.kubernetes.io/name=vault'

NAME                                    READY   STATUS    RESTARTS   AGE
vault-0                                 1/1     Running   0          1m49s
vault-1                                 1/1     Running   0          1m49s
Display all Vault services.
$ kubectl get services -n vault --selector='app.kubernetes.io/name=vault-ui'

NAME       TYPE       CLUSTER-IP      EXTERNAL-IP   PORT(S)          AGE
vault-ui   NodePort   10.97.113.241   <none>        8200:30096/TCP   16d
Display the nodes of the cluster.
$ kubectl get nodes

NAME           STATUS   ROLES                  AGE   VERSION
172.16.0.134   Ready    <none>                 16d   v1.21.6
172.16.0.53    Ready    <none>                 16d   v1.21.6
172.16.0.63    Ready    control-plane,master   16d   v1.21.6
172.16.0.97    Ready    control-plane,master   16d   v1.21.6
Install the HashiCorp tap, a repository of HashiCorp's Homebrew packages.
$ brew tap hashicorp/tapInstall Vault with hashicorp/tap/vault.
$ brew install hashicorp/tap/vaultSet the
VAULT_ADDRenvironment variable. Since you exposed Vault usingNodePort, Vault will be available at172.16.0.97:8200. Access it from your bastion host or VPN from the optional step.$ export VAULT_ADDR='http://172.16.0.97:30096'Set the
VAULT_TOKENenvironment variable value to the initial root token value generated during the Vault initialization.$ export VAULT_TOKEN="s.zJNwZlRrqISjyBHFMiEca6GF"Enable the kv secrets engine.
$ vault secrets enable -path=kv kv

Success! Enabled the kv secrets engine at: kv/
Store some test data at
kv/hello.$ vault kv put kv/hello target=world Key Value --- ----- created_time 2022-03-21T21:23:00.540998543Z custom_metadata <nil> deletion_time n/a destroyed false version 1Read the stored data to verify.
$ vault kv get kv/hello

======= Metadata =======
Key                Value
---                -----
created_time       2022-03-21T21:23:00.540998543Z
custom_metadata    <nil>
deletion_time      n/a
destroyed          false
version            1

===== Data =====
Key       Value
---       -----
target    world
Configure Kubernetes auth method
Retrieve the additional configuration by cloning the
hashicorp/learn-vault-agentrepository from GitHub.$ git clone https://github.com/hashicorp-education/learn-vault-agentChange the working directory to
learn-vault-agent/vault-agent-k8s-demo.$ cd learn-vault-agent/vault-agent-k8s-demoUpdate the vault-auth service account.
$ kubectl apply --filename vault-auth-service-account.yamlCreate a read-only policy,
myapp-kv-roin Vault.$ vault policy write myapp-kv-ro - <<EOF path "secret/data/myapp/*" { capabilities = ["read", "list"] } EOFCreate some test data at the
secret/myapppath.$ vault kv put secret/myapp/config \ username='appuser' \ password='suP3rsec(et!' \ ttl='30s'Set the
K8S_HOSTenvironment variable value to minikube IP address.$ export K8S_HOST=$(kubectl config view --raw --minify --flatten \ --output 'jsonpath={.clusters[].cluster.server}')Enable the Kubernetes auth method at the default path.
$ vault auth enable kubernetes

Success! Enabled kubernetes auth method at: kubernetes/
Configure the Kubernetes auth method.
$ vault write auth/kubernetes/config \
     kubernetes_host="$K8S_HOST"
Output:
Success! Data written to: auth/kubernetes/configCreate a role named,
example, that maps the Kubernetes Service Account to Vault policies and default token TTL.$ vault write auth/kubernetes/role/example \ bound_service_account_names=vault-auth \ bound_service_account_namespaces=default \ token_policies=myapp-kv-ro \ ttl=24hOutput:
Success! Data written to: auth/kubernetes/role/example
Verify the Kubernetes auth method configuration
Create a variable named
EXTERNAL_VAULT_ADDR.$ export EXTERNAL_VAULT_ADDR="172.16.0.97:30096"Define a Pod with a container.
$ cat > devwebapp.yaml <<EOF
apiVersion: v1
kind: Pod
metadata:
  name: devwebapp
  labels:
    app: devwebapp
spec:
  serviceAccountName: vault-auth
  containers:
    - name: devwebapp
      image: burtlo/devwebapp-ruby:k8s
      env:
        - name: VAULT_ADDR
          value: "http://$EXTERNAL_VAULT_ADDR:8200"
EOF
The Pod,
devwebapp, runs with thevault-authservice account.Create the
devwebapppod in thedefaultnamespace$ kubectl apply --filename devwebapp.yaml --namespace defaultDisplay all the pods in the default namespace.
$ kubectl get pods

NAME        READY   STATUS    RESTARTS   AGE
devwebapp   1/1     Running   0          77s
Wait until the
devwebapppod is running and ready (1/1).Start an interactive shell session on the
devwebapppod.$ kubectl exec --stdin=true --tty=true devwebapp -- /bin/sh #The command updates your system prompt to
#.Set
KUBE_TOKENto the service account token.$ export KUBE_TOKEN=$(cat /var/run/secrets/kubernetes.io/serviceaccount/token)Authenticate with Vault through the
examplerole with theKUBE_TOKEN.$ curl --request POST \ --data '{"jwt": "'"$KUBE_TOKEN"'", "role": "example"}' \ $VAULT_ADDR/v1/auth/kubernetes/loginExample output:
{
  "request_id": "2febc920-6feb-182a-19cd-c95c0cd70bf7",
  "lease_id": "",
  "renewable": false,
  "lease_duration": 0,
  "data": null,
  "wrap_info": null,
  "warnings": null,
  "auth": {
    "client_token": "s.ZOZk5OkIW1rbdMEqGmwJW7vj",
    "accessor": "yPwZcQG6LP721LryKzkgA4eA",
    "policies": [
      "default",
      "myapp-kv-ro"
    ],
    "token_policies": [
      "default",
      "myapp-kv-ro"
    ],
    "metadata": {
      "role": "example",
      "service_account_name": "vault-auth",
      "service_account_namespace": "default",
      "service_account_secret_name": "",
      "service_account_uid": "649f0652-42ef-44ba-a416-76862bc1b6c3"
    },
    "lease_duration": 86400,
    "renewable": true,
    "entity_id": "3f684285-bc1c-6b9e-e580-4ce310c956b2",
    "token_type": "service",
    "orphan": true
  }
}
Next steps
In this tutorial, you deployed Vault on an Amazon EKS Anywhere cluster. Also, you enabled Kubernetes auth method so that Vault clients can authenticate with Vault using the trusted service account.