Read secrets for Kubernetes workloads from HCP Vault Dedicated
Kubernetes workloads can authenticate with HCP Vault Dedicated to access secrets managed by Vault.
Challenge
Managing access to secrets is a critical process for organizations that run workloads on Kubernetes. A Vault client (a user, an application, Kubernetes pod, etc.) must authenticate with Vault before it can read secrets managed by Vault.
Solution
HCP Vault Dedicated can manage secrets for Kubernetes workloads from outside the Kubernetes cluster.
In this tutorial, you will setup:
- Your local environment to support Vault Dedicated.
- Start a Kubernetes cluster using minikube.
- Authenticate with Vault Dedicated using:
- Vault token
- Kubernetes auth method
- Kubernetes auth method via the Vault Agent injector service
- Read secrets stored in Vault Dedicated.
Prerequisites
- HCP Vault Dedicated dev tier or higher cluster available
- Vault
- kubectl
- Helm
- minikube installed and configured
- ngrok installed and configured with an auth token
This tutorial was tested against the following specific versions:
- HCP Vault Dedicated 1.12.3
- Vault CLI 1.13
- Kubectl 1.26
- Helm 3.112
- minikube 1.29
- Kubernetes 1.26
Personas
The scenario described in this tutorial involves two personas:
adminwith privileged permissions to manage Vault and Kubernetesappsreads the secrets from Vault (client)
Lab setup
Vault setup
Launch the HCP Portal and login.
Click Vault in the left navigation pane.
In the Vault clusters pane, click vault-cluster.
Under Cluster URLs, click Public Cluster URL.
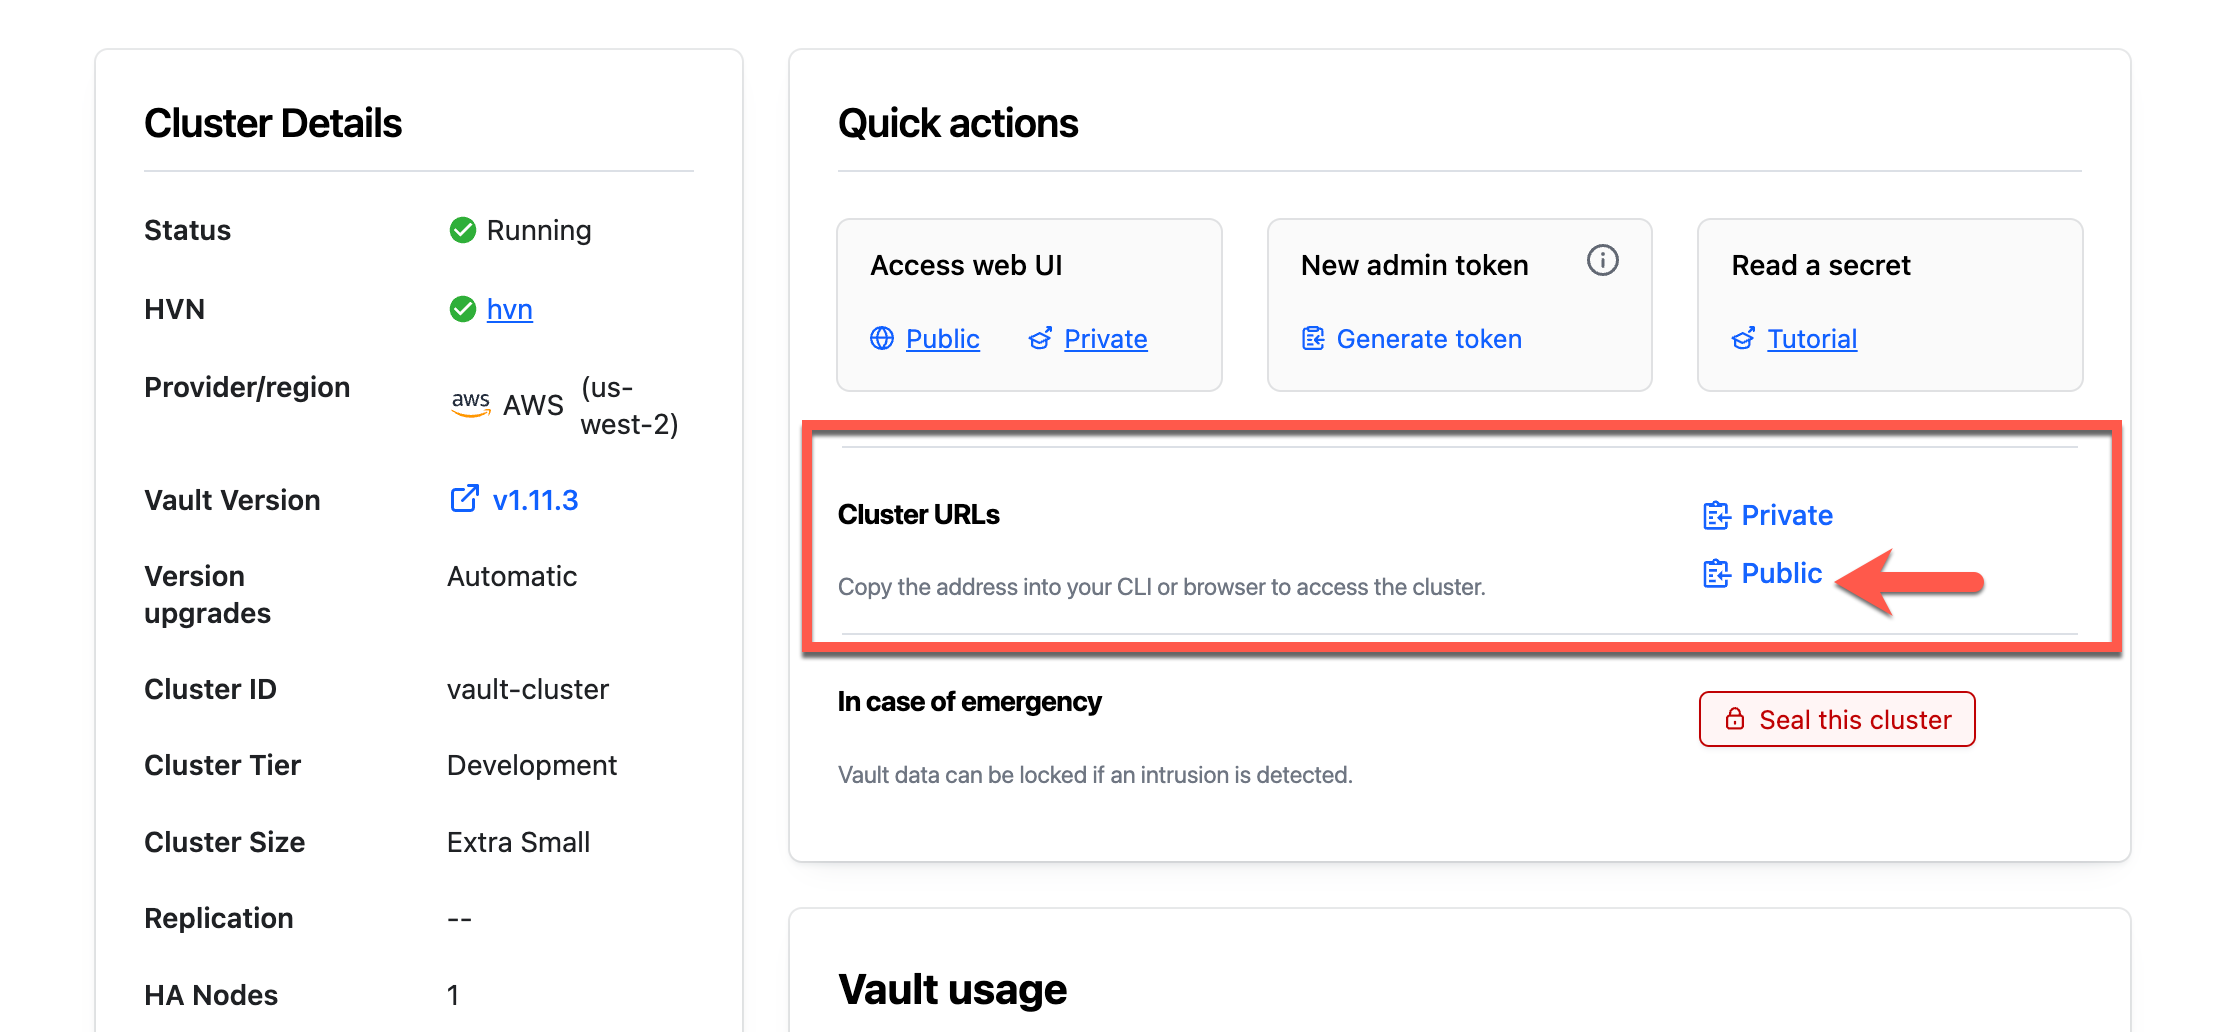
Open a new terminal and set the
VAULT_ADDRenvironment variable to the copied address.$ export VAULT_ADDR=<Public_Cluster_URL>Return to the Overview page and click Generate token.
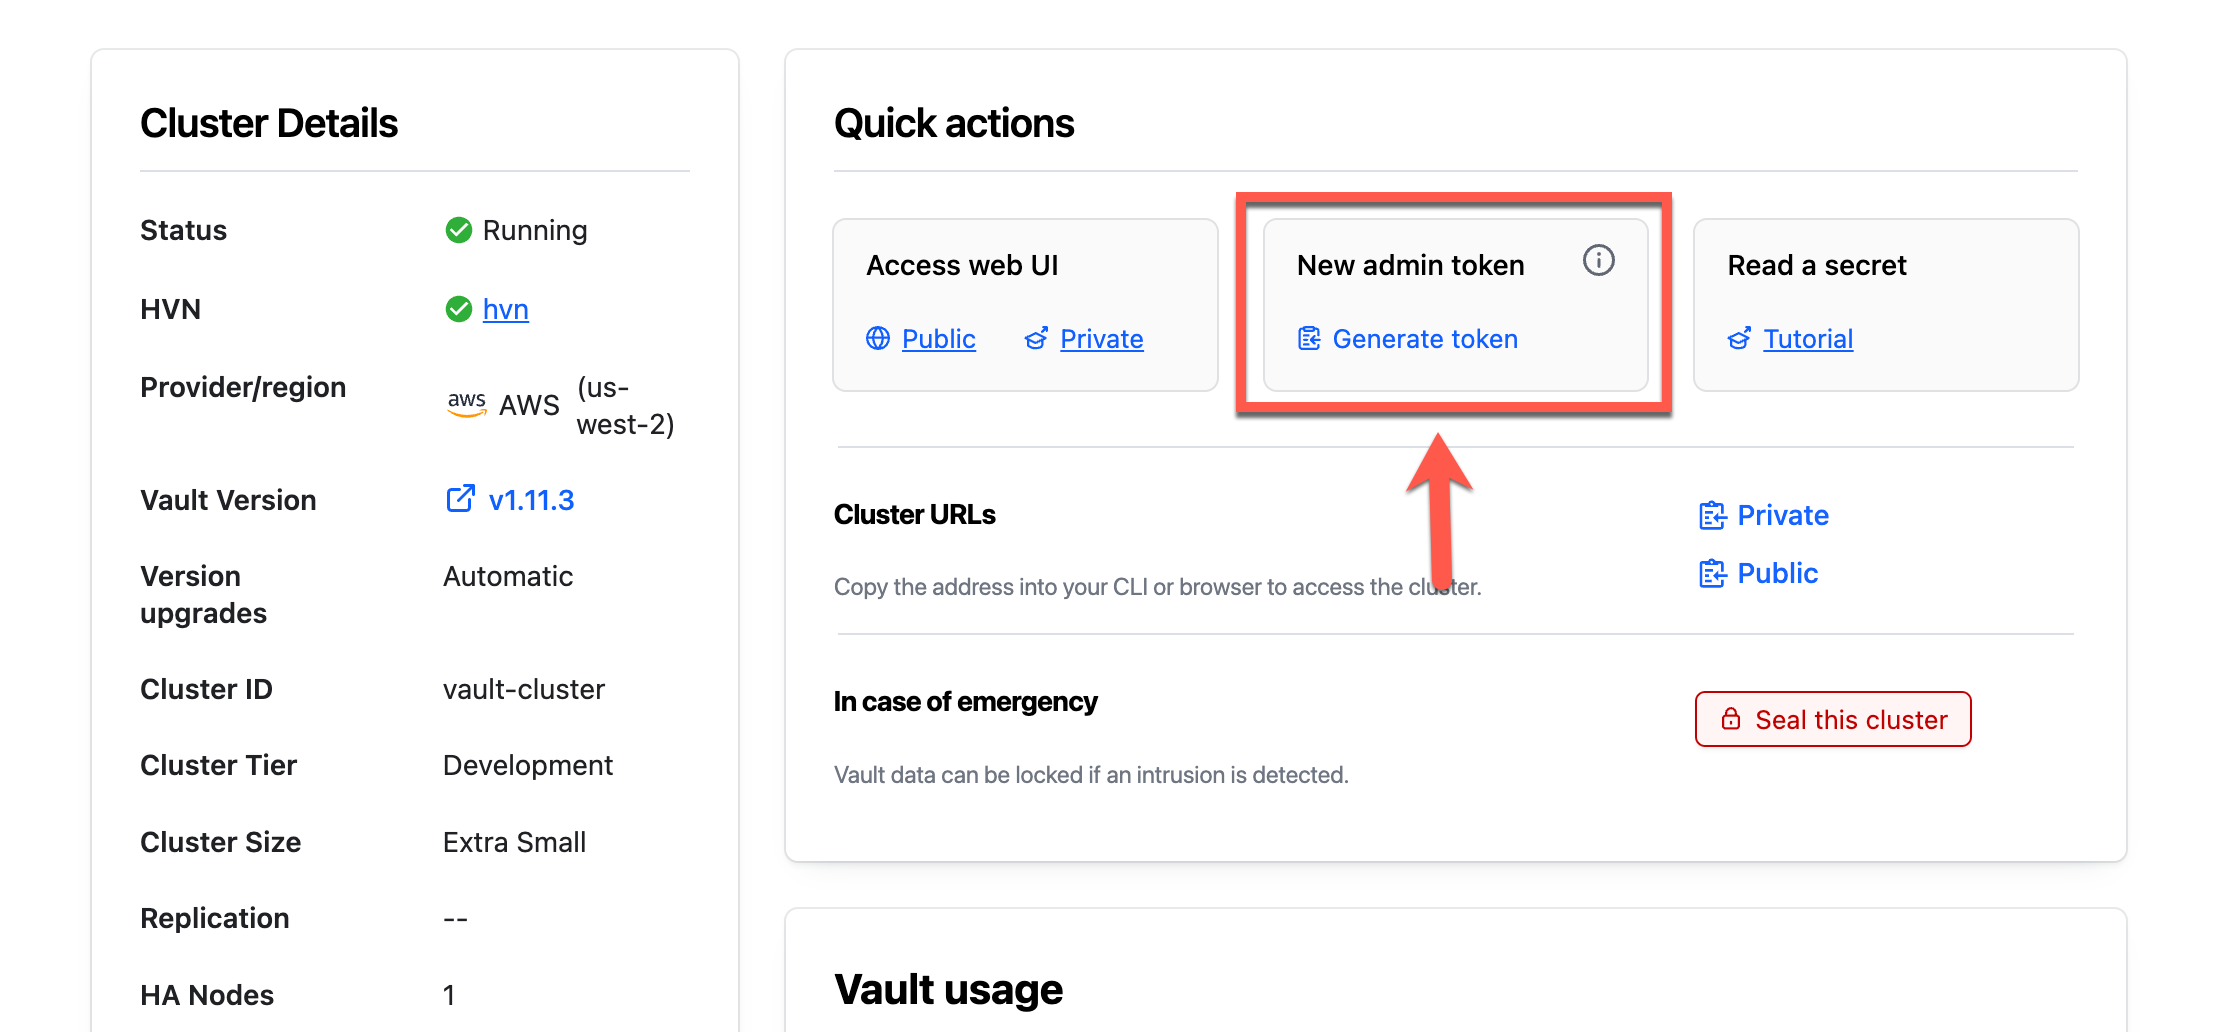
Within a few moments, a new token will be generated.
Copy the Admin Token.
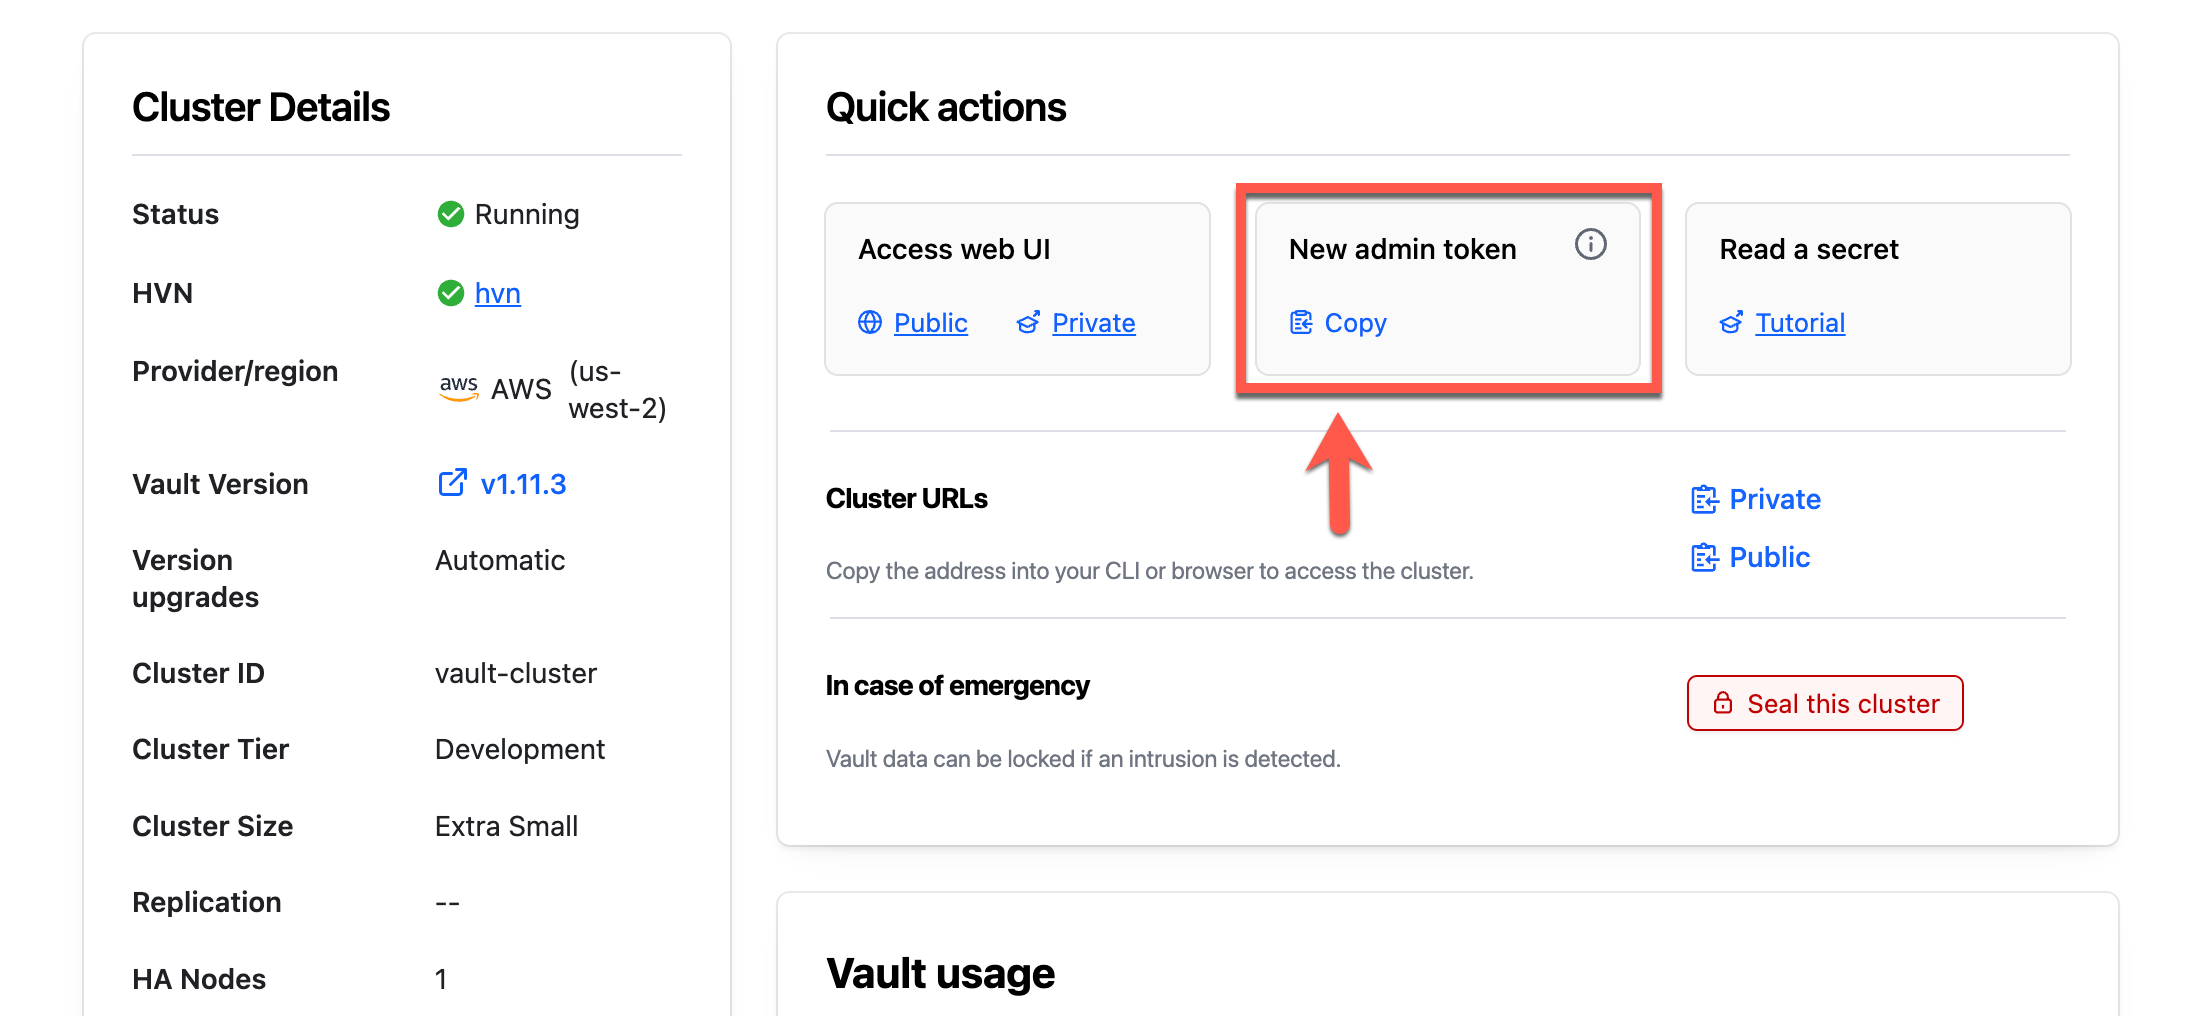
Return to the terminal and set the
VAULT_TOKENenvironment variable.$ export VAULT_TOKEN=<token>Set the
VAULT_NAMESPACEenvironment variable toadmin.$ export VAULT_NAMESPACE=adminThe
adminnamespace is the top-level namespace automatically created by HCP Vault. All CLI operations default to use the namespace defined in this environment variable.Enable the KV secret engine.
$ vault secrets enable -version=2 -path=secret kv

Success! Enabled the kv secrets engine at: secret/
Create a secret at path
secret/exampleapp/configwith ausernameandpassword.$ vault kv put secret/exampleapp/config username='jalbertson' password='bestpasswordever' ======== Secret Path ======== secret/data/exampleapp/config ======= Metadata ======= Key Value --- ----- created_time 2022-06-06T18:26:14.070155Z custom_metadata <nil> deletion_time n/a destroyed false version 1The Vault Dedicated server is ready.
minikube setup
minikube is a CLI tool that provisions and manages the lifecycle of single-node Kubernetes cluster locally inside Virtual Machines (VM) on your system.
Start a Kubernetes cluster.
$ minikube start

😄  minikube v1.25.2 on Darwin 12.3
✨  Automatically selected the docker driver. Other choices: hyperkit, virtualbox, ssh
👍  Starting control plane node minikube in cluster minikube
🚜  Pulling base image ...
🔥  Creating docker container (CPUs=2, Memory=8100MB) ...
🐳  Preparing Kubernetes v1.23.3 on Docker 20.10.12 ...
    ▪ kubelet.housekeeping-interval=5m
    ▪ Generating certificates and keys ...
    ▪ Booting up control plane ...
    ▪ Configuring RBAC rules ...
🔎  Verifying Kubernetes components...
    ▪ Using image gcr.io/k8s-minikube/storage-provisioner:v5
🌟  Enabled addons: storage-provisioner
🏄  Done! kubectl is now configured to use "minikube" cluster and "default" namespace by default
The initialization process takes several minutes as it retrieves any necessary dependencies and executes various container images.
Verify the status of the minikube cluster.
$ minikube status

minikube
type: Control Plane
host: Running
kubelet: Running
apiserver: Running
kubeconfig: Configured
Create a Kubernetes service account named
exampleappwith a service account token.$ kubectl create -f - <<EOF --- apiVersion: v1 kind: ServiceAccount metadata: name: exampleapp --- apiVersion: v1 kind: Secret metadata: name: exampleapp annotations: kubernetes.io/service-account.name: exampleapp type: kubernetes.io/service-account-token --- EOFExample output:
serviceaccount/exampleapp created
secret/exampleapp created
minikube is ready.
Token auth method authentication
(Persona: admin)
A pod can authenticate directly with a Vault Dedicated cluster using a token. In this example, the admin token is used for simplicity but any token can be supplied in the pod configuration.
Tokens can be created in Vault using a auth method and attaching a policy. Policies should follow the concept of least privilege to ensure the pod only has access to the secrets required.
Create a pod named
exampleapp-tokenthat sets theVAULT_ADDR,VAULT_NAMESPACE, andVAULT_TOKENenvironment variables.$ kubectl create -f - <<EOF apiVersion: v1 kind: Pod metadata: name: exampleapp-token labels: app: exampleapp-token spec: serviceAccountName: exampleapp containers: - name: app image: ubuntu command: [ "/bin/sh" , "-c", "tail -f /dev/null" ] env: - name: VAULT_ADDR value: $VAULT_ADDR - name: VAULT_TOKEN value: $VAULT_TOKEN - name: VAULT_NAMESPACE value: $VAULT_NAMESPACE EOFExample output:
pod/exampleapp-token createdGet all the pods in the default namespace.
$ kubectl get pods
NAME               READY   STATUS    RESTARTS   AGE
exampleapp-token   1/1     Running   0          4m
Wait until the
exampleapp-tokenpod reports that is running and ready (1/1).Update the containers apt repositories.
$ kubectl exec exampleapp-token -- apt updateInstall cURL in the container.
$ kubectl exec exampleapp-token -- apt install curl -yVerify connectivity from the Ubuntu container to the Vault Dedicated cluster.
(Persona: apps)
$ kubectl exec exampleapp-token -- \
   curl --silent $VAULT_ADDR/v1/sys/seal-status | jq
Example output:
{
  "type": "shamir",
  "initialized": true,
  "sealed": false,
  "t": 1,
  "n": 1,
  "progress": 0,
  "nonce": "",
  "version": "1.12.3+ent",
  "build_date": "2023-02-03T12:10:29Z",
  "migration": false,
  "cluster_name": "vault-cluster-be46d550",
  "cluster_id": "51ac8751-45d4-1970-2177-b30f6229568f",
  "recovery_seal": true,
  "storage_type": "raft"
}
Read the
secret/exampleapp/configsecret created in the lab setup section.$ kubectl exec exampleapp-token -- curl -silent \ --header "X-Vault-Request: true" \ --header "X-Vault-Token: $VAULT_TOKEN" \ --header "X-Vault-Namespace: $VAULT_NAMESPACE" \ $VAULT_ADDR/v1/secret/data/exampleapp/config | jqThe API returns the secret defined at the path
secret/data/exampleapp/config.Example output:
{
  "request_id": "508cdab5-166e-5a0d-519a-266e8a658ea6",
  "lease_id": "",
  "renewable": false,
  "lease_duration": 0,
  "data": {
    "data": {
      "password": "bestpasswordever",
      "username": "jalbertson"
    },
    "metadata": {
      "created_time": "2023-03-24T18:25:22.991166575Z",
      "custom_metadata": null,
      "deletion_time": "",
      "destroyed": false,
      "version": 1
    }
  },
  "wrap_info": null,
  "warnings": null,
  "auth": null
}
Stop the
exampleapp-tokenpod.$ kubectl delete pod exampleapp-token pod "exampleapp-token" deleted
Kubernetes auth method authentication
Rather than generating and assigning a token though the token auth method, pods can authenticate directly with Vault using a Kubernetes service account and an associated service account token. Vault uses the service account to validate the identity of the pod using the Kubernetes API.
In this scenario, Vault requires access to the Kubernetes API. In production environments, this would be done by connecting your HCP HVN to a transit gateway or peering connection with the network where Kubernetes is running.
For the purposes of this tutorial, you will configure ngrok to expose the Kubernetes API.
Kubernetes configuration
(Persona: admin)
Create a Kubernetes service account for Vault to authenticate with the Kubernetes, a service account token for the service account, and a role to allow Vault to access the appropriate API.
$ kubectl create -f - <<EOF
---
apiVersion: v1
kind: ServiceAccount
metadata:
  name: vault-auth
---
apiVersion: v1
kind: Secret
metadata:
  name: vault-auth
  annotations:
    kubernetes.io/service-account.name: vault-auth
type: kubernetes.io/service-account-token
---
apiVersion: rbac.authorization.k8s.io/v1
kind: ClusterRoleBinding
metadata:
  name: role-tokenreview-binding
roleRef:
  apiGroup: rbac.authorization.k8s.io
  kind: ClusterRole
  name: system:auth-delegator
subjects:
  - kind: ServiceAccount
    name: vault-auth
    namespace: default
EOF
Example output:
serviceaccount/vault-auth created
secret/vault-auth created
clusterrolebinding.rbac.authorization.k8s.io/role-tokenreview-binding created
Retrieve the
vault-authsecret and store it as an environment variable.$ VAULTAUTH_SECRET=$(kubectl get secret vault-auth -o json | jq -r '.data')Review the secret.
$ echo $VAULTAUTH_SECRETExample output:
{
  "ca.crt": "LS0tLS1CRUdJTiBDRVJUSUZJQ0FURS0tLS0tCk1JSURC..<snip>..lwNGN6cmFpb0E9PQotLS0tLUVORCBDRVJUSUZJQ0FURS0tLS0tCg==",
  "namespace": "ZGVmYXVsdA==",
  "token": "ZXlKaGJHY2lPaUpTVXpJMU5pSXNJbXRwWkNJNkl..<snip>..TWR3T0kwRVlxcE0zZGJ1d3JMUW5vMjNhSnJWaU5SaEp3"
}
The secret includes the public key
ca.crtandtokenas base64 encoded strings.Decode the
ca.crtcertificate and store it as an environment variable.$ K8S_CA_CRT=$(echo $VAULTAUTH_SECRET | jq -r '."ca.crt"' | base64 -d)Decode the
tokenand store it as an environment variable.$ VAULTAUTH_TOKEN=$(echo $VAULTAUTH_SECRET | jq -r '.token' | base64 -d)You have collected the necessary information for the
vault-authservice account to configure the Kubernetes auth method.
Configure networking
(Persona: admin)
In another terminal, start a proxy to expose the Kubernetes API.
$ kubectl proxy --disable-filter=true

Request filter disabled, your proxy is vulnerable to XSRF attacks, please be cautious
Starting to serve on 127.0.0.1:8001
Leave this tab open with the proxy running.
In another terminal, start ngrok and create a tunnel to the proxy listening on port
8001.$ ngrok http --scheme=http 127.0.0.1:8001Example output:
ngrok                                                                                                                                                              (Ctrl+C to quit)

Session Status                online
Account                       username (Plan: Free)
Update                        update available (version 3.0.5, Ctrl-U to update)
Version                       3.1.1
Region                        United States (us)
Latency                       32.791235ms
Web Interface                 http://127.0.0.1:4040
Forwarding                    http://d12b-34-567-89-10.ngrok.io -> 127.0.0.1:8001

Connections                   ttl     opn     rt1     rt5     p50     p90
                              0       0       0.00    0.00    0.00    0.00
Copy the ngrok forwarding address.
Return to the terminal where you set the
VAULT_ADDRenvironment variable and set an environment variable for the ngrok forwarding address.$ export K8S_URL=<actual-address-from-ngrok>
Configure Vault
(Persona: admin)
Enable the Kubernetes auth method.
$ vault auth enable kubernetes

Success! Enabled kubernetes auth method at: kubernetes/
Configure the Kubernetes auth method.
$ vault write auth/kubernetes/config \
 token_reviewer_jwt=$VAULTAUTH_TOKEN \
 kubernetes_host=$K8S_URL \
 kubernetes_ca_cert=$K8S_CA_CRT
Example output:
Success! Data written to: auth/kubernetes/configCreate a Vault policy that permits read access to
secret/exampleapp/config$ vault policy write exampleapp-read - << EOF path "secret/data/exampleapp/config" { capabilities = ["read"] } EOFExample output:
Success! Uploaded policy: exampleapp-readCreate a role for the Kubernetes auth method and include the
exampleapp-readVault policy.$ vault write auth/kubernetes/role/exampleapp \ bound_service_account_names=exampleapp \ bound_service_account_namespaces=default \ policies=default,exampleapp-read \ ttl=1hExample output:
Success! Data written to: auth/kubernetes/role/exampleapp
Authenticate and read secret
(Persona: apps)
Retrieve the
exampleappservice account token and store it as an environment variable.$ EXAMPLEAPP_TOKEN=$(kubectl get secret exampleapp -o json | jq -r '.data | .token' | base64 -d)Create a pod named
exampleapp-auththat sets theEXAMPLEAPP_AUTH,VAULT_ADDR, andVAULT_NAMESPACEenvironment variables.VAULT_TOKENis not required because the pod will authenticate with Vault using the Kubernetes service account defined in the auth method configuration to retrieve a token.$ kubectl apply -f - <<EOF apiVersion: v1 kind: Pod metadata: name: exampleapp-auth labels: app: exampleapp-auth spec: serviceAccountName: exampleapp containers: - name: app image: ubuntu command: [ "/bin/sh" , "-c", "tail -f /dev/null" ] env: - name: VAULT_ADDR value: $VAULT_ADDR - name: VAULT_NAMESPACE value: $VAULT_NAMESPACE - name: EXAMPLEAPP_TOKEN value: $EXAMPLEAPP_TOKEN EOFExample output:
pod/exampleapp-auth createdGet all the pods in the default namespace.
$ kubectl get pods
NAME               READY   STATUS    RESTARTS   AGE
exampleapp-auth    1/1     Running   0          4m
Wait until the
exampleapp-authpod reports that is running and ready (1/1).Update the containers apt repositories.
$ kubectl exec exampleapp-auth -- apt updateInstall cURL in the container.
$ kubectl exec exampleapp-auth -- apt install curl -yVerify connectivity from the Ubuntu container to the Vault Dedicated cluster.
$ kubectl exec exampleapp-auth -- \
   curl --silent $VAULT_ADDR/v1/sys/seal-status | jq
Example output:
{
  "type": "shamir",
  "initialized": true,
  "sealed": false,
  "t": 1,
  "n": 1,
  "progress": 0,
  "nonce": "",
  "version": "1.12.3+ent",
  "build_date": "2023-02-03T12:10:29Z",
  "migration": false,
  "cluster_name": "vault-cluster-be46d550",
  "cluster_id": "51ac8751-45d4-1970-2177-b30f6229568f",
  "recovery_seal": true,
  "storage_type": "raft"
}
Use the
exampleappVault role to authenticate and store the generated Vault token as an environment variable.$ POD_TOKEN=$(kubectl exec exampleapp-auth -- curl --silent \ --request POST \ --header "X-Vault-Namespace: $VAULT_NAMESPACE" \ --data '{"jwt": "'$EXAMPLEAPP_TOKEN'", "role": "exampleapp"}' \ $VAULT_ADDR/v1/auth/kubernetes/login | jq -r '.auth | .client_token')Read the
secret/exampleapp/configsecret created in the lab setup section using thePOD_TOKEN.$ kubectl exec exampleapp-auth -- curl --silent \ --header "X-Vault-Request: true" \ --header "X-Vault-Token: $POD_TOKEN" \ --header "X-Vault-Namespace: $VAULT_NAMESPACE" \ $VAULT_ADDR/v1/secret/data/exampleapp/config | jqThe API returns the secret defined at the path
secret/data/exampleapp/configbecause the API call used the token obtained using the Kubernetes auth method with theexampleapp-readpolicy attached.Example output:
{
  "request_id": "a32ec3f2-c6c4-67dd-6de5-c3ef208381af",
  "lease_id": "",
  "renewable": false,
  "lease_duration": 0,
  "data": {
    "data": {
      "password": "bestpasswordever",
      "username": "jalbertson"
    },
    "metadata": {
      "created_time": "2023-03-30T17:08:44.218378893Z",
      "custom_metadata": null,
      "deletion_time": "",
      "destroyed": false,
      "version": 1
    }
  },
  "wrap_info": null,
  "warnings": null,
  "auth": null
}
Stop the
exampleapp-authpod.$ kubectl delete pod exampleapp-auth pod "exampleapp-token" deleted
Vault Agent injector service
While a pod can access Vault directly, there are times when network restrictions do not allow one or more pods to connect to external services such as Vault Dedicated.
When requirements limit egress network traffic, one option to consider is using the Vault Agent injector service. The injector service enables the authentication and secret retrieval on behalf of the applications. The Vault Agent pod, however, will require an exception to permit egress communications to Vault Dedicated.
In this section, you will install the Vault Helm chart to run the injector service, and configure the pod with the necessary annotations to work with the injector service.
Install Vault Agent
(Persona: admin)
Add the HashiCorp Helm repository.
$ helm repo add hashicorp https://helm.releases.hashicorp.com
"hashicorp" has been added to your repositories
Update all the repositories to ensure
helmis aware of the latest versions.$ helm repo update Hang tight while we grab the latest from your chart repositories... ...Successfully got an update from the "hashicorp" chart repository Update Complete. ⎈Happy Helming!⎈Install the Vault agent and configure with the Vault Dedicated public address.
$ helm install vault hashicorp/vault \
    --set "global.externalVaultAddr=$VAULT_ADDR" \
The
global.externalVaultAddris assigned the address of Vault Dedicated cluster.Get all the pods in the default namespace.
$ kubectl get pods
NAME                                    READY   STATUS    RESTARTS   AGE
vault-agent-injector-7b6cd469d8-8svg5   1/1     Running   0          15s
The Vault Agent Injector pod is deployed in the default namespace.
Wait until the
vault-agent-injectorpod reports that it is running and ready (1/1).
Inject secrets into the pod
(Persona: apps)
The Vault Agent Injector only modifies a pod or deployment if it has a specific set of annotations. Refer to the Vault documentation for a complete list of available annotations.
Review the pod configuration.
apiVersion: v1
kind: Pod
metadata:
  name: exampleapp-secret-agent
  labels:
    app: exampleapp-secret-agent
  annotations:
    vault.hashicorp.com/agent-inject: 'true'
    vault.hashicorp.com/role: 'exampleapp'
    vault.hashicorp.com/agent-inject-secret-credentials.txt: 'secret/data/exampleapp/config'
    vault.hashicorp.com/namespace: 'admin'
spec:
  serviceAccountName: exampleapp
  containers:
    - name: app
      image: ubuntu
These annotations define a partial structure of the deployment schema and are prefixed with
vault.hashicorp.com.agent-injectenables the Vault Agent Injector servicerolespecifies the Vault Kubernetes authentication roleagent-inject-secret-FILEPATHprefixes the path of the file,credentials.txtwritten to the/vault/secretsdirectory. The value is the path to the secret defined in Vault.namespacedefines the Vault Dedicated namespace to be used. In this tutorial you are using the defaultadminnamespace.
Create the
exampleapp-secret-agentpod.$ kubectl apply -f - <<EOF apiVersion: v1 kind: Pod metadata: name: exampleapp-secret-agent labels: app: exampleapp-secret-agent annotations: vault.hashicorp.com/agent-inject: 'true' vault.hashicorp.com/role: 'exampleapp' vault.hashicorp.com/agent-inject-secret-credentials.txt: 'secret/data/exampleapp/config' vault.hashicorp.com/namespace: 'admin' spec: serviceAccountName: exampleapp containers: - name: app image: ubuntu command: [ "/bin/sh" , "-c", "tail -f /dev/null" ] EOFExample output:
pod/exampleapp-secret-agent createdGet all the pods in the default namespace.
$ kubectl get pods
NAME                                    READY   STATUS    RESTARTS   AGE
exampleapp-secret-agent                 1/1     Running   0          84s
vault-agent-injector-7b6cd469d8-8svg5   1/1     Running   0          17m
Wait until the
exampleapp-secret-agentpod reports that it is running and ready (2/2).Display the secrets written to the file
/vault/secrets/secret-credentials.txton theexampleapp-secret-agentpod.$ kubectl exec -it exampleapp-secret-agent -c app -- cat /vault/secrets/credentials.txtThe result displays the unformatted secret data present on the container.
data: map[password:salsa username:giraffe] metadata: map[created_time:2023-04-03T05:26:14.070155Z custom_metadata:<nil> deletion_time: destroyed:false version:1]The application in this pod still retrieves the secrets directly, but now that the injector service is deployed and capable of retrieving secrets for the application, future updates can remove that application logic.
Cleanup
Delete the
exampleapp-secret-agentpod.$ kubectl delete pod exampleapp-secret-agentRemove the Vault agent pod.
$ helm uninstall vaultStop minikube.
$ minikube stopDelete minikube.
$ minikube deleteReturn to the terminal where the proxy is running and press ctrl-c to stop the proxy.
Return to the terminal where ngrok is running and press ctrl-c to stop ngrok.
Next steps
You deployed Vault Dedicated external to a Kubernetes cluster and deployed pods that leveraged it as a secrets store. You configured a pod to retrieve secrets using the token auth method, using the Kubernetes auth method, and finally through the Vault injector service.
Learn more about the Vault Helm chart by reading the documentation, exploring the project source code, exploring how pods can retrieve secrets through the Vault Injector service via annotations, or secrets mounted on ephemeral volumes.
For deploying self-hosted Vault on Red Hat OpenShift, see Install Vault to Red Hat OpenShift.