Detailed design
Core design requirements
This section takes the recommended architecture from the preceding section and provides more detail on each component of the architecture. Review this section to identify all technical and personnel requirements before moving on to implementation.
Compute
This section contains specific hardware capacity recommendations, network requirements, and additional infrastructure considerations.
Sizing
Every hosting environment is different, and every customer's Vault usage profile is different. These recommendations only serve as a starting point, from which each customer's operations staff may observe and adjust to meet the unique needs of each deployment. For more information, refer to the Vault Reference Architecture section on Sizing For Vault Servers(opens in new tab).
This guide divides sizing recommendations into two common cluster sizes: small, and large. Small clusters are appropriate for most initial production deployments or for development and testing environments. Large clusters are production environments with a consistently high workload. That might be a large number of transactions, a large number of secrets, or a combination of the two.
| Size | CPU | Memory | Disk capacity | Disk IO | Disk throughput |
|---|---|---|---|---|---|
| Small | 2-4 cores | 8-16 GB RAM | 100+ GB | 3000+ IOPS | 75+ MB/s |
| Large | 4-8 cores | 32-64 GB RAM | 200+ GB | 10000+ IOPS | 250+ MB/s |
For a mapping of these requirements to specific instance types for each cloud provider, refer to the cloud-focused sections below.
Hardware considerations
In general, CPU, and storage performance requirements depend on the customer's exact usage profile (for example, types of requests, average request rate, and peak request rate). Memory requirements depend on the total size of data stored in memory. Size memory according to that data.
When using integrated storage, Vault servers must have a high-performance hard disk subsystem capable of up to 10000+ IOPS and 250+ MB/s disk throughput. Many vault operations (such as login requests) require multiple disk writes. When the system generates or rotates many secrets frequently, Vault also needs to flush this data to disk. In both cases, the use of slower storage systems negatively impacts performance(opens in new tab).
HashiCorp strongly recommends configuring Vault with audit logging enabled, as well as telemetry for diagnostic purposes. Vault: Operating Guide for Adoption covers the configuration of these components. The impact of the additional storage I/O from audit logging varies depending on your particular pattern of requests.
Networking
Vault requires node interconnection between availability zones (AZs in AWS/GCP, or Availability Zones in Azure), client redirect logic, and load balancers configured with TLS passthrough to connect clients to clusters.
Node interconnectivity requires low latency (around 8 ms(opens in new tab)) to replicate secrets across the integrated storage backend, as well as to efficiently route client write requests from standby nodes to the active node. These nodes are also fronted by Layer 4 load balancers, which permit end-to-end TLS communication.
Network rules must allow Vault to communicate across TCP ports designated for API and intracluster traffic. Deploy Vault nodes in private subnets. Deploy network address translation (NAT) devices in public subnets to allow VMs/instances to retrieve critical security updates through egress Internet traffic.
Availability zones
This Validated Design uses 3 availability zones, with 2 nodes per availability zone.
In order for cluster members to stay properly in sync, we recommend network latency between availability zones be less than eight milliseconds (8 ms).
Network connectivity
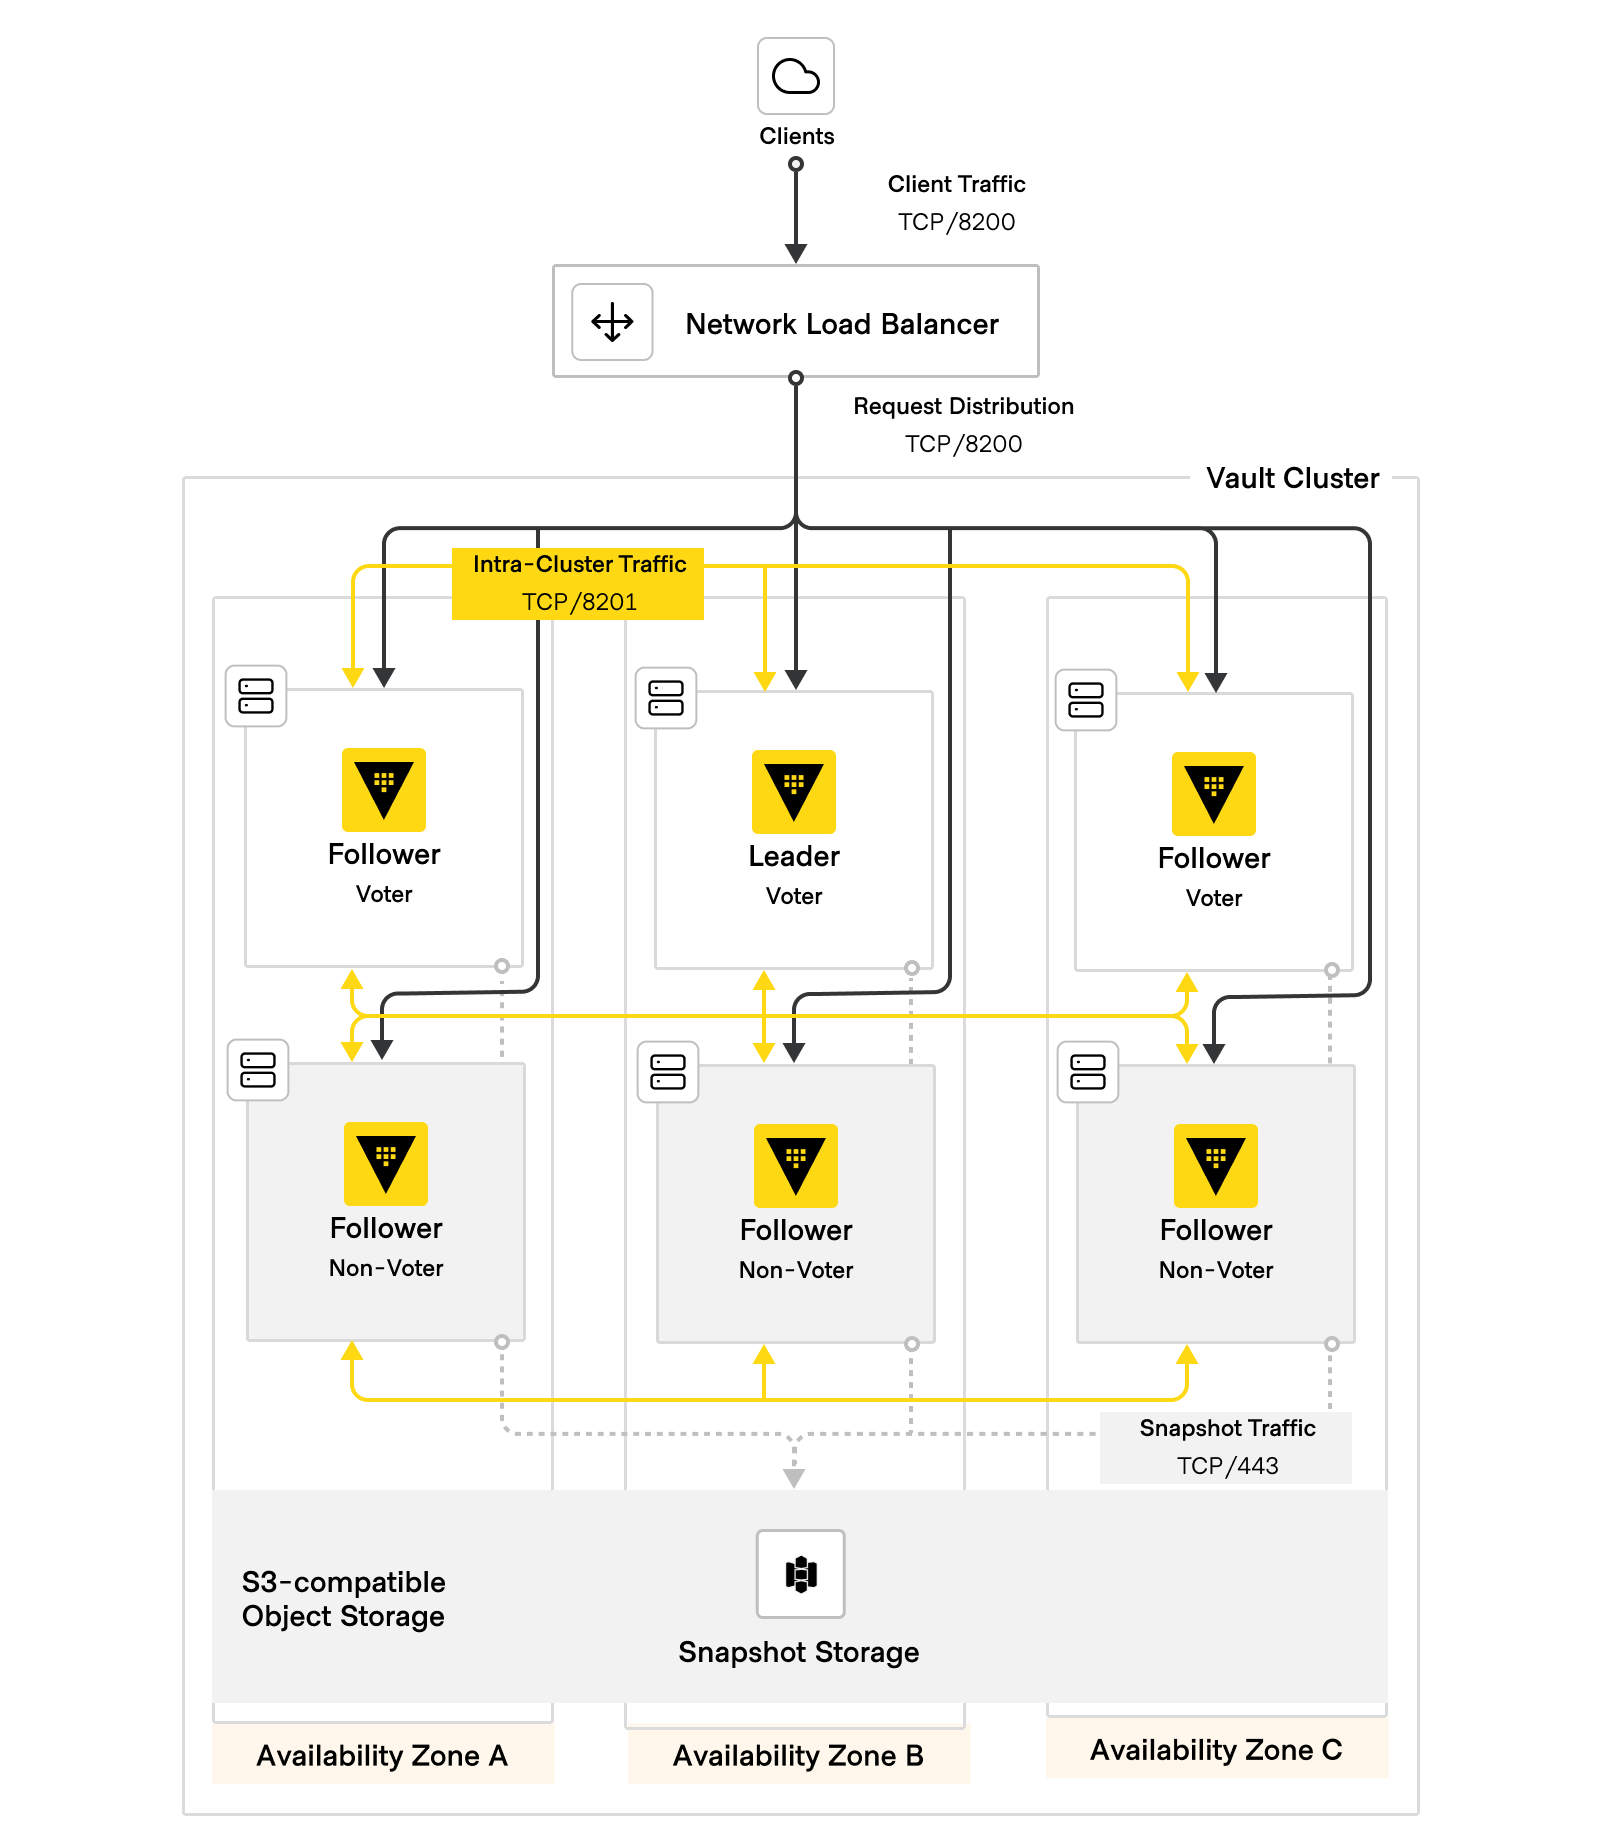 Figure 5: HVD Vault networking diagram
The following table outlines the minimum network connectivity requirements for Vault cluster nodes. You may also need to grant the Vault servers outbound access to additional services that live elsewhere, either within your own internal network or through the Internet. Examples may include:
- Authentication and secret provider backends, such as cloud providers (AWS, Azure, GCP) or a Kubernetes cluster.
- Network Time Protocol (NTP), for maintaining consistent time between nodes.
- Remote log handlers, such as a Splunk or ELK environment.
- Metrics collection, such as Prometheus or Datadog.
| Source | Destination | Port | Protocol | Direction | Purpose |
|---|---|---|---|---|---|
| Client machines/administration | Load balancer | 8200 | tcp | incoming | Request distribution |
| Load balancer | Vault servers | 8200 | tcp | incoming | Vault API; api_addr |
| Vault servers | Vault servers | 8200 | tcp | bidirectional | Cluster bootstrapping |
| Vault servers | Vault servers | 8201 | tcp | bidirectional | Raft, replication, request forwarding; cluster_addr |
| Vault servers | External systems | various | various | various | External APIs |
Do not expose Vault to inbound traffic through a publicly accessible endpoint. This minimizes both the risk of exposing secrets and the risk of denial-of-service attacks. Wherever possible, limit access to the Vault API to the networks where you need to access Vault.
Here is an overview of an example write transaction to Vault:
- Clients make HTTPS requests to Vault through the load balancer endpoint over port
8200. - The load balancer selects a target and forwards the request to one of the Vault servers in the cluster through port
8200. - The Vault server that receives the request terminates TLS.
- If the node that receives the request is not the active node, the request is then forwarded from the standby node to the active node through port 8201 using the IP address known from the
config.hcl. - The active node receives the request and performs the write operation.
- The node that received the request sends a response to the client. This happens regardless of whether it is the active node – clients are not aware of whether the system forwarded the request.
- All data written to the active node is then replicated to its standby nodes through port
8201.
Traffic encryption
Encrypt every segment of Vault-related network traffic in transit using TLS over HTTPS. This includes communication from clients to the Vault servers, as well as communication between cluster members.
Create a standard X.509 public certificate from an existing trusted certificate authority internal to your organization. This certificate represents the Vault cluster, and each Vault server in the cluster serves it. Along with the certificate itself (vault-public.pub), also supply the certificate's private key (vault-private.key) and a bundle file from the certificate authority used to generate the certificate (ca.pub). The implementation section of this document references these files.
Vault also encrypts server-to-server communication, which requires no additional configuration. Vault automatically negotiates an mTLS connection between servers when new members join the cluster.
Domain name system
Internally, Vault nodes do not use DNS names to talk to other members of the cluster, relying instead on IP addresses. However, you need to configure a DNS record that resolves to the IP address hosting your load balancer configuration. This guide uses vault.domain as the example value to refer to this DNS record in later sections.
Load balancing
Use a TCP-based (layer 4) load balancer to distribute incoming requests across multiple Vault nodes within a cluster. Configure the load balancer to listen on port 8200/tcp and forward requests to all Vault nodes in the cluster on port 8200/tcp. All healthy nodes in the cluster must be able to receive requests in this way, including standby nodes (that is, followers) and nodes configured as non-voters.
TLS passthrough
Configure the load balancer to use TLS passthrough, rather than terminating the TLS connection at the load balancer. This keeps the traffic end-to-end encrypted from the client to the Vault nodes, removing even the load balancer as a possible attack vector.
Health check
Each Vault node provides a health check API endpoint at /v1/sys/health. HTTPS-based health checks provide a deeper check than checking the TCP port.
Configure your load balancer to perform a health check to all Vault nodes in a cluster by using the path /v1/sys/health?perfstandbyok=true, with an expected status code of 200. By default, only a leader node returns a 200 status code. Setting the perfstandbyok parameter to true instead directs all nodes to return a 200 status code, including non-leader nodes (also known as performance standby nodes(opens in new tab)). Configuring the health check in this way enables the load balancer to spread client read requests to all nodes in the cluster, while the system still redirects write requests sent to performance standby nodes to the leader node using request forwarding(opens in new tab).
For specific details on all query options and response codes and their meanings, refer to the HashiCorp Vault Documentation on the /sys/health API endpoint(opens in new tab).
Software
To deploy production Vault, this Validated Design only requires that you install the Vault Enterprise software binaries on the Vault servers.
Do not run the Vault process as root. Instead, create a dedicated user to run the Vault service and to protect the files used by and created by Vault.
Memory locking and swap configuration
When using integrated storage, you must explicitly configure the disable_mlock parameter in your Vault configuration file. Vault does not start without this explicit configuration.
We recommend you disable mlock when using integrated storage. The mlock() system call does not interact well with memory-mapped files such as those created by BoltDB, which Raft uses to track state. When you enable mlock, memory-mapped files get loaded into resident memory, causing Vault to load its entire dataset in-memory. This can cause out-of-memory issues if Vault's data becomes larger than the available RAM.
We recommend you disable swap. Even though the data within BoltDB remains encrypted at rest, disable swap on the host system to prevent Vault from writing other in-memory sensitive data to disk.
This approach prioritizes system stability while maintaining security through proper host hardening. If an attacker has access to read swap space, they likely already have access to read live memory, making host-level security controls the critical defense layer.
If you choose not to disable mlock (not recommended for integrated storage), you must grant the Vault user access to the mlock() system call. For systemd-based OSes, you can specify this capability in the Vault systemd unit file:
[Unit]
Description=Vault service
Requires=network-online.target
After=network-online.target

[Service]
User=vault
Group=vault
ExecStartPre=/sbin/setcap 'cap_ipc_lock=+ep' $(readlink -f $(which vault))
ExecStart=/usr/local/bin/vault server -config /etc/vault.d/config.hcl
Capabilities=CAP_IPC_LOCK+ep
CapabilityBoundingSet=CAP_SYSLOG CAP_IPC_LOCK
...
This configuration is not recommended when using integrated storage due to the memory issues described in the preceding section.
Vault license
Deploy your Vault Enterprise license on every Vault node for the Vault process to start. The implementation section has more details on how to autoload the license at each Vault start time.
Storage
Data storage
Use integrated storage as the storage backend for Vault. Vault's persistent data storage lives on the Vault servers.
Backups
Integrated storage provides an Automated Snapshots(opens in new tab) feature, which enables you to perform backups of your data within Vault. Unlike OS- or volume-based snapshots, Vault automated snapshots only capture the integrated storage dataset. This ensures data integrity and consistency when recovering Vault.
To store your snapshots, you can either use an object store, such as Amazon S3, Azure Blob Storage, or Google Cloud Storage, or a durable remote filesystem, such as NFS. Vault: Operating Guide for Adoption details the procedure for configuring automated snapshots.
Configuration
This section covers the various sections of your Vault configuration file. The Vault server process references this file each time it starts.
The configuration file contains a number of different stanzas. Below you find required fields for each stanza. In some cases the fields contain the recommended values, but others depend on your particular environment. In those cases, take note of what the relevant values are, as you need them during the installation process as detailed in the Implementation section.
listener stanza
This stanza defines the listener configuration for Vault. It specifies the address and port on which Vault listens for incoming connections, as well as the TLS certificate and key files to use for TLS termination.
listener "tcp" {
  address       = "0.0.0.0:8200"
  tls_cert_file = "/etc/vault.d/server.crt"
  tls_key_file  = "/etc/vault.d/server.key"
  tls_client_ca_file = "/etc/vault.d/ca.pub"
}
tls_cert_file specifies the path to the server's TLS certificate file.
tls_key_file specifies the path to the server's private key file.
tls_client_ca_file specifies the path to the certificate authority file, which the system uses to verify client certificates if you want to enforce client-side authentication.
storage stanza
This stanza defines integrated storage (also known as raft) as the Vault storage method, defines where Vault stores data on disk for each server, and lists the other servers that belong to the cluster.
storage "raft" {
  path    = "/var/lib/vault/data"
  node_id = "vault1"

  retry_join {
    leader_api_addr         = "https://vault-1.domain:8200"
    leader_ca_cert_file     = "/etc/vault.d/ca.pub"
    leader_client_cert_file = "/etc/vault.d/vault-public.pub"
    leader_client_key_file  = "/etc/vault.d/vault-private.key"
    leader_tls_servername   = "vault.domain"
  }

  retry_join {
    leader_api_addr         = "https://vault-2.domain:8200"
    leader_ca_cert_file     = "/etc/vault.d/ca.pub"
    leader_client_cert_file = "/etc/vault.d/vault-public.pub"
    leader_client_key_file  = "/etc/vault.d/vault-private.key"
    leader_tls_servername   = "vault.domain"
  }

  retry_join {
    leader_api_addr         = "https://vault-3.domain:8200"
    leader_ca_cert_file     = "/etc/vault.d/ca.pub"
    leader_client_cert_file = "/etc/vault.d/vault-public.pub"
    leader_client_key_file  = "/etc/vault.d/vault-private.key"
    leader_tls_servername   = "vault.domain"
  }

  ...
}
path: Specifies the directory where Vault stores its data on disk.node_id: A unique identifier for the node within the Raft cluster. Can be any string.retry_join: This block configures Vault nodes to auto-join the Raft cluster on startup.
The retry_join stanzas identify other Vault nodes in the cluster. If you know the connection details for all nodes in the cluster in advance, you can use these stanzas to facilitate automatic joining of the nodes to the Raft cluster. Each stanza declares identifying details of a particular node. Upon initialization of one node as the leader, the remaining nodes use this configuration to locate and connect to the leader node, thus forming the cluster. For more information on the retry_join stanza, refer to the HashiCorp Vault documentation on Integrated Storage(opens in new tab).
seal stanza
Your Vault config includes auto-unseal configuration using the seal stanza. Manual unsealing using the Shamir secret sharing algorithm does not require the use of this stanza.
Example of auto-unseal using AWS KMS:
seal "awskms" {
  region     = "us-west-2"
  kms_key_id = "abcd1234-a123-456a-a12b-a123b4cd56ef"
}
regionspecifies the AWS region where the KMS key resides.kms_key_idspecifies the ID of the AWS KMS key to use for auto-unsealing.
Example of auto-unseal using Azure Key Vault:
seal "azurekeyvault" {
  tenant_id      = "46646709-b63e-4747-be42-516edeaf1e14"
  vault_name     = "vault-auto-unseal-keyvault"
  key_name       = "vault-seal-key"
}
tenant_idspecifies the Azure Active Directory tenant ID.vault_namespecifies the name of the Azure Key Vault.key_namespecifies the name of the key in Azure Key Vault to use for auto-unsealing.
Example of auto-unseal using GCP Cloud KMS:
seal "gcpckms" {
  project     = "my-project"
  region      = "us-east1"
  key_ring    = "vault-keyring"
  crypto_key  = "vault-key"
}
projectspecifies the GCP project ID.regionspecifies the GCP region where the Cloud KMS key resides.key_ringspecifies the name of the Cloud KMS key ring.crypto_keyspecifies the name of the crypto key to use for auto-unsealing.
Example of auto-unseal using PKCS11 (HSM)(opens in new tab):
seal "pkcs11" {
  lib            = "/usr/vault/lib/libCryptoki2_64.so"
  slot           = "2305843009213693953"
  pin            = "AAAA-BBBB-CCCC-DDDD"
  key_label      = "vault-hsm-key"
  hmac_key_label = "vault-hsm-hmac-key"
}
lib: Path to the Public Key Cryptography Standards (PKCS) #11 library on the virtual machine that installs Vault Enterprise.slot: The slot number to use.pin: PKCS #11 personal identification number (PIN) for login.key_label: Defines the label of the key you want to use.hmac_key_label: Defines the label of the key you want to use for hash-based message authentication code (HMAC).
PKCS #11 authentication occurs using a slot number and personal identification number (PIN). In practice, because the PIN is not required to be numeric (and some hardware security modules (HSMs) require more complex PINs), this behaves like a username and password.
Like a username and password, protect these values. If you store them in Vault's configuration file (like the stanza example in the preceding section), control read access to the file for appropriate users.
Rather than storing these values into Vault's configuration file, you can also supply them using environment variables(opens in new tab).
telemetry stanza
The Vault server process collects various runtime metrics about the performance of different libraries and subsystems. Stream and store telemetry from Vault in metrics aggregation software to monitor Vault and collect durable metrics. For more information, see the HashiCorp Vault documentation on Telemetry(opens in new tab).
The telemetry stanza defines how metrics become available to your telemetry platform. If you do not already have an existing metrics platform, we recommend using Prometheus, which has a good balance of simplicity of configuration and scalability.
Example of a telemetry configuration using Prometheus:
telemetry {
  disable_hostname = true
  prometheus_retention_time = "12h"
}
prometheus_retention_time(string: "24 h"): Specifies the amount of time that Prometheus retains metrics in memory. Setting this to0disables Prometheus telemetry.disable_hostname(boolean): prevents the system from prefixing metrics with hostname.
You can find additional guidance about collecting metrics using Prometheus in Vault: Operating Guide for Adoption. For more information, see the HashiCorp Vault documentation on Monitoring Telemetry using Grafana and Prometheus(opens in new tab).
Unseal and recovery keys
Vault encrypts data with an encryption key. That encryption key is further encrypted with a second key, known as the root key. At Vault initialization time, you can choose to split the root key into a number of key shares using Shamir's secret sharing algorithm. When initializing Vault with the Shamir seal, the system calls generated key shares unseal keys. When initializing Vault with auto-seal or HSM, it knows the key shares as recovery keys. There are important differences between the two.
Both unseal keys and recovery keys can authorize Vault to perform certain operations, such as generating a new root key. However, only unseal keys are able to decrypt the root key and unseal Vault. Recovery keys cannot decrypt the root key, and thus are not sufficient to unseal Vault if the Auto Unseal mechanism is not working. They are purely an authorization mechanism.
For more information, see the HashiCorp Vault documentation on Seal Concepts(opens in new tab).
Key share encryption
When you initialize Vault, it returns hexadecimal-encoded or base64-encoded representations of the key shares and initial root token value in plaintext by default. Vault can encrypt the key shares and initial root token value at initialization time with user-supplied public keys generated from any RFC 4880 compliant Pretty Good Privacy (PGP) software, such as GNU Privacy Guard (GPG).
By initializing Vault with the pgp-keys and root-token-pgp-key options, it
- Encrypts the unseal keys and root token value with the specified GPG public keys.
- Base64 encodes the encrypted values.
- Outputs those values instead of plaintext values.
Before installing Vault, choose the individuals who participate in this process. Each individual needs to create their own PGP-compliant public key to use in the encryption process. Please note that the system ties PGP encryption to the individual user and relies on their private key, which may not be well secured or reliably stored. You create these keys later as part of the implementation steps.
Key share threshold
Vault requires a threshold of unseal or recovery key shares to authorize certain vital operations in Vault. When generated, distribute these key shares amongst a chosen set of trusted individuals. However, consider the real-world implications of having humans responsible for providing key share data.
If a member of the team departs the organization or is otherwise severed, their portion of the recovery key becomes inaccessible if it is PGP encrypted. Over time, an organization likely experiences personnel attrition, thereby losing a threshold of key shares to perform vital recovery operations.
Operators plan in advance for how many key shares they want Vault to generate during initialization, and how many of those key shares meet the threshold requirement. Both options are configurable when initializing Vault. By default, Vault creates 5 key shares, with a threshold of 3 required to reconstitute the unseal or recovery key.
Rekeying and rotating Vault
In addition to configuring Vault to generate a higher number of recovery key shares, Vault operators also define a cadence by which they rekey Vault and rotate its encryption key. Rekeying(opens in new tab) is a manual process where you instruct Vault to regenerate the root key and its key shares. Common events that can warrant a rekey include:
- Someone joins or leaves the organization.
- Security wants to change the number of shares or threshold.
- Compliance mandates that you rotate the keys at a regular interval.
Rekeying the Vault requires a threshold number of unseal keys. Before continuing, ensure enough unseal key holders are available to assist with the rekeying to match the threshold configured when you issued the keys.
The standard Vault recommendation for unseal key shares/recovery key shares has historically been 5 key shares with a threshold of 3 to do sensitive actions. This recommendation comes from the competing priorities of making these actions straightforward to perform, but minimizing the likelihood that only one user can perform them without checks or balances. As long as you schedule a regular interval to rekey your keys and replace any keyholders that leave your team and rekey the keys at that point, this recommendation is likely sufficient for most customers, with some limited caveats.
In addition to rekeying the root key, you may independently want to rotate the underlying encryption key Vault uses to encrypt data at rest. Unlike rekeying the Vault, rotating Vault's encryption key does not require a quorum of unseal keys. Anyone with the proper permissions in Vault can perform the encryption key rotation.
Compute
Each Vault node in a cluster resides on a separate compute instance (EC2 instance in AWS, Virtual Machine in Azure, or Compute Engine instance in GCP). Shared or dedicated tenancy is acceptable. A single Vault cluster lives in a single region, with nodes deployed across all availability zones. This design leverages Vault Enterprise Redundancy Zones(opens in new tab), and deploys six nodes in total across three availability zones. Within each zone, configure one node as a voting node and the other as a non-voting node.
Operating systems
The Validated Design Terraform module uses Ubuntu 22.04.
Sizing
On AWS, you can use m5.2xlarge or m5.4xlarge instance types to supply the recommended amounts of vCPU and RAM(opens in new tab) for Vault.
Create new gp3 volumes configured with desired disk throughput and IOPS for your expected workload. If you are unsure of your workload requirements, your HashiCorp account team can help you evaluate your use case and provide specific guidance.
Autoscaling
Networking
Private network
The Validated Design module creates a new virtual network (VPC in AWS/GCP, or VNet in Azure) and deploys a number of resources:
- One private and one public subnet for each availability zone (total of 6).
- Private and public route tables.
- One NAT gateway per subnet, each paired with a public IP (total of 3 NAT gateways and 3 public IPs).
- One Internet gateway.
- Network security groups for ingress and egress (total of 2).
Subnets
The Validated Design deploys 3 private subnets and 3 public subnets across 3 availability zones. The Vault service is not exposed to the public Internet, so the module deploys VM instances into the private subnets.
The design deploys NAT Gateway instances in the public subnets. The design also deploys an Internet gateway into the virtual network.
Routing
Along with creating subnets, NAT gateways, network security groups, and load balancers, the Validated Design defines routes for connecting resources together. Virtual network route tables
- define ingress and egress routes among all of the private subnets for intra-node communication.
- Allow ingress and egress traffic from the private subnets to the NAT gateways (public subnets) for communication with the load balancer, as well as services such as Amazon S3, Azure Blob Storage, and Google Cloud Storage.
- Define the egress route between NAT gateways and the Internet gateway, thereby providing an Internet route for Vault nodes in private subnets.
Network security groups
The Validated Design does not deploy firewall rules or firewall configurations, but it does deploy network security groups (security groups in AWS/GCP, or Network Security Groups in Azure). These security groups facilitate instance communication within the Vault cluster and outside of it. One contains ingress-only rules for TCP ports 8200 and 8201, and the other is the virtual network default (unused).
Load balancing
For load balancing, use a Layer 4 network load balancer (Network Load Balancer in AWS, Azure Load Balancer, or Network Load Balancer in GCP) in front of all Vault cluster nodes, across all subnets. There are load balancer listeners for TCP ports 8200 and 8201. The target groups or backend pools associated with each of these listeners both contain the full set of all cluster nodes.
The system uses an HTTPS health check for all target groups using the path below.
/v1/sys/health?perfstandbyok=true&activecode=200&performancestandbycode=473
Software
Vault license
Deploy your Vault Enterprise license on every Vault node for the Vault process to start. When using the included Terraform modules, submit your license file as a variable to Terraform, which base64 encodes it and creates a new secret with its contents on the respective cloud secrets management service (such as AWS Secrets Manager, Azure Key Vault, or Google Secret Manager). As part of the cloud-init process, the system reads the license contents from the secrets manager service, decodes them, and writes them to a file on the node at a location that the Vault service autoloads(opens in new tab) at start time.
Storage
When deploying on public cloud, use the native CSP cloud storage to store automated snapshots. Deploy the storage in the same region as the compute instances.
Auto-unseal
Operators deploying Vault in a cloud context leverage the key management service of the respective cloud (AWS KMS, Azure Key Vault, or GCP Cloud KMS) to generate the key used for auto-unsealing the cluster. The provided Terraform deployment modules create a customer managed key for this purpose, and reference the appropriate identifier for this key in the seal stanza of the Vault configuration file on each server.
Domain name system
The Validated Design assumes that you already have a public DNS hosted zone, in your cloud provider's DNS service (Route 53 for AWS, Azure DNS for Azure, Cloud DNS for GCP) or another DNS service. This is a prerequisite for generating TLS certificates(opens in new tab) that secure traffic between Vault nodes.
If you intend to use a public cloud for DNS, the HVD module creates
- An A record pointing to the load balancer that it also created during deployment
- A failover record pointing to the same target location. You can specify the DNS hostname to the provided Terraform deployment modules, which create the necessary records in the public cloud DNS service.
Certificates
The provided Terraform deployment modules read these certificates and base64 encode them before uploading to the public cloud secrets management service for the life of the initial install process.
vault-public.pub- the TLS certificate itselfvault-private.key- the certificate's private keyca.pub- the certificate authority bundle file
IAM
The provided Terraform deployment modules require an IAM role with necessary permissions to deploy and manage all required AWS components. The module can create this role on your behalf or use an existing one that you create yourself. If you choose to create the IAM role yourself, ensure the role contains the following policies and permissions:
| Service | Permissions | Resources |
|---|---|---|
| EC2 (for cloud auto-join) | DescribeInstances DescribeVolumes DescribeTags | All (*) |
| SSM* | (Attach AmazonSSMManagedInstanceCore managed policy) | n/a |
| KMS | ReEncrypt GenerateRandom GenerateDataKey* Encrypt DescribeKey Decrypt CreateGrant EnableKeyRotation | Vault KMS key |
| Autoscaling | CompleteLifecycleAction | Vault module ASG hook |
| Secrets Manager | GetSecretValue | Vault license Vault CA bundle Vault public cert Vault private key |
| CloudWatch | PutMetricData PutRetentionPolicy PutLogEvents DescribeLogStreams DescribeLogGroups CreateLogStreams CreateLogGroups | Vault log group |
| S3 | PutObject ListBucket ListBucketVersions GetObject GetBucketLocation DeleteObject | Automated snapshots bucket |