Import Terraform configuration
Terraform supports bringing your existing infrastructure under its management. By importing resources into Terraform, you can consistently manage your infrastructure using a common workflow.
When you create new infrastructure with Terraform, you usually use the following workflow:
Write Terraform configuration that defines the infrastructure you want to create.
Review the Terraform plan to ensure the configuration will result in the expected infrastructure.
Apply the configuration to have Terraform create your infrastructure.

Terraform stores information about your infrastructure in a state file. To update your infrastructure, you first modify your configuration, and then use Terraform to plan and apply the required changes. Terraform uses the data in your state file to determine the changes it needs to make to your infrastructure.
As of Terraform 1.5, you can use configuration to import existing resources into your state file with the plan-and-apply workflow. You can still use the terraform import command, but configuration-driven import is safer, works with CICD pipelines, and allows you to preview the import operation before modifying state. You can also optionally use Terraform to generate an initial configuration for the resources you will import.
Using configuration to import resources involves the following steps:
- Identify the existing infrastructure you will import.
- Define an
importblock for the resources. - Run
terraform planto review the import plan and optionally generate configuration for the resources. - Prune generated configuration to only the required arguments.
- Apply the configuration to bring the resource into your Terraform state file.
In this tutorial, you will create a Docker container with the Docker CLI. Then, you will declare an import block for the existing Docker container, use Terraform to generate configuration for the container, modify the generated configuration, and use the plan-and-apply workflow to bring the container under Terraform management.
Prerequisites
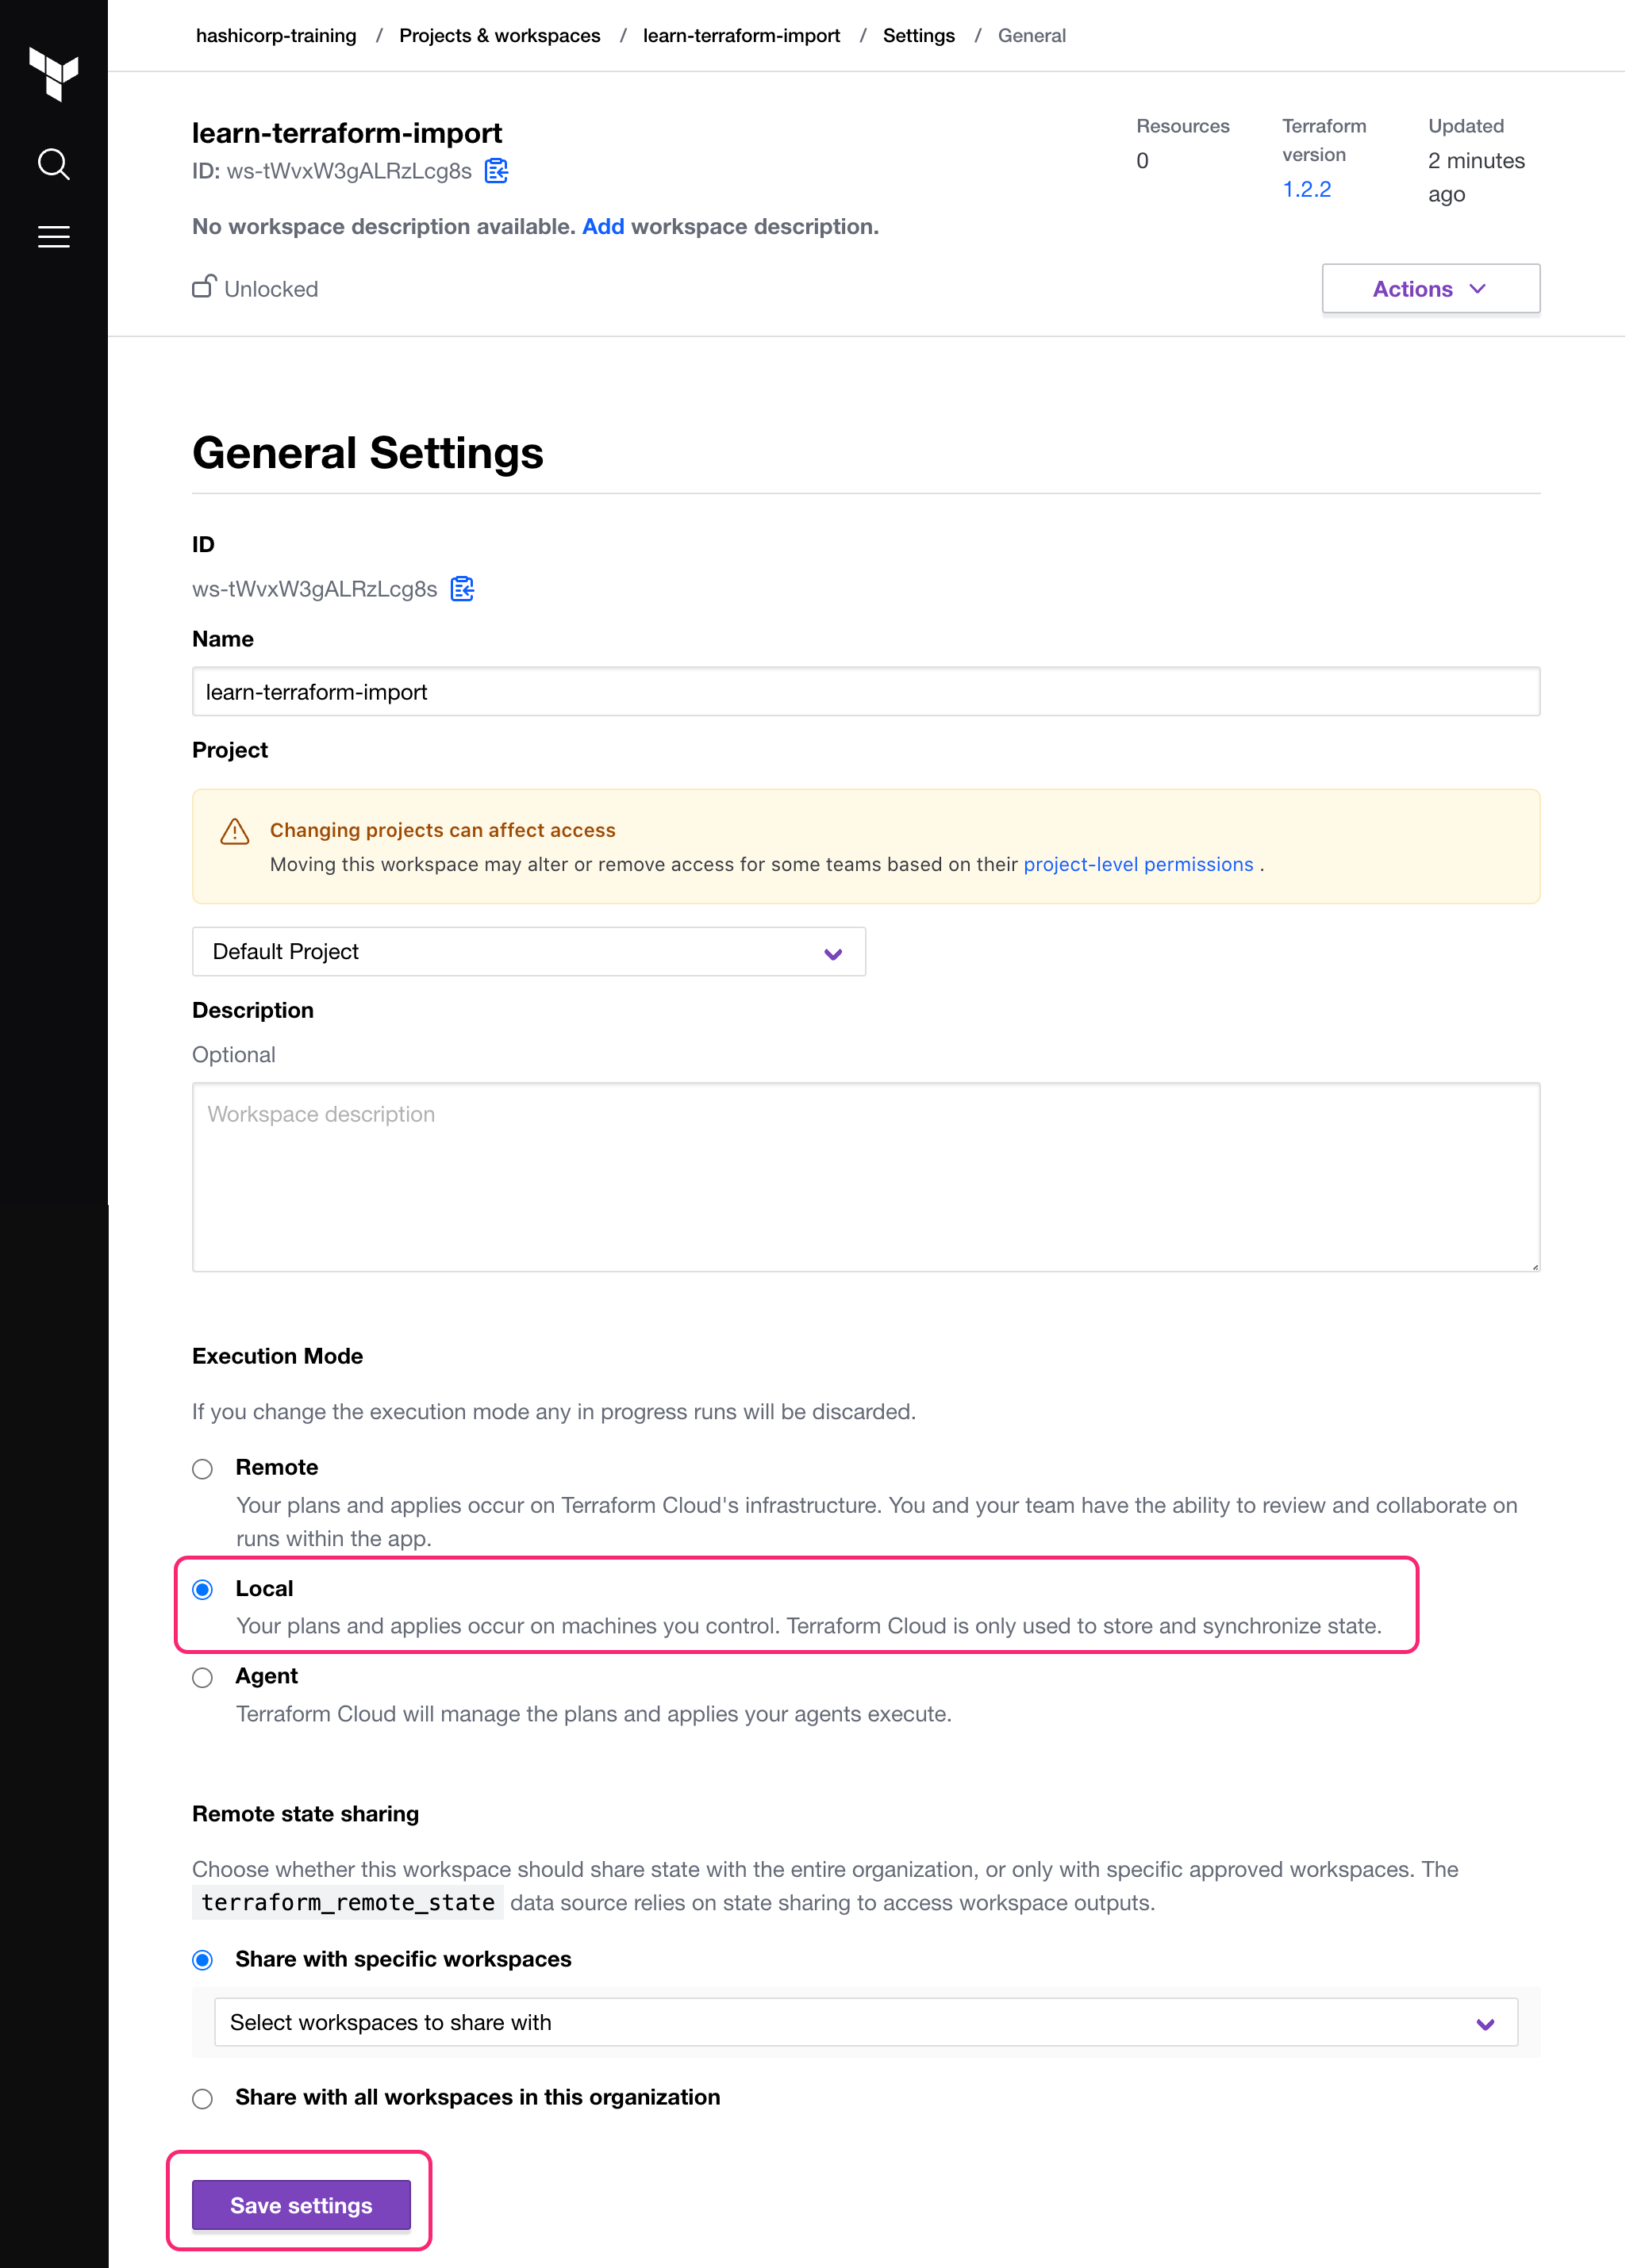
You can complete this tutorial using the same workflow with either Terraform Community Edition or HCP Terraform.
HCP Terraform is a platform that you can use to manage and execute your Terraform projects. It includes features like remote state and execution, structured plan output, workspace resource summaries, and more.
Select the HCP Terraform tab to complete this tutorial using HCP Terraform.
This tutorial assumes that you are familiar with the Terraform workflow. If you are new to Terraform, complete the Get Started tutorials first.
In order to complete this tutorial, you will need the following:
- Docker installed and running.
- Terraform v1.5+ installed locally.
Create a Docker container
Create a container named hashicorp-learn using the latest NGINX
image from Docker Hub, and publish that container's port 80 (HTTP) to your local
host system's port 8080. You will import this container in this tutorial.
$ docker run --name hashicorp-learn --detach --publish "0.0.0.0:8080:80" nginx:latest
Unable to find image 'nginx:latest' locally
latest: Pulling from library/nginx
afb6ec6fdc1c: Pull complete
dd3ac8106a0b: Pull complete
8de28bdda69b: Pull complete
a2c431ac2669: Pull complete
e070d03fd1b5: Pull complete
Digest: sha256:883874c218a6c71640579ae54e6952398757ec65702f4c8ba7675655156fcca6
Status: Downloaded newer image for nginx:latest
e7ba41fd94e51c501533241e4cffd307fbda81c5b402c372d989c4578518d2e5
Use docker ps to verify that the container is running.
$ docker ps --filter="name=hashicorp-learn"
CONTAINER ID        IMAGE               COMMAND                  CREATED              STATUS              PORTS                  NAMES
e7ba41fd94e5        nginx:latest        "/docker-entrypoint.…"   About a minute ago   Up 59 seconds       0.0.0.0:8080->80/tcp   hashicorp-learn
Visit the address localhost:8080 in your web browser to see the NGINX default
index page.
Now you have a Docker image and container to import into your project and manage with Terraform.
Initialize configuration
Now, clone the example repository for this tutorial.
$ git clone https://github.com/hashicorp-education/learn-terraform-import
Change to the repository directory.
$ cd learn-terraform-import
This directory organizes Terraform configuration across three files:
terraform.tfconfigures the Terraform and provider versionsmain.tfconfigures the Docker providerdocker.tfwill contain the configuration you write as part of this tutorial
Initialize this configuration.
$ terraform init
Initializing the backend...
##...
Terraform has been successfully initialized!
You may now begin working with Terraform. Try running "terraform plan" to see
any changes that are required for your infrastructure. All Terraform commands
should now work.
If you ever set or change modules or backend configuration for Terraform,
rerun this command to reinitialize your working directory. If you forget, other
commands will detect it and remind you to do so if necessary.
Define import block
Configuration-driven import relies on the import block, which has two required arguments:
idis the provider-specific identifier for the infrastructure you want to importtois the identifier Terraform will give the resource in state, consisting of the resource type and name
First, run the following command to return the full SHA256 container ID of the hashicorp-learn container.
$ docker inspect --format="{{.ID}}" hashicorp-learn
Now, open docker.tf in your editor and define an import block to guide the import operation. Replace FULL_CONTAINER_ID with the container ID from the docker inspect command.
docker.tf
import {
  id = "FULL_CONTAINER_ID"
  to = docker_container.web
}
Generate configuration
When importing a resource, you must both bring the resource into your state file, and define a corresponding resource block for it in your configuration. Although you can manually define the resource yourself, configuration-driven import can generate configuration for you to use as a starting point.
The generated configuration contains all possible arguments for the imported resources, including those set to default values and those without values. We recommend that you prune the generated configuration to only required arguments and arguments whose values differ from defaults, to reduce the size of your configuration.
Use terraform plan with the -generate-config-out flag to generate configuration for the container you will import. Terraform builds a plan and outputs the generated configuration for the container to the specified file.
$ terraform plan -generate-config-out=generated.tf

docker_container.web: Preparing import... [id=72d53edc26459adc666d60be2d57e6b8973238b6cedcc59fcb4e95639816b0bb]
docker_container.web: Refreshing state... [id=72d53edc26459adc666d60be2d57e6b8973238b6cedcc59fcb4e95639816b0bb]

Terraform used the selected providers to generate the following execution plan.
Resource actions are indicated with the following symbols:
-/+ destroy and then create replacement

Terraform will perform the following actions:

  # docker_container.web must be replaced
  # (imported from "72d53edc26459adc666d60be2d57e6b8973238b6cedcc59fcb4e95639816b0bb")
  # Warning: this will destroy the imported resource
-/+ resource "docker_container" "web" {
      ## ...
      + env               = (known after apply) # forces replacement
      ## ...
    }

Plan: 1 to import, 1 to add, 0 to change, 1 to destroy.

──────────────────────────────────────────────────────────────────────────────────────────────────────────────────────────────────────────────────────────────────────────────────────────────────────────────

Terraform has generated configuration and written it to generated.tf. Please
review the configuration and edit it as necessary before adding it to version
control.

Note: You didn't use the -out option to save this plan, so Terraform can't
guarantee to take exactly these actions if you run "terraform apply" now.
Terraform used the docker provider to find a docker_container resource with the ID you specified in the import block. It then saved the resource definition to generated.tf.
Notice that Terraform plans to replace the container after import due to the default value of the env parameter returned by the provider. You will fix this in the next section to ensure Terraform imports the container without making destructive changes to it.
Open generated.tf to review the generated configuration.
generated.tf
# __generated__ by Terraform
# Please review these resources and move them into your main configuration files.

# __generated__ by Terraform from "371e85d406a937b359d5cc3a49a423b736ec6e9367abe705dcdf6673ec1fb4c4"
resource "docker_container" "web" {
## ...
  env  = null
## ...
}
Notice that env is set to null. Open the Docker container resource schema for the env parameter. The provider expects this parameter type to be a set of strings.
Change the value of env to an empty set using square brackets.
generated.tf
resource "docker_container" "web" {
## ...
  env  = []
## ...
}
The container resource schema requires the image and name arguments, so you must define them in your configuration.
Recall that you specified a port mapping when you launched the Docker container, so your configuration must also contain a ports block that matches the current configuration of the container.
Prune the generated configuration to contain only the necessary arguments you identified.
generated.tf
## ...
resource "docker_container" "web" {
  env = []
  image = "..."
  name  = "hashicorp-learn"
  ports {
    external = 8080
    internal = 80
    ip       = "0.0.0.0"
    protocol = "tcp"
  }
}
Run terraform plan to verify that your configuration matches the current settings for the container.
$ terraform plan

docker_container.web: Preparing import... [id=72d53edc26459adc666d60be2d57e6b8973238b6cedcc59fcb4e95639816b0bb]
docker_container.web: Refreshing state... [id=72d53edc26459adc666d60be2d57e6b8973238b6cedcc59fcb4e95639816b0bb]

Terraform used the selected providers to generate the following execution plan. Resource actions are indicated with the following symbols:
  ~ update in-place

Terraform will perform the following actions:

  # docker_container.web will be updated in-place
  # (imported from "72d53edc26459adc666d60be2d57e6b8973238b6cedcc59fcb4e95639816b0bb")
  ~ resource "docker_container" "web" {
      + attach                                      = false
## ...
      + container_read_refresh_timeout_milliseconds = 15000
## ...
      + logs                                        = false
## ...
      + must_run                                    = true
## ...
      + remove_volumes                              = true
## ...
      + start                                       = true
## ...
      + wait                                        = false
      + wait_timeout                                = 60
## ...
    }

Plan: 1 to import, 0 to add, 1 to change, 0 to destroy.

──────────────────────────────────────────────────────────────────────────────────────────────────────────────────────────────────────────────────────────────────────────────────────────────────────────────

Note: You didn't use the -out option to save this plan, so Terraform can't guarantee to take exactly these actions if you run "terraform apply" now.
Notice that Terraform now plans to import the resource, and then make changes in place
to add the attach, container_read_refresh_timeout_milliseconds, logs, must_run, remove_volumes, start, wait, and wait_timeout attributes. These are non-destructive changes.
Terraform uses these attributes to create Docker containers, but Docker does not store them. Since Docker does not track these attributes, Terraform did not include them in the generated configuration. When you apply your configuration, the Docker provider will assign the default values for these attributes and save them in state, but they will not affect the running container.
Import and update the resource
When importing a resource, we recommend limiting any destructive changes and making the first operation on the resource a no-op. However, Terraform's configuration-driven import lets you import and modify a resource in the same operation, so you can use the Terraform workflow to manage your resource right away.
Change the external port to 8081. This will be a destructive change.
generated.tf
## ...

resource "docker_container" "web" {
  env                                         = []
  name = "hashicorp-learn"
  image                                       = "sha256:c42efe0b54387756e68d167a437aef21451f63eebd9330bb555367d67128386c"
  ports {
    external = 8081
    internal = 80
    ip       = "0.0.0.0"
    protocol = "tcp"
  }
}
Now, apply the configuration. Respond yes to the prompt to confirm the operation.
$ terraform apply

docker_container.web: Preparing import...
    [id=76fc3728c7bb84137469bd3c15d3e77e57be88819e88ac6f2077da9a874cea89]
docker_container.web: Refreshing state...
    [id=76fc3728c7bb84137469bd3c15d3e77e57be88819e88ac6f2077da9a874cea89]

Terraform used the selected providers to generate the following execution plan.
Resource actions are indicated with the following symbols:
-/+ destroy and then create replacement

Terraform will perform the following actions:

  # docker_container.web must be replaced
  # (imported from "76fc3728c7bb84137469bd3c15d3e77e57be88819e88ac6f2077da9a874cea89")
  # Warning: this will destroy the imported resource
-/+ resource "docker_container" "web" {

## ...

      ~ ports {
          ~ external = 8080 -> 8081 # forces replacement
            internal = 80
            ip       = "0.0.0.0"
            protocol = "tcp"
        }
    }

Plan: 1 to import, 1 to add, 0 to change, 1 to destroy.

Do you want to perform these actions?
  Terraform will perform the actions described above.
  Only 'yes' will be accepted to approve.

  Enter a value: yes

docker_container.web: Importing... [id=76fc3728c7bb84137469bd3c15d3e77e57be88819e88ac6f2077da9a874cea89]
docker_container.web: Import complete [id=76fc3728c7bb84137469bd3c15d3e77e57be88819e88ac6f2077da9a874cea89]
docker_container.web: Destroying... [id=76fc3728c7bb84137469bd3c15d3e77e57be88819e88ac6f2077da9a874cea89]
docker_container.web: Destruction complete after 0s
docker_container.web: Creating...
docker_container.web: Creation complete after 0s [id=c30d6bc712cd95e41260a04f1a979ae9c91a054a8ba32f2bbabb09f0e7f95220]

Apply complete! Resources: 1 imported, 1 added, 0 changed, 1 destroyed.
Terraform imported the resource, then replaced the container since you changed the external port mapping.
Now verify that Terraform replaced the container with a new one by running docker ps or visiting localhost:8081 in your web browser.
$ docker ps --filter "name=hashicorp-learn"
CONTAINER ID   IMAGE          COMMAND                  CREATED          STATUS          PORTS                  NAMES
c30d6bc712cd   c42efe0b5438   "/docker-entrypoint.…"   50 seconds ago   Up 50 seconds   0.0.0.0:8081->80/tcp   hashicorp-learn
Review the contents of your state file by running terraform show.
$ terraform show
# docker_container.web:
resource "docker_container" "web" {
    attach                                      = false
    command           = [
      "nginx",
      "-g",
      "daemon off;",
    ]

    ## ...

    ports {
      external = 8081
      internal = 80
      ip       = "0.0.0.0"
      protocol = "tcp"
    }
}
Now your configuration file, Terraform state, and the container are all in sync, and you can use Terraform to manage the Docker container's settings and lifecycle.
Create image resource
You can bring some resources under Terraform's management
without using the import block. This is often the case for
resources defined by a single unique ID or tag, such as Docker images.
In your generated.tf file, the docker_container.web resource specifies the
SHA256 hash ID of the image used to create the container. This is how Docker
stores the image ID internally, so the import operation loaded the image ID
directly into your state. However, identifying the image by its tag or name would make your configuration easier to understand.
Retrieve the image's tag name by running the following command.
$ docker image inspect -f {{.RepoTags}} `docker inspect --format="{{.Image}}" hashicorp-learn`
[nginx:latest]
Then add the following configuration to your docker.tf file to represent this
image as a resource.
docker.tf
resource "docker_image" "nginx" {
  name         = "nginx:latest"
}
Run terraform apply to create an image resource in state. Remember to confirm
the apply step with a yes.
$ terraform apply
docker_container.web: Refreshing state... [id=5cf0052f45a4c22e6b077ca476cd0f584f4e874b64c1a7c89e8a3ceb2e41bad6]

Terraform used the selected providers to generate the following execution plan. Resource actions are indicated with the following symbols:
  + create

Terraform will perform the following actions:

  # docker_image.nginx will be created
  + resource "docker_image" "nginx" {
      + id          = (known after apply)
      + image_id    = (known after apply)
      + name        = "nginx:latest"
      + repo_digest = (known after apply)
    }

Plan: 1 to add, 0 to change, 0 to destroy.

##...

Apply complete! Resources: 1 added, 0 changed, 0 destroyed
Now that Terraform created a resource for the image, you can reference it in
your container's configuration. Change the image value for
docker_container.web to reference the new image resource.
generated.tf
resource "docker_container" "web" {
  ## ...
  image = docker_image.nginx.image_id
  ## ...
}
Since docker_image.nginx.latest matches the hardcoded image ID you
replaced, terraform apply returns a no-op.
$ terraform apply
docker_image.nginx: Refreshing state... [id=sha256:9e7e7b26c784556498f584508123ae46da82b4915e262975893be4c8ec8009a5nginx:latest]
docker_container.web: Refreshing state... [id=5cf0052f45a4c22e6b077ca476cd0f584f4e874b64c1a7c89e8a3ceb2e41bad6]

No changes. Your infrastructure matches the configuration.

Terraform has compared your real infrastructure against your configuration and found no differences, so no changes are needed.
Now that Terraform manages both the Docker container and image, you can use Terraform to modify their configuration.
Destroy infrastructure
You have now imported your Docker container and its image used into Terraform.
Destroy the container and image by running terraform destroy. Respond yes to the prompt to confirm the operation.
$ terraform destroy
docker_image.nginx: Refreshing state... [id=sha256:9beeba249f3ee158d3e495a6ac25c5667ae2de8a43ac2a8bfd2bf687a58c06c9nginx:latest]
docker_container.web: Refreshing state... [id=3fe1cb2e5326c31bac9250f6d09eade77945ee07ccea025d6424d91a89f98557]

An execution plan has been generated and is shown below.
Resource actions are indicated with the following symbols:
  - destroy

Terraform will perform the following actions:

  # docker_container.web will be destroyed
  - resource "docker_container" "web" {
      - attach            = false -> null

      ## ...
    }

Plan: 0 to add, 0 to change, 2 to destroy.

Do you really want to destroy all resources?
  Terraform will destroy all your managed infrastructure, as shown above.
  There is no undo. Only 'yes' will be accepted to confirm.

  Enter a value: yes

docker_container.web: Destroying... [id=3fe1cb2e5326c31bac9250f6d09eade77945ee07ccea025d6424d91a89f98557]
docker_container.web: Destruction complete after 1s
docker_image.nginx: Destroying... [id=sha256:9beeba249f3ee158d3e495a6ac25c5667ae2de8a43ac2a8bfd2bf687a58c06c9nginx:latest]
docker_image.nginx: Destruction complete after 0s

Destroy complete! Resources: 2 destroyed.
Finally, run docker ps to validate that Terraform destroyed the container.
$ docker ps --filter "name=hashicorp-learn"
CONTAINER ID        IMAGE               COMMAND             CREATED             STATUS              PORTS               NAMES
If you used HCP Terraform for this tutorial, after destroying your resources, delete the learn-terraform-import workspace from your HCP Terraform organization.
Limitations and other considerations
There are several important things to consider when using configuration to import resources into Terraform:
Terraform import uses the current state of your infrastructure reported by the provider. It cannot determine:
- the health of the infrastructure.
- the intent of the infrastructure.
- changes made to the infrastructure that are not in Terraform's control, such as the state of a Docker container's filesystem.
Importing involves manual steps which can be error prone, especially if the operator lacks context about the purpose and history of the infrastructure. We recommend carefully reviewing plan output before applying to avoid destructive changes.
Importing manipulates the Terraform state file during the apply. You may want to create a backup before importing new infrastructure.
Terraform import does not detect or generate relationships between infrastructure. You can manually add relationships to the configuration before you apply changes.
Terraform import does not detect which default attributes you can skip setting.
Not all providers and resources support Terraform import.
Importing a resource into Terraform does not mean that Terraform can destroy and recreate it. For example, the imported infrastructure could rely on other unmanaged infrastructure or configuration.
Following Infrastructure as Code (IaC) best practices, such as immutable infrastructure, can help prevent many of these problems.
Next steps
In this tutorial, you used configuration-driven import to bring a Docker container under Terraform management. You then used Terraform to modify its configuration, including defining resource dependencies. You also reviewed the limitations of the import workflow, and the enhanced safety and predictability configuration-driven import offers over the terraform import command.
Review the following resources to learn more about how to use Terraform to safely and consistently manage your infrastructure:
- Review the Terraform Import documentation.
- Learn how to migrate configuration to HCP Terraform.
- Learn how to create reusable configuration with modules.
- Learn how to manage a resource in Terraform state.