Load Balancing with NGINX Plus' Service Discovery Integration
This tutorial describes how to automatically configure NGINX Plus' load balancers with service discovery data, via a native integration with Consul. This allows NGINX Plus to automatically scale its backend server pools using Consul's service discovery.
In this tutorial, you will set up an NGINX Plus configuration that generates the load balancer backend server pool based on the available service instances registered in Consul's service catalog.
Prerequisites
To complete this tutorial, you will need previous experience with Consul and NGINX Plus. Additionally, you should have the following infrastructure configured.
- A Consul cluster with the web UI enabled.
- At least three nodes, each with a local Consul client that can register the web
services and health checks in this tutorial.
enable_local_script_checksmust be set totrueon the Consul clients. - A running instance of NGINX Plus of version R9 or later.
- Standard web servers running on each node, listening on HTTP port 80.
Be aware, that NGINX Plus is the commercial product of NGINX and the service discovery features demonstrated in this tutorial are not available in the open source version of NGINX. For an entirely open-source tutorial refer to the Load Balancing with NGINX and Consul Template tutorial.
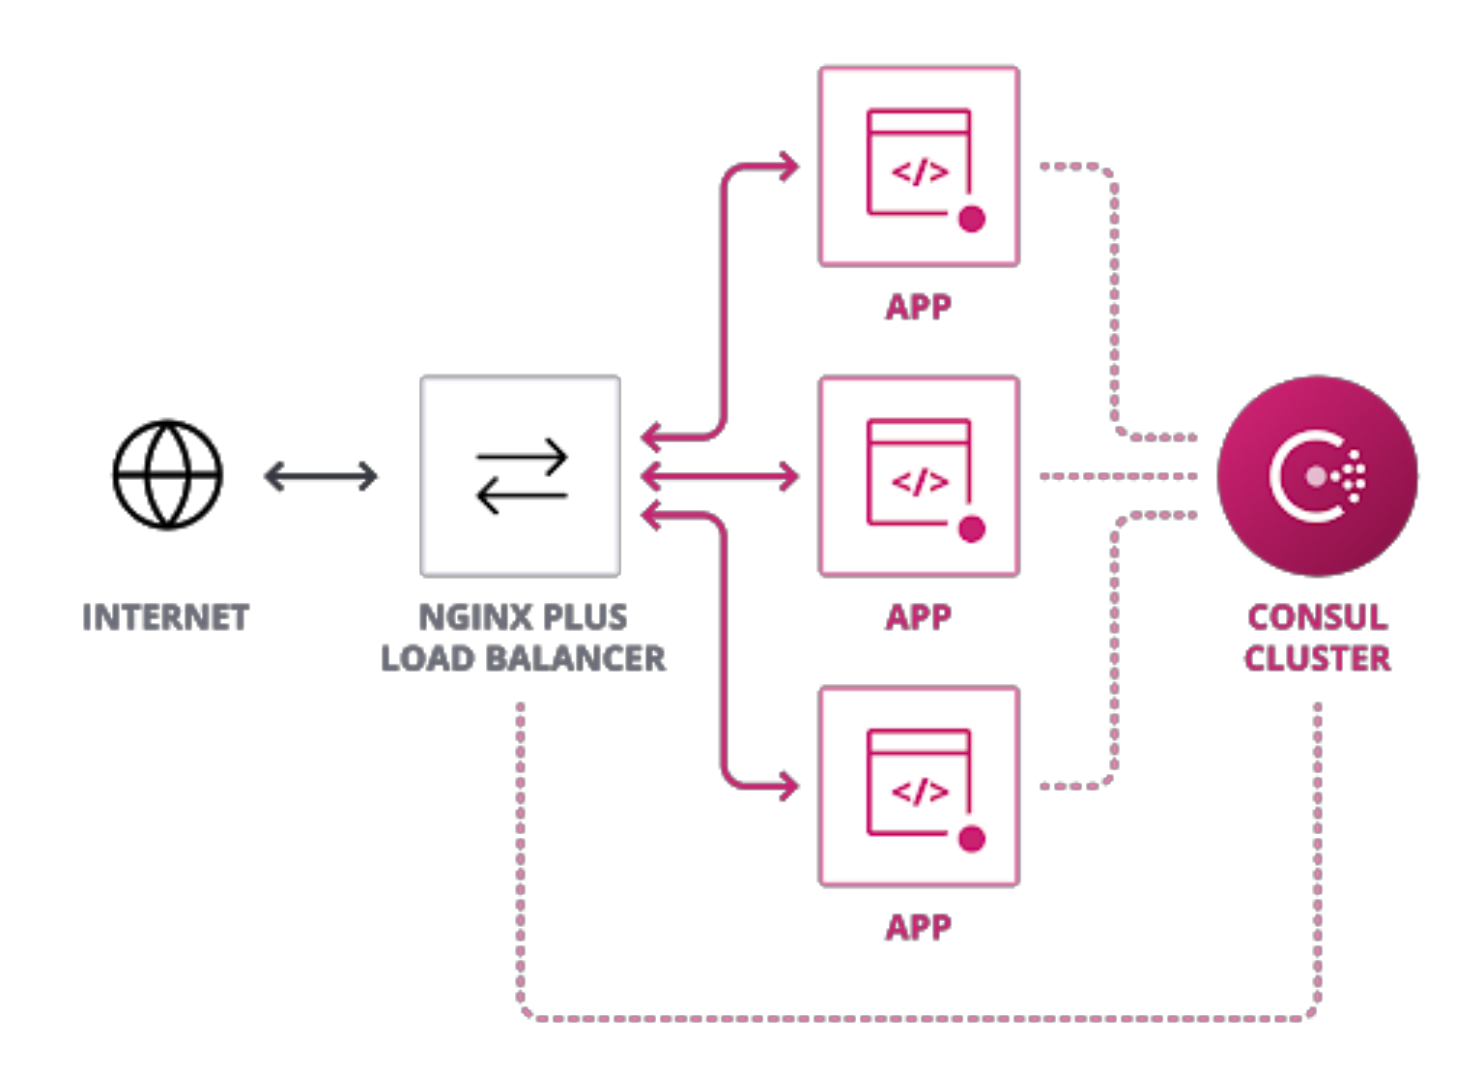
When you've completed the tutorial, your infrastructure will resemble the diagram below.
Set up the Consuls clients
First, you will need to configure your Consul clients.
Register a web service
To register the web service on your first node with Consul, create a service
definition in Consul's config directory - /etc/consul.d/ by default.
Create a service registration file for the web service with the following content.
web-service.hcl
service {
  name = "web"
  port = 80
  check {
    args = ["curl", "localhost"]
    interval = "3s"
  }
}
Reload the client to read the new service definition.
$ consul reload
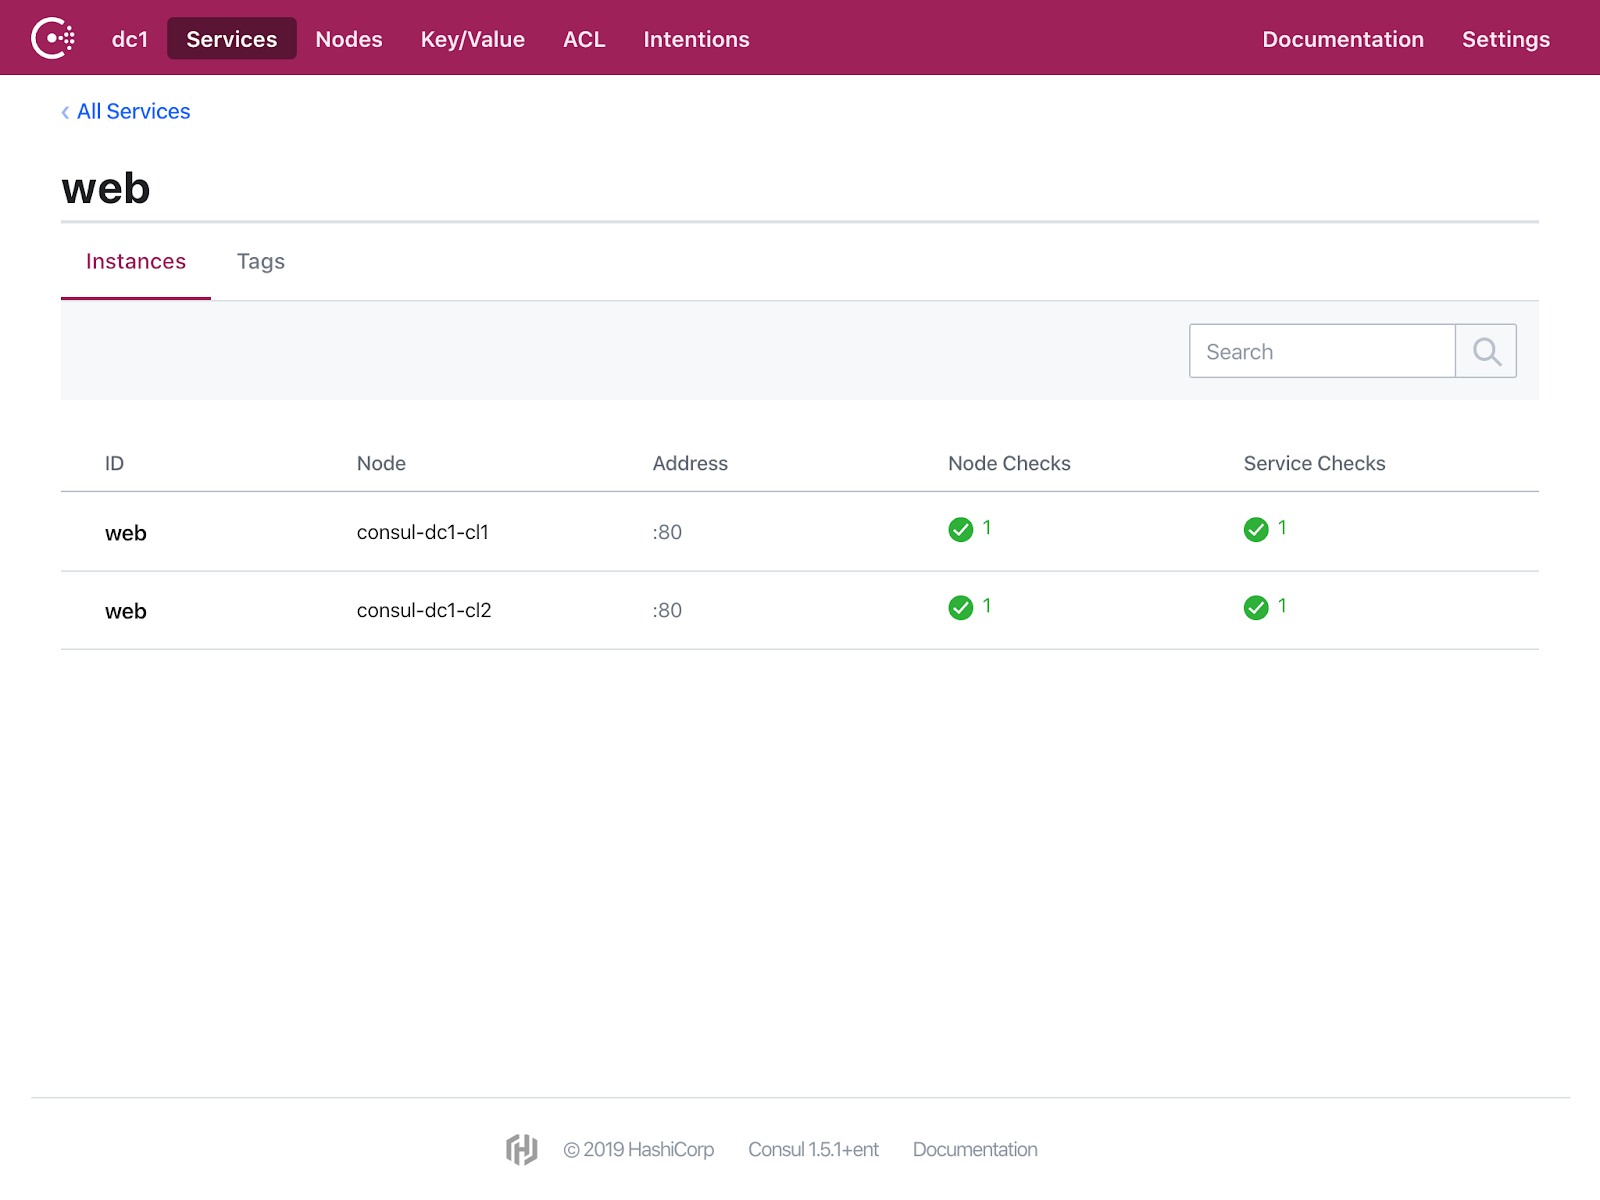
Register a second web service by repeating this process on a second node. Both instances of the web service will be displayed in the Consul UI.
Configure DNS settings on a Consul client
To enforce the use of TCP for DNS lookups with larger payloads on the node running the NGINX Plus instance, update the Consul client by adding the following configuration to the Consul configuration file.
Consul agent configuration
## ...

dns_config {
  enable_truncate = true
}

## ...
You can find more information on the enable_truncate option by reviewing the
agent configuration
documentation.
Configure NGINX Plus
Clean up NGINX Plus default sites config
For this tutorial, start with a new install of NGINX Plus.
To ensure your NGINX Plus instance will act as a load balancer, and not as a web
server, delete the /etc/nginx/sites-enabled/default file if it exists.
Then reload the NGINX service.
$ service nginx reload
Create the NGINX Plus configuration
Create a configuration file for your
NGINX Plus load balancer located at /etc/nginx/conf.d/load-balancer.conf.
Add the following configuration.
/etc/nginx/conf.d/load-balancer.conf
server {
   listen 80;

   location / {
      proxy_pass http://web;
      health_check;
   }
}
server {
    listen 8080;
    root /usr/share/nginx/html;

    # Conventional location for accessing the NGINX Plus API
    location /api {
        api write=on;
    }

    # Redirect to the NGINX Plus dashboard
    location = / {
        return 301 /dashboard.html;
    }
}
upstream web {
  zone upstream_web 128k;
  server service.consul service=web resolve;
}
resolver 127.0.0.1:8600 valid=5s;
resolver_timeout 2s;
Below, the NGINX configuration file is explained in detail.
Server
The first server stanza instructs NGINX Plus to listen for HTTP
requests on TCP port 80 and to use the web upstream pool as the default load
balancer backend. It will also instruct NGINX Plus to put a default
health_check on all the available servers in the upstream group.
The second server stanza instructs NGINX Plus to listen for HTTP requests on
TCP port 8080 and to redirect requests for / to the monitoring Dashboard
of NGINX Plus which will be used for monitoring tasks later in this tutorial.
Also, the NGINX Plus API at /api will be enabled, as this is a prerequisite
for using the Dashboard.
Upstream
The upstream web stanza defines the server backend group which
is referenced by the first server stanza. A shared memory zone called
upstream_web is defined, which keeps the group’s configuration and run-time
state. server service.consul service=web resolve will instruct NGINX Plus to
use the DNS SRV record for the backend service web.service.consul to discover
the available web service endpoints within Consul’s service catalog.
Resolver
The resolver definition defines the actual Consul service discovery endpoint to be used by NGINX Plus.
resolver 127.0.0.1:8600 points NGINX Plus to the DNS interface of the local
Consul client.
valid=5s will instruct NGINX Plus to check Consul's service catalog every 5
seconds for updates on available and healthy service endpoints. This value is
tuned in this example for faster service discovery.
Finally, a resolver_timeout of 2 seconds is configured.
For all available configuration options for NGINX Plus resolver, please refer to the configuration documentation.
Reload NGINX Plus
Reload your NGINX Plus instance to apply the new
load-balancer.conf configuration file.
$ service nginx reload
Check functionality of NGINX Plus load balancing
Browse to the IP address of your NGINX Plus load balancer and reload the page several times. Because you registered two services in Consul and configured NGINX Plus to use round robin load balancing (default behavior), you should see the connection toggling between both your available web servers.
Check NGINX Plus statistics page
A statistics and monitoring dashboard of
NGINX Plus will be accessible at http://Your-NGINX-Plus-IP-address:8080
which can be used for basic monitoring purposes.
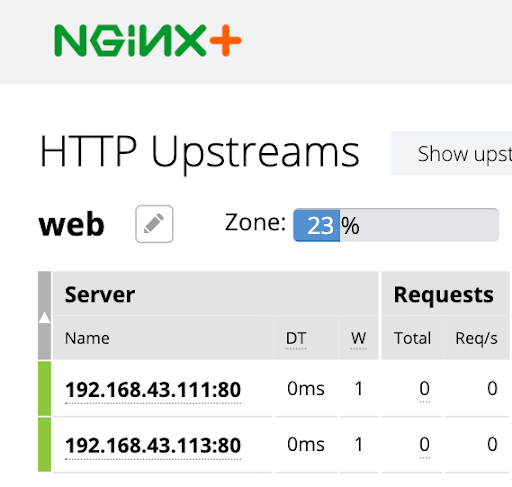
Click on the Upstreams tab on the landing page, you will be redirected to the statistics page. Your two web servers will be registered in the web upstream server group.
Scale your backend servers
NGINX Plus will query Consul's DNS interface every 5 seconds to check if the endpoints have changed for the requested service "web". Scale your web service by registering the instance running on your third node.
In this tutorial you will manually register the already running service.
Create a service definition in the third Consul client's config directory for the
web service.
web-service.hcl
service {
  name = "web"
  port = 80
  check {
    args = ["curl", "localhost"]
    interval = "3s"
  }
}
Reload the client to read the new service definition.
$ consul reload
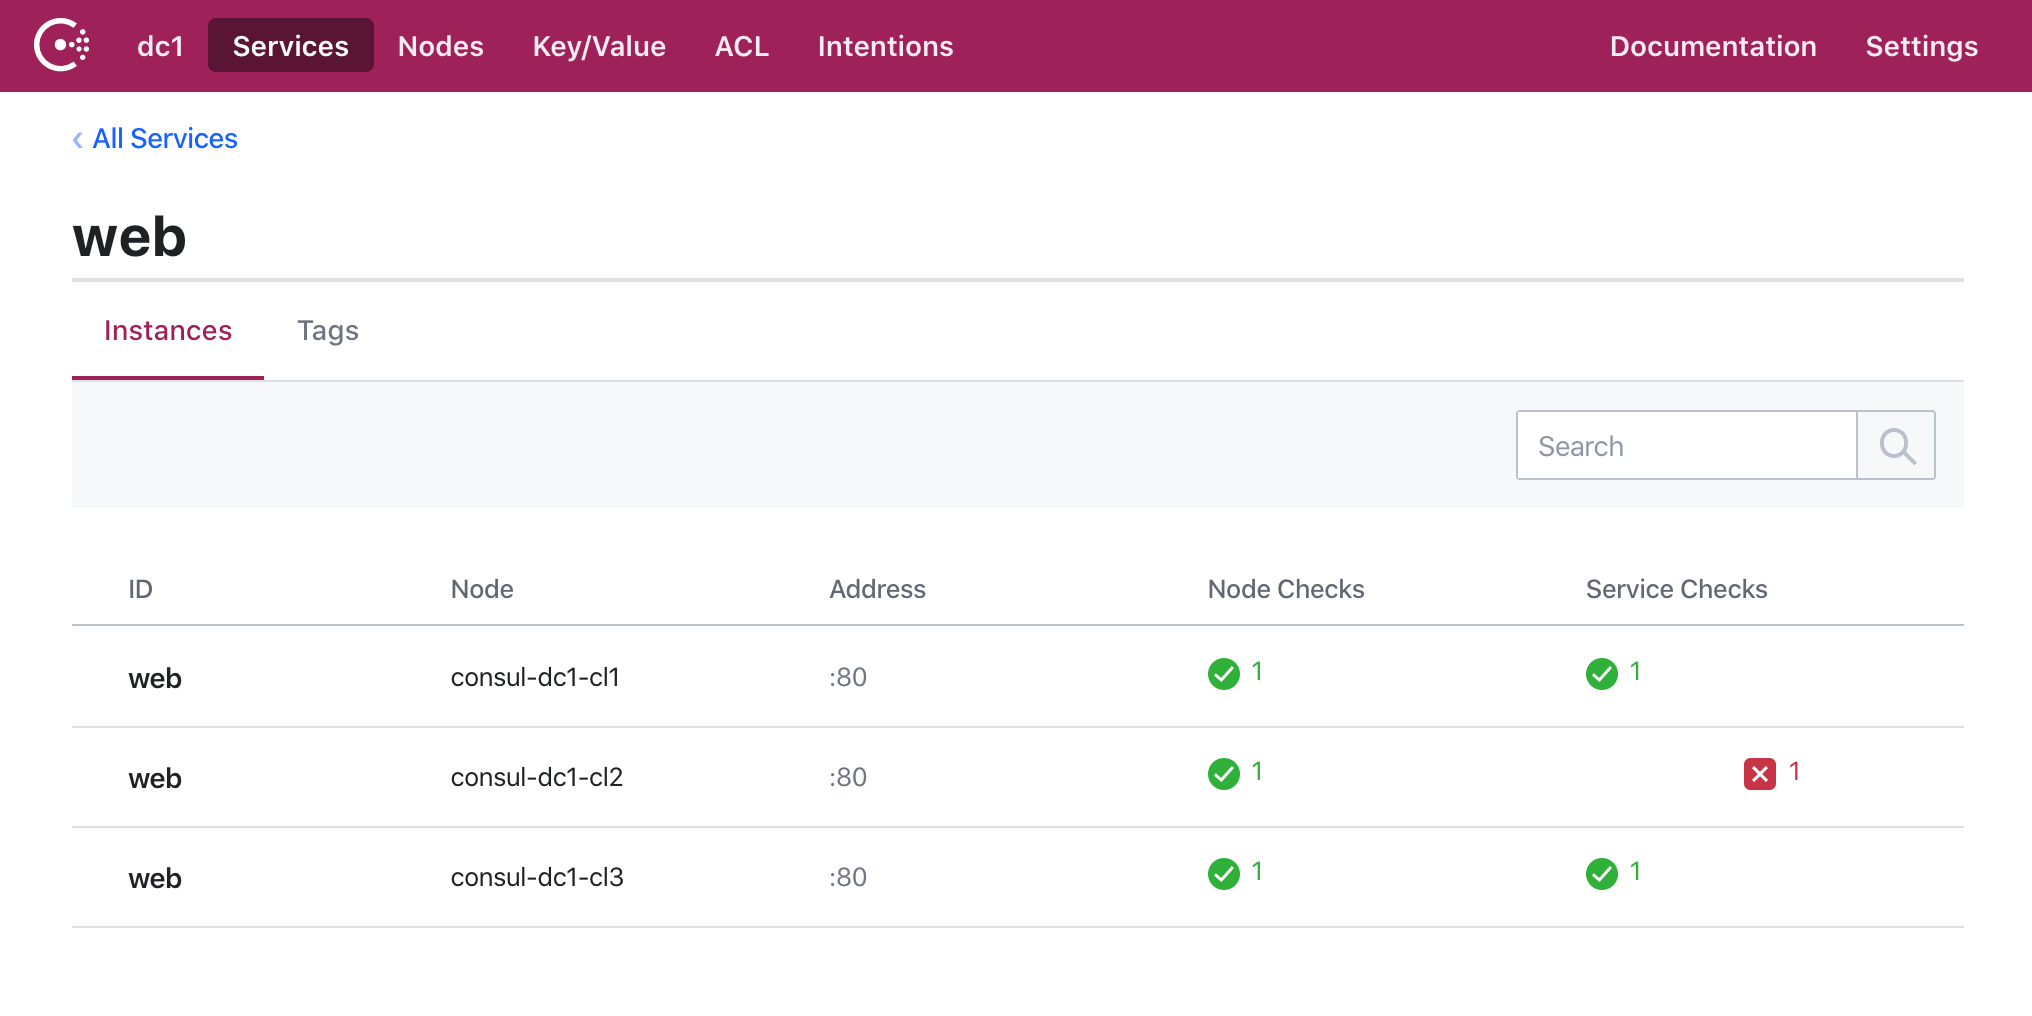
Once you register the new web service, NGINX Plus will notice the change and trigger an update in its runtime configuration. After scaling your backend server pool from two to three instances, the resulting runtime load balancer configuration will be reflected in the dashboard page. Traffic should now be load balanced across all three available services.
Stop one backend service
Not only will NGINX Plus' service discovery integration scale your backend configuration automatically (up and down) depending on the available services, it will also only use healthy services for rendering the final configuration.
Since you configured Consul with a health check, Consul will notice if the "web" server instance is in an unhealthy state.
To simulate an error, and verify Consul health checks are working, stop the web server process on one of your nodes.
$ service <WEBSERVER> stop
In the Consul UI, the service instance will be marked "Unhealthy". The instance immediately became unhealthy since the "curl" health check returned an error, as no service responds to requests on HTTP port 80.
Due to its regular check against Consul's DNS interface, your NGINX Plus instance will notice the health and will adjust its runtime load balancer configuration. Your NGINX Plus instance will now only balance traffic between the two remaining healthy services.
You can again check the resulting runtime load balancer configuration for your NGINX Plus instance in the dashboard statistics page.
Note, that the unhealthy instance is removed completely from the web upstream server group as DNS resolution for the web service does not include this specific host anymore, due to it being marked as unhealthy in Consul’s service catalog.
Restart the stopped "web" server instance. The Consul health check will mark the service as "Healthy" and it will be added back into the load balancer backend configuration to serve traffic.
Add DNS weights to the NGINX Plus configuration
In addition to Consul’s DNS interface for querying only healthy instances, NGINX Plus' service discovery integration can also evaluate the DNS weight. In this section, you will adjust one of your services to give it a higher weight. This will enable NGINX Plus to adjust its runtime value for the upstream server weight, which will result in sending more traffic to the respective upstream server.
This approach can be helpful if your servers are different sizes, or some instances of a service are able to handle more requests than others.
Check the current weight
First, check the assigned DNS weights in Consul using the Consul DNS interface.
$ dig @127.0.0.1 -p 8600 -t srv web.service.consul
<SNIP>

;; ANSWER SECTION:
web.service.consul. 0 IN  SRV 1 1 80 consul-dc1-srv2.node.dc1.consul.
web.service.consul. 0 IN  SRV 1 1 80 consul-dc1-srv3.node.dc1.consul.
web.service.consul. 0 IN  SRV 1 1 80 consul-dc1-srv1.node.dc1.consul.

<SNIP>
The DNS weight is the column before the port number (which is 80). The DNS weight is currently set to 1 for all of your healthy services, which is the default that Consul uses.
NGINX Plus supports all DNS weights between 1 and 65535.
Add a weight to one service
Adjust one of your service definitions by
adding the weights option to the service configuration file.
web-service.hcl
service {
  name = "web"
  port = 80
  check {
    args = ["curl", "localhost"]
    interval = "3s"
  }
  weights {
    passing = 2
    warning = 1
  }
}
Reload the local Consul client to read the new service definition, consul reload.
Check the new weight
First, check Consul's DNS interface to make sure Consul now shows another weight for the service instance you just configured.
$ dig @127.0.0.1 -p 8600 -t srv web.service.consul
<SNIP>

;; ANSWER SECTION:
web.service.consul. 0 IN  SRV 1 1 80 consul-dc1-srv2.node.dc1.consul.
web.service.consul. 0 IN  SRV 1 2 80 consul-dc1-srv3.node.dc1.consul.
web.service.consul. 0 IN  SRV 1 1 80 consul-dc1-srv1.node.dc1.consul.

<SNIP>
Second, you can check the NGINX Plus dashboard statistics page, http://Your-NGINX-Plus-IP-address:8080.
Finally, check that traffic is now being load balanced unequally across the three available service endpoints. Browse to the IP address of your NGINX Plus load balancer and reload the page several times. One of your instances will serve twice as many requests as the others.
Next steps
NGINX Plus' service discovery integration queries Consul's DNS interface on a regular, configurable basis to get updates about changes for a given service and adjusts the runtime configuration of NGINX Plus automatically. You can adjust your NGINX Plus runtime configuration by configuring additional options in Consul like DNS weights.
In this tutorial you configured NGINX Plus to natively integrate with Consul for service discovery. You also tested the NGINX Plus runtime configuration based on service health and weight. Finally, you were able to monitor the changes with the Consul UI, NGINX Plus dashboard, and Consul DNS interface.