SSH certificate injection with HCP Boundary and Vault
HCP Boundary and Boundary Enterprise enable credential injection for SSH certificates into sessions, using the HashiCorp Vault SSH Secrets Engine to dynamically generate certificates. Currently users must bring their own Vault deployment to HCP Boundary.
This tutorial demonstrates SSH certificate injection into an SSH server configured using Docker. Learners may also bring their own target to use for this tutorial.
Tutorial overview
- Prerequisites
- Background
- Set up an SSH target
- Set up Vault
- Set up Boundary
- Inject certificates into sessions
Prerequisites
This tutorial assumes the learner has completed the HCP Boundary Getting Started tutorials. The learner should have a working Boundary cluster and org running on HCP.
Docker is installed (Note: Learners may also bring their own target, instead of using Docker)
A Boundary binary greater than 0.12.0 in your
PATHA Vault binary greater than 1.12.0 in your
PATHis recommended. Any version of Vault greater than 1.7 should work with this tutorial.The
jqutility installed and in yourPATHInstalling the Boundary Desktop App provides an optional workflow at the end of this tutorial. The 1.2.0 version or above is required for Vault support.
This tutorial assumes basic knowledge of using Vault, including running a development server and managing policies, roles, and tokens. If you are new to using Vault, complete the Getting Started with Vault quick start tutorials before integrating Vault with Boundary.
This tutorial also extends the workflow for credential brokering via Vault. If new to this process, we recommend completing the Vault Credential Brokering Quickstart tutorial before moving forward.
Certificate injection background
Secure Shell (SSH), is arguably the de facto tool for remote administration, enabling end users and administrators with a simple, powerful, and secure access method. SSH offers a variety of benefits and configurations, such as:
- Encryption
- Support for a wide range of keys types and sizes
- Built in key exchange
- Ability to create a tunnel and spawn multiple channels
Boundary seamlessly provides authenticated users access to remote machines via their SSH client, regardless of the authentication mechanisms implemented by their administrators.
Boundary supports credential brokering, where Boundary controllers check out credentials from Vault, and return them back to users and clients. In this workflow, Boundary acts as a broker of the credential.
Brokering lacks the ability to hide credentials from clients. With credential injection, controllers instead return credentials to Boundary workers and create a session to a target where the client never has access to the credential. This credential injection workflow results from Boundary injecting the credential into a worker's session instead of passing it back to the client.
Starting in Boundary 0.10, users can inject SSH private keys, as well as usernames and passwords within Boundary. With public key authentication, you must distribute keys for each user to all the correct hosts. In contrast, SSH certificates require administrators to distribute a certificate authority's (CA) public key to the hosts.
Boundary 0.12 added support for credential injection of Vault SSH certificates. Boundary uses Vault as a certificate authority for SSH certificates by integrating with the Vault SSH Secrets Engine.
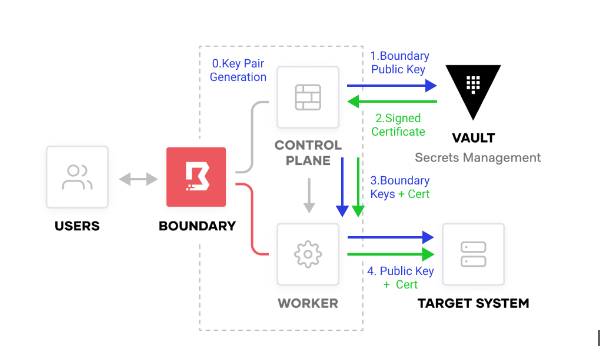
Boundary administrators can use either the /issue or /sign endpoints to
broker certificates with Vault.
/issue: Vault generates and signs the key pair for you./sign: The Boundary controllers generate the key pair and then send it to Vault to be signed.
In this tutorial, you will use the /sign endpoint to allow Vault to sign certificates generated by Boundary.
This tutorial assumes the reader has installed Boundary 0.12.0 or above, and a Vault binary greater than 1.7.0. You can run Vault in development mode locally, as demonstrated in this tutorial, or by supplying a Vault public address to HCP Boundary.
Set up Vault
Vault needs the proper configuration to issue certificates for the SSH target. To set up Vault you need to:
- Start Vault.
- Enable the SSH secrets engine.
- Define the credential and SSH policies.
- Create a token for the Boundary certificate library.
- Generate the CA key for signing certificates, and add it to Vault.
HCP Boundary supports public or private Vault access. If you use private Vault or a Vault dev server, you must also deploy a self-managed worker. Select one of the options for configuring Vault to continue.
Integrating private Vault with HCP Boundary requires that you deploy a self-managed worker in the same network as Vault. If you define a Vault credential store with a worker filter, Boundary's controller will know that it should route Vault requests to workers matching that filter.

You can configure private Vault clusters running on HCP to access HCP Boundary via a self-managed worker placed in a peered network via a HashiCorp Virtual Network (HCVN).

For simplicity, this tutorial demonstrates integrating HCP Boundary with a private Vault cluster running locally in development mode with the worker also running locally.
To learn more about HVNs, refer to the HashiCorp Virtual Network documentation.
To learn more about deploying a self-managed worker for HCP, refer to the Self-Managed Worker Registration with HCP Boundary tutorial.
Open a new terminal session and run Vault in development mode.
$ vault server -dev -dev-root-token-id=groot

==> Vault server configuration:

             Api Address: http://127.0.0.1:8200
                     Cgo: disabled
         Cluster Address: https://127.0.0.1:8201
              Go Version: go1.17.13
              Listener 1: tcp (addr: "127.0.0.1:8200", cluster address: "127.0.0.1:8201", max_request_duration: "1m30s", max_request_size: "33554432", tls: "disabled")
               Log Level: info
                   Mlock: supported: false, enabled: false
           Recovery Mode: false
                 Storage: inmem
                 Version: Vault v1.11.4, built 2022-09-23T06:01:14Z
             Version Sha: b47a9e72942719f217f7750df18be36ec21dfc0e

==> Vault server started! Log data will stream in below:

2023-02-12T18:29:53.153-0700 [INFO]  proxy environment: http_proxy="" https_proxy="" no_proxy=""
2023-02-12T18:29:53.153-0700 [WARN]  no `api_addr` value specified in config or in VAULT_API_ADDR; falling back to detection if possible, but this value should be manually set
2023-02-12T18:29:53.155-0700 [INFO]  core: Initializing version history cache for core
2023-02-12T18:29:53.156-0700 [INFO]  core: security barrier not initialized
2023-02-12T18:29:53.156-0700 [INFO]  core: security barrier initialized: stored=1 shares=1 threshold=1
2023-02-12T18:29:53.157-0700 [INFO]  core: post-unseal setup starting
2023-02-12T18:29:53.159-0700 [INFO]  core: loaded wrapping token key
2023-02-12T18:29:53.159-0700 [INFO]  core: Recorded vault version: vault version=1.11.4 upgrade time="2023-02-13 01:29:53.159455 +0000 UTC" build date=2022-09-23T06:01:14Z
2023-02-12T18:29:53.159-0700 [INFO]  core: successfully setup plugin catalog: plugin-directory=""
2023-02-12T18:29:53.159-0700 [INFO]  core: no mounts; adding default mount table
2023-02-12T18:29:53.161-0700 [INFO]  core: successfully mounted backend: type=cubbyhole path=cubbyhole/
2023-02-12T18:29:53.162-0700 [INFO]  core: successfully mounted backend: type=system path=sys/
2023-02-12T18:29:53.162-0700 [INFO]  core: successfully mounted backend: type=identity path=identity/
2023-02-12T18:29:53.164-0700 [INFO]  core: successfully enabled credential backend: type=token path=token/ namespace="ID: root. Path: "
2023-02-12T18:29:53.165-0700 [INFO]  rollback: starting rollback manager
2023-02-12T18:29:53.165-0700 [INFO]  core: restoring leases
2023-02-12T18:29:53.166-0700 [INFO]  identity: entities restored
2023-02-12T18:29:53.166-0700 [INFO]  identity: groups restored
2023-02-12T18:29:53.167-0700 [INFO]  expiration: lease restore complete
2023-02-12T18:29:53.358-0700 [INFO]  core: post-unseal setup complete
2023-02-12T18:29:53.359-0700 [INFO]  core: root token generated
2023-02-12T18:29:53.359-0700 [INFO]  core: pre-seal teardown starting
2023-02-12T18:29:53.359-0700 [INFO]  rollback: stopping rollback manager
2023-02-12T18:29:53.359-0700 [INFO]  core: pre-seal teardown complete
2023-02-12T18:29:53.360-0700 [INFO]  core.cluster-listener.tcp: starting listener: listener_address=127.0.0.1:8201
2023-02-12T18:29:53.360-0700 [INFO]  core.cluster-listener: serving cluster requests: cluster_listen_address=127.0.0.1:8201
2023-02-12T18:29:53.360-0700 [INFO]  core: post-unseal setup starting
2023-02-12T18:29:53.361-0700 [INFO]  core: loaded wrapping token key
2023-02-12T18:29:53.361-0700 [INFO]  core: successfully setup plugin catalog: plugin-directory=""
2023-02-12T18:29:53.361-0700 [INFO]  core: successfully mounted backend: type=system path=sys/
2023-02-12T18:29:53.361-0700 [INFO]  core: successfully mounted backend: type=identity path=identity/
2023-02-12T18:29:53.361-0700 [INFO]  core: successfully mounted backend: type=cubbyhole path=cubbyhole/
2023-02-12T18:29:53.362-0700 [INFO]  core: successfully enabled credential backend: type=token path=token/ namespace="ID: root. Path: "
2023-02-12T18:29:53.362-0700 [INFO]  rollback: starting rollback manager
2023-02-12T18:29:53.362-0700 [INFO]  core: restoring leases
2023-02-12T18:29:53.362-0700 [INFO]  expiration: lease restore complete
2023-02-12T18:29:53.363-0700 [INFO]  identity: entities restored
2023-02-12T18:29:53.363-0700 [INFO]  identity: groups restored
2023-02-12T18:29:53.363-0700 [INFO]  core: post-unseal setup complete
2023-02-12T18:29:53.363-0700 [INFO]  core: vault is unsealed
2023-02-12T18:29:53.365-0700 [INFO]  expiration: revoked lease: lease_id=auth/token/root/h77c55819b7e33ba510334de2c483720207b9da21fbd49582e6b25b400bc6a691
2023-02-12T18:29:53.369-0700 [INFO]  core: successful mount: namespace="" path=secret/ type=kv
2023-02-12T18:29:53.379-0700 [INFO]  secrets.kv.kv_c67682df: collecting keys to upgrade
2023-02-12T18:29:53.379-0700 [INFO]  secrets.kv.kv_c67682df: done collecting keys: num_keys=1
2023-02-12T18:29:53.379-0700 [INFO]  secrets.kv.kv_c67682df: upgrading keys finished
WARNING! dev mode is enabled! In this mode, Vault runs entirely in-memory
and starts unsealed with a single unseal key. The root token is already
authenticated to the CLI, so you can immediately begin using Vault.

You may need to set the following environment variable:

    $ export VAULT_ADDR='http://127.0.0.1:8200'

The unseal key and root token are displayed below in case you want to
seal/unseal the Vault or re-authenticate.

Unseal Key: AfXL/4Tu82hTFkUEHZXrT+3PpuNntoe9NATed3EKke0=
Root Token: groot

Development mode should NOT be used in production installations!
Leave Vault running in dev mode and open a new terminal window.
Next, export the required Vault environment variables for the address and token.
$ export VAULT_ADDR="http://127.0.0.1:8200"; export VAULT_TOKEN="groot"
Then enable the ssh secrets engine at ssh-client-signer/.
$ vault secrets enable -path=ssh-client-signer ssh

Success! Enabled the ssh secrets engine at: ssh-client-signer/

Define the controller policy
As described in the Vault Credential Brokering Quickstart tutorial, the following Vault policy must be defined for the Boundary controller to support credential brokering.
Write the controller policy to Vault.
$ vault policy write boundary-controller -<<EOF
path "auth/token/lookup-self" {
  capabilities = ["read"]
}
path "auth/token/renew-self" {
  capabilities = ["update"]
}
path "auth/token/revoke-self" {
  capabilities = ["update"]
}
path "sys/leases/renew" {
  capabilities = ["update"]
}
path "sys/leases/revoke" {
  capabilities = ["update"]
}
path "sys/capabilities-self" {
  capabilities = ["update"]
}
EOF
Define the credential and ssh policies
Vault requires an SSH policy to issue, sign, and update credentials.
Write the ssh policy to Vault.
$ vault policy write ssh -<<EOF
path "ssh-client-signer/issue/boundary-client" {
  capabilities = ["create", "update"]
}

path "ssh-client-signer/sign/boundary-client" {
  capabilities = ["create", "update"]
}
EOF
Lastly, create a role for testing the certificates.
$ vault write ssh-client-signer/roles/boundary-client -<<EOF
{
    "key_type": "ca",
    "allow_user_certificates": true,
    "default_user": "admin",
    "default_extensions": {
        "permit-pty": ""
    },
    "allowed_users": "*",
    "allowed_extensions": "*"
}
EOF
Create a Vault token
Create the a Vault token to be used by Boundary later on, and export it as the
$CRED_STORE_TOKEN variable**.
$ export CRED_STORE_TOKEN=$(vault token create \
    -format=json \
    -no-default-policy=true \
    -policy="boundary-controller" \
    -policy="ssh" \
    -orphan=true \
    -period=24h \
    -renewable=true | \
    jq -r '.auth.client_token')
$ echo $CRED_STORE_TOKEN
hvs.CAESIL1WVudMz-rmTq5ZofAYPD8Vqgy7g8HC09DGj20CPH-3Gh4KHGh2cy5RZDFKb2NQcGN6V1dsM3ExSzJ2ZEdRNjU
Deploy a self-managed worker
An HCP worker deployed on the same network as Vault is required for integrating private Vault clusters with HCP Boundary. Additionally, a self-managed worker is also needed to route traffic to targets on private networks, like the Docker container in this tutorial. To learn more about setting up self-managed workers, refer to the Self-Managed Worker Registration with HCP Boundary tutorial.
Download the Boundary Enterprise binary
Download the Boundary Enterprise binary to the ~/boundary/ directory.
You can manually download the latest binary for your operating system by navigating to the Boundary releases page. The following example demonstrates downloading the binary using the command line.
Below is an example of downloading and unzipping the Boundary Enterprise binary on Ubuntu, MacOS, and Windows.
The following command downloads the Boundary Enterprise binary and unzips it to the current directory.
$ wget -q https://releases.hashicorp.com/boundary/0.13.0+ent/boundary_0.13.0+ent_linux_amd64.zip ;\
sudo apt-get update && sudo apt-get install unzip ;\
unzip *.zip
Once downloaded, verify the version of the boundary Boundary.
$ ./boundary version

Version information:
  Build Date:          2023-06-07T16:41:10Z
  Git Revision:        fb4ed58459d555d480e70ddc20d2639c26ad0f8f
  Metadata:            ent
  Version Number:      0.13.0+ent
Ensure the Version Number matches the version of the HCP Boundary control plane. They should match in order to get the latest HCP Boundary features.
Write the worker configuration
Next, open the worker.hcl file with a text editor.
Update the worker configuration file:
~/boundary/worker.hcl
disable_mlock = true

hcp_boundary_cluster_id = "<cluster-id>"

listener "tcp" {
  address = "127.0.0.1:9202"
  purpose = "proxy"
}

worker {
  auth_storage_path = "/home/myusername/boundary/worker1"
  tags {
    type = ["worker", "vault"]
  }
}
Update the cluster id in the worker.hcl file:
The <cluster-id> on line 3 can be determined from the UUID in the HCP
Boundary Cluster URL. For example, if your Cluster URL is:
https://c3a7a20a-f663-40f3-a8e3-1b2f69b36254.boundary.hashicorp.cloud,
then the cluster id is c3a7a20a-f663-40f3-a8e3-1b2f69b36254
The auth_storage_path should match the full path to the ~/boundary/worker1
directory, such as /home/myusername/boundary/worker1.
Save this file.
Start the worker
With the worker configuration defined, start the worker server. Specify the
full path to the worker configuration file
(such as /home/myusername/boundary/worker.hcl).
$ ./boundary server -config="/home/myusername/boundary/worker.hcl"

==> Boundary server configuration:

                               Cgo: disabled
                        Listener 1: tcp (addr: "127.0.0.1:9202", max_request_duration: "1m30s", purpose: "proxy")
                         Log Level: info
                             Mlock: supported: false, enabled: false
                           Version: Boundary v0.13.0+ent
                       Version Sha: fb4ed58459d555d480e70ddc20d2639c26ad0f8f
        Worker Auth Current Key Id: preaching-favored-verbalize-widen-duchess-relish-jurist-sly
  Worker Auth Registration Request: GzusqckarbczHoLGQ4UA25uSRmUHY1BGSRA6cePp8RWHQFUYSrf3hnDw4ETPswFnMrcxx6tq7BUWD5azGULzPecPicuYGD6qg3qYvaGRgHgKwvh9FLY9Gu891KSj8hAef19JjHog8d7qpo9f9KoiwrhfcV2YxGyVu1P943656iNGCFHWiBR3ofsyTatQ7fzcMV2ciKtuYYGfx4FfiRStnkAzoE98RdR2LeCk2huRkFt7ayeeWVfD7Awm8xaZfFJn4pYRJwu2LRBeNs915warEBaS8XHXSKoi3cRUYif8Qu
          Worker Auth Storage Path: /home/ubuntu/boundary/worker1
          Worker Public Proxy Addr: 127.0.0.1:9202

==> Boundary server started! Log data will stream in below:

{"id":"Rb7PMMBdZa","source":"https://hashicorp.com/boundary/ip-172-31-84-100/worker","specversion":"1.0","type":"system","data":{"version":"v0.1","op":"worker.(Worker).StartControllerConnections","data":{"msg":"Setting HCP Boundary cluster address e58fe114-7624-431c-994d-b6670e90b09f.proxy.boundary.hashicorp.cloud:9202 as upstream address"}},"datacontentype":"application/cloudevents","time":"2022-09-19T22:16:38.770232603Z"}
The worker will start and begin attempting to connect to the upstream Controller.
The worker also outputs its authorization request as the Worker Auth
Registration Request token. This will also be saved to a file,
auth_request_token, defined by the auth_storage_path in the worker config.
Note the Worker Auth Registration Request: value. This value can also be
located in the ~/boundary/worker1/auth_request_token directory. Copy this
value.
Register the worker with HCP
Workers can be registered using the Boundary CLI or Admin Console Web UI.
Workers can be registered and managed via the Boundary Admin Web UI.
Authenticate to HCP Boundary as the admin user:
Log in to the HCP portal.
From the HCP Portal's Boundary page, click Open Admin UI - a new page will open.
Enter the admin username and password you created when you deployed the new instance and click Authenticate.
Once logged in, navigate to the Workers page.
Notice that only HCP workers are listed.
Click New.
Scroll down to the bottom of the New Worker page and paste the Worker Auth Registration Request key you copied earlier.
Click Register Worker.


Click Done and notice the new worker on the Workers page.


Set up an SSH target
Next, set up a target to test certificate injection using Vault.
The example below demonstrates configuring a Debian or RHEL target.
First, generate the CA key for signing certificates and add it to Vault. Note that
the jq utility is used to parse the public key. Refer back to the tutorial
prerequisites if you need to install jq.
$ vault write -format=json ssh-client-signer/config/ca generate_signing_key=true | \
    jq -r '.data.public_key' > ca/ca-key.pub
The command above has Vault generate a signing certificate, and then jq is used
to store the key at ca/ca-key.pub.
Next, set up SSH on the target to trust the CA.
Copy the /ca directory to the target at /ca.
Next, execute the following commands on the target:
$ cp /ca/ca-key.pub /etc/ssh/ca-key.pub \
chown 1000:1000 /etc/ssh/ca-key.pub \
chmod 644 /etc/ssh/ca-key.pub \
echo TrustedUserCAKeys /etc/ssh/ca-key.pub >> /etc/ssh/sshd_config
Lastly, restart ssh.
$ sudo systemctl restart ssh.service
Next, skip to the Set up Boundary section.
Deploy an openssh-server target on Docker for testing credential injection.
For the purposes of this tutorial, create an ssh keypair that Vault can use when signing certificates.
First, open a terminal session and create a new directory to store the keypair
in. This tutorial recommends creating the openssh directory within your home
directory at ~/. You can place this directory elsewhere if desired, so
long as you deploy the Docker container in the same directory.
$ mkdir openssh/ && cd openssh/
Now create two new directories, ca/ and custom-cont-init.d/.
$ mkdir ca/ && mkdir custom-cont-init.d/
Set up the CA key
Next, generate the CA key for signing certificates and add it to Vault. Note that this example uses the jq utility to parse the public key. Refer back to the tutorial prerequisites if you need to install jq.
$ vault write -format=json ssh-client-signer/config/ca generate_signing_key=true | \
    jq -r '.data.public_key' > ca/ca-key.pub
The command above has Vault generate a signing certificate, and then use jq
to store the key at ca/ca-key.pub. You will copy this directory onto the
docker container target in a moment, so the target has access to the CA's public
key.
Next, create an open-ssh container startup script. This script sets appropriate permissions on the CA public key so the open-ssh server will trust the Vault CA.
$ cat > custom-cont-init.d/00-trust-user-ca -<<EOF
#!/usr/bin/with-contenv bash

cp /ca/ca-key.pub /etc/ssh/ca-key.pub
chown 1000:1000 /etc/ssh/ca-key.pub
chmod 644 /etc/ssh/ca-key.pub
echo TrustedUserCAKeys /etc/ssh/ca-key.pub >> /etc/ssh/sshd_config
echo PermitTTY yes >> /etc/ssh/sshd_config
sed -i 's/X11Forwarding no/X11Forwarding yes/' /etc/ssh/sshd_config
echo "X11UseLocalhost no" >> /etc/ssh/sshd_config

apk update
apk add xterm util-linux dbus ttf-freefont xauth firefox
EOF
Deploy the target
Ensure Docker is running, and then deploy the OpenSSH container.
Supply the following options to docker run:
- The absolute path to the
ca/andcustom-cont-init.d/directories created earlier after the--volume=option,** for example at/Users/myusername/openssh/caand/Users/myusername/openssh/custom-cont-init.d/.
This will deploy the OpenSSH container, and mount the ca/ and
custom-cont-init.d/ folder contents as shared volumes.
Update lines 10 and 11 with correct local paths, then execute the following
command from the openssh/ directory.
$ docker run -d \
--name=openssh-server \
--hostname=openssh-server \
-e SUDO_ACCESS=false \
-e PUID=1000 \
-e PGID=1000 \
-e USER_NAME=admin \
-p 2222:2222 \
--restart unless-stopped \
-v /path/to/ca:/ca \
-v /path/to/custom-cont-init.d/:/custom-cont-init.d \
lscr.io/linuxserver/openssh-server:latest
Note that the username for the OpenSSH server is admin, and the target is
available on your localhost at port 2222 (127.0.0.1:2222).
Leave this container running during the tutorial.
Set up Boundary
Start by logging in to HCP Boundary within the terminal.
Log in to the HCP portal.
From the HCP Portal's Boundary page, click Open Admin UI - a new page will open.
Enter the admin username and password you created when you deployed the new instance and click Authenticate.
Next, set up a new ssh testing org and project scope.
Navigate to the Orgs page, and click New Org.
Fill out the new org form with a Name of
testing-organd Description ofSSH testing org. Click Save.From within the new org, click New Project.
Fill out the new project form with a Name of
ssh-projectand Description ofSSH test machines. Click Save.
Create a credential store
Next, create a new credential store within Boundary using the new token. Use
the vault credential store type for Vault integration, but you can also
use static credential stores with credential injection.
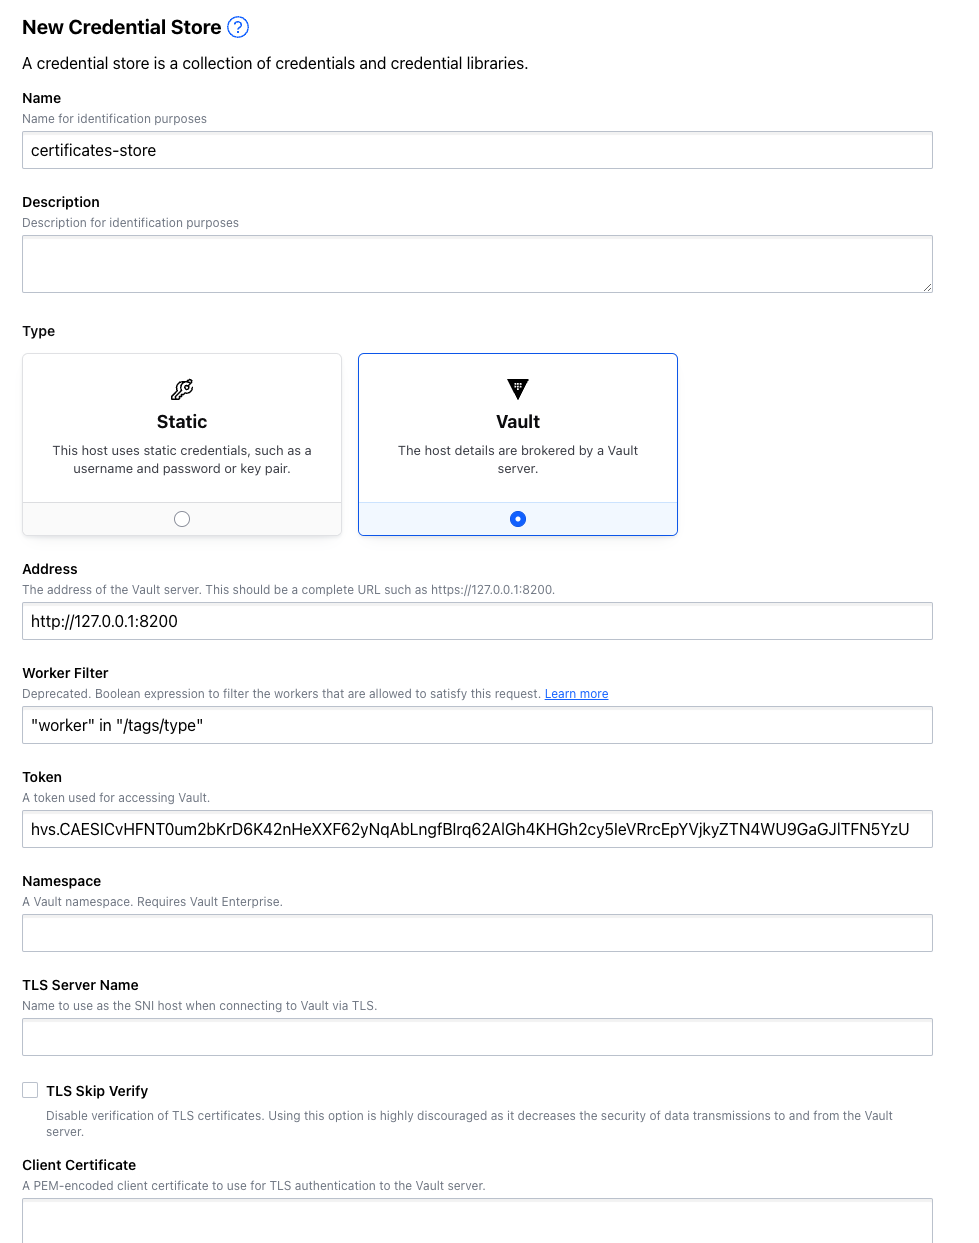
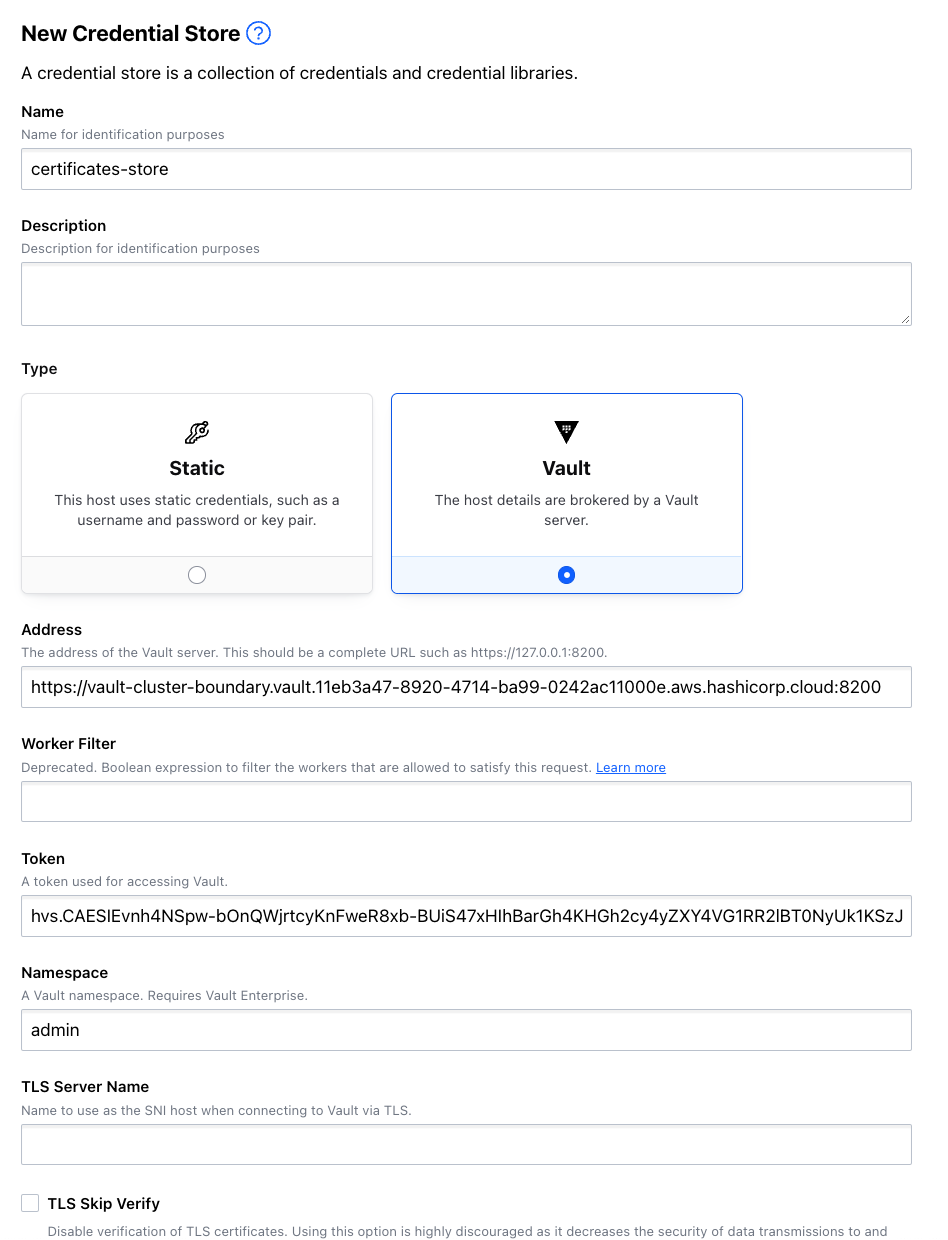
Create a new Vault credential store.
Navigate to the Credential Stores page, and click New Credential Store.
Fill out the New Credential Store form. Supply the Credential Store Token copied earlier for the Token value:
- Name:
certificates-store - Type:
Vault - Address:
http://127.0.0.1:8200 - Worker Filter:
"vault" in "/tags/type" - Token: <CRED_STORE_TOKEN>
Click Save.
- Name:
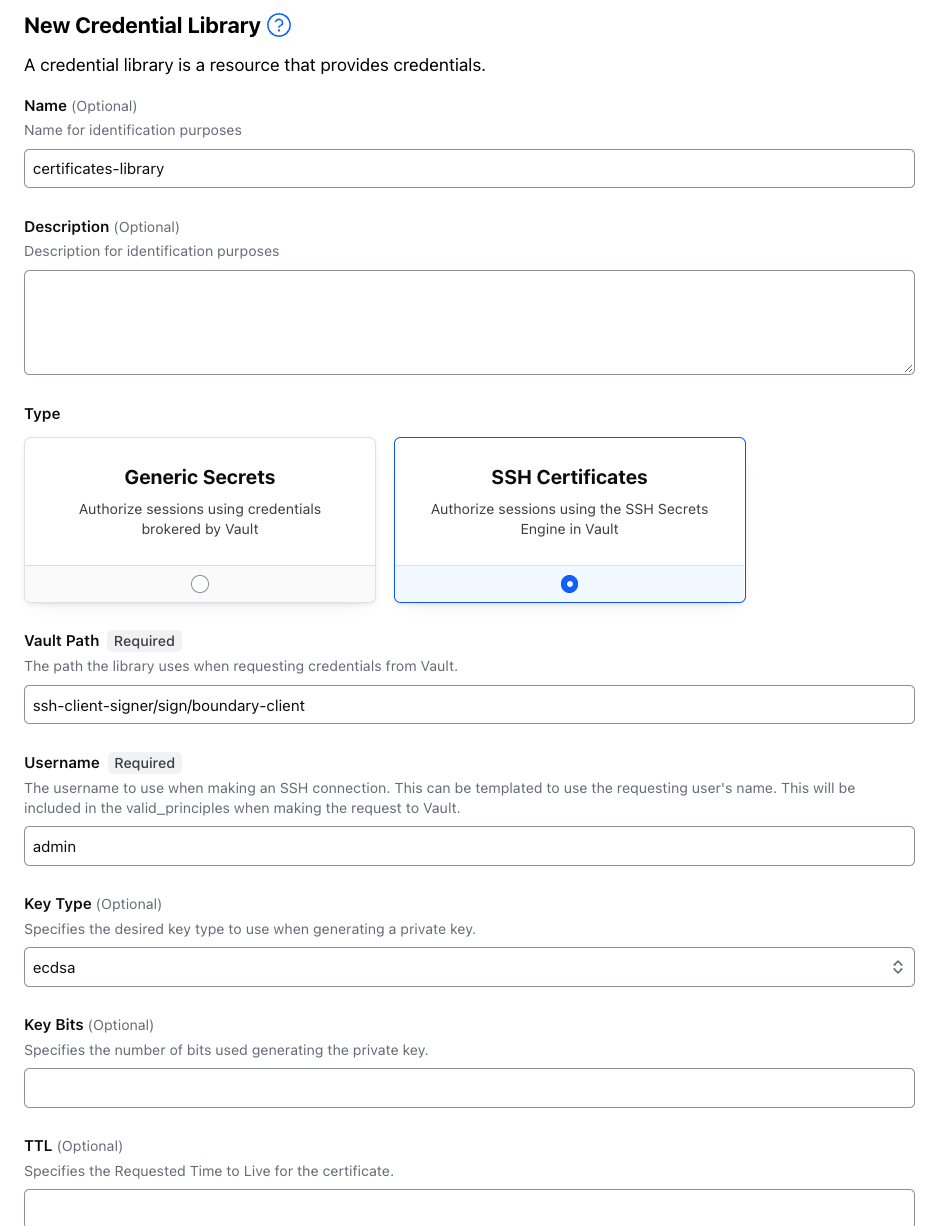
Create a credential library
Create a new credential library of type vault-ssh-certificate within
Boundary using the credential store ID and passing the vault-path of
ssh-client-signer/sign/boundary-client.
Click the newly created certificates-store. Navigate to the Credential Libraries tab. Click the Mange dropdown and select New Credential Library.
Select a Type of SSH Certificates and fill out the New Credential Library form:
- Name:
certificates-library - Type:
SSH Certificates - Vault Path:
ssh-client-signer/sign/boundary-client - Username:
admin - Key Type:
ecdsa - Key Bits:
521 - Extensions: Key:
permit-pty
Click Save.
- Name:
Create an SSH target
Create a new target of type ssh and set its address to 127.0.0.1 and default
port to 2222.
Navigate to the Targets page and click New Target.
Fill out the New Target form. Select a Type of SSH.
- Name:
openssh-target - Type:
SSH - Target Address:
127.0.0.1 - Default Port:
2222 - Maximum Connections:
-1
Click Save.
- Name:
Select the Workers tab.
Next to Egress workers, click Edit worker filter.
An egress worker filter specifies which worker has access to the target, such as a worker deployed in the same network as the target. An ingress worker specifies how to route a Boundary client to the target network, and is not used in this example.
Paste in the following filter expression. When finished, click Save.
"worker" in "/tags/type"
Now associate the SSH target with the SSH credential library.
Click on the new
openssh-targetto view its details page.Select the Injected Application Credentials tab. Click +Add Injected Application Credentials.
Select the
certificates-librarycredential of typeSSH Certificates.Click Add Injected Application Credentials.
Inject certificates into sessions
Now you are ready to inject certificates directly into a shell session. You can
accomplish this using the Boundary Desktop App, or by using the boundary
connect command.
To log into Boundary using the Desktop App, you must gather the BOUNDARY_ADDR (Boundary cluster address) and BOUNDARY_AUTH_METHOD_ID (user Auth Method ID) values from the HCP Boundary Admin Console, as demonstrated in the HCP
Boundary Getting Started
tutorial.
Open the Boundary desktop app.
Enter the Boundary cluster URL (for example,
https://ffee961b-5fd8-4e68-ba1d-2bbb487b576e.boundary.hashicorp.cloud) and
click Submit.
Authenticate using your HCP Boundary user credentials.


Under the Targets page, notice the target details for ssh-target.

Click Connect to initiate a session.

The Successfully Connected page will display the target ID (Target Connection details) and Proxy URL.
To start a session, open your terminal or SSH client. You can start a session using SSH, and the Proxy URL from the Boundary desktop app.
For the OpenSSH docker target, connect on 127.0.0.1 and specify the proxy
port using the -p option. Enter yes when prompted to establish a connection.
$ ssh 127.0.0.1 -p 51968

The authenticity of host '[127.0.0.1]:2222 ([127.0.0.1]:2222)' can't be established.
ECDSA key fingerprint is SHA256:SzGEXZDM/6u0/9lcO8EDADHXzDsemSFaL6Q36KBrlhQ.
Are you sure you want to continue connecting (yes/no/[fingerprint])? yes
Warning: Permanently added '[127.0.0.1]:2222' (ECDSA) to the list of known hosts.
Welcome to OpenSSH Server

openssh-server:~$
$ Error from controller when performing authorize-session action against given target

Error information:
  Kind:                FailedPrecondition
  Message:             No egress workers can handle this session, as they have all been filtered
  out.
  Status:              400
  context:             Error from controller when performing authorize-session action against
  given target
The error information states that No egress workers can handle this session, as they have all been filtered.
This implies that Boundary does not understand which worker should handle the session, and cannot route traffic through the worker it selected.
In this example the error can be due to either of the following conditions:
- Boundary is unable to log into Vault using the provided credential store token.
- The OpenSSH target's egress worker filter is unset, or incorrect.
First, troubleshoot the Vault credential store by generating a new Vault token.
$ export CRED_STORE_TOKEN=$(vault token create \
  -no-default-policy=true \
  -policy="boundary-controller" \
  -policy="kv-read" \
  -orphan=true \
  -period=20m \
  -renewable=true \
  -field=token) && echo $CRED_STORE_TOKEN
Copy this token (such as hvs.CAESIAbmG5WIi0qILYm87ucbJSGa0rv879aJAchvFR6wG0pbGh4KHGh2cy5xY1BzTGpHUW91ZEx4ZGFTcFVDTkdPMTY), and then update Boundary's Vault cred store with the new token value.
Update the token within the Admin Console UI:
Navigate to the Admin Console in the web browser and authenticate as the admin user.
Navigate to the Credential Stores view within the
ssh-projectscope.Click on the
certificates-store, and then click on thecertificates-library.Click the Edit Form button in the credential library's details page. Paste the updated CRED_STORE_TOKEN value into the Token field, then click Save.
With an updated Vault credential store token in place, attempt to connect to the target again using the Desktop App.
If you are still unable to establish a connection, check that you correctly defined the worker filter on the SSH target.
Update the worker filter for the openssh target:
Click on the Targets view within the
ssh-projectscope.Click on the
openssh targetto view its details. Select the Workers tab. Verify that Egress workers contains the following filter expression:"worker" in "/tags/type"If incorrect, click Edit worker filter and update the filter to match.
Click Save when finished.
With the updated token in place, attempt to connect to the SSH target again.
When finished, the user can close the connection to the server by entering
exit, or directly cancel the session from the Boundary desktop app
under the Sessions view.
Cleanup and teardown
Locate the terminal session used to execute the vault dev server command, and
execute ctrl+c to stop Vault.
Unset the environment variables used in any active terminal windows for this tutorial.
$ unset VAULT_ADDR; unset VAULT_TOKEN
Destroy the openssh-server container created for the tutorial.
$ docker rm -f openssh-server
Check your work by executing docker ps and ensure there are no more containers
from the tutorial leftover. If unexpected containers still exist, execute
docker rm -f <CONTAINER_ID> against each to remove them.