Vault Agent and proxy quick start
What is Vault Agent?
Vault Agent behaves as a client-side daemon to make requests to Vault on behalf of the client application. This includes the authentication to Vault.
Vault clients (human users, applications, etc.) must authenticate with Vault and get a client token to make API requests. Because tokens have time-to-live (TTL), the clients must renew the token's TTL or re-authenticate to Vault based on its TTL. Vault Agent authenticates with Vault and manage the token's lifecycle so that the client application doesn't have to.
In addition, you can inject the Consul Template markup into Vault Agent so that secrets can be rendered to files where the client application load data from.
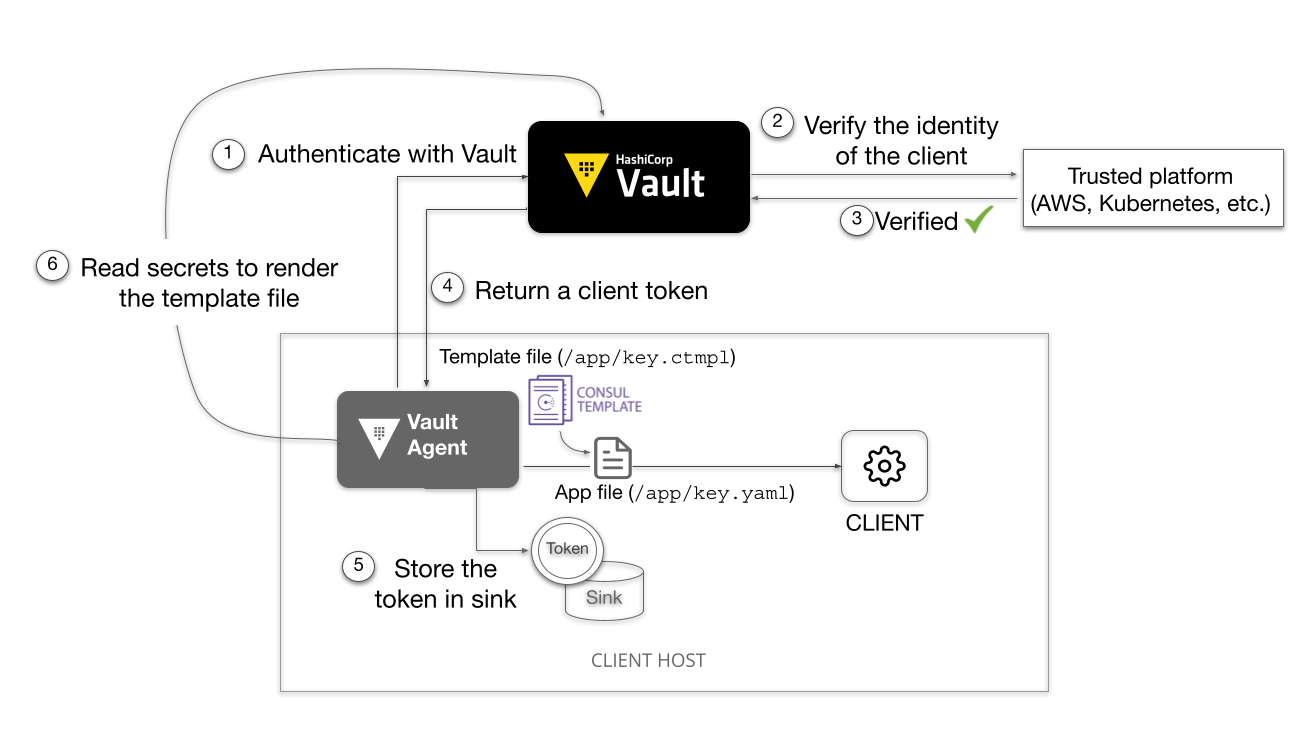
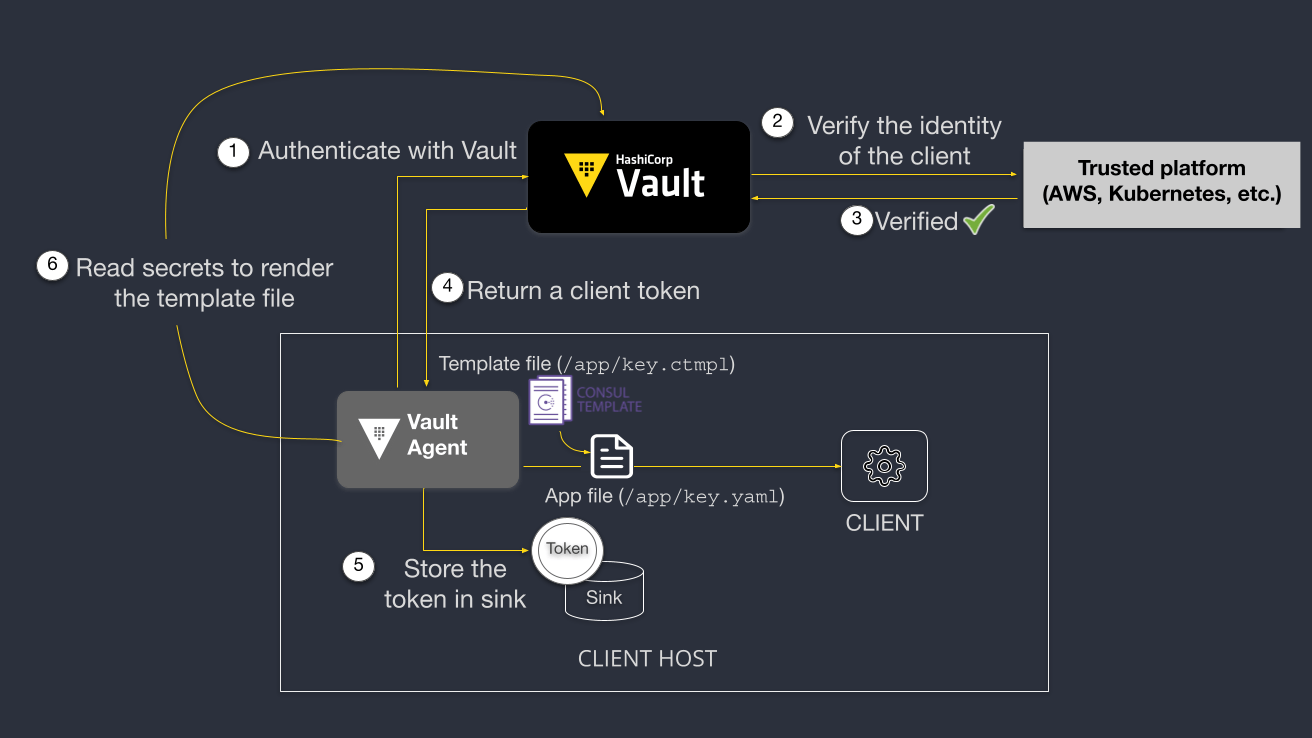
This eliminates the need to change your application code to invoke the Vault API. Your existing applications can remain Vault-unaware.
Prerequisites
To complete this tutorial, you need to install a Vault binary.
Launch Terminal
This tutorial includes a free interactive command-line lab that lets you follow along on actual cloud infrastructure.

Lab setup
Open a terminal and start a Vault dev server with
rootas the root token value.The Vault dev server defaults to running at
127.0.0.1:8200. The server is also initialized and unsealed.Insecure operation: Do not run a Vault dev server in production. This approach is only used here to simplify the unsealing process for this demonstration.
Export an environment variable for the
vaultCLI to address the Vault server.Log into Vault.
Tip
Vault server is ready and the token value (
root) was written to the file$HOME/.vault-token.
Create a working directory
Create a directory where you generate test files.
You will read the created secrets using Vault Agent.
Create test data
Create a mock data file.
Create the mock data in the KV v2 secrets engine.
Start a Vault Agent
Start a Vault Agent instance that connects to the Vault server running at
VAULT_ADDR.
Create the Vault Agent configuration file.
Note
As of Vault 1.13.0, you can use the client token stored in a file (
token_file_path). This is a convenient way to authenticate the Vault Agent with Vault server during development. For production deployment, use one of the supported auth methods.Start a Vault Agent.
Example output:
At this point, you still need to change your client application to make Vault
requests targeting to VAULT_ADDR using the Vault token stored in the sink
location ($HOME/vault-token-via-agent).
Next, explore other Vault Agent features.
Modify the Vault Agent configuration
Starting Vault 1.13.0, you can specify multiple Vault Agent configuration files.
Or, point to a directory where configuration files are located.
In this section, you are going to define additional Vault Agent configurations.
Define Vault Agent template
In the following scenario, the client application loads data read from customer.json.
Press Ctrl + C to stop the running Vault Agent.
Create a
customer.json.tmplfile.Create a Vault Agent configuration file with
templatestanza.Start Vault Agent again with additional configuration.
Example output:
Open a new browser or text editor and verify that the
customer.jsonfile has the secrets retrieved from Vault.This should match to the data stored in
secret/.If the template fails, make sure that the
VAULT_NAMESPACEvariable is set.
The client application was designed to load data from the customer.json file.
By leveraging the Vault Agent Template feature, you did not have to make any
code change to the client application while your secrets are managed by Vault.
Vault Agent logs
You can specify the behavior of Vault Agent logs using command flag, environment variable, or configuration parameters.
Start Vault Agent with the
-log-filecommand flags which defines the prefix for the log file.The command generates a log file named
$HOME/vault-test/vault-agent-{timestamp}.log.Verify the generated log file.
You can open the file to verify its content.
Tip
To see the full list of available parameters, refer to the Vault Agent documentation.
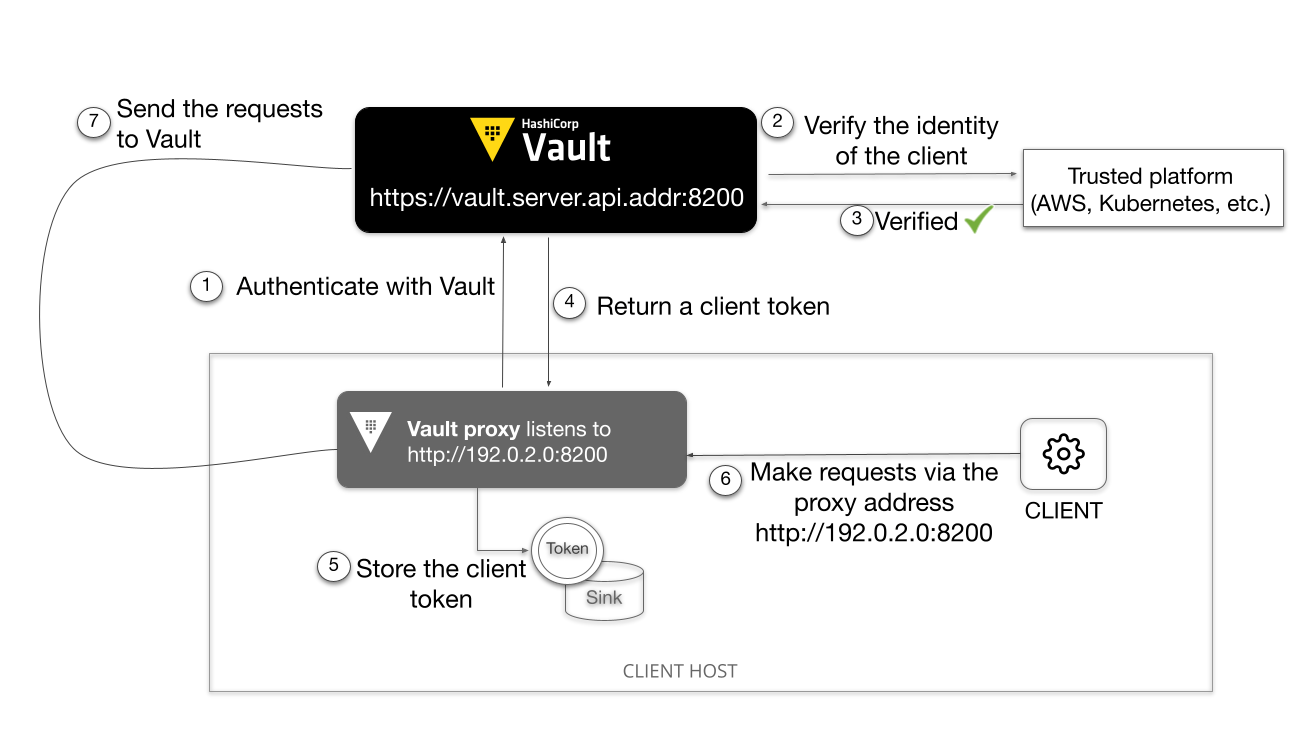
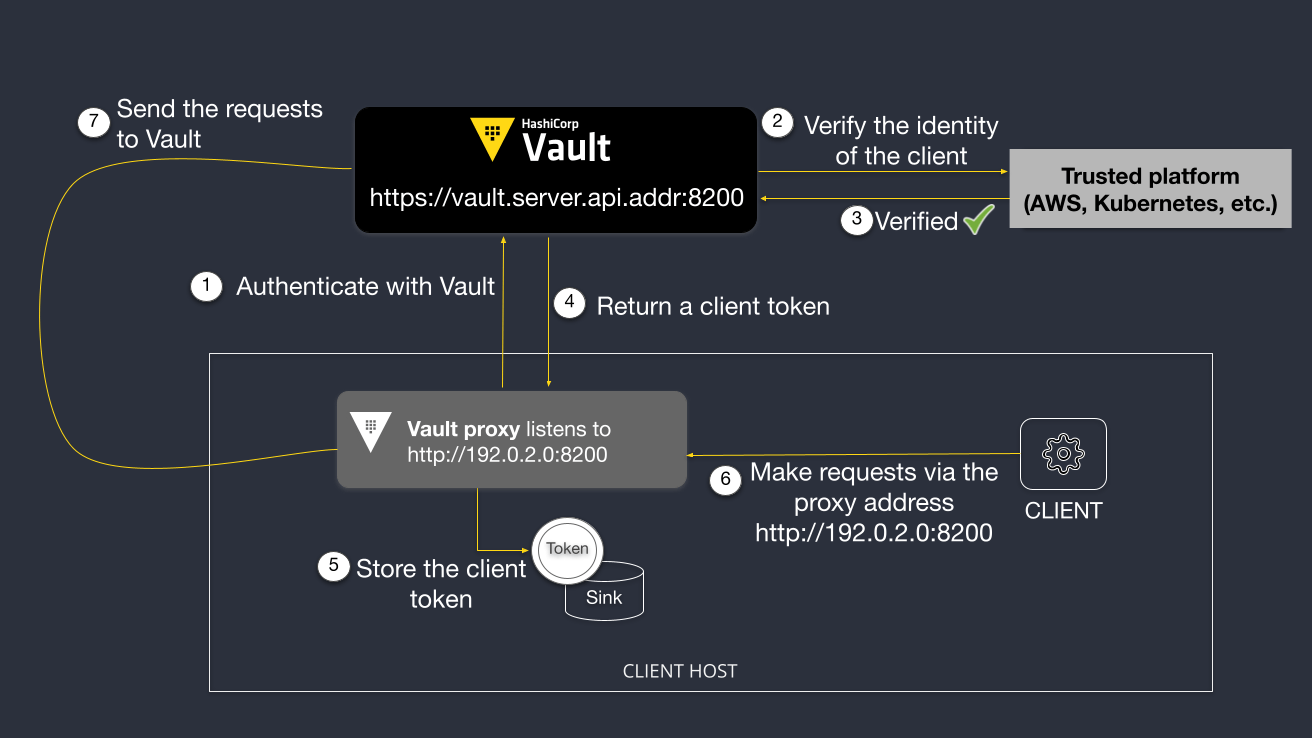
Vault proxy
Vault proxy acts as a proxy between Vault and its client applications. See the Vault Agent and Vault proxy documentation page to learn the feature parity between Vault Agent and Vault proxy.
Feature deprecation
Vault Agent also offers an API proxy functionality which works the same way as to Vault Proxy; however, it will be deprecated. Therefore, this section focuses on the Vault proxy.
Configure Vault proxy
You can define an API endpoint that the client application can send requests to
the endpoint rather than VAULT_ADDR.
Press Ctrl + C to stop the running Vault Agent.
Create a file that defines the
listenerstanza andapi_proxystanza.This configuration adds an endpoint to listen,
127.0.0.1:8100. You can add multiplelistenerstanzas. (See the Vault proxy documentation.)The
api_proxystanza enables theuse_auto_auth_tokenparameter. When enabled, Vault Agent will use the auto-auth token for proxied requests that do not carry their own token. Therefore, requests will use the auto-auth token without needing to provide theX-Vault-Tokenheader.Vault Enterprise 1.16 or later
Set the
cache_static_secretsparameter in thecachestanza to true to enable the static secrets caching feature which requires Vault Enterprise 1.16 or later. It enables Vault proxy to cache the static secrets read from the KV v1 and KV v2 secrets engines.Vault proxy's persistent caching is available with Vault Community Edition, which is currently supported only in a Kubernetes environment, and does not cache static secrets.
Start a Vaul proxy.
Vault Agent is now listening to the proxy addresses
http://127.0.0.1:8100.Open another command terminal, and send an API request to through the Vault proxy.
Read the secrets at
secret/customers/acmevia the proxy address.This example uses jq to process the JSON output for readability.
Output:
Note
Although no client token was provided in the API request (without the
X-Vault-Tokenheader), a token was automatically attached to the request by the Vault proxy because theuse_auto_auth_tokenparameter was set totruein the configuration.
Read the secrets again. This time, Vault proxy returns the cached secrets.
Tip
Use the
--verboseor-voption with the cURL command so that you can see more detail.Notice that the
X-CacheisHIT.Update the secrets to see what happens.
Read the secrets again via proxy.
The
Agevalue changed since the secrets were just updated.
Clean up
Press Ctrl + C to stop the running Vault Agent.
You can stop the Vault dev server by pressing Ctrl+C where the server is running. Or, execute the following command.
Unset the
VAULT_ADDRenvironment variable.Delete the
$HOME/vault-testdirectory.
Summary
This tutorial demonstrated the basics of Vault Agent. You learned:
- Minimum Vault Agent configuration
- Used templates to read secrets from Vault
- Define an API address that Vault Agent listens to
The use of Vault token file is an convenient way to quickly start the Vault Agent. For a production deployment, use one of the supported auth methods so that the Vault Agent can manage the lifecycle of the token properly.
See the following tutorials for auto auth examples:
The Vault Agent Template demonstrated that the client application can remain Vault-unaware while Vault manages the secrets.
See the following tutorials to see more template examples:
- Vault Agent Templates
- Read Secrets From Vault Using Vault Agent
- Using HashiCorp Vault Agent with .NET Core