• HashiCorp Developer

  • HashiCorp Cloud Platform
  • Terraform
  • Packer
  • Consul
  • Vault
  • Boundary
  • Nomad
  • Waypoint
  • Vagrant
Vault
  • Install
  • Tutorials
  • Documentation
  • API
  • Try Cloud(opens in new tab)
  • Sign up
HCP Vault

Skip to main content
3 tutorials
  • HCP Vault with Amazon Elastic Kubernetes Service
  • HCP Vault with AWS EKS and JWT Auth Method
  • Vault Agent with Amazon Elastic Container Service

  • Resources

  • Tutorial Library
  • Certifications
  • Community Forum
    (opens in new tab)
  • Support
    (opens in new tab)
  • GitHub
    (opens in new tab)
  1. Developer
  2. Vault
  3. Tutorials
  4. HCP Vault
  5. Vault Agent with Amazon Elastic Container Service

Vault Agent with Amazon Elastic Container Service

  • 1hr 30min

  • HCPHCP
  • VaultVault
  • TerraformTerraform

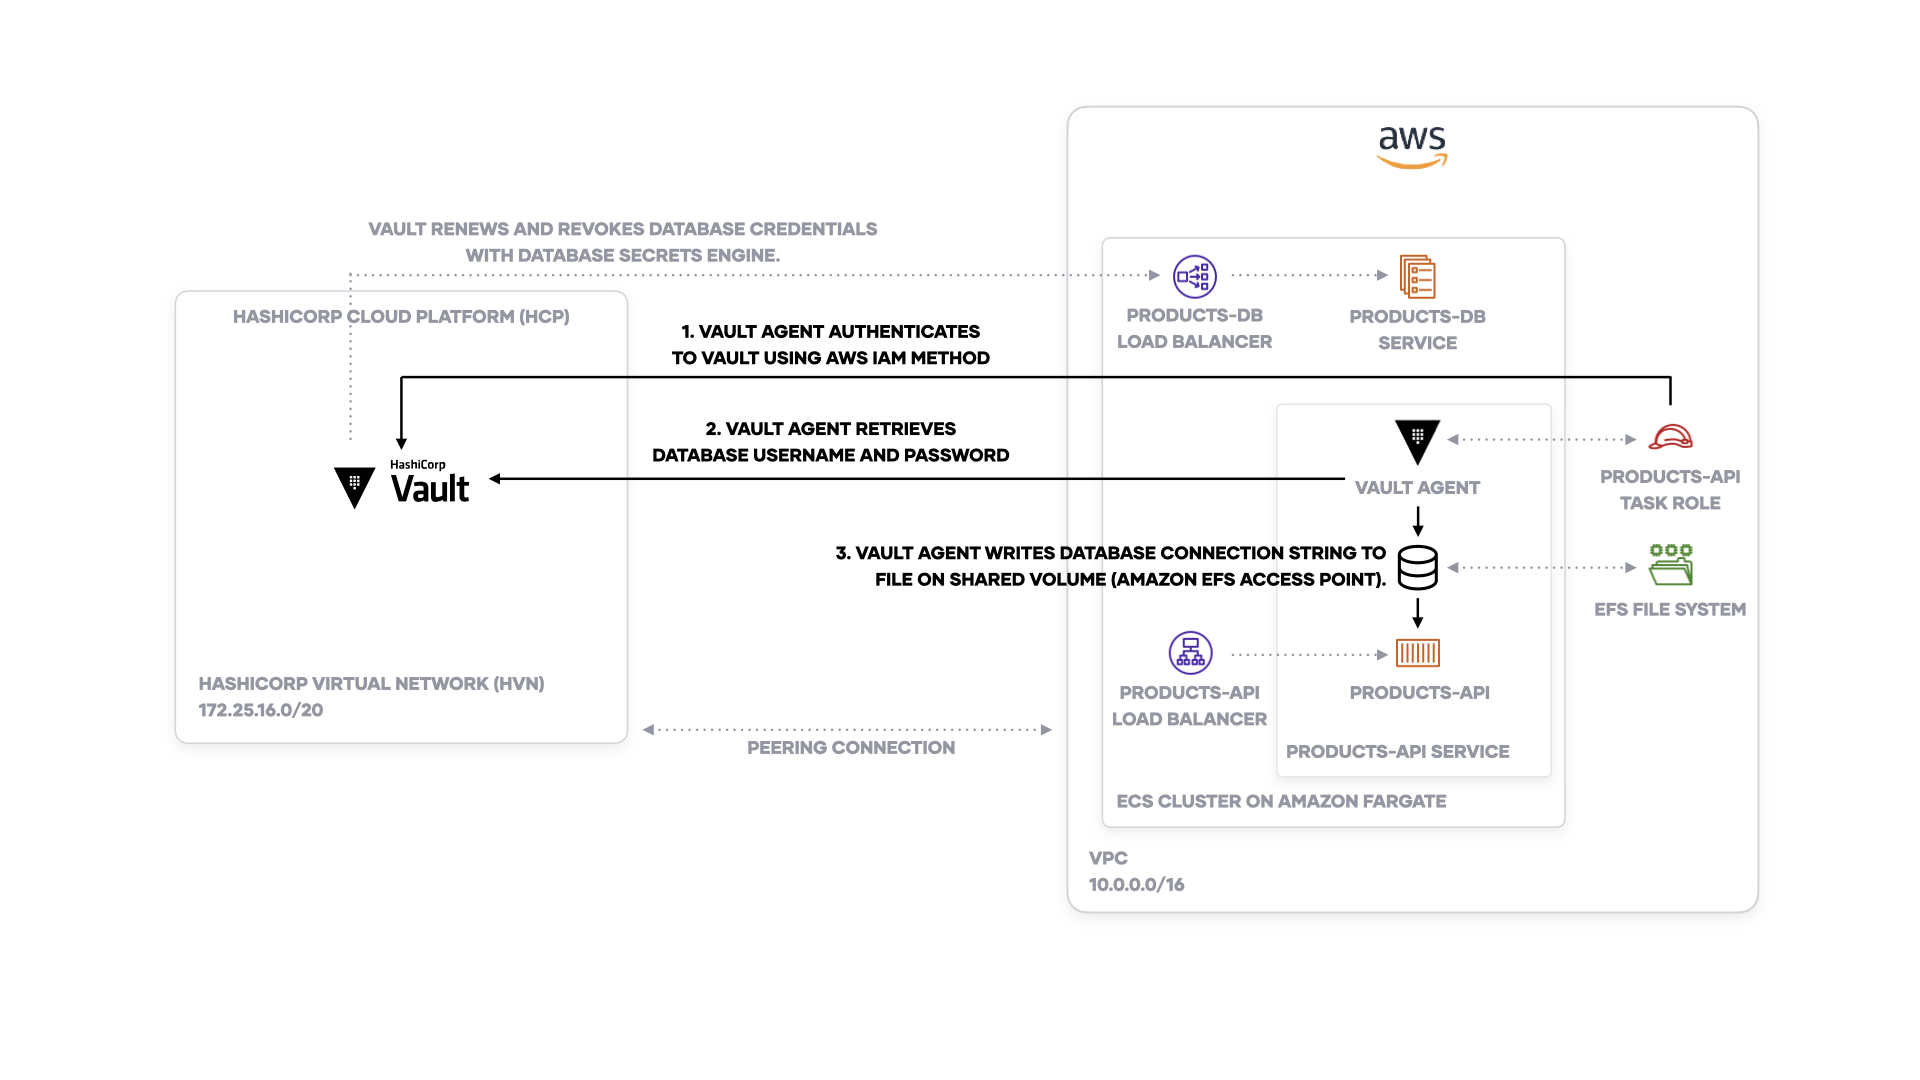
This tutorial covers the configuration required to allow an Amazon Elastic Container Service (ECS) task definition to retrieve a secret from HashiCorp Vault. You will configure an ECS task definition with sidecar container for Vault Agent that authenticates to Vault with the AWS Identity & Access Management (IAM) authentication method. The Vault Agent sidecar writes the secrets to a shared Amazon EFS volume for the application container to use.

The tutorial uses HashiCorp Cloud Platform (HCP) Vault, Amazon ECS on AWS Fargate and Amazon EFS volumes. However, you can adjust the configurations to work with any external Vault cluster outside of an Amazon ECS cluster and Amazon ECS on Amazon EC2.

First, you'll use Terraform to set up infrastructure in us-east-1 and configure the ECS task to authenticate to Vault. Your ECS task (called product-api) will use the AWS IAM auth method to authenticate to Vault using its task role. Then, the task retrieves a database username and password managed by the Vault database secrets engine. Finally, Vault Agent writes the database username and password to a shared volume for the application to use. Vault will need access to the database to configure secrets.

Example ECS task with Vault Agent connecting to HashiCorp Cloud Platform

Note: The Vault Agent on Amazon ECS container image and Terraform modules in this tutorial are created for demonstration purposes and not intended for production use! They can help you build your own secure container image to run Vault Agent on Amazon ECS.

Prerequisites

The following prerequisites are required:

  • git

  • AWS CLI v2.0 or later installed

  • Terraform v1.0 or later installed

  • Your AWS credentials configured locally. Copy the credentials and set them as environmnent variables in your terminal.

    Export the access key value.

    $ export AWS_ACCESS_KEY_ID=<your AWS access key ID>
    

    Export the secret access key value.

    $ export AWS_SECRET_ACCESS_KEY=<your AWS secret access key>
    

    Export the session token value.

    $ export AWS_SESSION_TOKEN=<your AWS session token>
    
  • Access to HashiCorp Cloud Platform via a service principal and key. Copy the credentials and set them as environmnent variables in your terminal.

    Export the client ID.

    $ export HCP_CLIENT_ID=<client id value previously copied>
    

    Export the client secret.

    $ export HCP_CLIENT_SECRET=<client secret value previously copied>
    

Clone vault-guides repository

Clone the demo assets from the hashicorp/vault-guides GitHub repository to perform the steps described in this tutorial.

$ git clone https://github.com/hashicorp/vault-guides.git

This repository contains supporting content for all of the Vault tutorials. The content specific to this tutorial can be found within a sub-directory.

Be sure to set your working directory to the vault-guides/identity/vault-agent-ecs folder.

$ cd vault-guides/identity/vault-agent-ecs

The working directory should contain the provided Terraform configurations:

$ ls -1

README.md
application
clean.sh
infrastructure
modules
set.sh
vault

Set up infrastructure

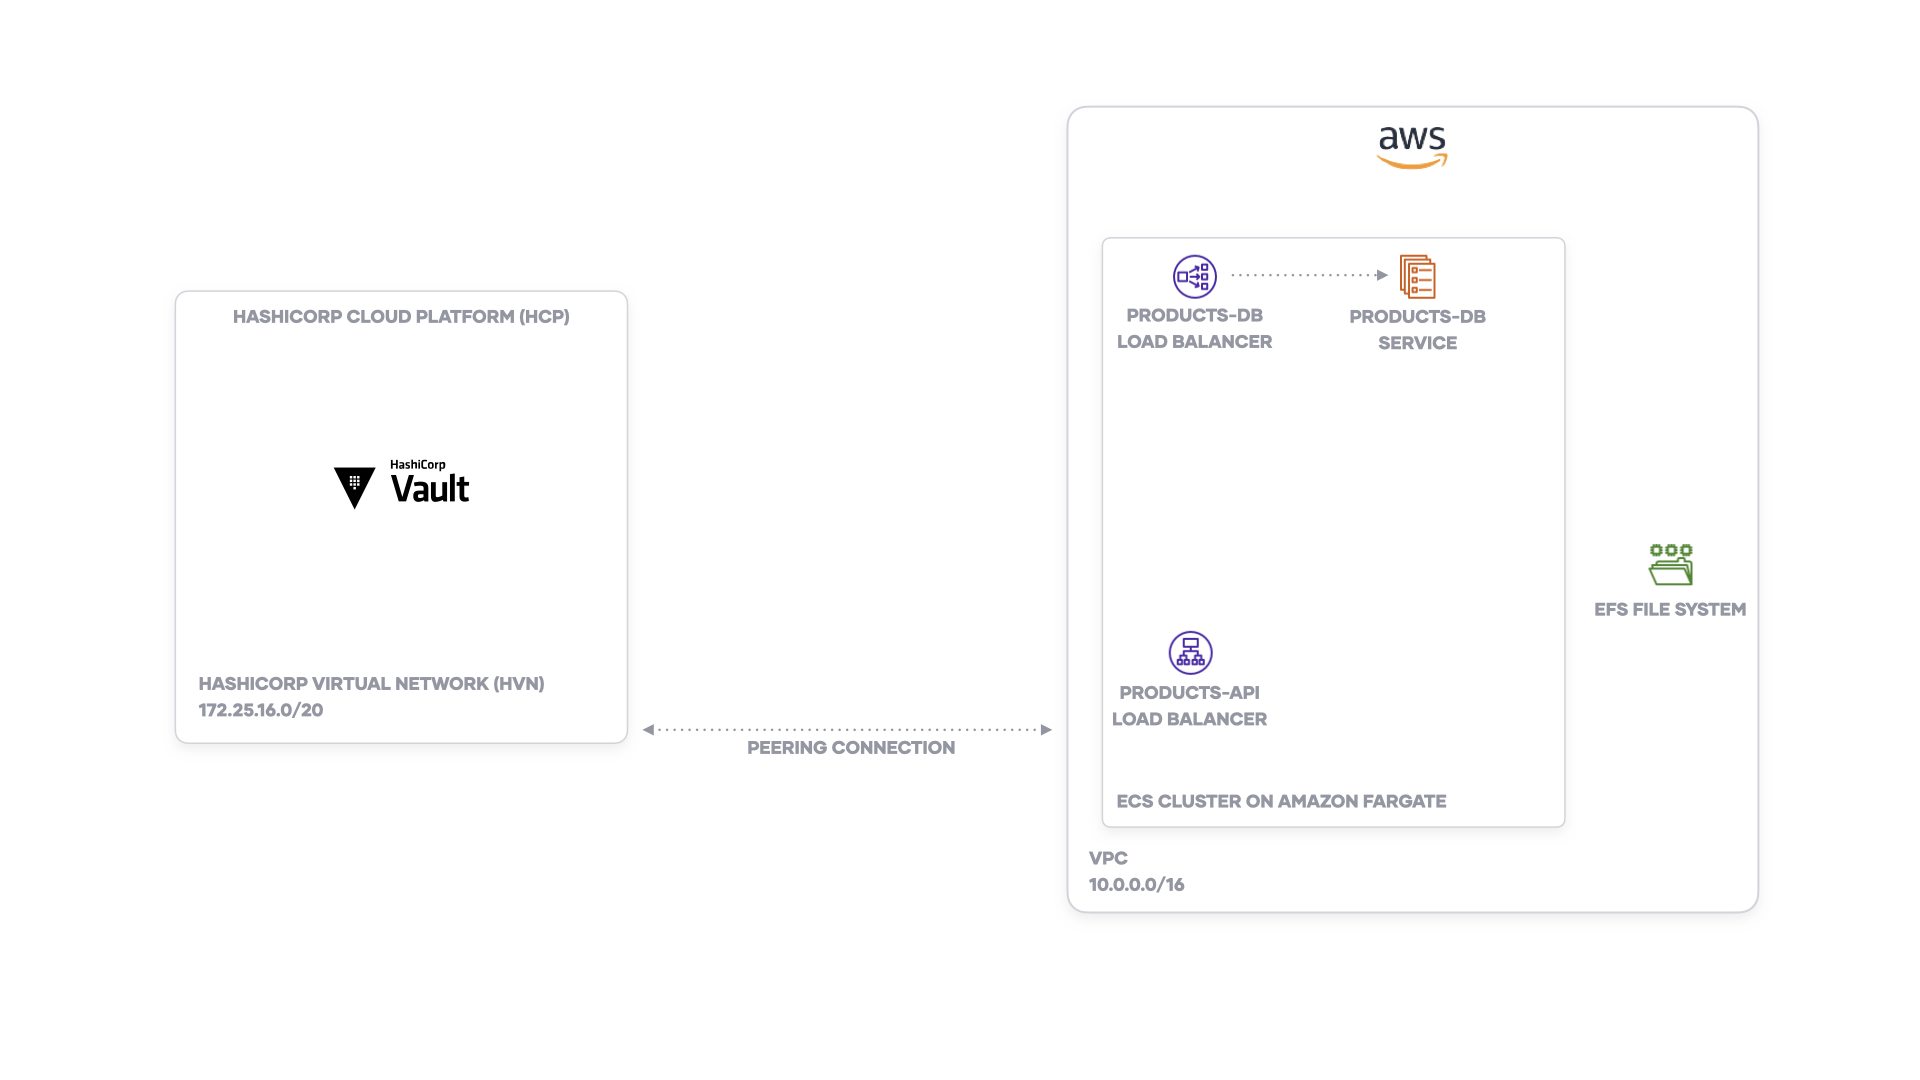
Before you can deploy an example service to Amazon ECS, you need to create the following:

  • Amazon ECS cluster using AWS Fargate
  • A database (Amazon ECS service) and load balancer endpoint
  • HCP Vault cluster
  • An application load balancer
  • Amazon EFS volume (for storing secrets rendered from Vault Agent)

You'll create these resources with Terraform.

Terraform sets up the ECS cluster, database, and Vault cluster

  1. Change your directory to the infrastructure/ folder, which contains the initial setup.

    $ cd infrastructure
    
  2. Verify that you are in the correct directory before proceeding.

    $ ls -1
    
    alb.tf
    database.tf
    ecs.tf
    efs.tf
    hcp.tf
    main.tf
    nlb.tf
    outputs.tf
    variables.tf
    vpc.tf
    
  3. Initialize Terraform.

    $ terraform init
    
    Initializing the backend...
    
    Initializing provider plugins...
    ...snip...
    
    Terraform has been successfully initialized!
    
  4. After Terraform is initialized, you can verify that it will create the resources with terraform plan.

    $ terraform plan
    
    An execution plan has been generated and is shown below.
    Resource actions are indicated with the following symbols:
    ...snip...
    
    Plan: 54 to add, 0 to change, 0 to destroy.
    

    You should note resources listed in the output.

  1. Deploy the resources with terraform apply.

    $ terraform apply
    
    ...snip...
    Do you want to perform these actions?
      Terraform will perform the actions described above.
      Only 'yes' will be accepted to approve.
    
      Enter a value:
    

    Confirm the run by entering yes. Once you confirm, Terraform may take 15 minutes or more to complete the deployment.

    Note: You may get an error that Terraform failed to find a routing table. This error results from a race condition with the peering connection to the HashiCorp Virtual Network (HVN). Re-run Terraform with terraform apply to resolve the error.

    If the deployment succeeds, Terraform outputs a set of resource IDs, endpoints, and secrets.

    Apply complete! Resources: 54 added, 0 changed, 0 destroyed.
    
    Outputs:
    
    database_security_group = "sg-0484d8fa6090becae"
    ecs_security_group = "sg-07b0e0d4d93ccfb30"
    efs_file_system_id = "fs-010f3743fcba7366f"
    hcp_vault_admin_token = <sensitive>
    hcp_vault_private_endpoint = <sensitive>
    hcp_vault_public_endpoint = <sensitive>
    private_subnets = [
      "subnet-08467661a0be7d175",
      "subnet-0d2a806c1fa614de3",
    ]
    product_api_efs_access_point_arn = <sensitive>
    product_api_efs_access_point_id = "fsap-0cc9a908d2fd17c41"
    product_api_endpoint = "learn-product-api-1153734907.us-east-1.elb.amazonaws.com"
    product_database_hostname = "learn-product-db-4052ce990fa0cebe.elb.us-east-1.amazonaws.com"
    product_database_password = <sensitive>
    product_database_username = "postgres"
    target_group_arn = <sensitive>
    
  2. Check that Terraform successfully deployed the database (called product-db) to your Amazon ECS cluster (called learn). The ECS service should have a running count of 1.

    $ aws ecs describe-services --cluster learn --region us-east-1 --services product-db --query 'services[0].runningCount'
    
    1
    
  3. Return your directory to the vault-guides/identity/vault-agent-ecs/ folder for the next step.

    $ cd ..
    

Set up Vault authentication methods and secrets engines

You deployed your infrastructure, including an Amazon ECS and HCP Vault cluster. However, you need to configure Vault with authentication methods and secrets engines in order for it to dynamically manage credentials.

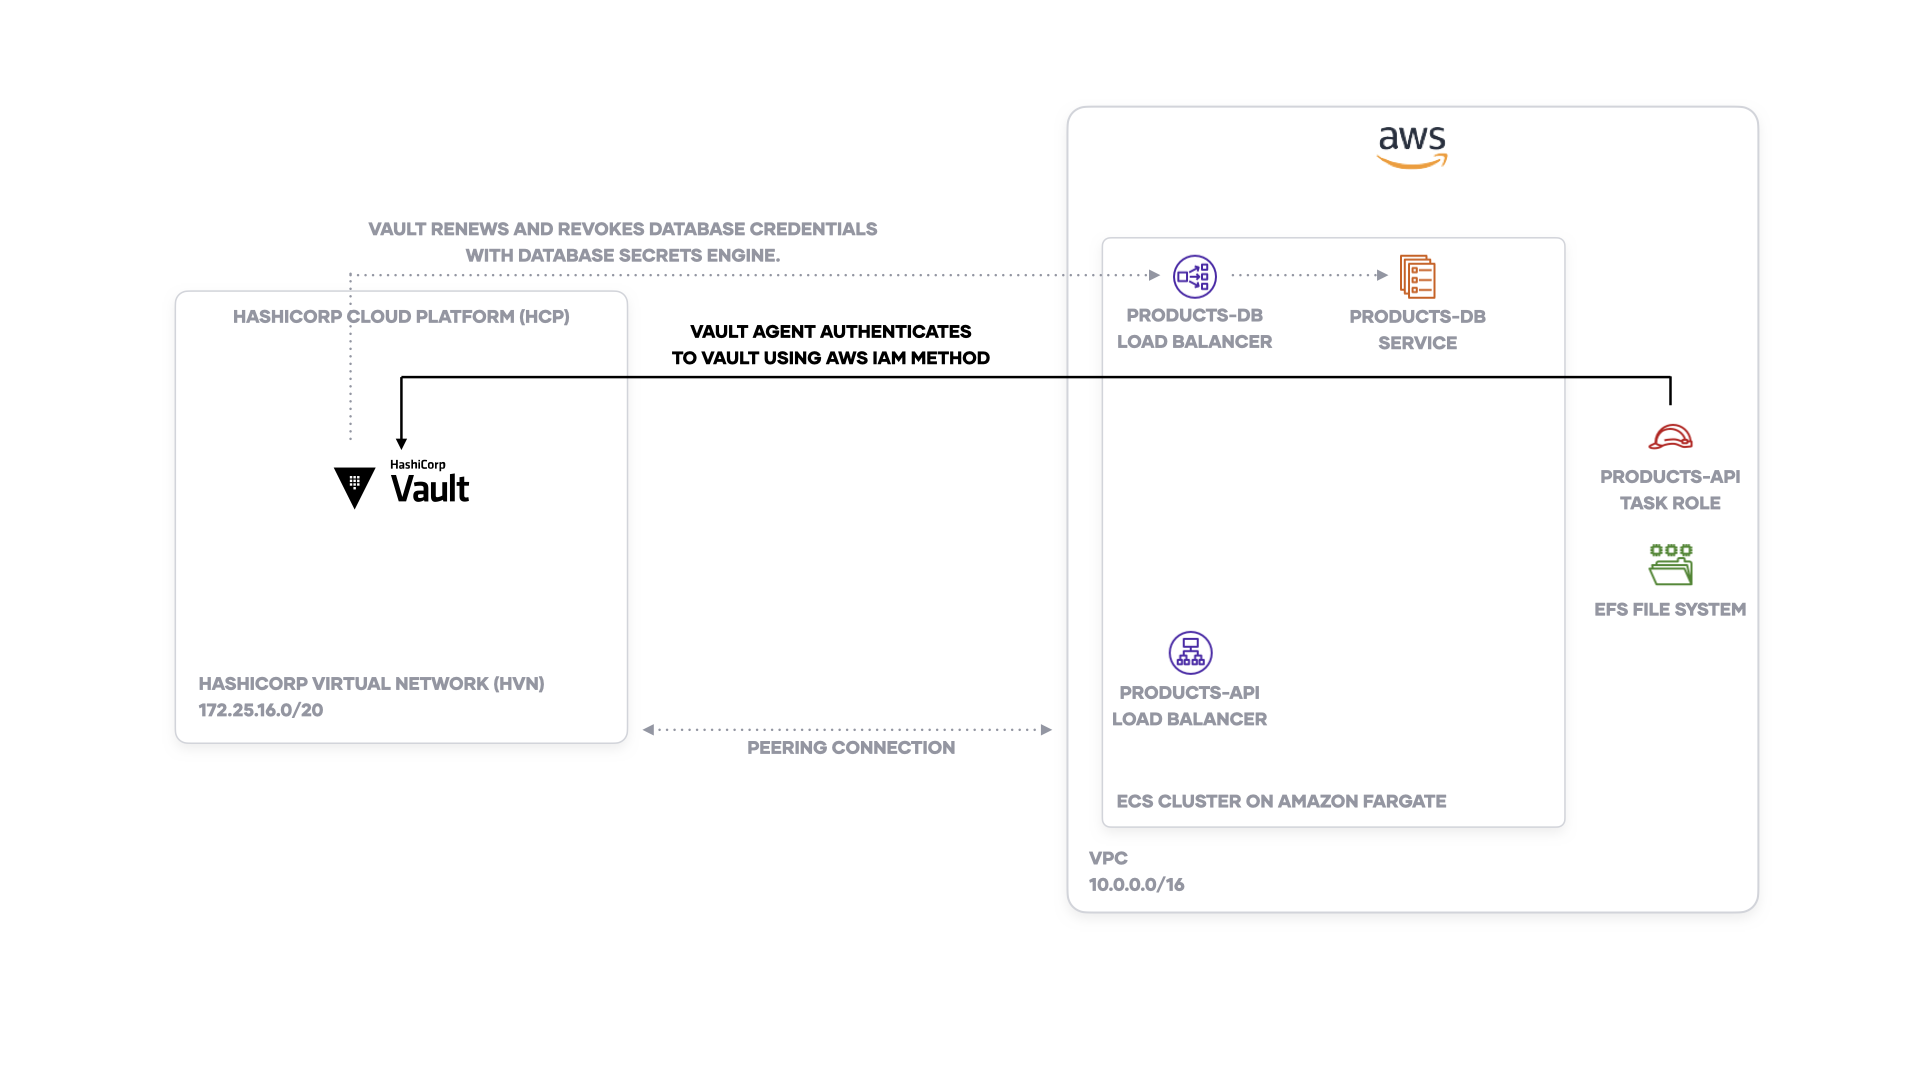
Configure AWS IAM authentication method for ECS task role

An Amazon ECS task needs to authenticate to Vault before it can read secrets from Vault. Rather than copy and paste a Vault token into an ECS task definition, you can use the Amazon ECS task's IAM role to authenticate to Vault. Configure Vault's AWS IAM authentication method with the task IAM role.

All Vault configurations exist in the vault/ directory, which you'll apply with Terraform.

Examine vault/iam.tf, which references a local module in the modules/vault-task/iam directory.

vault/iam.tf
12345module "task_role" {
  source                        = "../modules/vault-task/iam"
  name                          = "${var.name}-product-api"
  ecs_task_efs_access_point_arn = var.product_api_efs_access_point_arn
}

Review the module under modules/vault-task/iam. The file modules/vault-task/iam/iam.tf defines a list of allowed AWS policies and the task IAM role.

You'll find three main policies:

  1. vault-agent: allows the task to use the AWS IAM auth method
  2. ecs-task: allows the task to create logs and deploy to the cluster
  3. efs-access-point: allows the task to access an EFS access point. You created this using the Terraform under infrastructure/.
modules/vault-task/iam/iam.tf
1 2 3 4 5 6 7 8 9 101112131415161718192021222324252627282930313233343536373839404142434445464748495051525354555657585960616263646566676869707172737475767778resource "aws_iam_policy" "vault_agent" {
  name        = "${var.name}-vault-agent"
  path        = "/ecs/"
  description = "Policy for AWS IAM Auth Method for Vault"
  tags        = local.tags

  policy = <<EOF
{
  "Version": "2012-10-17",
  "Statement": [
    {
      "Effect": "Allow",
      "Action": [
        "ec2:DescribeInstances",
        "iam:GetInstanceProfile",
        "iam:GetUser",
        "iam:GetRole"
      ],
      "Resource": [
        "*"
      ]
    }
  ]
}
EOF
}

resource "aws_iam_policy" "ecs_task" {
  name        = "${var.name}-ecs-task"
  path        = "/ecs/"
  description = "Policy for ECS task"
  tags        = local.tags

  policy = <<EOF
{
  "Version": "2012-10-17",
  "Statement": [
    {
      "Effect": "Allow",
      "Action": [
        "ecr:GetAuthorizationToken",
        "ecr:BatchCheckLayerAvailability",
        "ecr:GetDownloadUrlForLayer",
        "ecr:BatchGetImage",
        "logs:CreateLogStream",
        "logs:PutLogEvents"
      ],
      "Resource": "*"
    }
  ]
}
EOF
}

resource "aws_iam_policy" "efs_access_point" {
  name        = "${var.name}-efs-access-point"
  path        = "/ecs/"
  description = "Policy for task IAM role to access to EFS access point"
  tags        = local.tags

  policy = <<EOF
{
    "Version": "2012-10-17",
    "Statement": [
        {
            "Effect": "Allow",
            "Action": [
                "elasticfilesystem:ClientMount",
                "elasticfilesystem:ClientWrite"
            ],
            "Resource": "${var.ecs_task_efs_access_point_arn}"
        }
    ]
}
EOF
}

# omitted for clarity

Terraform will create a new IAM role and attach these policies. You will use this IAM role for your task definition.

modules/vault-task/iam/iam.tf
1 2 3 4 5 6 7 8 9 10111213141516171819202122232425262728293031323334353637# omitted for clarity

resource "aws_iam_role" "task" {
  name = var.name
  tags = local.tags

  assume_role_policy = <<EOF
{
  "Version": "2012-10-17",
  "Statement": [
    {
      "Sid": "",
      "Effect": "Allow",
      "Principal": {
        "Service": "ecs-tasks.amazonaws.com"
      },
      "Action": "sts:AssumeRole"
    }
  ]
}
EOF
}

resource "aws_iam_role_policy_attachment" "vault_agent" {
  role       = aws_iam_role.task.id
  policy_arn = aws_iam_policy.vault_agent.arn
}

resource "aws_iam_role_policy_attachment" "ecs_task" {
  role       = aws_iam_role.task.id
  policy_arn = aws_iam_policy.ecs_task.arn
}

resource "aws_iam_role_policy_attachment" "efs_access_point" {
  role       = aws_iam_role.task.id
  policy_arn = aws_iam_policy.efs_access_point.arn
}

After creating the IAM role, you can bind it as a principal to Vault's AWS IAM auth method.

Examine the file vault/auth.tf. It sets up the AWS auth backend. Then, it configures the auth backend with a Vault role that uses the iam authentication type and attaches to the task IAM role. You also attach a Vault policy so the role can read secrets.

vault/auth.tf
1 2 3 4 5 6 7 8 9 101112resource "vault_auth_backend" "aws" {
  type = "aws"
}

resource "vault_aws_auth_backend_role" "ecs" {
  backend                  = vault_auth_backend.aws.path
  role                     = "${var.name}-product-api"
  auth_type                = "iam"
  resolve_aws_unique_ids   = false
  bound_iam_principal_arns = [module.task_role.arn]
  token_policies           = [vault_policy.product.name]
}

Note: The configuration sets resolve_aws_unique_ids to false because we use HCP Vault. HCP Vault requires cross-account access.

When you attach the task IAM role to the Vault role, you allow an AWS entity using the role to authenticate to Vault.

Set up database secrets engine

Your database (product-db) has a administrative username and password. However, you don't want your application (product-api) using the admin credentials. You set up the database secrets engine in Vault to dynamically generate a username and password for the application.

Examine the file vault/database.tf. It sets up the database secrets engine for PostgreSQL at the path learn/database and configures a database connection using the root username and password.

vault/database.tf
1 2 3 4 5 6 7 8 9 10111213141516171819202122232425262728293031323334353637383940resource "vault_mount" "postgres" {
  path = "${var.name}/database"
  type = "database"
}

resource "vault_database_secret_backend_connection" "postgres" {
  backend       = vault_mount.postgres.path
  name          = "product"
  allowed_roles = ["*"]

  postgresql {
    connection_url = "postgresql://${var.product_db_username}:${var.product_db_password}@${var.product_db_hostname}:${var.product_db_port}/products?sslmode=disable"
  }
}

resource "vault_database_secret_backend_role" "product" {
  backend             = vault_mount.postgres.path
  name                = "product"
  db_name             = vault_database_secret_backend_connection.postgres.name
  creation_statements = ["CREATE ROLE \"{{username}}\" WITH LOGIN PASSWORD '{{password}}' VALID UNTIL '{{expiration}}'; GRANT SELECT ON ALL TABLES IN SCHEMA public TO \"{{username}}\";"]
  default_ttl         = 604800
  max_ttl             = 604800
}

locals {
  products_creds_path = "${vault_mount.postgres.path}/creds/${vault_database_secret_backend_role.product.name}"
}

data "vault_policy_document" "product" {
  rule {
    path         = local.products_creds_path
    capabilities = ["read"]
    description  = "read all credentials for product database as product-api"
  }
}

resource "vault_policy" "product" {
  name   = "product"
  policy = data.vault_policy_document.product.hcl
}

Terraform will create a Vault role. The Vault role issues a database username and password for one week (default_ttl). Terraform also adds a Vault policy to allow the product-api to read the database credentials.

Configure Vault with Terraform

Create the Vault role, policy, authentication method, and database secrets engine with Terraform.

Terraform sets up the Vault authenticatiom method, database secrets engine, and role

  1. Verify that you are in the vault-guides/identity/vault-agent-ecs/ folder for the next step.

    $ ls -1
    
    README.md
    application
    clean.sh
    infrastructure
    modules
    set.sh
    vault
    
  2. Set Terraform environment variables to pass the product database connection information and EFS access point ARN. The configuration needs these values in order to configure the database secrets engine and set up the IAM role for the task. Terraform will retrieve inputs from environment variable prefixed with TF_VAR_.

    $ export TF_VAR_product_db_hostname=$(cd infrastructure && terraform output -raw product_database_hostname) && \
      export TF_VAR_product_db_username=$(cd infrastructure && terraform output -raw product_database_username) && \
      export TF_VAR_product_db_password=$(cd infrastructure && terraform output -raw product_database_password) && \
      export TF_VAR_product_api_efs_access_point_arn=$(cd infrastructure && terraform output -raw product_api_efs_access_point_arn)
    
  3. Set the VAULT_ADDR, VAULT_TOKEN, and VAULT_NAMESPACE environment variables so you can connect to HCP Vault.

    Note: You set the Vault namespace to admin because HCP Vault uses Vault namespaces.

    $ export VAULT_ADDR=$(cd infrastructure && terraform output -raw hcp_vault_public_endpoint) && \
      export VAULT_TOKEN=$(cd infrastructure && terraform output -raw hcp_vault_admin_token) && \
      export VAULT_NAMESPACE=admin
    
  4. Change your directory to the vault/ folder, which contains the Vault configuration.

    $ cd vault
    
  5. Verify that you are in the correct directory before proceeding.

    $ ls -1
    
    auth.tf
    database.tf
    iam.tf
    main.tf
    outputs.tf
    variables.tf
    
  6. Initialize Terraform.

    $ terraform init
    
    Initializing the backend...
    
    Initializing provider plugins...
    ...snip...
    
    Terraform has been successfully initialized!
    
  7. After Terraform is initialized, you can verify that it will create the resources with terraform plan.

    $ terraform plan
    
    An execution plan has been generated and is shown below.
    Resource actions are indicated with the following symbols:
    ...snip...
    
    Plan: 13 to add, 0 to change, 0 to destroy.
    

    You should note resources listed in the output.

  8. Deploy the resources with terraform apply.

    $ terraform apply
    
    ...snip...
    Do you want to perform these actions?
      Terraform will perform the actions described above.
      Only 'yes' will be accepted to approve.
    
      Enter a value:
    

    Confirm the run by entering yes.

    If the deploy was successful, you should observe output at the end with a Vault role name, Vault database credentials path, and task IAM role ARN.

    Apply complete! Resources: 13 added, 0 changed, 0 destroyed.
    
    Outputs:
    
    product_api_role = "learn-product-api"
    product_api_role_arn = <sensitive>
    product_db_vault_path = "learn/database/creds/product"
    
  9. Check that Terraform successfully configure Vault by retrieving a database username and password from the database secrets engine.

    $ vault read $(terraform output -raw product_db_vault_path)
    
    Key                Value
    ---                -----
    lease_id           learn/database/creds/product/NbRywQwRNn5eM0JJUIxcJY9k.utv41
    lease_duration     168h
    lease_renewable    true
    password           REDACTED
    username           REDACTED
    
  10. Return your directory to the vault-guides/identity/vault-agent-ecs/ folder for the next step.

    $ cd ..
    

Deploy example application to ECS cluster

You deployed your infrastructure, configured Vault's database secrets engine to rotate database usernames and password, and created an authentication method to allow an IAM role to authenticate to Vault.

You can now use the IAM role, assign it to your ECS service, and inject a Vault agent sidecar container to get database credentials for the application (product-api).

Configure Vault Agent sidecar for an ECS service with Terraform

An Amazon ECS task needs to authenticate to Vault before it can read secrets from Vault. Vault Agent can help you authenticate to Vault and write the database credentials to a file. The application uses the credentials from the file. This pattern ensures that you do not have to make changes to your application to authenticate to Vault.

All ECS task definitions and service configurations exist in the application/ directory, which you'll apply with Terraform.

Examine application/product.tf, which references a module under modules/vault-task/ecs. The module accepts an input variable with a Vault Agent template. You pass the database credentials path in Vault, database address, and products-api port to the template. You also need to configure the application to read the database configuration from the /config directory on the task's shared EFS volume.

application/product.tf
1 2 3 4 5 6 7 8 9 101112131415161718192021222324252627282930313233343536373839404142434445464748495051module "product_api" {
  source          = "../modules/vault-task/ecs"
  family          = local.product_api_name
  vault_address   = var.vault_address
  vault_namespace = var.vault_namespace

  vault_agent_template = base64encode(templatefile("templates/conf.json", {
    vault_database_creds_path = var.product_db_vault_path,
    database_address          = var.product_db_hostname,
    products_api_port         = local.product_api_port
  }))

  vault_agent_template_file_name = "conf.json"
  vault_agent_exit_after_auth    = false

  task_role = {
    arn = var.product_api_role_arn
    id  = var.product_api_role
  }

  execution_role = {
    arn = var.product_api_role_arn
    id  = var.product_api_role
  }

  efs_file_system_id  = var.efs_file_system_id
  efs_access_point_id = var.product_api_efs_access_point_id
  log_configuration   = local.product_log_config
  container_definitions = [{
    name      = local.product_api_name
    image     = "hashicorpdemoapp/product-api:v0.0.19"
    essential = true
    portMappings = [
      {
        containerPort = local.product_api_port
        protocol      = "tcp"
      }
    ]
    environment = [
      {
        name  = "NAME"
        value = local.product_api_name
      },
      {
        name  = "CONFIG_FILE"
        value = "/config/conf.json"
      },
    ]
  }]
  tags = local.tags
}

Examine application/templates/conf.json. The product-api application reads the configuration from this file in order to connect to the database, set up ports, and explose metrics. Vault Agent will template the database username and password based on the Vault database credentials path passed through Terraform.

application/templates/conf.json
1234567{
  {{- with secret "${vault_database_creds_path}" }}
  "db_connection": "host=${database_address} port=5432 user={{ .Data.username }} password={{ .Data.password }} dbname=products sslmode=disable",
  {{- end }}
  "bind_address": ":${products_api_port}",
  "metrics_address": ":9102"
}

Examine the Terraform resource for aws_ecs_task_definition in modules/vault-task/ecs/task.tf. This submodule takes an application's container definition and adds a container definition for a custom Vault Agent container image.

Note: The Vault Agent on Amazon ECS container image are created for demonstration purposes and not intended for production use! You can refer to the container build file as a reference for building your own.

It sets the task_role_arn to the IAM role you created previously in the vault/ configuration. The IAM role allows the task to authenticate to Vault.

modules/vault-task/ecs/task.tf
1 2 3 4 5 6 7 8 9 10resource "aws_ecs_task_definition" "task" {
  family                   = var.family
  requires_compatibilities = var.requires_compatibilities
  network_mode             = "awsvpc"
  cpu                      = var.cpu
  memory                   = var.memory
  execution_role_arn       = var.execution_role.arn
  task_role_arn            = var.task_role.arn

## omitted for clarity

The aws_ecs_task_definition resource also defines an EFS volume configuration using the EFS file system ID and access point ID you set up with the infrastructure/ configuration. The EFS access point will securely store the database connection string rendered by Vault Agent.

modules/vault-task/ecs/task.tf
1 2 3 4 5 6 7 8 9 101112131415161718resource "aws_ecs_task_definition" "task" {

## omitted for clarity

  volume {
    name = local.vault_data_volume_name

    efs_volume_configuration {
      file_system_id     = var.efs_file_system_id
      transit_encryption = "ENABLED"
      authorization_config {
        iam             = "ENABLED"
        access_point_id = var.efs_access_point_id
      }
    }
  }

## omitted for clarity

The module allows you to append your own volumes to the ECS task definition. However, it defines the Vault Agent's EFS volume configuration by default.

You will also find that container_definitions for aws_ecs_task_definition resource appends your task's container definition with a separate one for Vault Agent. The task definition will start the Vault Agent container. Vault Agent authenticates to Vault using its task IAM role and generates a file containing the secrets.

You must set the following environment variables for the example Vault Agent container:

  1. VAULT_ROLE: Name of the Vault role attached to the AWS IAM auth method. In this case, it uses learn-product-api.

  2. TARGET_FILE_NAME: Name of the rendered file. The container reads the template from the /vault-agent directory and writes it to the /config directory.

  3. VAULT_AGENT_TEMPLATE: Base-64 encoded contents of a Vault Agent template. This allows Vault Agent to write the credentials to file compatible with the application.

  4. VAULT_AGENT_EXIT_AFTER_AUTH: Exit the Vault Agent after rendering the template. Since product-api uses dynamic database credentials, you set this to false. This allows the Vault Agent to continuously run as a sidecar and check for credentials rotation.

  5. VAULT_ADDR: Allows the Vault Agent to connect to HCP Vault. The Terraform configuration sets it as a global constant to append to the container definition's environment variables.

  6. VAULT_NAMESPACE: Sets the Vault namespace for the Vault Agent to retrieve credentials. The Terraform configuration sets it as a global constant to append to the container definition's environment variables.

modules/vault-task/ecs/task.tf
1 2 3 4 5 6 7 8 9 1011121314151617181920212223242526272829303132333435363738394041424344454647484950515253545556575859606162636465666768locals {

  ## omitted for clarity

  vault_address = [{
    name  = "VAULT_ADDR"
    value = var.vault_address
  }]
  vault_connection = var.vault_namespace == null ? local.vault_address : concat(local.vault_address, [{
    name  = "VAULT_NAMESPACE"
    value = var.vault_namespace
  }])

  ## omitted for clarity
}

resource "aws_ecs_task_definition" "task" {

  ## omitted for clarity

  container_definitions = jsonencode(
    flatten(
      concat(
        local.container_defs_with_depends_on,
        [
          {
            name             = "vault-agent"
            image            = var.vault_ecs_image
            essential        = false
            logConfiguration = var.log_configuration
            mountPoints = [
              local.vault_data_mount_read_write
            ]
            cpu         = 0
            volumesFrom = [],
            healthCheck = {
              "command" : [
                "CMD-SHELL",
                "Vault Agent --help"
              ],
              "interval" : 5,
              "timeout" : 2,
              "retries" : 3
            },
            environment = concat(local.vault_connection, [
              {
                name  = "VAULT_ROLE"
                value = var.task_role.id
              },
              {
                name  = "TARGET_FILE_NAME"
                value = var.vault_agent_template_file_name
              },
              {
                name  = "VAULT_AGENT_TEMPLATE"
                value = var.vault_agent_template
              },
              {
                name  = "VAULT_AGENT_EXIT_AFTER_AUTH"
                value = tostring(var.vault_agent_exit_after_auth)
              }
            ])
          }
        ]
      )
    )
  )
}

Note: If you have static credentials, you can configure VAULT_AGENT_EXIT_AFTER_AUTH to true. The agent will write the credentials to the file and exit with status 0.

After the Vault Agent starts, it writes an application configuration file with the database connection string to the EFS volume. The application container (product-api) starts and reads the database connection string from the volume.

Deploy the ECS service with Terraform

You will use Terraform to create the ECS service (product-api) with the Vault Agent sidecar.

Terraform deploys the ECS service with the Vault Agent sidecar

  1. Verify that you are in the vault-guides/identity/vault-agent-ecs/ folder for the next step.

    $ ls -1
    
    README.md
    application
    clean.sh
    infrastructure
    modules
    set.sh
    vault
    
  2. Set Terraform environment variables to pass the Vault address and namespace to the task definition. Terraform will retrieve inputs from environment variable prefixed with TF_VAR_.

    $ export TF_VAR_vault_address=$(cd infrastructure && terraform output -raw hcp_vault_private_endpoint) && \
      export TF_VAR_vault_namespace=admin
    
  3. Set Terraform environment variables to pass the EFS file system ID, access point IDs, IAM role, and database path to the ECS task definition.

    $ export TF_VAR_efs_file_system_id=$(cd infrastructure && terraform output -raw efs_file_system_id) && \
      export TF_VAR_product_api_efs_access_point_id=$(cd infrastructure && terraform output -raw product_api_efs_access_point_id) && \
      export TF_VAR_product_api_role=$(cd vault && terraform output -raw product_api_role) && \
      export TF_VAR_product_api_role_arn=$(cd vault && terraform output -raw product_api_role_arn) && \
      export TF_VAR_product_db_vault_path=$(cd vault && terraform output -raw product_db_vault_path)
    
  4. Set Terraform environment variables to pass the subnet information, ECS and database security groups, and target group. The ECS service for product-api uses these variables to connect the application to the load balancer.

    $ export TF_VAR_private_subnets=$(cd infrastructure && terraform output -json private_subnets) && \
      export TF_VAR_ecs_security_group=$(cd infrastructure && terraform output -raw ecs_security_group) && \
      export TF_VAR_database_security_group=$(cd infrastructure && terraform output -raw database_security_group) && \
      export TF_VAR_target_group_arn=$(cd infrastructure && terraform output -raw target_group_arn)
    
  5. Change your directory to the application/ folder, which contains the ECS service configuration for product-api.

    $ cd application
    
  6. Verify that you are in the correct directory before proceeding.

    $ ls -1
    
    logging.tf
    main.tf
    product.tf
    templates
    variables.tf
    
  7. Initialize Terraform.

    $ terraform init
    
    Initializing the backend...
    
    Initializing provider plugins...
    ...snip...
    
    Terraform has been successfully initialized!
    
  8. After Terraform is initialized, you can verify that it will create the resources with terraform plan.

    $ terraform plan
    
    An execution plan has been generated and is shown below.
    Resource actions are indicated with the following symbols:
    ...snip...
    
    Plan: 3 to add, 0 to change, 0 to destroy.
    

    You should note resources listed in the output.

  9. Deploy the resources with terraform apply.

    $ terraform apply
    
    ...snip...
    Do you want to perform these actions?
      Terraform will perform the actions described above.
      Only 'yes' will be accepted to approve.
    
      Enter a value:
    

    Confirm the run by entering yes. Terraform may take 5 minutes or more to finish deployment.

    If the deployment succeeds, you should observe output at the end with a Vault role name, Vault database credentials path, and task IAM role ARN.

    Apply complete! Resources: 3 added, 0 changed, 0 destroyed.
    
  10. Return your directory to the vault-guides/identity/vault-agent-ecs/ folder for the next step.

    $ cd ..
    
  11. Check that Terraform successfully deployed the application (called product-api) to your Amazon ECS cluster (named learn). The ECS service should have a running count of 1.

    $ aws ecs describe-services --cluster learn --region us-east-1 --services product-api --query 'services[0].runningCount'
    
    1
    
  12. You can test the product-api by getting information about coffees from its API endpoint. The response should include JSON metadata about coffees.

    $ curl http://$(cd infrastructure && terraform output -raw product_api_endpoint)/coffees | jq .
    
    [
      {
        "id": 1,
        "name": "HashiCup",
        "teaser": "Automation in a cup",
        "description": "",
        "price": 200,
        "image": "/hashicorp.png",
        "ingredients": [
          {
            "ingredient_id": 6
          }
        ]
      },
    ...snip...
    

    A succesfully response indicates that the product-api authenticated to the product-db using the dynamic credentials retrieved by Vault Agent!

Clean up

You can remove all resources by running a clean-up script. Verify that you are in the vault-guides/identity/vault-agent-ecs/ folder for the next step.

$ ls -1

README.md
application
clean.sh
infrastructure
modules
set.sh
vault

Run the cleanup.sh, which will automatically destroy all resources and revoke the leases for database credentials from Vault.

$ bash clean.sh

aws_cloudwatch_log_group.log_group: Refreshing state... [id=learn-services]
module.product_api.aws_ecs_task_definition.task: Refreshing state... [id=product-api]
aws_ecs_service.product_api: Refreshing state... [id=arn:aws:ecs:us-east-1:REDACTED:service/learn/product-api]

Terraform used the selected providers to generate the following execution plan. Resource actions are indicated with the following symbols:
  - destroy
...snip...

It may take more than 15 minutes to remove all resources.

Next steps

In this tutorial, you injected Vault Agent as a sidecar for an Amazon ECS task and retrieved PostgreSQL database credentials dynamically from HCP Vault. To learn more about the Vault features introduced in this tutorial, refer to the following tutorials.

  • Dynamic Secrets: Database Secrets Engine
  • Vault Agent Templates
  • Vault Agent with AWS
 Previous
 Next Collection

This tutorial also appears in:

  •  
    8 tutorials
    Vault Agent
    Use Vault Agent to authenticate and read secrets from Vault with little to no change in your application code.
    • Vault

On this page

  1. Vault Agent with Amazon Elastic Container Service
  2. Prerequisites
  3. Clone vault-guides repository
  4. Set up infrastructure
  5. Set up Vault authentication methods and secrets engines
  6. Deploy example application to ECS cluster
  7. Clean up
  8. Next steps
Give Feedback(opens in new tab)
  • Certifications
  • System Status
  • Terms of Use
  • Security
  • Privacy
  • Trademark Policy
  • Trade Controls
  • Give Feedback(opens in new tab)