AppRole with Terraform & Chef
In the AppRole Pull Authentication tutorial, the question of how best to deliver the Role ID and Secret ID were brought up, and the role of trusted entities (Terraform, Chef, Nomad, Kubernetes, etc.) was mentioned.
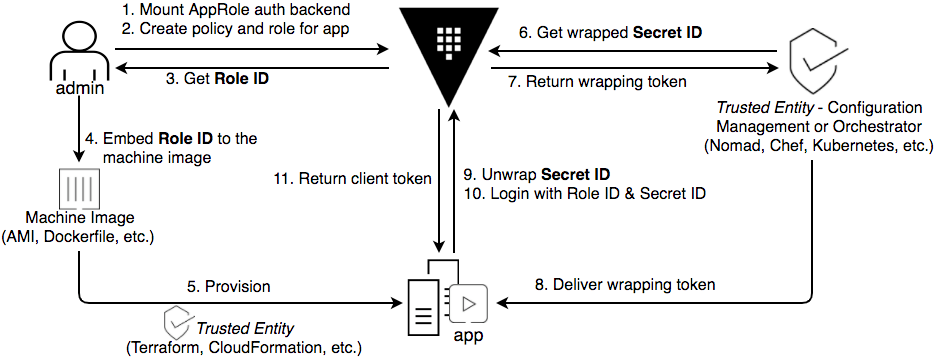
This intermediate Vault tutorial aims to provide a simple, end-to-end example of how to use Vault's AppRole authentication method, along with Terraform and Chef, to address the challenge of the secure introduction of an initial token to a target system.
The purpose of this tutorial is to provide the instruction to reproduce the working implementation demo introduced in the Delivering Secret Zero: Vault AppRole with Terraform and Chef webinar.
Note
This is a proof of concept and NOT SUITABLE FOR PRODUCTION USE.
Challenge
The goal of the AppRole authentication method is to provide a mechanism for the secure introduction of secrets to target systems (servers, applications, containers, etc.).
The question becomes what systems within our environment do we trust to handle
or deliver the RoleID and SecretID to our target systems.
Solution
Use Trusted Entities to deliver the AppRole authentication values. For
example, use Terraform to deliver your RoleID or embed it into your AMI or
Dockerfile. Then you might use Jenkins or Chef to obtain the
response-wrapped SecretID and
deliver it to the target system.
AppRole allows us to securely introduce the authentication token to the target system by preventing any single system from having full access to an authentication token that does not belong to it. This helps us maintain the security principles of least privilege and non-repudiation.
The important thing to note here is that regardless of what systems are considered as Trusted Entities, the same pattern applies.
Example:
- With Chef, you might use the Vault Ruby Gem for simplified interaction with Vault APIs
- Terraform provides a Vault provider: Provider: Vault - Terraform by HashiCorp
- For Jenkins, you might use the Vault CLI or APIs directly, as described here: Reading Vault Secrets in your Jenkins pipeline
Prerequisites
This tutorial assumes that you are proficient enough to perform basic Terraform tasks. If you are not familiar with Terraform, refer to the online documentation.
The following AWS resources are required to perform this demo:
- An Amazon S3 bucket
- An IAM user credential with administrator permissions (to be able to create additional IAM policies and instance profiles)
Download demo assets
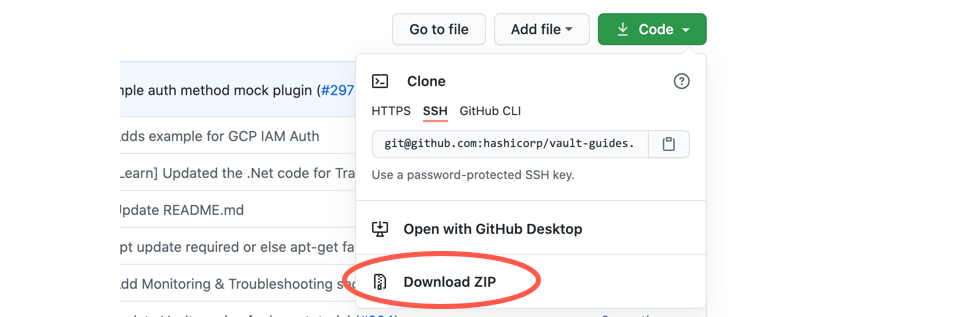
Clone or download the demo assets from the hashicorp/vault-guides GitHub repository.
Clone the repository:
Or download the repository:
This repository contains supporting content for all of the Vault learn guides. The content specific to this tutorial can be found within a sub-directory.
The following assets can be found in the repository:
- Chef cookbook (
/chef/cookbooks): A sample cookbook with a recipe that installs NGINX and demonstrates Vault Ruby Gem functionality used to interact with Vault APIs. - Terraform configurations (
/terraform-aws):/terraform-aws/mgmt-node: Configuration to set up a management server running both Vault and Chef Server, for demo purposes./terraform-aws/chef-node: Configuration to set up a Chef node and bootstrap it with the Chef Server, passing in Vault's AppRole RoleID and the appropriate Chef run-list.
- Vault configuration (
/scripts): Data scripts used to configure the appropriate mounts and policies in Vault for this demo.
Scenario introduction
The scenario in this tutorial uses Terraform and Chef as trusted entities to
deliver RoleID and SecretID.
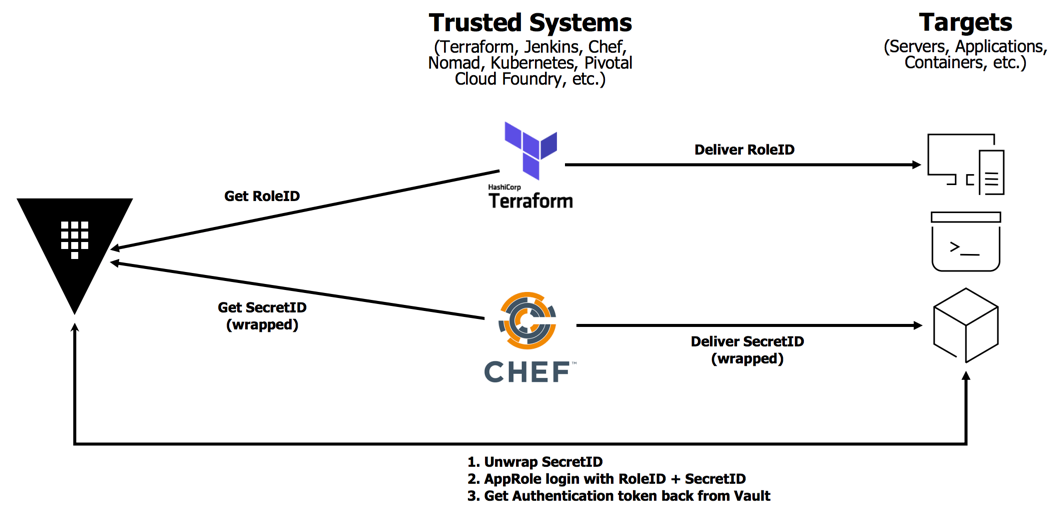
For the simplicity of the demonstration, both Vault and Chef are installed on
the same node. Terraform provisions the node which contains the RoleID as an
environment variable. Chef pulls the SecretID from Vault.
Provisioning for this demo happens in 2 phases:
Phase 1: Provision our Vault plus Chef Server
- Step 1: Provision the Vault and Chef Server
- Step 2: Initialize and Unseal Vault
- Step 3: AppRole Setup
- Step 4: Configure Tokens for Terraform and Chef
- Step 5: Save the Token in a Chef Data Bag
- Step 6: Write Secrets
Phase 2: Provision our Chef Node to Show AppRole Login
Step 1: Provision the Vault and Chef server
This provides a quick and simple Vault and Chef Server configuration to help you get started.
Note
This is done for demonstration purpose and NOT a recommended practice for production.
In this phase, you use Terraform to spin up a server (and associated AWS resources) with both Vault and Chef Server installed. Once this server is up and running, you'll complete the appropriate configuration steps in Vault to set up our AppRole and tokens for use in the demo.
If using Terraform Enterprise, create a
Workspace
for this repo and set the appropriate Terraform Environment variables using the
terraform.tfvars.example file as a reference. Follow the instructions in the
documentation to perform the appropriate setup in Terraform Enterprise.
Using Terraform CLI:
Change the working directory (
cd) toidentity/vault-chef-approle/terraform-aws/mgmt-node.Copy
terraform.tfvars.exampleand save it asterraform.tfvarsand set the variable values to match your AWS account.The
vpc_id,subnet_id,key_nameandec2_pemare specific to the AWS region. If your VPC is in a region other thanus-east-1, be sure to set theaws_regionvalue to match your chosen region.To create a new VPC, refer to the AWS VPC documentation. If you don't have an EC2 key pair, refer to the Amazon EC2 documentation. Also, to create a new Amazon S3 bucket, refer to the Amazon S3 documentation.
Perform a
terraform initto pull down the necessary provider resources. Thenterraform planto verify your changes and the resources that will be created. If all looks good, then perform aterraform applyto provision the resources. The Terraform output will display the public IP address to SSH into your server.The Terraform output will display the public IP address to SSH into your server.
Example:
Initial setup of the Chef server takes several minutes. Once you can SSH into your mgmt server, run
tail -f /var/log/tf-user-data.logto see when the initial configuration is complete.When you see the following message, the initial setup is complete:
Ctrl+C to stop tailing the log.
You can find the following subfolders in your home directory:
/home/ubuntu/vault-chef-approle-demo: root of our project/home/ubuntu/vault-chef-approle-demo/chef: root of our Chef app; this is where ourknifeconfiguration is located (.chef/knife.rb)/home/ubuntu/vault-chef-approle-demo/scripts: there's avault-approle-setup.shscript located here to help automate the setup of Vault, or you can follow along in the rest of this README to configure Vault manually
Step 2: Initialize and Unseal Vault
Before you can do anything in Vault, you need to initialize and unseal it. Perform one of the following:
- Option 1: Run the
/home/ubuntu/demo_setup.shscript to get up and running, and proceed to Step 7: Provision our Chef Node to Show AppRole Login. - Option 2: Continue onto Step 3: AppRole Setup to set up the demo environment manually.
Step 3: AppRole Setup
First, initialize and unseal the Vault server using a shortcut.
This is a convenient shortcut for demo. DO NOT DO THIS IN PRODUCTION!!!
Refer to the online documentation for initializing and unsealing Vault for more details.
In the next few steps, you will create a number of policies and tokens within Vault. Below is a table that summarizes them:
| Policy | Description | Token Attachment |
|---|---|---|
app-1-secret-read | Sets the policy for the final token that will be delivered via the AppRole login | None. This will be delivered to the client upon AppRole login |
app-1-approle-roleid-get | Sets the policy for the token that you'll give to Terraform to deliver the RoleID (only) | roleid-token |
terraform-token-create | The Terraform Vault provider doesn't use the token supplied to it directly. This is to prevent the token from being exposed in Terraform's state file. Instead, the Token given to Terraform needs to have the capability to create child tokens with short TTLs. See here for more info | roleid-token |
app-1-approle-secretid-create | Sets the policy for the token that you'll store in the Chef Data Bag. This will only be able to pull our AppRole's SecretID | secretid-token |
These setups only need to be performed upon initial creation of an AppRole, and would typically be done by a Vault administrator.
Now that you have your Vault server unsealed, you can begin to set up necessary policies, AppRole auth method, and tokens.
Task 1: Set up our AppRole policy
This is the policy that will be attached to secret zero which you are delivering to our application (app-1).
CLI command
API call using cURL
Task 2: Enable the AppRole authentication method
CLI command
API call using cURL
Task 3: Configure the AppRole
Now, you are going to create an AppRole role named app-1.
CLI command
API call using cURL
Step 4: Configure Tokens for Terraform and Chef
Now, you're ready to configure the policies and tokens to Terraform and Chef to
interact with Vault. Remember, the point here is that you are giving each system
a limited token that is only able to pull either the RoleID or SecretID,
but not both.
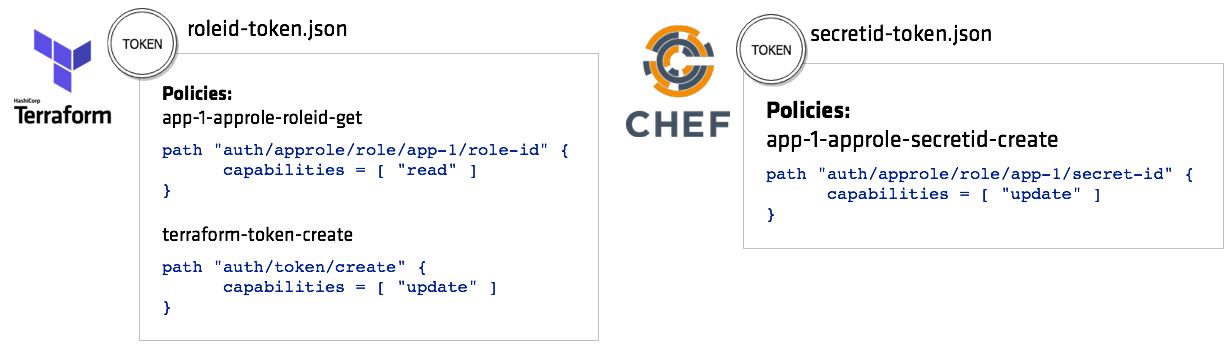
Task 1: Create a policy and token for Terraform
Create a token with appropriate policies allowing Terraform to pull
the RoleID from Vault:
CLI command
The token and associated metadata will be written out to the file
roleid-token.json. The client_token value is what you'll give to
Terraform.
API call using cURL
The token and associated metadata will be written out to the file
roleid-token.json. The client_token value is what you'll give to
Terraform.
Task 2: Create a policy and token for Chef
Create a token with appropriate policies allowing Chef to pull the SecretID
from Vault:
CLI command
API call using cURL
Step 5: Save the Token in a Chef Data Bag
At this point, you have a client token generated for Terraform and another for
Chef server to log into Vault. For the sake of simplicity, you can put the
Chef's client token (secretid-token.json) in a Data
Bag which is fine because this token can
only retrieve SecretID from Vault which is not much of a use without a
corresponding RoleID.
Now, create a Chef Data Bag and put the SecretID token (secretid-token.json)
along with the rest of its metadata.
The last step should show the following output:
Step 6: Write Secrets
Let's write some test data in the secret/app-1 path so that the target app
will have some secret to retrieve from Vault at a later step.
CLI command
API call using cURL
At this point, just about all the pieces are in place. Remember, these setup steps will only need to be performed upon initial creation of an AppRole, and would typically be done by a Vault administrator.
Step 7: Provision our Chef Node to Show AppRole Login
To complete the demo, run the chef-node Terraform configuration to see how
everything talks to each other.
Terraform will perform the following actions:
- Pull a
RoleIDfrom our Vault server - Provision an AWS instance
- Write the
RoleIDto the AWS instance as an environment variable - Run the Chef provisioner to bootstrap the AWS instance with our Chef Server
- Run our Chef recipe which will install NGINX, perform our AppRole login, get
our secrets, and output them to our
index.htmlfile

Task 1: Review the provided Terraform
Open another terminal on your host machine (not the mgmt-node)
and cd into the identity/vault-chef-approle/terraform-aws/chef-node
directory:
Open and review the main.tf file. At line 10, it pulls Vault
provider.
Starting at line 18, the Terraform reads app-1 role information from the
approle auth method.
Starting at line 130, reads the role ID from the approle and pass it onto the
templates/userdata-chef-node.tpl file.
Review the templates/userdata-chef-node.tpl file. It sets the role ID as a
APPROLE_ROLEID environment variable on the Chef node.
The Chef recipe can be found at
identity/vault-chef-approle/chef/cookbooks/vault_chef_approle_demo/recipes/default.rb.
Task 2: Update terraform.tfvars.example
Replace the variable values in terraform.tfvars.example to match your
environment and save it as terraform.tfvars like you have done at Step
1.
- Update the
vault_addressandchef_server_addressvariables with the IP address of ourmgmt-nodefrom above. - Update the
vault_tokenvariable with theRoleIDtoken from Task 1 in Step 4.- If you ran the
demo-setup.shscript (Option 1), retrieve theclient_tokenin the/home/ubuntu/vault-chef-approle-demo/roleid-token.jsonfile:
- If you ran the
Task 3: Run Terraform
Perform a terraform init to pull down the necessary provider
resources. Then terraform plan to verify your changes and the resources that
will be created. If all looks good, then perform a terraform apply to
provision the resources.
The Terraform output will display the public IP address to SSH into your server.
Note
If the terraform apply fails with "io: read/write on closed pipe" error, this is a known
issue with Terraform
0.11.4 and 0.11.5. Please try re-running terraform apply again with another
Terraform version.
Troubleshoot
If terraform apply fails with recipe compilation error, SSH into the Chef
node.
Perform the following to troubleshoot:
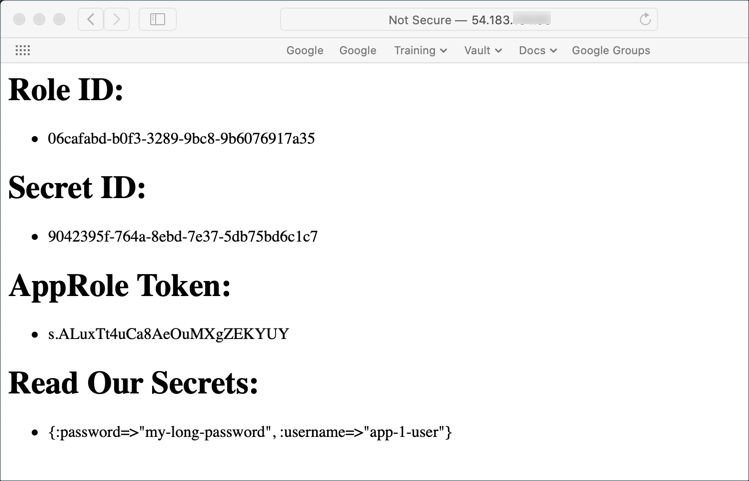
Task 4: Verification
Once Terraform completes the apply operation, it will output the public IP
address of our new server. You can plug that IP address into a browser to see
the output. It should look similar to the following:
Help and Reference
- How (and Why) to Use AppRole Correctly in HashiCorp Vault
- AppRole Auth Method
- Authenticating Applications with HashiCorp Vault AppRole
- Delivering Secret Zero: Vault AppRole with Terraform and Chef
- Managing Secrets in a Container Environment by Jeff Mitchell
- Using HashiCorp's Vault with Chef written by Seth Vargo
- Manage Secrets with Chef and HashiCorps Vault by Seth Vargo & JJ Asghar
- Vault Ruby Client